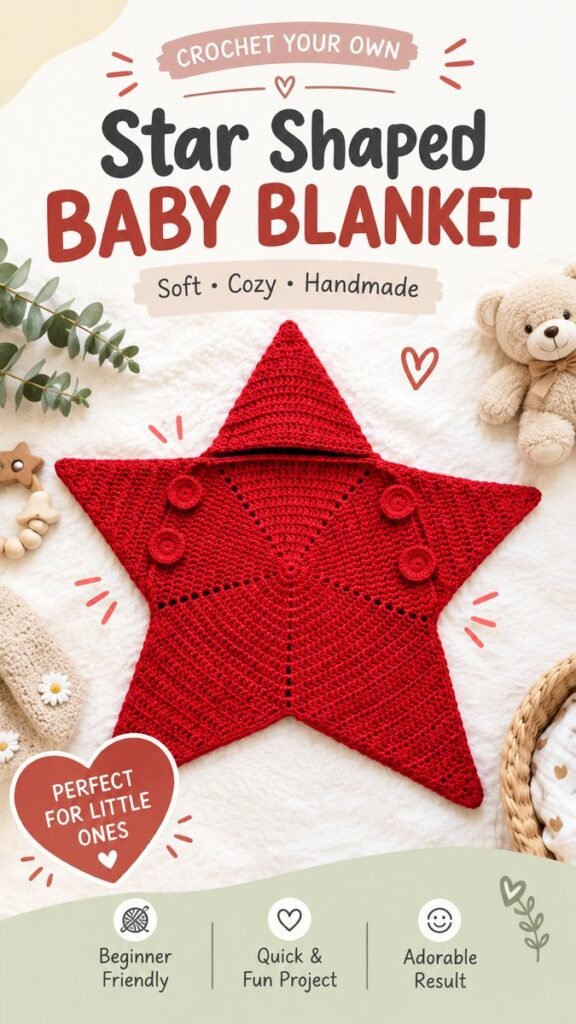
A star baby blanket crochet project is a charming way to create something soft, practical, and memorable for a little one. With its distinctive five-point star shape, cozy texture, and playful silhouette, this style of blanket brings a handmade touch to a nursery while also making a thoughtful baby shower or newborn gift. The pictured design combines a rich red crochet fabric with a simple buttoned hood detail, creating a blanket that feels both decorative and functional.
Whether you are looking for a beginner-friendly crochet baby blanket idea or simply want inspiration for your next handmade project, a star-shaped design offers plenty of room for creativity. You can experiment with yarn colors, edging details, button placement, and overall size while keeping the recognizable star construction at the heart of the project.
Key Takeaways
- A star-shaped silhouette makes a baby blanket feel playful and distinctive.
- Soft, baby-friendly yarn is an important choice for comfort and usability.
- A simple textured crochet fabric can create a cozy handmade appearance.
- Color changes can completely transform the personality of the finished blanket.
- Buttons and a hood-inspired detail can add extra visual interest to a star blanket.
- The design can be adapted for different sizes, from newborn wraps to larger cozy blankets.
Why Star Baby Blankets Are So Special
Traditional baby blankets are often rectangular or square, but a star baby blanket crochet design immediately stands out because of its unusual shape. The five points create a playful outline that looks beautiful when the blanket is photographed, displayed in a nursery, or wrapped around a baby.
The star shape also creates a wonderful opportunity to play with construction. A central crochet section can gradually expand outward, allowing the points to develop as the project grows. This gives the finished piece a naturally eye-catching appearance without requiring complicated decorative motifs.
The pictured blanket uses a vivid red yarn that makes the star silhouette especially noticeable. Its repeated rows create visible texture across the surface, while the center and outer sections give the blanket dimension. Small round crochet details near the upper portion add another handmade accent.
Important: When making a crochet blanket for a baby, softness and practicality should take priority over decorative details. Choose appropriate yarn, keep the fabric comfortable, and make sure any attached embellishments are secure and suitable for the intended use.
Choosing Yarn for a Crochet Baby Blanket
Yarn selection can make a major difference in the finished feel of a star baby blanket. Since the blanket is intended for babies, look for yarn that feels soft against sensitive skin and is easy to care for. Machine-washable options can be especially convenient because baby blankets often need frequent cleaning.
A medium-weight yarn can be a practical starting point for a project like this because it provides enough structure to show the star shape while remaining comfortable and flexible. However, the exact yarn weight should match the pattern or construction method you choose.
Color Ideas for a Star Blanket
The strong red shade shown in the design creates a bold and cheerful look, but there is no need to limit yourself to one color. Soft cream, dusty pink, sage green, sky blue, lavender, warm beige, or buttery yellow can create a gentler nursery aesthetic.
- Classic: Use one solid shade for a clean, timeless appearance.
- Modern: Combine neutral tones with one accent color.
- Playful: Alternate two or more cheerful colors between sections.
- Minimal: Choose an ivory, oatmeal, or soft beige yarn for a calm look.
Understanding the Star Shape
The defining feature of a star baby blanket is its five-point silhouette. Rather than simply crocheting a conventional rectangle, the construction needs to create areas that expand outward and inward to form the points of the star.
One useful way to understand the design is to think of the blanket as a series of sections radiating from a central area. Increases help the fabric grow, while strategically placed decreases or changes in stitch placement can create the valleys between the points.
The exact stitch sequence will depend on the pattern you follow. Some star blankets are worked from the center outward, while others use multiple sections that are joined together. If you are designing your own version, make a small sample first so you can see how your chosen stitch behaves as the shape expands.
Expert Insight
The most important visual element is consistency. Even tension and evenly spaced increases help the points develop neatly. If your star begins to curl, ripple, or lose its shape, check your stitch count and tension before continuing several more rounds.
Basic Materials You May Need
A star baby blanket can be made with a relatively simple collection of crochet supplies. The exact requirements depend on the size and pattern, but the following materials are a useful starting point:
- Soft baby-friendly yarn in your preferred color.
- A crochet hook appropriate for the selected yarn weight.
- Yarn needle for weaving in ends.
- Scissors for trimming yarn.
- Stitch markers for keeping track of sections or increases.
- Optional buttons or decorative crochet details if the design calls for them.
Always check the yarn label for recommended hook sizes and care instructions. If you are following a specific pattern, use the hook size and yarn weight suggested by that pattern unless you are intentionally adjusting the finished dimensions.
How to Approach a Star Baby Blanket Crochet Project
If you are making your first star-shaped blanket, it helps to approach the project in stages. Begin by familiarizing yourself with the basic stitches used in your chosen pattern. Then make a small test section to check your tension before committing to the entire blanket.
- Choose your yarn and color. Select a soft yarn that fits the intended use and desired appearance.
- Check your tension. Crochet a small sample to see how your stitches behave.
- Establish the center. Follow your pattern carefully as the first section determines the foundation of the shape.
- Build the star points. Pay attention to increases and stitch placement so the points remain balanced.
- Check the shape regularly. Lay the blanket flat every few rounds to make sure it is developing evenly.
- Finish the edges. Use the recommended edging technique to give the outer points a neat appearance.
- Secure the ends. Weave in loose yarn ends carefully and inspect the finished blanket.
Keep Your Tension Consistent
Crochet tension can affect both the appearance and size of your blanket. If you crochet very tightly, the fabric may become firm and the blanket may turn out smaller than expected. Very loose tension can create a drapier fabric and may change how clearly the star points appear.
Pro Tip: Lay the project flat occasionally while you work. Looking at the whole shape instead of only the stitches in front of you makes it easier to spot uneven points, unwanted rippling, or areas where your tension has changed.
Adding the Cozy Hood Detail
One of the most distinctive visual features of the pictured design is the pointed hood-like section positioned above the center of the star. This creates a playful character and gives the blanket a more garment-inspired appearance.
If your chosen pattern includes a hood, follow its construction instructions carefully because the shape and placement need to work with the main blanket. The hood should be attached securely without creating uncomfortable bulk or sharp edges.
For a simpler version, you can leave the hood detail out entirely and let the star silhouette become the main feature. The blanket will still have a distinctive shape and can be personalized through color, edging, or texture.
Decorative Details That Make It Unique
Small details can turn a basic crochet baby blanket into a memorable handmade piece. The reference design uses round crochet accents near the upper portion, giving the blanket a playful layered appearance.
You can create a similarly interesting look with simple additions such as a contrasting border, small crocheted motifs, textured sections, or a subtle color change. Keep the decorations secure and appropriate for the intended use, particularly when the blanket will be around babies.
Ideas for Personalization
- Choose a favorite nursery color.
- Add a contrasting border around the star points.
- Use two shades of the same color for subtle dimension.
- Experiment with textured stitches in selected sections.
- Create a larger version for toddler use or a smaller version for decorative nursery styling.
Making the Blanket Beginner Friendly
A star baby blanket may look complicated at first, but many crochet projects become much easier once the construction is understood. If you are still developing your skills, choose a pattern that clearly explains the stitch sequence and provides information about increases, decreases, and finishing.
Avoid rushing through the first few rounds. The center establishes the foundation for everything that follows, so accuracy at the beginning can save significant time later. Stitch markers can be particularly helpful when a pattern repeats several sections around the blanket.
It is also perfectly fine to pause and count your stitches. Taking a few extra moments to verify your work is usually much easier than discovering several rounds later that an increase was missed.
Common Crochet Mistakes to Watch For
Star-shaped projects can reveal mistakes quickly because the overall silhouette depends on balance. If one point looks noticeably different from the others, check your stitch counts before continuing.
- Uneven points: Recheck increase placement and stitch counts.
- Excessive curling: Check tension and confirm that the pattern is being followed accurately.
- Ruffling: Too many increases can cause excess fabric.
- Blanket becoming too stiff: Consider whether your tension is too tight or whether a different yarn and hook combination is appropriate.
- Incorrect size: Measure the project as you work rather than waiting until the final round.
Remember that small differences are normal in handmade crochet. The goal is a comfortable, attractive finished piece rather than absolute machine-like uniformity.
Styling a Star Blanket for a Nursery
A handmade star blanket can become part of a beautiful nursery display even when it is not being used. Fold it over the edge of a crib or chair, place it in a cozy reading corner, or layer it with other soft neutral textiles for photographs.
The bold red version shown here creates a striking focal point against a light background. If you prefer a quieter aesthetic, a neutral star blanket can blend beautifully with cream, beige, sage, or muted pastel nursery accessories.
For photography, natural-looking textures such as knitted fabric, woven baskets, soft blankets, wooden nursery accessories, and greenery can complement the handmade character of crochet without distracting from the main project.
Care and Finishing Tips
Once the blanket is finished, take time to inspect the entire piece. Check the edges, corners, center, and any decorative details. Loose ends should be woven in securely so they do not unravel during normal handling or washing.
Follow the yarn manufacturer’s care instructions when washing and drying the blanket. Different fibers respond differently to heat, agitation, and moisture, so the label is the best starting point for determining how to care for the finished project.
Blocking may also help improve the overall shape, depending on the yarn and stitch pattern. If you choose to block the blanket, use a method suitable for the fiber and avoid excessive heat unless the yarn instructions specifically allow it.
A Thoughtful Handmade Baby Gift
A crochet star baby blanket can be much more than a decorative project. Handmade blankets often carry a sense of time, creativity, and personal effort that makes them especially meaningful as gifts. A finished star blanket can be presented for a baby shower, newborn celebration, first birthday, or simply as a thoughtful handmade surprise.
Because the design is visually distinctive, it also offers an opportunity to choose a color that reflects the recipient’s nursery style. A personalized palette can make the project feel intentionally created rather than simply selected from a collection of ready-made items.
At a Glance
- Distinctive five-point star silhouette
- Soft yarn creates a cozy baby-friendly feel
- Color choices can personalize the finished blanket
- Great inspiration for handmade baby gifts
- Easy to adapt with borders and decorative details
Conclusion
A star baby blanket crochet project combines an eye-catching shape with the warmth and personality of handmade work. The pictured red design shows how a simple color choice, textured crochet fabric, and playful star silhouette can turn an everyday baby blanket into something truly memorable.
Whether you follow an established crochet pattern or use the design as inspiration for your own version, focus on soft materials, consistent tension, balanced shaping, and secure finishing. From gentle neutrals to bold statement colors, there are countless ways to make the finished blanket your own.
Most importantly, enjoy the process. Crochet projects made for little ones are a wonderful opportunity to slow down, practice your craft, and create something that can become part of special everyday moments. If a star-shaped blanket has been on your crochet list, this cozy design is a lovely project to save and revisit for your next handmade creation.