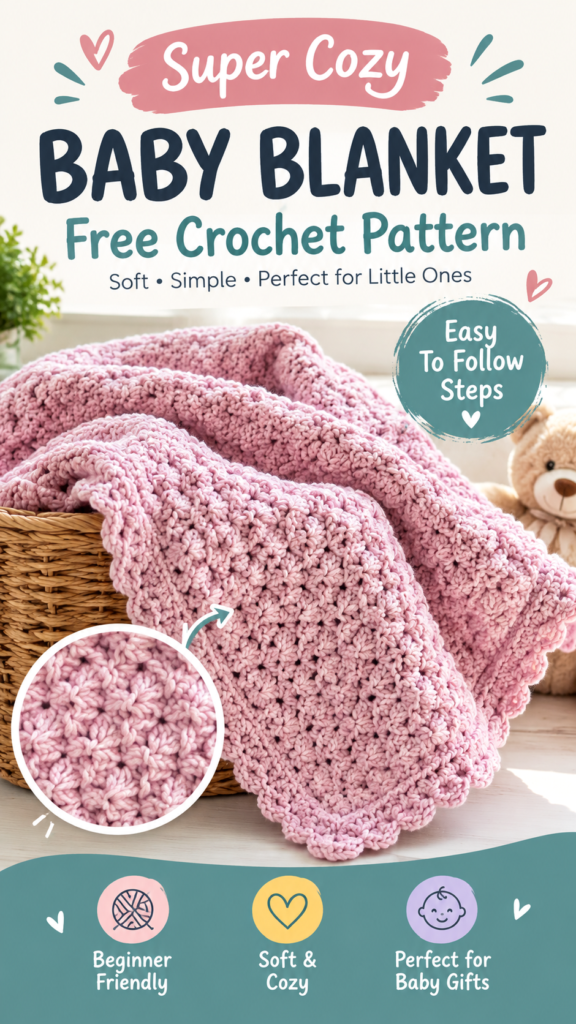
Soft, cozy, and wonderfully simple, this easy crochet baby blanket is designed for crocheters who want beautiful texture without a complicated stitch pattern. The inspiration is a plush blush-pink blanket with a closely textured surface, gentle drape, and a clean rectangular shape that works beautifully as a baby shower gift, nursery throw, or everyday cuddle blanket.
This original interpretation uses an alternating single crochet and double crochet texture. The combination creates a subtle pebbled surface that looks more detailed than it is to make. The blanket is worked flat in rows from one short edge to the other, followed by a simple single crochet border that frames the fabric neatly.
Important: The exact yarn, hook, gauge, and construction of a photographed blanket cannot be determined from appearance alone. The pattern below is an original interpretation designed to create a similar soft, textured baby-blanket look using practical, beginner-friendly crochet techniques.
Key Takeaways
- A soft, rectangular easy crochet baby blanket with a dense, lightly pebbled texture.
- The main fabric alternates single crochet and double crochet for an uncomplicated textured stitch.
- Medium-weight yarn and a 5.5 mm crochet hook are suggested for a cozy but flexible fabric.
- The original base pattern finishes at approximately 30 x 36 inches, or 76 x 91 cm, before minor gauge variation.
- The width and length can be changed easily while keeping the stitch pattern consistent.
- A simple single crochet border gives the blanket a tidy finished edge.
A Soft and Simple Crochet Baby Blanket
A handmade blanket does not need an elaborate stitch pattern to feel special. In fact, simple crochet stitches can be ideal for baby blankets because they create a comfortable fabric while allowing the yarn color and texture to take center stage.
The pictured style has a warm, soft appearance with a dusty pink color and a closely textured surface. Rather than recreating an unseen original pattern, this free crochet pattern uses a practical stitch combination that gives a comparable handmade character. It is easy enough for a confident beginner but interesting enough to keep an experienced crocheter engaged.
The rectangular construction also makes this project easy to customize. You can make a smaller stroller blanket, a traditional receiving blanket, or a larger nursery throw simply by changing the starting chain and the number of rows.
What This Crochet Blanket Looks Like
The finished blanket is a straightforward rectangle with a gently textured surface rather than an open lace design. The visual effect comes from alternating single crochet and double crochet stitches, producing small changes in height across every row.
A soft blush, dusty rose, cream, pale sage, light gray, or muted blue can all work beautifully with this design. A solid color emphasizes the texture, while stripes can give the same basic pattern a completely different personality.
The finished fabric is intended to feel substantial without becoming extremely stiff. A medium-weight yarn paired with a hook that allows comfortable movement gives the stitches enough room to form their texture while retaining the cozy appearance of the inspiration.
Likely Project Category
This is a crochet baby blanket intended for practical home use, gifting, nursery decoration, and supervised cozy time. The simple shape makes it especially useful for beginners learning how to maintain an even stitch count across many rows.
Difficulty Level
Confident beginner. The main skills are chain stitches, single crochet, double crochet, turning, counting stitches, changing yarn if desired, and working a simple border. There is no complicated shaping, motif joining, or advanced stitchwork.
Crochet Construction and Stitch Texture
The blanket is worked flat in horizontal rows. There are no separate panels or motifs to join. After the rectangular body is complete, the yarn is fastened off and a two-round single crochet border is worked around all four sides.
The main stitch texture is created by alternating single crochet and double crochet. On the following row, the stitch types are reversed so that a double crochet is worked into each single crochet and a single crochet is worked into each double crochet. This keeps the surface visually varied while remaining very repetitive and easy to memorize.
Because single crochet and double crochet have different heights, the fabric naturally develops a subtle raised texture. The result is more dimensional than a blanket made entirely from single crochet, but it remains much simpler than a heavily textured cable or relief pattern.
Stitch Tip
- Keep your yarn tension relaxed enough that the double crochets do not pull the fabric inward.
- Check the first and last few stitches of every row before turning.
- If your fabric feels unusually stiff, try a slightly larger hook while maintaining the same stitch sequence.
Free Crochet Pattern: Cozy Pebble Baby Blanket
Project description: This original easy crochet baby blanket pattern creates a soft rectangular blanket with a subtle pebbled texture. The body is made entirely in rows, using alternating single crochet and double crochet. A simple single crochet border completes the design.
Pattern interpretation: This original pattern uses practical yarn and hook recommendations selected to create a similar cozy appearance. These specifications are suggested rather than claims about the exact photographed blanket.
| Specification | Recommendation |
|---|---|
| Skill Level | Confident beginner |
| Finished Size | Approximately 30 x 36 in (76 x 91 cm), excluding minor variation from border and gauge |
| Yarn | Medium weight #4 washable acrylic or acrylic-cotton blend |
| Yarn Quantity | Approximately 950 to 1,050 yd (869 to 960 m) |
| Hook | 5.5 mm, US I-9 |
| Gauge | Approximately 14 stitches x 16 rows = 4 x 4 in (10 x 10 cm) in the main stitch |
| Terminology | US crochet terminology |
Materials
- Approximately 950 to 1,050 yards (869 to 960 meters) of medium weight #4 yarn.
- 5.5 mm, US I-9 crochet hook.
- Yarn needle with a large eye.
- Scissors.
- Optional stitch markers for identifying the first and last stitches.
Crochet Terminology and Abbreviations
- ch = chain
- sc = single crochet
- dc = double crochet
- st = stitch
- sts = stitches
- sl st = slip stitch
- rep = repeat
- RS = right side
- WS = wrong side
For reference, the UK term double crochet corresponds to US single crochet, while the UK term treble crochet corresponds to US double crochet. The instructions in this pattern use US terminology only.
Gauge and Finished Measurements
Work a small swatch using the main stitch pattern before beginning if you want the finished blanket to closely match the stated measurements. The suggested gauge is approximately 14 stitches and 16 rows over 4 inches (10 cm).
At the suggested gauge, the main body measures approximately 30 inches (76 cm) wide and 35 1/2 inches (90 cm) long before the border. The completed blanket is approximately 30 x 36 inches (76 x 91 cm), with slight variation possible because of the edging and individual tension.
Main Stitch Pattern
The body uses an alternating stitch sequence. In an odd-numbered row, work single crochet in the first stitch and double crochet in the next stitch, repeating across. In an even-numbered row, reverse the sequence by working double crochet in the first stitch and single crochet in the next stitch.
The turning chain does not count as a stitch. Every row contains exactly 106 stitches. The starting chain contains 107 chains to provide one working chain for each of the 106 stitches.
Starting the Blanket
- Make a slip knot and place it on the hook.
- Chain 107.
- Do not count the loop on the hook as a chain.
- Turn the foundation chain slightly so the back bumps are easy to see if that is your preferred method of working into the chain.
Blanket Body
Row 1 – RS
Sc in the 2nd ch from hook, dc in the next ch. *Sc in the next ch, dc in the next ch; repeat from * across. You will have 106 stitches: 53 sc and 53 dc.
Row 2 – WS
Ch 1, turn. The ch-1 does not count as a stitch. Dc in the first stitch, sc in the next stitch. *Dc in the next stitch, sc in the next stitch; repeat from * across. You will have 106 stitches: 53 dc and 53 sc.
Row 3 – RS
Ch 1, turn. Sc in the first stitch, dc in the next stitch. *Sc in the next stitch, dc in the next stitch; repeat from * across. You will have 106 stitches.
Rows 4-142
Repeat Rows 2 and 3 consecutively for 139 additional rows. In other words, work an even-numbered row using the Row 2 sequence, then an odd-numbered row using the Row 3 sequence, continuing until Row 142 is complete.
Each row must contain exactly 106 stitches. At the end of Row 142, fasten off if you are changing colors for the border, or leave the working yarn attached if you want to continue with the same color.
When counting the body, there are 142 completed rows. The stitch pattern alternates on every row, which keeps the texture balanced and prevents long vertical columns from forming.
Optional Color Changes
The simplest version is made in one solid color, which allows the texture to remain the focus. For stripes, change color at the end of a selected row before beginning the next row.
For clean stripes, complete the final stitch of the current row with the new color. Then chain 1 and turn. A practical stripe sequence is 8 rows of Color A followed by 8 rows of Color B, repeated as desired.
If you prefer a more subtle effect, alternate two closely related shades every 16 or 20 rows. For a nursery-inspired palette, soft pink and cream, sage and ivory, dusty blue and white, or lavender and pale gray can work especially well.
Border
The border is worked around the entire rectangular blanket. The goal is a neat frame that does not overpower the textured center.
Round 1
With the right side facing, attach yarn in any corner. Ch 1. Work 1 sc in each stitch across the top edge. At the corner, work 3 sc in the corner space or edge stitch. Turn the blanket so you can work down the side.
Along the side edge, work approximately 142 sc evenly down the row edge, placing 1 sc into the edge of each body row. At the next corner, work 3 sc in the corner space or edge stitch.
Work 1 sc in each of the 106 stitches across the bottom edge. At the next corner, work 3 sc in the corner space or edge stitch.
Work approximately 142 sc evenly along the remaining side edge, placing 1 sc into the edge of each body row. At the final corner, work 3 sc in the corner space or edge stitch. Join with a sl st to the first sc.
The exact side-edge stitch count can vary slightly depending on personal row height. The important goal is to distribute the stitches evenly so the border lies flat without ruffling or pulling.
Round 2
Ch 1. Sc in the first stitch and in every stitch around. Work 3 sc in each corner stitch. Join with a sl st to the first sc.
Fasten off, leaving a tail of approximately 6 inches (15 cm) for weaving in. Pull the yarn through the final loop and gently tighten.
Finishing the Blanket
- Use a yarn needle to weave every loose end securely into the wrong side of the blanket.
- Thread each tail through several stitches in one direction, then reverse direction and weave through neighboring stitches.
- Trim excess yarn only after it is securely woven.
- Inspect the entire border for missed stitches, loose ends, or uneven corners.
- Block the blanket if needed to encourage a clean rectangular shape.
Baby-item safety: Choose a soft, washable yarn and avoid adding buttons, beads, charms, detachable appliques, long ties, or other loose decorations to a baby blanket. A handmade blanket should always be used appropriately and supervised around babies and young children.
How to Customize the Baby Blanket Size
One of the best features of this easy crochet baby blanket is how straightforward it is to resize. The main stitch pattern uses pairs of stitches, so the starting chain should create an even number of working stitches.
Changing the Width
For the main pattern, begin with a foundation chain that is one more than an even number. For example, chain 87 to create 86 working stitches, or chain 127 to create 126 working stitches.
The approximate width can be estimated by dividing the number of working stitches by your stitches-per-inch gauge. With a gauge of approximately 14 stitches per 4 inches, 86 stitches create roughly 24 1/2 inches, while 126 stitches create roughly 36 inches.
Always measure your own swatch rather than relying solely on these estimates because yarn thickness, hook size, and personal tension can change the final measurements.
Changing the Length
Simply add or remove complete rows. Since the stitch sequence alternates between two row types, an even number of rows keeps the color and texture rhythm balanced. For example, you can stop after 120 rows for a shorter blanket or work 160 rows for a longer version.
Remember that changing the dimensions also changes the amount of yarn required. Larger blankets can require considerably more yarn, particularly when using medium-weight yarn.
Choosing Different Yarn
For a baby blanket, washable yarn is particularly practical. Acrylic, acrylic-cotton blends, and other soft machine-washable fibers can be convenient choices. Look for yarn that feels comfortable against delicate skin and follow the manufacturer’s care instructions.
A lighter yarn can create a more delicate blanket, but you will usually need additional stitches and rows to reach the same dimensions. A heavier yarn can create a warmer, denser blanket and may require a larger hook.
Pro Tip: If you change yarn weight, make a new gauge swatch instead of simply changing the hook size. Matching your desired fabric texture is more important than forcing a particular hook size.
Common Mistakes and Troubleshooting
My Blanket Is Getting Wider or Narrower
The most common cause is accidentally skipping the first or last stitch of a row. Because the turning chain does not count as a stitch, always work into the first actual stitch directly beneath it.
Count the stitches after every few rows during the beginning of the project. You should have exactly 106 stitches in every body row for the base size.
The Texture Looks Uneven
Check that you are alternating the stitch types correctly. Odd-numbered rows begin with single crochet and even-numbered rows begin with double crochet. If two consecutive stitches of the same type appear where they should not, unravel back to the mistake and correct it.
The Edges Are Wavy
Wavy edges usually mean the border contains too many stitches. If the first border round ripples, reduce the number of side-edge stitches slightly while distributing them evenly. If the border pulls inward, add a few evenly spaced stitches along that edge.
The Blanket Feels Too Stiff
Try loosening your tension or moving up by 0.5 to 1 mm in hook size. The fabric should have enough flexibility to fold comfortably without becoming overly loose and holey.
The Blanket Is Smaller Than Expected
Compare your gauge with the suggested 14 stitches by 16 rows over 4 inches. If you have more stitches per 4 inches, your blanket will be narrower. If you have fewer stitches, it will be wider. The same principle applies to row height.
Finishing, Blocking, and Care
Blocking is optional for this blanket, but it can help straighten the edges and make the rectangular shape more polished. Because this is a textured fabric, avoid aggressively stretching the stitches. The goal is simply to encourage the edges to sit flat.
To wet-block, gently wash the finished blanket according to the yarn care instructions. Remove excess water without wringing, then lay the blanket flat on a clean dry surface. Smooth it into the desired rectangular shape and allow it to dry completely.
If the yarn is machine washable, follow its care label rather than assuming a particular washing temperature or drying method. For a baby gift, a washable yarn is especially useful because blankets can require frequent cleaning.
Keeping the Texture Looking Its Best
Store the blanket folded rather than compressed tightly for long periods. If the fabric develops minor creases, gently reshape it after washing. Avoid attaching heavy decorative elements that could distort the textured stitches.
Easy Ways to Personalize the Crochet Blanket
A solid color gives the blanket a calm, classic appearance, while stripes make it more playful. You can also use one neutral shade for the body and a contrasting color for the border.
- Soft monochrome: Use several shades from the same color family for a gentle nursery palette.
- Classic neutral: Try cream, oatmeal, light gray, or warm beige.
- Two-color stripes: Alternate colors every 8, 12, or 16 rows.
- Contrasting border: Keep the body simple and use a slightly darker shade for both edging rounds.
- Extra-long blanket: Add complete pairs of rows to increase the length while preserving the stitch rhythm.
For a handmade crochet gift, a simple color choice can make the finished blanket feel highly personalized without changing the pattern itself.
At a Glance
- Best yarn choice: Soft, washable medium weight #4 acrylic or acrylic-cotton blend.
- Skill level: Confident beginner.
- Key technique: Alternating single crochet and double crochet in rows.
- Base size: Approximately 30 x 36 inches (76 x 91 cm).
- Finishing: Two simple rounds of single crochet with three stitches at each corner.
Conclusion: A Quick and Cozy Crochet Baby Blanket
This easy crochet baby blanket combines a simple construction with enough texture to make the finished piece look special. The alternating single crochet and double crochet pattern is straightforward to learn, easy to memorize, and flexible enough for many color combinations and blanket sizes.
Before beginning, choose a soft washable yarn, check your gauge if the finished measurements matter, and read through the complete pattern so the row sequence and border construction are familiar. Once the first few rows are established, the project becomes a relaxing rhythm of alternating stitches.
Whether you keep the blanket in a gentle blush shade or personalize it with stripes and a contrasting edge, this original free crochet pattern offers a practical starting point for a handmade baby gift. Adjust the width, add rows for extra length, experiment with colors, and let the yarn texture create the finished character.
Tags
Crochet Baby Blanket
Easy Crochet Pattern
Free Crochet Pattern
Beginner Crochet
Crochet Blanket
Baby Shower Gift
Textured Crochet
Handmade Baby Gift