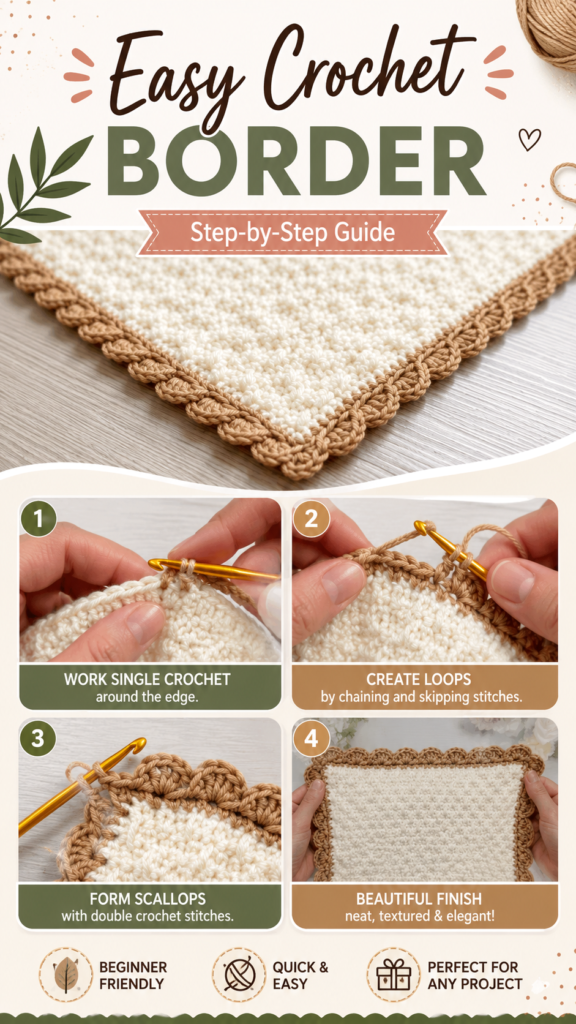
A beautiful crochet edging can turn a simple handmade piece into something that looks polished, thoughtful, and completely finished. Whether you are working on a crochet blanket, dishcloth, towel, baby project, or another small textile, the right border adds structure while giving the project its own personality. This easy crochet edging features a soft cream center paired with a warm tan border and a delicate scalloped finish, creating a timeless look that feels cozy without being overly complicated.
If you have been searching for crochet edging patterns free that are approachable and decorative, this style is a wonderful place to start. The finished border has enough texture to stand out, yet the overall design remains simple enough to complement many different crochet projects. With a few basic techniques and careful stitch placement, you can create a neat decorative edge that makes even a plain piece feel special.
Key Takeaways
- Simple crochet borders can dramatically improve the finished appearance of handmade projects.
- A scalloped edging creates a soft, decorative look without requiring an overly complicated design.
- Working evenly around corners helps the border lie flat and look professional.
- Contrasting yarn colors can make the edging more visible and visually interesting.
- Practicing the border on a small swatch makes it easier to control tension and stitch placement.
- This style can be adapted for blankets, towels, cloths, baby items, and many other projects.
Why Crochet Edging Makes Such a Difference
The final row of a crochet project often has more influence than we expect. A plain edge can make a project feel unfinished, while a thoughtfully chosen crochet border provides definition and gives the eye a clear stopping point. It can also help disguise minor unevenness along the outer edge and create a more intentional shape.
The border shown here works especially well because of its contrast. The light cream fabric creates a quiet background, while the warm tan yarn draws attention to the outside edge. The scalloped detail adds a decorative rhythm that follows the perimeter without overwhelming the center.
Important: A successful crochet edging is not only about the decorative stitches. Consistent tension, even spacing, and smooth corner transitions are what make the finished border look neat and professional.
Understanding the Scalloped Crochet Border
A scalloped border is made by creating groups of stitches that form small rounded shapes along the edge. When repeated consistently, these groups resemble a series of soft waves or shells. This gives the project a feminine, textured finish while keeping the main body of the crochet work visually simple.
The example uses a warm neutral yarn for the edging, which makes the decorative border easy to see against the cream background. You can use the same approach with a similar neutral palette or experiment with brighter shades if you want the border to become the main focal point.
The Basic Idea Behind the Border
The construction begins by establishing a clean edge around the project. From there, additional stitches are worked to create the decorative loops or scallops. The exact stitch combination can be adjusted according to the look you want, but the important principle is repetition. Each section should be similar in size so the border develops an even visual pattern.
The photographed process shows a crochet hook being used directly along the edge of the fabric. This is useful inspiration for anyone learning how to add a border to an existing crochet piece because it demonstrates how the decorative yarn becomes integrated with the finished edge rather than simply sitting beside it.
How to Create an Easy Crochet Edging
You do not need an elaborate technique to create an attractive crochet border. The most important part is taking your time and checking the edge as you work. If your project already has a finished perimeter, you can begin by attaching your border yarn at a suitable corner or edge position.
1. Prepare the Project Edge
Before adding decorative stitches, look carefully at the outer edge of your project. If it is crocheted, identify the existing stitches and decide where your hook will enter. If you are working around a fabric-based piece, make sure the edge has evenly spaced attachment points.
A clean foundation makes everything that follows easier. Avoid rushing into the decorative portion if the edge is noticeably uneven. Taking a moment to establish consistent spacing can save considerable adjustment later.
2. Work the Foundation Edge
A simple round of crochet can provide the foundation for the decorative edging. Single crochet is particularly useful when you want a firm, controlled edge that supports additional stitches. Work around the perimeter while maintaining an even tension.
As you reach the corners, pay attention to how the fabric behaves. Corners often require extra consideration because a straight sequence of stitches can pull the fabric inward. The goal is to create enough room for the border to turn naturally without producing large gaps.
3. Build the Decorative Loops
Once the foundation is established, the decorative section can be created with combinations of chains and additional crochet stitches. These stitches form the spaces and curves that give a scalloped border its distinctive appearance.
Keep the spacing consistent from one section to the next. If one scallop is significantly larger than the others, the difference can become noticeable when viewed along a long blanket edge. Counting stitches can help, especially when you are making your first attempt.
4. Shape the Scallops
The rounded scallop effect comes from working multiple stitches into carefully chosen spaces. These stitches naturally build height and fullness, creating the small arches visible around the finished piece.
Try to maintain the same tension throughout each scallop. Pulling one section tighter than another can change the size of the curves. Relax your hands, keep the hook movement consistent, and periodically lay the project flat to check the overall shape.
Expert Insight
The secret to an attractive crochet border is consistency rather than complexity. A simple edging with evenly spaced stitches will usually look better than an elaborate design worked with uneven tension. Let the texture of the yarn and the rhythm of the stitches do the decorating.
Choosing Yarn for Crochet Edging Patterns
Yarn selection can change the entire personality of a crochet border. The example uses a soft neutral combination, pairing cream with a warm tan shade. This creates a subtle contrast that feels cozy and versatile.
Match the Yarn Weight
For the most balanced result, choose an edging yarn that works well with the weight and texture of the main project. A dramatically heavier yarn may create a bulky border, while an extremely fine yarn may disappear against a thicker fabric.
If you want the edging to be the star of the project, a contrasting color can emphasize every scallop. For a quieter appearance, choose a shade that is close to the main color but slightly darker or lighter.
Think About Texture
Texture matters just as much as color. Smooth yarn tends to show stitch definition clearly, while fluffy or highly textured yarn can soften the appearance of the individual stitches. For decorative crochet edging patterns, yarn with good stitch visibility can make the scalloped details easier to appreciate.
How to Keep Your Crochet Border Neat
Even experienced crocheters sometimes find borders challenging. The decorative round can reveal tension differences that are less obvious in the main body of the project. Fortunately, a few simple habits can make the process much easier.
- Count regularly: Checking stitch groups helps prevent accidental increases or decreases.
- Watch your tension: Try to keep your hands and yarn tension relaxed and consistent.
- Check the shape: Lay the project flat after each section to make sure the edge is not puckering.
- Plan corners: Give corners enough stitches to turn smoothly without creating excessive fullness.
- Keep the pattern rhythm: Repeating the same sequence produces a more polished appearance.
Pro Tip: If the edge starts to wave more than you want, pause and inspect your stitch spacing. Too many stitches can create extra fullness, while too few can cause the fabric to pull inward. Correcting the spacing early is much easier than fixing an entire finished round.
Crochet Projects That Look Great With a Decorative Border
One of the best things about free crochet edging patterns is their versatility. You can use a decorative border on many projects without changing the basic concept. The scalloped finish shown here has a particularly timeless appearance, making it suitable for practical items as well as handmade gifts.
Blankets and Throws
A crochet blanket can benefit enormously from a finished border. Even a very simple center pattern can look more complete once a contrasting edging has been added. A scalloped border can soften the straight lines of a blanket and give it a cozy handmade character.
Dishcloths and Kitchen Textiles
Smaller projects are excellent for practicing crochet edging. A dishcloth or small kitchen textile gives you a manageable surface where you can experiment with color combinations, stitch spacing, and scallop size without committing to a large project.
Baby and Gift Projects
Soft colors and rounded scallops can work beautifully on handmade baby items and gifts. The border adds a decorative detail that feels thoughtful without requiring an overly elaborate design. Neutral shades like cream and tan are especially adaptable when you want a classic look.
Towels and Decorative Cloths
Adding crochet edging to a towel or decorative cloth can turn an everyday item into something more personal. The border provides an attractive frame and can also be used to coordinate the item with other handmade pieces in a room.
Simple Ways to Customize the Look
Once you understand the basic structure of an easy crochet border, there is plenty of room for creativity. You can change the yarn color, alter the scale of the scallops, or experiment with different stitch combinations while keeping the same general concept.
- Use one color for a subtle monochromatic finish.
- Choose a contrasting shade to make the border stand out.
- Try pastel colors for a soft and delicate effect.
- Use deeper neutral shades for a rustic, understated appearance.
- Make smaller scallops for a refined edge or fuller scallops for a bolder finish.
The cream and tan combination shown in this style is especially easy to adapt. You can recreate the same understated feeling with beige, oatmeal, taupe, caramel, soft gray, or other warm neutrals.
Troubleshooting Common Crochet Edging Problems
If your border does not look quite right on the first attempt, do not be discouraged. Decorative edging often requires a little adjustment because every project has different dimensions, stitch tension, and foundation spacing.
Why Is My Border Wavy?
A wavy border can happen when too many stitches are added around the edge. It can also occur when the decorative stitch groups are too large for the foundation. Try checking the number and placement of your stitches before continuing.
Why Is My Border Pulling?
If the project begins to curl inward, the edging may not have enough stitches to accommodate the perimeter. Tight tension can make this effect more noticeable. Loosen your tension slightly and check whether the spacing needs to be adjusted.
Why Do My Scallops Look Uneven?
Uneven scallops are usually related to inconsistent tension or variations in stitch count. Count the stitches within each repeated section and compare the height of several scallops as you work. Small corrections early in the process can create a much more uniform finished edge.
Making Free Crochet Edging Patterns Beginner Friendly
If you are new to crochet borders, start with a small project instead of immediately working around a large blanket. This gives you the opportunity to practice attaching the yarn, maintaining consistent spacing, forming decorative groups, and turning corners.
It is also helpful to work slowly during the first few repeats. Once your hands become familiar with the stitch sequence, your rhythm will naturally improve. A border that initially feels complicated can quickly become one of the easiest parts of the project.
The visual sequence of a decorative edging is another advantage for beginners. You can focus on completing one small scallop at a time rather than thinking about the entire perimeter. Breaking the project into repeated sections makes the process feel much more manageable.
A Beautiful Finish Comes From the Details
The charm of this crochet edging style comes from its balance. The main fabric remains simple and light, while the border introduces texture and visual interest around the outside. Nothing needs to be overly complicated for the result to feel special.
Whether you are finishing a handmade gift or giving new life to a simple crochet piece, a decorative border is an easy way to add personality. Choosing a coordinating yarn, keeping your stitch spacing even, and taking care around corners will help you achieve the clean look that makes this style so appealing.
At a Glance
- Start with an even foundation around the project.
- Maintain consistent tension throughout the decorative round.
- Use repeated stitch groups to create balanced scallops.
- Give extra attention to corners and stitch spacing.
- Choose colors that complement the main crochet fabric.
Conclusion
Crochet edging patterns free up endless possibilities for adding a polished finish to handmade projects. A simple scalloped border can frame a blanket, dishcloth, towel, baby item, or decorative textile while bringing extra texture and personality to the finished piece. The warm neutral color combination shown in this design proves that an understated palette can be just as eye-catching as a bold one.
The key is to focus on the fundamentals: even spacing, steady tension, thoughtful corner placement, and consistent decorative stitches. Once you become comfortable with these basics, you can experiment with colors, stitch combinations, and scallop sizes to create your own signature crochet borders.
Most importantly, enjoy the finishing process. A well-chosen crochet border is a small detail that can make a handmade project feel complete, personal, and beautifully crafted.
Tags
Crochet Edging Crochet Border Free Crochet Patterns Easy Crochet Scalloped Crochet Crochet Blanket Border Beginner Crochet Crochet Ideas