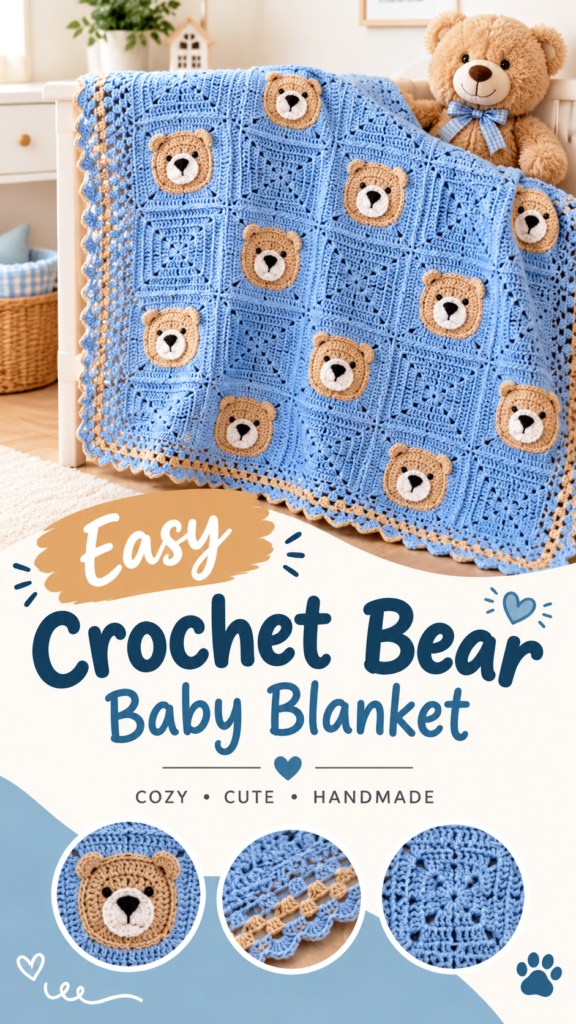
This crochet bear baby blanket brings together soft blue square motifs, sweet teddy bear faces, and a delicate scalloped edge for a classic handmade nursery look. The design has the charm of a traditional motif blanket while keeping the bear details simple enough to make with basic crochet techniques. This original interpretation is designed as a practical baby blanket using joined granny-style squares, embroidered facial details, and a lightweight decorative border.
The suggested construction uses individual squares worked in joined rounds, making the blanket easy to assemble and customize. Ten squares receive bear appliques, while the remaining squares are left plain to create visual breathing room. The result is a cozy free crochet pattern that works beautifully as a baby shower gift, nursery throw, stroller blanket, or treasured handmade keepsake.
Key Takeaways
- A soft blue baby blanket made from individual square motifs.
- Ten squares feature an original crocheted teddy bear face applique.
- The square motifs use simple double crochet clusters with raised texture.
- Suggested yarn is washable category 3 DK yarn in blue, tan, white, and black.
- The finished blanket measures approximately 32 x 40 inches, or 81 x 102 cm.
- The layout is easy to resize by adding or removing complete squares.
A Sweet Crochet Bear Baby Blanket for a Handmade Nursery
The pictured style is especially appealing because it balances detail and simplicity. The soft blue background gives the blanket a calm nursery feel, while the tan teddy bear faces provide the main focal points. A small white muzzle and dark embroidered facial details make each bear recognizable without adding bulky embellishments.
For this original pattern, the blanket is arranged as 20 square motifs, with four squares across and five squares down. Ten squares carry bear faces in an alternating arrangement. The other ten remain textured blue squares. This arrangement keeps the blanket playful without making every section visually busy.
The suggested yarn is a soft, machine-washable category 3 DK yarn. Acrylic, cotton-acrylic, or another baby-friendly washable fiber can work well. Choose a yarn with good stitch definition because the raised square texture and bear appliques are important parts of the design.
Crochet Construction and Stitch Details
How the Blanket Is Built
Each blanket square is worked from the center outward in joined rounds. The construction resembles a traditional granny square, but the square is kept relatively solid by using double crochet clusters and carefully placed raised stitches. Eight rounds create a square with four matching sides and four corner spaces.
Once all 20 squares are complete, they are arranged into four columns and five rows. The motifs are joined using a neat whip stitch through corresponding stitches on the wrong side. Because every finished square has the same number of edge stitches, the assembly process remains straightforward.
The teddy bear is made as a separate applique. A tan rounded rectangular head is combined with two small ears, a white muzzle, and embroidered black facial features. This approach creates dimension while avoiding complicated shaping directly into the blanket square.
Visible Texture and Color Arrangement
The blue squares are the dominant visual element. A raised center stitch on selected rounds gives the motifs a subtly dimensional appearance without making the fabric too dense. Tan is reserved for the teddy bear details and a narrow accent round in the border. White provides the muzzle contrast, while black is used only for embroidered facial details.
The original interpretation below uses a repeating bear placement that creates a balanced checkerboard effect. You can easily change which squares receive bears without changing the square pattern itself.
Crochet Insight
Keep your joining tension relaxed. Pulling the seams tightly can cause the blanket to pucker and can make the square edges look uneven. A loose whip stitch through matching edge stitches keeps the blanket flexible and helps the motifs lie flat.
Free Crochet Bear Baby Blanket Pattern
Project Overview
This is an original image-inspired crochet blanket pattern using 20 individual textured squares and 10 removable-style bear face appliques. The measurements and material quantities are suggested specifications rather than measurements of an unseen original pattern.
| Skill Level | Confident beginner to intermediate |
| Finished Size | Approximately 32 x 40 in (81 x 102 cm) |
| Blanket Layout | 4 squares wide x 5 squares long |
| Square Size | Approximately 8 x 8 in (20 x 20 cm) |
| Yarn | Category 3 DK, washable acrylic or cotton-acrylic |
| Main Color | Approximately 1,150 yd (1,050 m) soft blue |
| Accent Yarn | Approximately 180 yd (165 m) tan |
| White Yarn | Approximately 60 yd (55 m) |
| Black Yarn | Approximately 20 yd (18 m) |
| Hook | 4.0 mm US G-6 crochet hook |
| Gauge | Approximately 18 dc x 9 rounds = 4 in (10 cm) |
| Terminology | US crochet terminology |
Materials and Notions
- Category 3 DK washable yarn in soft blue, approximately 1,150 yards (1,050 meters)
- Category 3 DK tan yarn, approximately 180 yards (165 meters)
- Category 3 DK white yarn, approximately 60 yards (55 meters)
- Category 3 DK black yarn, approximately 20 yards (18 meters)
- 4.0 mm US G-6 crochet hook
- Yarn needle with a blunt tip
- Scissors
- Removable stitch marker for marking joins if desired
- Measuring tape
Abbreviations
- ch: chain
- sc: single crochet
- hdc: half double crochet
- dc: double crochet
- fpdc: front post double crochet
- sl st: slip stitch
- st/sts: stitch/stitches
- sk: skip
- inc: increase, two stitches worked into the same stitch
- RS: right side
- WS: wrong side
- rep: repeat
US terms are used throughout. In UK terminology, single crochet is called double crochet, half double crochet is half treble, and double crochet is treble crochet.
Special Stitch
Front Post Double Crochet (fpdc): Yarn over, insert the hook from front to back to front around the post of the indicated double crochet, yarn over and pull up a loop, then complete the stitch as a regular double crochet. The fpdc counts as one stitch.
Corner cluster: 3 dc, ch 2, 3 dc worked into the same corner space.
Side cluster: 3 dc worked into the indicated space between double crochet groups.
Construction Notes
Each square is worked in joined rounds. The starting ch-3 counts as the first dc in every round. The ch-2 corner spaces do not count as stitches. Slip stitches used to close rounds do not count as stitches.
Each completed blue square has 24 double crochet stitches along each side, excluding the corner spaces. This gives every square the same edge structure for simple assembly.
Part 1: Textured Blue Square
Round 1
With blue yarn, make a magic ring. Ch 3, work 2 dc into the ring, ch 2. Repeat [3 dc into the ring, ch 2] three more times. Sl st to the top of the beginning ch-3. Pull the magic ring closed. 12 dc, 4 corner spaces.
Round 2
Sl st across to the next corner space. Ch 3, 2 dc in the same corner space, ch 2, 3 dc in the same space. In each of the next 3 corner spaces, work 3 dc, ch 2, 3 dc. Sl st to the top of the beginning ch-3. 24 dc.
Round 3
Sl st to the next corner space. Ch 3, 2 dc in the corner, ch 2, 3 dc in the same corner. In the next side space, work 3 dc. In the next corner, work 3 dc, ch 2, 3 dc. Repeat the side-space cluster and corner cluster around the square, ending with a side-space cluster before the final corner. Sl st to the beginning ch-3. 36 dc.
Round 4
Sl st to the next corner space. Ch 3, 2 dc in the corner, ch 2, 3 dc in the same corner. Work 3 dc in each of the 2 side spaces to the next corner. Work 3 dc, ch 2, 3 dc in the corner. Repeat this sequence around the square. Sl st to the beginning ch-3. 48 dc.
Round 5
Sl st to the next corner space. Ch 3, 2 dc in the corner, ch 2, 3 dc in the same corner. Work 3 dc in each of the 3 side spaces to the next corner. Work 3 dc, ch 2, 3 dc in the corner. Repeat around. Sl st to the beginning ch-3. 60 dc.
Round 6
Sl st to the next corner space. Ch 3, 2 dc in the corner, ch 2, 3 dc in the same corner. Work 3 dc in each of the 4 side spaces to the next corner. Work 3 dc, ch 2, 3 dc in the corner. Repeat around. Sl st to the beginning ch-3. 72 dc.
Round 7: Raised Texture
Sl st to the next corner space. Ch 3, 2 dc in the corner, ch 2, 3 dc in the same corner. On the first side, work 3 dc in the first space, fpdc around the middle dc of the next 3-dc group, 3 dc in the next 2 spaces. Continue across each side by placing one fpdc around the middle dc of the second side cluster on that side. At every corner, work 3 dc, ch 2, 3 dc. Repeat the same arrangement on all four sides. Sl st to the beginning ch-3. 84 dc, with 4 raised fpdc texture stitches.
For consistency, the raised fpdc replaces the middle dc of an existing 3-dc group rather than adding a new stitch. The total stitch count therefore remains 84 dc-equivalent stitches.
Round 8
Sl st to the next corner space. Ch 3, 2 dc in the corner, ch 2, 3 dc in the same corner. Work 3 dc in each of the 6 side spaces to the next corner. Work 3 dc, ch 2, 3 dc in the corner. Repeat around the entire square. Sl st to the beginning ch-3. Fasten off and weave in the end. 96 dc.
The completed square should have four equal sides with 24 dc stitches along each side between corner spaces. Lightly block each square to approximately 8 x 8 inches (20 x 20 cm).
Part 2: Teddy Bear Face Applique
Make 10 bear faces. The face is crocheted in tan yarn, with a white muzzle and embroidered black details. The finished applique is approximately 4 x 4.25 inches (10 x 11 cm).
Bear Head
With tan yarn, ch 10.
- Row 1: Sc in the 2nd ch from hook and in each chain across. 9 sc.
- Rows 2-8: Ch 1, turn, sc in each stitch across. 9 sc. Fasten off after Row 8, leaving a sewing tail.
The resulting piece is a simple 9-stitch by 8-row rectangle. The border will soften the corners and create the rounded teddy face shape.
Bear Head Border
Join tan yarn in the upper-left corner. Ch 1. Work sc evenly around the rectangle, placing 2 sc in each corner. Work 9 sc across the top, 8 sc down the side, 9 sc across the bottom, and 8 sc up the remaining side, adjusting only at the corners with the specified increases. Join with a sl st. 42 sc.
Fasten off and leave a long tail for sewing. Lightly block the head into a soft rounded-square shape.
Bear Ears
Make 2 in tan.
- Make a magic ring. Work 6 sc into the ring. Do not join.
- Round 2: Work 2 sc in each stitch around. 12 sc.
- Sl st to the first stitch and fasten off, leaving a sewing tail.
Fold each ear very slightly at the bottom to create a gentle curved shape. Position the ears behind the top corners of the head and sew securely using tan yarn.
White Muzzle
With white yarn, ch 5.
- Round 1: Sc in the 2nd, 3rd, and 4th chains. Work 3 sc in the last chain. Working along the underside of the foundation chain, sc in the next 3 chains, then work 2 sc in the final chain. 11 sc.
- Round 2: Sc in the next 3 sts, work 2 sc in each of the next 3 sts, sc in the next 3 sts, then work 2 sc in each of the final 2 sts. 16 sc.
- Round 3: Sc in the next 3 sts, repeat [sc in next st, 2 sc in next st] three times, sc in the next 3 sts, then repeat [sc in next st, 2 sc in next st] twice. 22 sc.
Sl st to the first stitch, fasten off, and leave a sewing tail. The muzzle should be an elongated oval.
Bear Face Assembly
- Center the white muzzle on the lower-middle portion of the tan head.
- Sew the muzzle securely around its entire perimeter using white or tan yarn.
- Using black yarn, embroider two small oval eyes above the muzzle.
- Embroider a small upside-down triangle for the nose.
- Add a short vertical line below the nose and two tiny curved lines for the mouth.
- If desired, add two tiny tan or black embroidered dots as cheeks, keeping all facial details firmly secured.
For a baby blanket, embroidered facial features are preferable to loose plastic eyes, beads, buttons, or other detachable decorations.
Important: Because this blanket is intended for babies, avoid buttons, beads, plastic safety eyes, bells, or other small detachable pieces. Secure every embroidered feature and applique firmly. A handmade blanket should be supervised around babies and should not be represented as medically tested or sleep safe.
Part 3: Make the Blanket Squares
Make 20 blue textured squares using the complete eight-round square pattern above. Fasten off and weave in the ends after every square, or leave selected joining tails if you prefer to use them during assembly.
For the pictured-inspired arrangement, decorate 10 of the squares with bear faces. Leave 10 squares plain.
Use this layout from top to bottom:
- Row 1: Bear, plain, Bear, plain
- Row 2: Plain, Bear, Plain, Bear
- Row 3: Bear, Plain, Bear, Plain
- Row 4: Plain, Bear, Plain, Bear
- Row 5: Bear, Plain, Bear, Plain
Sew one bear face to the center of each designated square. Keep the appliques oriented in the same direction and use the same distance from the square edges so the finished blanket looks balanced.
Part 4: Join the Squares
Arrange all 20 squares on a flat surface before sewing. Check that the bear faces alternate correctly and that the raised texture is facing upward on every square.
- Place the first two squares together with their wrong sides facing each other.
- Thread a yarn needle with blue yarn.
- Whip stitch through the corresponding edge stitches, using one stitch from each square for every pass.
- Continue across the complete 24-stitch side.
- Repeat for the remaining squares in each horizontal row.
- Join the five completed horizontal rows in the same manner.
- Weave in all joining ends securely on the wrong side.
Because every side contains 24 stitches, the seams should align stitch for stitch. Avoid pulling the joining yarn tightly. The fabric should remain flat and flexible.
Part 5: Three-Round Decorative Border
Border Round 1: Blue
Join blue yarn at any corner. Ch 1. Work 24 sc evenly across the first side, 2 sc in the corner area, then 24 sc across the next side and 2 sc in the next corner. Continue around the blanket in the same way. You will have 104 sc total. Join with a sl st to the first sc.
Border Round 2: Tan
Join tan yarn at the first stitch after any corner. Ch 1 and sc in every stitch around. At each of the four corner areas, work 2 sc in the corner stitch. Keep the total at 104 sc. Join with a sl st to the first sc and fasten off.
Border Round 3: Blue Scallops
Join blue yarn. Ch 1. Work the following repeat around the entire blanket: sk 2 sts, 5 dc in the next st, sk 2 sts, sc in the next st. Repeat this sequence exactly 26 times. Join with a sl st to the first sc. Fasten off and weave in the end.
The 104-stitch border is divisible by four, so the 26 shell repeats fit evenly around the blanket. If your individual square gauge differs substantially, do not force the scallops. Adjust the first border round so its total stitch count remains a multiple of four.
Final Blocking
Place the finished blanket on a clean, dry surface. Gently smooth the squares into straight lines, paying particular attention to the outer corners and joining seams. Lightly dampen the blanket according to the care requirements of your yarn and allow it to dry flat.
Do not stretch aggressively. The goal is simply to encourage the squares to settle into a consistent rectangular shape and to open the decorative border.
Customization and Size Adjustments
One advantage of this crochet bear baby blanket construction is that the size can be changed without redesigning the basic motif. Simply make more or fewer complete squares and arrange them into the desired dimensions.
Changing the Blanket Width
Each square is approximately 8 inches (20 cm) wide. For a smaller stroller blanket, use three squares across. For a larger blanket, use five squares across. Four squares across creates the approximately 32-inch width used in the main pattern.
- 3 squares across: approximately 24 inches (61 cm) before edging
- 4 squares across: approximately 32 inches (81 cm) before edging
- 5 squares across: approximately 40 inches (102 cm) before edging
The exact finished measurements will depend on your yarn, hook, tension, and blocking.
Changing the Blanket Length
Add or remove horizontal rows of four squares. Each additional row adds approximately 8 inches (20 cm) to the blanket before the border. You can also make a smaller security-style blanket with only three or four rows.
Color Ideas
The soft blue and tan combination creates a traditional teddy bear look, but the pattern works with many nursery palettes. Try dusty sage with cream bears, pale gray with caramel bears, lavender with oatmeal accents, or warm ivory with muted blue bears.
For an especially clean appearance, keep the square color consistent and change only the bear faces. This lets the appliques remain the visual focal point.
Common Mistakes and Troubleshooting
My Squares Are Not Square
Check that every corner receives the full corner cluster of 3 dc, ch 2, 3 dc. Missing one corner increase can cause the motif to curl or become rectangular. Also check your tension. If the fabric is very loose, try a smaller hook. If the square is too small or stiff, try a larger hook.
The Seams Look Wavy
Wavy seams are usually caused by mismatched stitch counts or overly loose joining stitches. Confirm that both squares have 24 edge stitches. Place one stitch from each square together as you sew and keep the joining yarn relaxed.
The Bear Face Looks Crooked
Block the tan head before attaching the muzzle. Mark the center of the square and use it as a guide when positioning the face. Sew the muzzle first, then embroider the eyes and nose after the applique is securely attached.
The Border Does Not Lie Flat
A border that ruffles usually has too many stitches, while a border that pulls inward usually has too few. Since the blanket is assembled from multiple motifs, the first border round is the best place to correct minor differences. Keep the first round even and maintain a multiple of four stitches for the final scalloped round.
Finishing, Care, and Baby-Friendly Details
Weave every yarn end securely through several stitches on the wrong side before trimming. Because blankets receive frequent handling and washing, do not rely on a single pass through the fabric. Thread the tail through multiple stitches, change direction, and trim only after it is secure.
For everyday care, follow the washing instructions recommended for your chosen yarn. A washable fiber is particularly practical for baby blankets because spills and messes are inevitable. Avoid high heat unless the yarn label specifically allows it.
Keep the surface free from detachable embellishments. The teddy bear design gets plenty of character from its embroidered eyes, nose, and mouth, so there is no need for buttons or plastic accessories.
Safety Reminder: For a blanket intended for a baby or young child, use firmly secured embroidered facial features rather than loose small parts. Inspect the blanket periodically for loose seams, yarn ends, or damaged appliques and repair them before continued use.
At a Glance
- Best yarn: Soft, washable category 3 DK acrylic or cotton-acrylic.
- Skill level: Confident beginner to intermediate, with basic granny-square and applique skills.
- Key technique: Joined-round textured squares with embroidered bear appliques.
- Size adjustment: Add or remove complete rows and columns of approximately 8-inch squares.
- Finishing: Whip-stitch the squares, add a three-round border, then lightly block.
Final Thoughts on This Crochet Bear Baby Blanket
This crochet bear baby blanket is a lovely combination of simple square construction and charming handmade detail. The repeating blue motifs make the blanket approachable, while the tan teddy bear faces give it the playful character that makes a handmade baby gift feel special.
Before beginning the full project, choose your yarn and make one complete square. Check the gauge and finished square size, then adjust your hook if necessary. Reading through the complete pattern before starting will also make the joining and border stages much easier.
Once your gauge is comfortable, make the squares assembly-line style, then lay them out before sewing. Experiment with bear placement, alternate the colors, or create a smaller version for a stroller or nursery chair. The modular construction makes this free crochet pattern easy to personalize while keeping the recognizable teddy bear theme.
With soft yarn, secure finishing, and a carefully chosen color palette, this crochet blanket can become a thoughtful handmade gift for a new arrival. Take your time with the appliques, keep your seams relaxed, and let the simple teddy bear details do the decorating.
Tags
Crochet Baby Blanket
Crochet Bear Blanket
Free Crochet Pattern
Baby Blanket Crochet
Granny Square Blanket
Teddy Bear Crochet
Nursery Crochet
Handmade Baby Gift