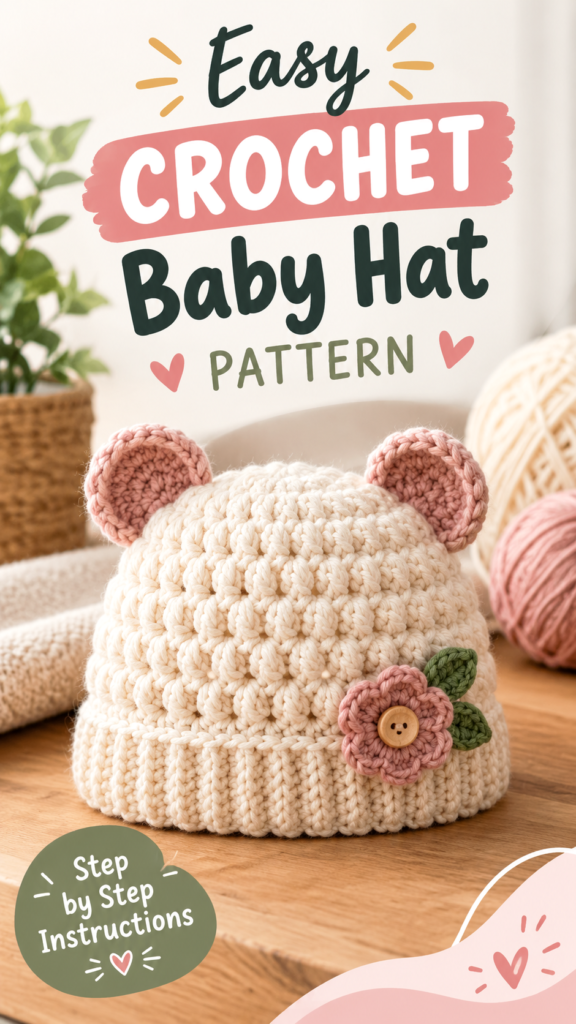
This free crochet baby hat is inspired by a cozy, teddy-bear-style beanie with a chunky cream texture, a softly ribbed brim, rounded bear ears, and a sweet decorative accent. The simple shape makes it a lovely handmade crochet gift for a baby, while the neutral color keeps the finished hat easy to pair with different outfits and nursery styles.
The design uses a practical construction: a short ribbed band is crocheted first, joined into a ring, and then the hat body is worked upward in rounds. Small circular ear pieces are crocheted separately and securely sewn to the crown. The result is a warm-looking baby hat with plenty of room for personalization.
Key Takeaways
- A cozy crochet baby hat with a teddy-bear-inspired silhouette.
- The hat is constructed from a ribbed brim and crocheted body worked in rounds.
- Single crochet creates a dense, warm fabric with a softly textured appearance.
- Suggested bulky yarn makes the project quick and plush without complicated stitches.
- The base pattern fits approximately a 16-inch head circumference and can be adjusted.
- Bear ears and a yarn bow or flower provide simple customization options.
Crochet Baby Hat Project Description
The pictured style has the unmistakable look of a cuddly handmade baby accessory. The main hat appears to use a light cream or oatmeal shade, giving it a soft, natural appearance. The body has a compact stitch texture, while the brim has vertical ribbing that visually separates the lower edge from the crown.
Two rounded ears sit near the top of the hat, creating the playful teddy-bear effect. A small contrasting decorative piece near the lower front adds another handmade detail. For an infant-friendly version, this pattern replaces a loose button center with a securely embroidered yarn center.
The free crochet baby hat pattern below is an original interpretation designed around these visible characteristics. It does not attempt to reproduce an unseen original pattern. The recommended yarn, hook, measurements, and gauge are practical suggestions chosen to create a similar overall shape and texture.
What Makes This Baby Hat Special?
The appeal comes from combining very simple crochet techniques with carefully placed details. You do not need an elaborate stitch pattern to create an eye-catching baby hat. A dense single crochet fabric, a ribbed brim, rounded ears, and one small decorative accent are enough to give the project plenty of personality.
The hat also works well as a beginner-friendly crochet project because most of the shaping is straightforward. Once the brim is complete, the body uses joined single crochet rounds and controlled decreases at the crown. The separate ears require only basic increases, making them a useful practice piece for anyone learning how crochet shaping works.
Crochet Construction and Stitch Analysis
The most practical construction for this design begins with the ribbed brim. The brim is crocheted back and forth in rows using single crochet worked through the back loop only. This creates raised vertical ridges and gives the lower edge the flexible appearance seen in many classic crochet hats.
After the ribbed strip reaches the desired circumference, its short ends are joined to form a ring. Single crochet stitches are then worked around one long edge of the ribbing. The body continues upward in joined rounds, which makes it easier to keep the stitch texture even and the crown shaping symmetrical.
The main fabric uses regular single crochet. This is a sensible alternative to trying to identify an exact photographed stitch because single crochet produces a compact fabric that works especially well with bulky or super bulky yarn. It also gives enough structure for the rounded crown and separate ears.
The crown is shaped with six evenly distributed decreases. Spacing the decreases around the hat keeps the top rounded rather than creating a sharply pointed peak. The final opening is closed with a yarn needle, and the remaining yarn tail is woven securely through the last stitches.
Yarn and Texture Recommendations
A soft bulky or light super bulky yarn is suggested for the closest overall appearance. Choose a washable acrylic, acrylic blend, or soft washable wool blend if the intended recipient can comfortably wear that fiber. For a baby item, avoid scratchy yarns and very fuzzy fibers that could shed excessively.
A cream, oatmeal, ivory, beige, warm taupe, or pale gray yarn recreates the neutral appearance of the pictured style. A small amount of dusty pink, mauve, rose, or another muted shade can be used for the decorative bow or flower.
Free Crochet Baby Hat Pattern
Free Crochet Pattern: Cozy Teddy Baby Hat
Pattern note: This original interpretation uses a ribbed brim, joined single crochet rounds, six-point crown decreases, and separately crocheted rounded ears to create a similar cozy teddy-bear-inspired look.
| Skill Level | Confident beginner |
| Finished Size | Approximately 16 in / 40.5 cm head circumference and 6.75 in / 17 cm height |
| Yarn | Bulky weight yarn, approximately 90 yd / 82 m in main color |
| Accent Yarn | Approximately 10 yd / 9 m in a contrasting color |
| Hook | 5.5 mm, US I-9 |
| Gauge | Approximately 12 sc x 13 rounds = 4 in / 10 cm |
| Terminology | US crochet terminology |
Finished Measurements and Fit
The base version is designed for an approximate head circumference of 16 inches / 40.5 cm. The finished hat has an approximate height of 6.75 inches / 17 cm from the lower edge to the crown. Because crochet fabric stretches, the hat should have a finished circumference slightly smaller than the wearer’s head circumference.
This base size is suitable as a starting point for a young baby, but babies grow quickly and head sizes vary. Always measure the intended recipient whenever possible rather than relying only on age.
Materials
- Approximately 90 yd / 82 m bulky weight washable yarn in the main color.
- Approximately 10 yd / 9 m contrasting bulky or worsted weight yarn for the decorative accent.
- 5.5 mm US I-9 crochet hook.
- Yarn needle with a blunt tip.
- Removable stitch marker.
- Small amount of matching yarn for sewing the ears and decorative accent.
- Scissors.
Baby Safety: Avoid loose buttons, beads, charms, safety eyes, detachable bows, and other small pieces on items intended for babies. The photographed style includes a button-like center, but this original baby-focused version uses an embroidered yarn center instead. Sew every decorative component firmly and inspect the finished hat before use.
Abbreviations
- ch: chain
- sc: single crochet
- sl st: slip stitch
- sc BLO: single crochet through back loop only
- inc: increase, two single crochet in the same stitch
- dec: single crochet decrease
- st/sts: stitch/stitches
- rnd: round
- rep: repeat
UK equivalent: US single crochet is called double crochet in UK terminology. The instructions below use US terminology exclusively.
Special Stitch
Single Crochet Decrease: Insert the hook into the next stitch and pull up a loop. Insert the hook into the following stitch and pull up a loop. Yarn over and pull through all three loops on the hook. This decreases two stitches into one.
Construction Notes
The hat is worked in three main stages: the ribbed brim, the single crochet crown, and the decorative ears. The brim is worked in rows and joined at the end. The body is then crocheted around the upper edge of the brim in joined rounds. The turning chain is not used because each round begins directly in the first stitch after joining.
Slip stitches do not count as stitches anywhere in the pattern. At the end of every joined body round, join with a slip stitch to the first single crochet. Use a stitch marker to identify the first stitch of each round if you find it difficult to see the joining point.
Part 1: Ribbed Brim
- Foundation: Ch 9.
- Row 1: Sc in the second ch from the hook and in each remaining chain across. You have 8 sts. Ch 1 and turn.
- Rows 2-30: Sc BLO in each of the 8 sts across. You have 8 sts. Ch 1 and turn after each row.
After Row 30, do not fasten off. Fold the strip so the first and last rows meet. Align the stitches carefully.
- Join the brim: Working through both thicknesses, sl st across all 8 corresponding stitches to close the brim into a ring. Fasten off the short joining tail only if desired, but keep the main working yarn available if you prefer to begin the body immediately from the upper edge.
The brim should measure approximately 16 inches / 40.5 cm around when gently stretched. If your gauge is different, adjust the number of ribbing rows before joining. Each additional row adds circumference, while each removed row decreases circumference.
Part 2: Crochet Baby Hat Body
Attach the main-color yarn evenly around the upper edge of the ribbed brim. You will work 48 single crochet stitches around the brim. A practical method is to place approximately 12 sc along each quarter of the band, spacing them as evenly as possible.
- Rnd 1: Ch 1. Sc in the same joining area and around the entire brim. Join with a sl st to the first sc. 48 sts.
- Rnd 2: Ch 1. Sc in each st around. Join with a sl st to the first sc. 48 sts.
- Rnd 3: Repeat Rnd 2. 48 sts.
- Rnd 4: Repeat Rnd 2. 48 sts.
- Rnd 5: Repeat Rnd 2. 48 sts.
- Rnd 6: Repeat Rnd 2. 48 sts.
- Rnd 7: [Sc in next 6 sts, dec over next 2 sts] 6 times. Join. 42 sts.
- Rnd 8: Sc in each st around. Join. 42 sts.
- Rnd 9: [Sc in next 5 sts, dec over next 2 sts] 6 times. Join. 36 sts.
- Rnd 10: Sc in each st around. Join. 36 sts.
- Rnd 11: [Sc in next 4 sts, dec over next 2 sts] 6 times. Join. 30 sts.
- Rnd 12: Sc in each st around. Join. 30 sts.
- Rnd 13: [Sc in next 3 sts, dec over next 2 sts] 6 times. Join. 24 sts.
- Rnd 14: Sc in each st around. Join. 24 sts.
- Rnd 15: [Sc in next 2 sts, dec over next 2 sts] 6 times. Join. 18 sts.
- Rnd 16: Sc in each st around. Join. 18 sts.
- Rnd 17: [Sc in next st, dec over next 2 sts] 6 times. Join. 12 sts.
- Rnd 18: Dec over the next 2 sts 6 times. 6 sts.
Fasten off, leaving an approximately 8-inch / 20 cm tail. Thread the tail onto a yarn needle and weave it through the front loops of the remaining 6 stitches. Pull gently to close the crown. Insert the needle through the center of the closure and weave the yarn securely through several nearby stitches on the inside of the hat. Trim the excess.
Part 3: Rounded Bear Ears
Make two identical ears using the main color. These ears are worked in joined rounds so their edges remain neat and easy to sew onto the crown.
- Rnd 1: Make a magic ring. Ch 1 and work 6 sc into the ring. Join with a sl st to the first sc. 6 sts.
- Rnd 2: Ch 1. Work 2 sc in each st around. Join. 12 sts.
- Rnd 3: Ch 1. [Sc in next st, 2 sc in next st] 6 times. Join. 18 sts.
- Rnd 4: Ch 1. [Sc in next 2 sts, 2 sc in next st] 6 times. Join. 24 sts.
- Rnd 5: Ch 1. Sc in each st around. Join. 24 sts.
Fasten off, leaving a 10-inch / 25 cm sewing tail. Do not stuff the ears. Fold each circle gently in half to create a softly rounded half-moon shape. Use the yarn tail to make a few small securing stitches through the lower portion of the fold so the ear holds its curved shape.
Part 4: Sew the Ears to the Hat
- Lay the finished hat flat with the crown centered.
- Position one ear approximately 1.75 inches / 4.5 cm to either side of the crown center.
- Keep the lower edge of each ear approximately 0.75 inch / 2 cm below the top center so the ears sit naturally above the crown.
- Pin or temporarily hold each ear in place with a strand of scrap yarn.
- Using the sewing tail, stitch through the lower edge of the ear and the corresponding hat stitches.
- Work several secure stitches across the entire attachment area rather than securing only the center.
- Weave the remaining tail through the inside of the hat and trim it neatly.
Construction Tip: Place both ears before sewing either one permanently. Looking at the hat from the front makes it much easier to adjust their spacing and angle so they appear balanced.
Optional Yarn Bow Accent
The photographed style includes a small contrasting bow-like decoration. For a baby-safe interpretation, make a simple flat yarn bow and sew it firmly to the hat. Do not attach it with a button, bead, snap, or other detachable center.
- Using the contrasting yarn, ch 16.
- Sc in the second ch from the hook and across. 15 sts.
- Ch 1 and turn. Sc BLO across. 15 sts.
- Repeat Row 3 for a total of 5 rows.
- Fasten off, leaving a 12-inch / 30 cm tail.
- Fold the rectangle into a small bow shape by bringing the short ends toward the center.
- Wrap the yarn tail several times around the middle of the folded rectangle to create the bow center.
- Sew the bow securely to the front of the hat using multiple passes through the hat fabric.
For an even simpler accent, substitute a small crocheted flower made from the contrasting yarn. Keep the flower flat and securely attached, and avoid any loose center embellishment.
Finishing the Pattern
- Check the inside of the hat for loose yarn tails.
- Weave every tail securely through several stitches before trimming.
- Inspect both ears and the decorative accent to make sure they cannot easily be pulled away.
- Gently shape the crown with your hands rather than stretching it aggressively.
- If desired, lightly steam the finished hat from a safe distance according to the yarn manufacturer’s care recommendations. Do not apply direct heat to synthetic yarn.
Crochet Insight: Why the Ribbed Brim Matters
The ribbed brim is more than a decorative detail. Working single crochet through the back loop creates rows that compress and expand more easily than a standard flat single crochet edge. This gives the lower portion of the hat a flexible feel and helps the finished piece sit comfortably around the head.
- Keep your ribbing rows consistent for an even lower edge.
- Do not make the brim excessively tight, especially for a baby.
- Measure the completed band before beginning the crown.
Customization and Size Adjustment
The easiest way to resize this free crochet baby hat is to change the circumference of the ribbed brim before beginning the body. Since the brim controls the number of stitches around the hat, it is best to establish the desired circumference at this stage rather than trying to reshape the finished crown.
Adjusting the Circumference
For the base pattern, the ribbing has 30 rows and the body contains 48 stitches. If you need a larger or smaller hat, add or remove ribbing rows in pairs when possible so the band remains easy to join. Once the band is complete, distribute your stitches evenly around the upper edge.
For a different size, aim for approximately 90 to 95 percent of the measured head circumference because crochet fabric needs some negative ease. For example, if the measured head circumference is 17 inches / 43 cm, a finished hat circumference around 15.5 to 16 inches / 39.5 to 40.5 cm may provide a useful starting point, depending on yarn stretch and gauge.
Adjusting the Height
To make the hat deeper, add plain single crochet rounds before beginning the crown decreases. To make it shallower, begin the decrease section earlier. Keep the decrease sequence intact so the crown continues to reduce from 48 stitches to 6 stitches.
If you add or remove rounds, make the adjustment in the plain section rather than changing the decrease mathematics unless you are comfortable recalculating the crown.
Color Ideas
For a classic teddy look, keep the hat and ears in cream, oatmeal, beige, or light brown. A soft pink accent creates a gentle nursery-inspired style. Pale sage, dusty blue, lavender, or muted peach can also add color without overpowering the simple texture.
For a two-tone hat, work the ribbed brim in a slightly darker neutral and the crown in a lighter shade. Keep color changes at the joining point of the rounds to make the transition as clean as possible.
Common Crochet Baby Hat Mistakes and Troubleshooting
The Hat Is Too Tight
If the hat circumference is smaller than expected, first check your gauge. Bulky yarn can vary considerably between brands and fibers. A tighter crocheting style can also reduce the finished measurement. Try a larger hook for the gauge swatch or add rows to the ribbed band for additional circumference.
The Crown Looks Pointed
A pointed crown usually means the decrease section is too aggressive or the fabric is being pulled tightly. Make sure each decrease is worked as instructed and that you are not accidentally skipping additional stitches. The plain rounds between decrease rounds help maintain a rounded profile.
The Ears Look Uneven
Do not sew the ears immediately after crocheting them. Place both pieces on the finished hat first and view the project from the front. Adjust the spacing until they look symmetrical. If one ear leans differently, rotate it slightly before sewing.
The Brim Looks Wavy
A wavy brim can result from inconsistent tension or adding too many stitches when attaching the body. Count the stitches around the upper edge before beginning Round 1. The target is 48 stitches for the base pattern. If necessary, distribute the stitches more evenly during the first body round.
Finishing, Care, and Baby-Safe Use
Before washing the hat, check the yarn label for its specific care instructions. Washable acrylic and acrylic blends are often practical for baby accessories because they can generally be cleaned easily, but always follow the fiber manufacturer’s instructions.
Use a gentle wash method and avoid harsh detergents or high heat unless the yarn specifically permits them. Reshape the hat while damp and allow it to dry naturally on a clean, flat surface. Avoid hanging the wet hat because the weight of the water can stretch the brim.
For baby accessories, inspect the finished piece before every use. Look for loose yarn tails, stretched seams, detached decorative pieces, or damaged fabric. The safest decorative approach is to use securely embroidered details and firmly sewn yarn components rather than small detachable objects.
Important: This handmade hat is an accessory and should not be treated as a medically approved or sleep-safe product. Never leave a baby unattended with loose decorative components, cords, ties, or detachable embellishments.
At a Glance
- Best yarn: Soft, washable bulky weight yarn in a smooth fiber.
- Skill level: Confident beginner, using single crochet, back-loop ribbing, increases, and decreases.
- Key technique: Crochet the ribbed band first, then build the crown in joined single crochet rounds.
- Size adjustment: Change the number of ribbing rows for circumference and add or remove plain crown rounds for height.
- Finishing: Close the crown securely, sew on rounded ears, weave in all ends, and inspect decorative details before use.
Final Thoughts on This Free Crochet Baby Hat
This free crochet baby hat combines a simple construction with the cozy character of a teddy-inspired design. The ribbed brim gives the hat a polished finish, while the dense single crochet crown provides a warm, structured fabric. The rounded ears are an easy way to turn a basic baby beanie into a playful handmade accessory.
Before beginning, choose a soft washable yarn, check your gauge, and read through the complete pattern so you understand the construction. Measure the intended wearer’s head whenever possible, especially when making a gift. Once the basic hat is complete, personalize the colors, ear placement, or yarn accent while keeping all embellishments securely attached.
With its straightforward shaping and adaptable sizing, this crochet baby hat makes a useful beginner-friendly project for handmade gifting, baby photography, seasonal outfits, or a cozy little wardrobe accessory. Choose your yarn, work at a comfortable tension, and enjoy adding your own finishing details to this original crochet design.
Tags
Crochet Baby Hat
Free Crochet Pattern
Baby Crochet
Easy Crochet Project
Crochet Baby Gift
Teddy Bear Crochet
Beginner Crochet Pattern
Handmade Baby Hat