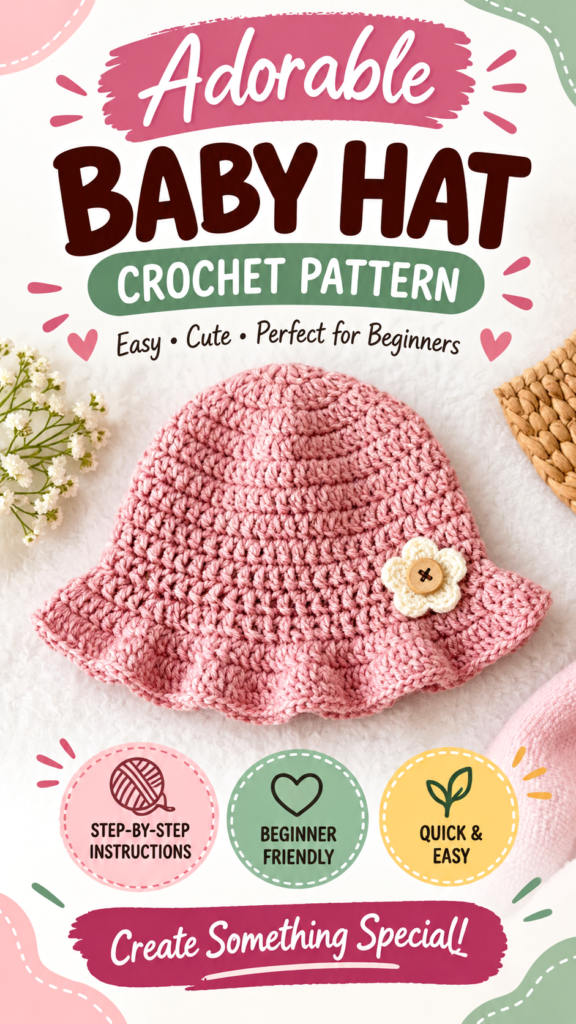
This baby bucket hat crochet pattern creates a soft, gently textured sun hat with a rounded crown, comfortable side walls, and a lightly flared brim. The original interpretation is designed in two baby-friendly sizes covering approximately newborn through 12 months, with simple shaping that makes the project approachable for confident beginners.
The pictured style is especially appealing in dusty pink, but the design works beautifully in cream, sage, lavender, butter yellow, sky blue, or any soft seasonal shade. The pattern below uses an easy half double crochet construction with subtle ridged texture created by working selected rounds through the back loop. It is an original crochet interpretation rather than an attempt to reproduce an unseen pattern.
Key Takeaways
- A sweet baby bucket hat crochet pattern with a rounded crown and softly flared brim.
- Designed for approximately newborn to 3 months and 3 to 12 months.
- Uses simple half double crochet stitches with back-loop texture for a handmade ribbed appearance.
- Suggested DK weight cotton keeps the hat lightweight, washable, and suitable for warm-weather use.
- The brim can be adjusted easily by adding or removing increase rounds.
- An embroidered accent is recommended instead of a loose button or bead for baby safety.
A Sweet Baby Bucket Hat for Sunny Days
A handmade baby hat is one of those crochet projects that can be both practical and satisfying. This baby bucket hat crochet pattern has a classic shape, but the softly textured fabric gives it a modern handmade feel. The crown is rounded rather than sharply domed, while the brim widens gradually to create the characteristic bucket-hat silhouette.
The suggested version is worked from the center of the crown outward in joined rounds. Once the crown reaches the appropriate diameter, the sides are worked without increases to create the depth of the hat. The brim then receives controlled increases so it gently moves away from the head instead of sitting flat against it.
For babies, lightweight cotton or a cotton-rich DK yarn is a particularly practical choice. It gives enough structure for the brim while remaining soft and breathable. Choose a smooth yarn rather than a fuzzy or heavily textured fiber so the stitch definition remains clear and the finished hat is comfortable against delicate skin.
What This Crochet Baby Hat Looks Like
The finished hat has four main visual features: a rounded crown, a textured cylindrical body, a softly flared brim, and a neat finished edge. The dusty pink color shown in the inspiration works particularly well because it emphasizes the rows of crochet stitches without overwhelming the simple shape.
The crown begins small and expands evenly. Each increase round adds eight stitches, which creates a balanced circular shape. After the required crown size is reached, the stitch count stays constant while the hat grows downward. Working these side rounds through the back loop creates subtle horizontal ridges that give the fabric more visual depth.
The brim is intentionally modest rather than extremely wide. Two controlled increase rounds provide enough flare to resemble a bucket hat while avoiding a stiff or oversized sunhat shape. A final round of single crochet gives the edge additional stability.
The project is suitable for everyday summer wear, outdoor family outings, baby photography, handmade gifts, and simple seasonal wardrobes. Because the brim is flexible, it can also be lightly shaped by hand after washing.
Visual Details to Recreate
- Color: Soft dusty pink is a close style choice, although any baby-friendly shade works.
- Texture: Half double crochet with back-loop rounds creates subtle horizontal ridges.
- Shape: Rounded crown, straight-to-gently-tapered sides, and a flared brim.
- Edge: A firm single crochet finish helps the brim retain its shape.
- Decoration: Use embroidery rather than detachable buttons, beads, or other loose embellishments.
Crochet Construction and Stitch Analysis
The practical construction for this design is a center-out circular hat. This avoids separate crown panels and seams and allows the circumference to be controlled by the number of increase rounds. The crown is worked in joined rounds, followed by joined rounds for the sides and brim.
The main stitch is half double crochet. It is taller than single crochet but more compact than double crochet, making it a useful choice for a baby hat that needs both softness and moderate structure. The textured section is created by working half double crochet stitches through the back loop only. This produces a raised ridge between rounds without requiring a complicated special stitch.
The recommended yarn is DK weight, approximately category 3. A smooth cotton or cotton-blend yarn is suggested because it is breathable, washable, and sufficiently firm for a bucket-hat brim. A 4.0 mm crochet hook, US size G-6, provides a balanced fabric for the suggested gauge.
The finished measurements below are approximate because crochet tension varies. Always make a small gauge sample before beginning if accurate sizing matters.
Free Crochet Pattern: Soft Summer Baby Bucket Hat
Free Crochet Pattern
Project name: Soft Summer Baby Bucket Hat
Pattern style: Original image-inspired crochet design
Construction: Center-out joined rounds
Skill level: Easy to confident beginner
| Skill Level | Easy to confident beginner |
| Finished Size | Small: approximately 14 in / 35.5 cm circumference. Large: approximately 16 in / 40.5 cm circumference. |
| Suggested Yarn | DK weight, category 3, smooth cotton or cotton blend |
| Yarn Quantity | Approximately 100 to 130 yd / 90 to 120 m |
| Hook | 4.0 mm, US G-6 |
| Gauge | 16 hdc x 11 rounds = approximately 4 x 4 in / 10 x 10 cm |
| Terminology | US crochet terminology |
Approximate Sizes
- Small: approximately newborn to 3 months, designed for a head circumference of about 13 to 14 in / 33 to 35.5 cm.
- Large: approximately 3 to 12 months, designed for a head circumference of about 15 to 16 in / 38 to 40.5 cm.
The finished circumference is slightly smaller than the maximum suggested head measurement because the crochet fabric has natural flexibility. If the baby’s head measures between sizes, choose based on the desired ease and your personal crochet tension.
Materials and Notions
- 100 to 130 yd / 90 to 120 m DK weight cotton or cotton-blend yarn
- 4.0 mm US G-6 crochet hook
- Yarn needle
- Small scissors
- Removable stitch marker, optional but useful for marking the beginning of rounds
- Tape measure
Baby Safety: Avoid loose buttons, beads, charms, long ties, and other detachable decorations on baby hats. If you want the small accent seen in the style inspiration, embroider a simple heart or flower securely with yarn instead. Handmade baby items should always be supervised during use and should not be treated as sleepwear or as a medical safety product.
Crochet Abbreviations
- ch: chain
- sl st: slip stitch
- sc: single crochet
- hdc: half double crochet
- hdc blo: half double crochet through the back loop only
- st: stitch
- sts: stitches
- inc: increase, meaning 2 stitches worked into the same stitch
- rep: repeat
- rnd: round
UK terminology note: US single crochet is called double crochet in UK terminology, and US half double crochet is called half treble crochet. The instructions in this pattern use US terminology throughout.
Special Stitch
Half double crochet through the back loop only: Yarn over, insert the hook under the back loop of the indicated stitch, yarn over and pull up a loop, yarn over again and pull through all three loops on the hook. The unused front loop remains visible on the front of the work and forms a soft horizontal ridge.
Construction Notes
The hat is worked from the crown downward. Every round is joined with a slip stitch to the first half double crochet unless otherwise stated. The starting chain 2 does not count as a stitch. When a round begins with “ch 2, hdc,” the first hdc is worked into the same stitch as the joining slip stitch.
For the small size, stop crown increases after reaching 56 stitches. For the large size, complete one additional increase round to reach 64 stitches. After the crown, the stitch count remains unchanged while the hat body grows longer.
Crown: Small Size
- Rnd 1: Make a magic ring. Ch 2, work 8 hdc into the ring. Sl st to first hdc. 8 sts.
- Rnd 2: Ch 2. Work 2 hdc in each stitch around. Sl st to first hdc. 16 sts.
- Rnd 3: Ch 2. Repeat [hdc in next st, 2 hdc in next st] 8 times. Sl st to first hdc. 24 sts.
- Rnd 4: Ch 2. Repeat [hdc in each of next 2 sts, 2 hdc in next st] 8 times. Sl st to first hdc. 32 sts.
- Rnd 5: Ch 2. Repeat [hdc in each of next 3 sts, 2 hdc in next st] 8 times. Sl st to first hdc. 40 sts.
- Rnd 6: Ch 2. Repeat [hdc in each of next 4 sts, 2 hdc in next st] 8 times. Sl st to first hdc. 48 sts.
- Rnd 7: Ch 2. Repeat [hdc in each of next 5 sts, 2 hdc in next st] 8 times. Sl st to first hdc. 56 sts.
Crown: Large Size
Work Rounds 1 through 7 above, then add the following round.
- Rnd 8: Ch 2. Repeat [hdc in each of next 6 sts, 2 hdc in next st] 8 times. Sl st to first hdc. 64 sts.
Hat Body
Switch to working the main body in the back loop only. This creates the ridged texture that gives the hat its softly ribbed appearance.
Small size: Begin after Round 7. Large size: Begin after Round 8.
- Body Rnd 1: Ch 2. Work 1 hdc blo in every stitch around. Sl st to first hdc. 56 sts small or 64 sts large.
- Body Rnd 2: Ch 2. Work 1 hdc blo in every stitch around. Sl st to first hdc. 56 sts small or 64 sts large.
- Body Rnd 3: Ch 2. Work 1 hdc blo in every stitch around. Sl st to first hdc. 56 sts small or 64 sts large.
- Body Rnd 4: Ch 2. Work 1 hdc blo in every stitch around. Sl st to first hdc. 56 sts small or 64 sts large.
- Body Rnd 5: Ch 2. Work 1 hdc blo in every stitch around. Sl st to first hdc. 56 sts small or 64 sts large.
- Body Rnd 6: Ch 2. Work 1 hdc blo in every stitch around. Sl st to first hdc. 56 sts small or 64 sts large.
- Body Rnd 7: Ch 2. Work 1 hdc blo in every stitch around. Sl st to first hdc. 56 sts small or 64 sts large.
- Body Rnd 8: Ch 2. Work 1 hdc blo in every stitch around. Sl st to first hdc. 56 sts small or 64 sts large.
At this stage, the hat should reach approximately 4.75 to 5.5 inches / 12 to 14 cm from the crown center to the lower edge, depending on tension. Do not worry if your measurement differs slightly. Check the fit against the intended head before beginning the brim.
Flared Brim: Small Size
- Brim Rnd 1: Ch 2. Repeat [hdc in each of next 6 sts, 2 hdc in next st] 8 times. Sl st to first hdc. 64 sts.
- Brim Rnd 2: Ch 2. Repeat [hdc in each of next 7 sts, 2 hdc in next st] 8 times. Sl st to first hdc. 72 sts.
- Brim Rnd 3: Ch 1. Work 1 sc in every stitch around. Sl st to first sc. 72 sts.
Flared Brim: Large Size
- Brim Rnd 1: Ch 2. Repeat [hdc in each of next 7 sts, 2 hdc in next st] 8 times. Sl st to first hdc. 72 sts.
- Brim Rnd 2: Ch 2. Repeat [hdc in each of next 8 sts, 2 hdc in next st] 8 times. Sl st to first hdc. 80 sts.
- Brim Rnd 3: Ch 1. Work 1 sc in every stitch around. Sl st to first sc. 80 sts.
Optional Soft Picot Edge
For a slightly more decorative finish, replace the final single crochet round with a simple picot edging. This is optional and may be omitted for a smoother baby-friendly edge.
- After completing the final brim increase round, ch 1.
- Work 1 sc in the next 2 stitches.
- Ch 2, sl st into the front loop of the sc just made to form a small picot.
- Repeat [sc in next 3 sts, ch 2, sl st into the front loop of the last sc] around.
- Sl st to the first sc and fasten off.
If the picot edge begins to ripple more than desired, omit it and use the standard single crochet edging. For baby hats, a smooth edge is often the easiest option for everyday wear.
Finishing the Hat
- Fasten off after the final brim round, leaving a yarn tail approximately 5 to 6 inches / 13 to 15 cm long.
- Thread the tail onto a yarn needle.
- Weave the tail securely through several stitches on the wrong side of the hat.
- Change direction and weave through another short section to anchor the end.
- Trim the remaining yarn close to the fabric without cutting the crochet stitches.
- Weave in the starting tail from the magic ring in the same secure manner.
Optional Embroidered Heart Accent
The style inspiration includes a small decorative accent on the side of the brim. For a baby-safe interpretation, create this detail with embroidery rather than attaching a button.
- Choose a contrasting or slightly darker shade of the same yarn.
- Thread a yarn needle with approximately 18 inches / 46 cm of yarn.
- Mark a point approximately 1 inch / 2.5 cm above the brim edge.
- Use small satin stitches to outline and fill a simple heart measuring approximately 0.5 inch / 1.3 cm across.
- Secure the yarn firmly on the inside of the hat and weave in the ends.
Keep the embroidery flat and firmly secured. Do not add loose beads, plastic charms, metal decorations, or detachable buttons to an infant hat.
Customization and Size Adjustment Guide
The easiest way to customize a baby bucket hat is to adjust the crown circumference before beginning the body. Measure the baby’s head around the widest part, generally just above the eyebrows and around the back of the head. Compare that measurement with the finished circumference rather than relying exclusively on age.
Adjusting the Circumference
Because each increase round adds eight stitches, this pattern grows in predictable increments. To make a smaller or larger crown, continue or stop the eight-stitch increase sequence at the appropriate point. Keep the same increase structure so the crown remains circular.
- 48 stitches create a smaller crown than the small-size 56-stitch version.
- 56 stitches are used for the smaller version in this pattern.
- 64 stitches are used for the larger version.
- 72 stitches can be used for a larger child size if the same gauge is maintained.
Do not automatically add more stitches to the body after the desired crown diameter has been reached. The crown determines circumference, while the body rounds determine depth.
Adjusting Hat Depth
To make the hat deeper, add one or more plain hdc blo rounds before starting the brim. To make it shallower, remove one body round at a time. Because the brim begins after the body, this adjustment does not require changing the brim stitch counts as long as the crown circumference remains the same.
Customization Tip
- For a firmer sunhat brim, use a slightly smaller hook only for the final brim rounds after confirming the fabric is not too stiff.
- For a softer, more drapey hat, choose a cotton blend and maintain the recommended hook size.
- For a more pronounced bucket shape, add one additional brim increase round using the same spacing logic.
Crochet Insight: Why Gauge Matters for Baby Hats
Gauge matters particularly for hats because even a small difference in stitch size can change the circumference by an inch or more. A looser crocheter may reach 56 stitches at a larger circumference than someone who works tightly with the same yarn and hook.
- Make a small swatch of half double crochet before starting if precise sizing is important.
- If your swatch is wider than 4 inches / 10 cm, try a smaller hook.
- If your swatch is narrower than 4 inches / 10 cm, try a larger hook.
For baby accessories, avoid compensating for a very different gauge only by changing stitch counts unless you have checked the crown diameter. Changing the hook size is usually the cleaner adjustment because it keeps the pattern proportions more consistent.
Common Mistakes and Troubleshooting
The Crown Looks Like a Bowl
If the crown is curling upward significantly, the fabric may be too tight or you may have missed increases. Count the stitches at the end of each increase round. The expected counts are 8, 16, 24, 32, 40, 48, 56, and 64 for the large size.
The Crown Has Too Many Waves
A wavy crown usually means there are too many stitches being added or the yarn and hook combination is producing a very loose fabric. Confirm that each increase round contains exactly eight increases. If the stitch count is correct but the crown still ripples, try a slightly smaller hook.
The Hat Is Too Loose
First measure the actual circumference. If the hat is consistently too large, check your gauge. A tighter gauge or smaller hook can reduce the finished circumference. For a major size change, stop the crown at an earlier increase round rather than trying to shrink the completed hat with finishing.
The Brim Does Not Flare
Check that both brim increase rounds were completed. The first brim round increases the stitch count from 56 to 64 in the small size or from 64 to 72 in the large size. The second increase round adds another eight stitches. If the brim is still too flat, add one more increase round before the final edging.
The Back-Loop Texture Looks Uneven
Make sure the hook is inserted under only the back loop of each stitch during the textured body rounds. Keep your tension steady and avoid pulling the working loop unusually tight. Small variations are normal in handmade fabric and often become less noticeable after washing and gentle shaping.
Finishing, Blocking, and Care
Once all ends are woven in, gently shape the hat by hand. Place it over a rounded object close to the intended head size if you want a more even crown, then arrange the brim so it sits naturally. There is no need for aggressive blocking.
For cotton yarn, follow the care instructions recommended for the specific yarn used. In general, gentle washing and air drying help preserve the shape of a handmade baby hat. Avoid excessive heat unless the yarn label specifically allows it.
If the brim becomes slightly uneven after washing, reshape it while damp. Smooth the crown first, then flatten the brim with your fingers. Allow it to dry completely before storing or wearing.
Important: Always check the completed hat for loose yarn ends, unsecured embroidery, stretched stitches, or any detachable decoration before giving it to a baby. Handmade accessories should be checked regularly for wear.
Ways to Personalize Your Crochet Baby Bucket Hat
One of the nicest features of this baby bucket hat crochet pattern is how easily the basic silhouette can be changed without rewriting the entire project. The simplest update is color. A single pastel shade gives a classic look, while a contrasting brim can make the stitch structure stand out.
- Soft neutrals: Try cream, oatmeal, warm beige, or pale gray for a timeless look.
- Pastels: Dusty pink, sage, lavender, powder blue, and butter yellow suit the summer style.
- Two-tone design: Work the crown and body in one color, then change yarn for the brim.
- Textured variation: Alternate regular hdc rounds with hdc blo rounds for a more dimensional surface.
- Embroidered accent: Add a tiny yarn heart, flower, leaf, or initial using securely woven embroidery.
For a particularly simple handmade gift, use one neutral yarn and add a small embroidered heart near the brim. This preserves the clean appearance of the hat while adding a personal touch without introducing a detachable decoration.
At a Glance
- Best yarn choice: Smooth, washable DK weight cotton or cotton blend.
- Skill level: Easy to confident beginner.
- Key technique: Joined half double crochet rounds with back-loop texture.
- Size adjustment: Change the crown increase rounds for circumference and the plain body rounds for depth.
- Finishing: Single crochet brim edge, secure yarn tails, gentle shaping, and optional embroidered decoration.
Final Thoughts on This Crochet Baby Bucket Hat
This baby bucket hat crochet pattern combines a simple circular construction with a softly textured body and an easy flared brim. The result is a charming handmade accessory that can be adapted for different baby sizes, yarn colors, and seasonal styles.
Before beginning, choose a soft washable yarn, check your gauge if accurate sizing is important, and read through the complete pattern so the crown, body, and brim transitions are clear. Measure the intended wearer whenever possible, especially when making the hat as a gift.
Once the basic shape is comfortable, personalize it with color changes, an optional picot edge, or a securely embroidered motif. The clean construction also makes this an approachable free crochet pattern for practicing circular shaping, back-loop texture, and controlled increases while creating a useful handmade baby accessory.
Whether you make it in the dusty pink style of the inspiration or choose your own favorite shade, this easy crochet project offers plenty of room for creativity while keeping the construction straightforward and practical.
Tags
Baby Bucket Hat Crochet Pattern
Free Crochet Pattern
Crochet Baby Hat
Baby Crochet Pattern
Easy Crochet Project
Summer Crochet Hat
Beginner Crochet Pattern
Crochet Gift Idea