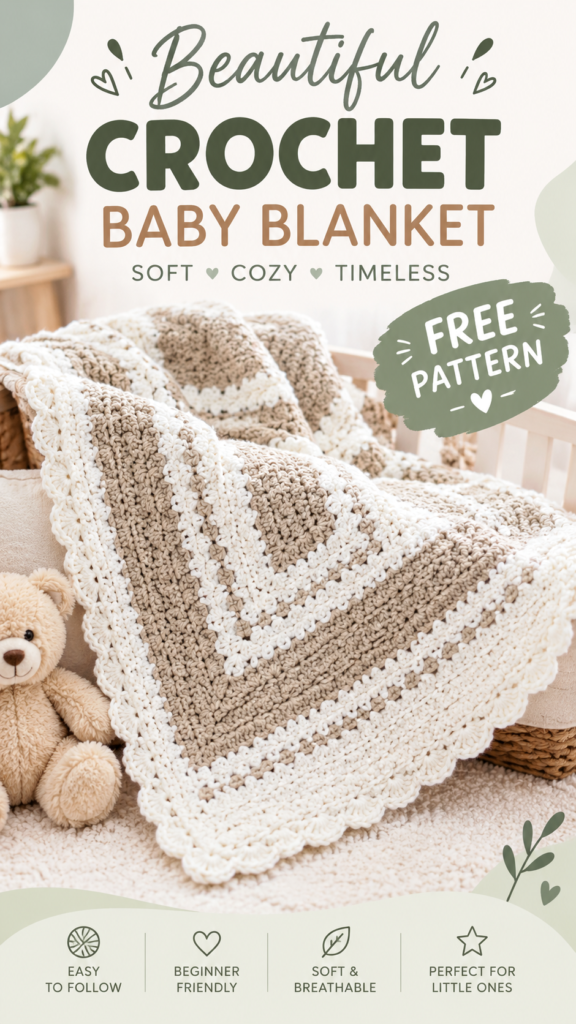
This free crochet baby blanket pattern is designed for a soft, timeless look with the same cozy spirit as a classic neutral nursery blanket. The original interpretation uses a simple textured stitch, warm oatmeal-colored main sections, narrow ivory accent bands, and a delicate scalloped border. The result is a comfortable handmade crochet gift that works beautifully for a baby shower, nursery display, stroller blanket, or supervised cuddle time.
The blanket is worked flat in rows from the bottom edge upward, so there are no separate motifs to join. The main texture comes from alternating single crochet and double crochet, creating a softly pebbled fabric with more visual interest than plain single crochet. Narrow ridged color bands break up the neutral body, while the final shell edging adds a gentle decorative finish.
Key Takeaways
- A cozy textured free crochet baby blanket pattern worked in simple rows.
- Alternating single crochet and double crochet creates the main nubby texture.
- Neutral oatmeal and ivory shades give the blanket a soft, classic nursery look.
- The pattern uses worsted-weight yarn and a 5 mm crochet hook.
- The basic dimensions can be changed easily by adjusting the starting chain and row count.
- A simple shell border creates the softly scalloped finish visible in the inspiration style.
A Cozy Textured Crochet Baby Blanket
The pictured style is especially appealing because it combines understated colors with plenty of texture. Instead of relying on complicated motifs, the blanket gets its character from stitch definition, alternating color bands, and a decorative edge. That makes this free crochet baby blanket pattern approachable for a confident beginner who is comfortable working basic stitches in rows.
The suggested palette is deliberately soft. A warm oatmeal, taupe, or beige can be paired with ivory or cream for a neutral baby blanket, but the same design can easily be made in pastel pink, sage, dusty blue, lavender, or any other nursery-friendly combination.
This is an original pattern inspired by the visible characteristics of the project rather than an attempt to reproduce an unseen original pattern. The measurements, yarn quantities, hook, gauge, stitch arrangement, and finishing method below are practical recommendations for creating a similar handmade crochet blanket.
Project Description and Visual Details
The finished blanket is approximately 40 x 45 inches (102 x 114 cm), including the border. The body is rectangular and worked in horizontal rows. Most of the blanket is made with the main oatmeal shade, while five narrow ivory ridges provide contrast across the width.
The texture is intentionally uncomplicated. Alternating single crochet and double crochet produces small changes in height from stitch to stitch, giving the fabric a pleasantly tactile surface. The ivory bands use single crochet worked through the back loop only, creating raised horizontal ridges that separate the larger textured sections.
A rounded shell-style edging finishes all four sides. The border is designed to soften the straight edges and add the scalloped appearance associated with classic baby blankets. Since the exact stitch construction of a photographed blanket cannot be determined from appearance alone, this pattern chooses a practical construction that produces a similar overall effect while remaining easy to follow.
Likely Construction
- Construction: One rectangular piece worked flat in rows.
- Main texture: Alternating single crochet and double crochet.
- Accent texture: Back-loop-only single crochet.
- Color arrangement: Oatmeal body with narrow ivory horizontal stripes.
- Finishing: Simple single crochet preparation rounds followed by a scalloped shell edge.
- Difficulty: Confident beginner to easy intermediate.
- Best use: Baby shower gifts, nursery blankets, keepsakes, and supervised cuddling.
Crochet Construction and Stitch Analysis
The main stitch is intentionally similar in spirit to a simple lemon-peel texture. Single crochet and double crochet alternate across the row, and the order reverses on the following row. This prevents the taller double crochet stitches from stacking directly above one another and creates a balanced, gently nubby fabric.
Because the stitch pattern is made from basic stitches, it is much easier to maintain than a complicated textured motif. It also has enough visual definition to look attractive in solid colors, making it particularly useful for a neutral baby blanket.
The accent stripes are made with back-loop-only single crochet. Working into the back loop leaves a small ridge on the front of the fabric. Three consecutive rows in ivory create the narrow raised bands without requiring a complicated lace stitch.
Yarn and Hook Recommendations
A washable worsted-weight yarn is a practical choice for this project. A soft acrylic or acrylic-cotton blend is especially convenient for a baby blanket because it is generally easy to wash and maintain. If choosing another fiber, prioritize softness and washability.
A 5 mm US H-8 crochet hook is suggested. The exact hook may need to change slightly depending on your yarn and personal tension. The goal is a flexible fabric rather than a stiff one.
For the pictured neutral effect, use a warm oatmeal or beige as Color A and an ivory or soft cream as Color B. Choose shades with enough contrast to make the stripes visible without making the blanket feel visually busy.
Free Crochet Baby Blanket Pattern
Free Crochet Pattern: Soft Meadow Textured Baby Blanket
Pattern note: This original interpretation uses the construction, colors, texture, and proportions described above. The exact specifications of a photographed blanket are not assumed. Measurements and yarn quantities are approximate recommendations intended to produce a similar cozy look.
| Skill Level | Confident beginner |
| Finished Size | Approximately 40 x 45 in (102 x 114 cm) |
| Yarn | Worsted weight, approximately 1,900 yd (1,737 m) total |
| Color A | Approximately 1,300 yd (1,189 m), oatmeal or beige |
| Color B | Approximately 600 yd (549 m), ivory or cream |
| Hook | 5 mm, US H-8 |
| Gauge | 14 stitches x 13 rows = 4 x 4 in (10 x 10 cm) in the main texture, approximately |
| Terminology | US crochet terminology |
Materials
- Worsted-weight washable yarn in Color A, approximately 1,300 yd (1,189 m).
- Worsted-weight washable yarn in Color B, approximately 600 yd (549 m).
- 5 mm US H-8 crochet hook.
- Yarn needle for weaving in ends.
- Scissors.
- Optional measuring tape and removable stitch markers.
Terminology and Abbreviations
- ch: chain
- sc: single crochet
- dc: double crochet
- st: stitch
- sts: stitches
- BLO: back loop only
- sl st: slip stitch
- rep: repeat
UK equivalents, for reference only: US single crochet is UK double crochet, and US double crochet is UK treble crochet. The instructions below use US terminology exclusively.
Gauge
Work a swatch at least 5 x 5 inches using the main textured stitch. Aim for approximately 14 stitches and 13 rows over 4 inches (10 x 10 cm). Gauge is not critical for a blanket, but it affects the final dimensions and yarn consumption.
If your swatch is wider than the target, change to a smaller hook. If it is narrower, use a larger hook. For a blanket, fabric softness and drape are more important than achieving an absolutely rigid gauge.
Special Stitch and Texture
Alternating Texture Stitch: Work single crochet and double crochet alternately across the row. On the following row, place a single crochet into the double crochet from the previous row and a double crochet into the single crochet from the previous row. This reversal keeps the textured pattern consistent.
Back-Loop-Only Ridge: Insert the hook through only the back loop of each stitch when making a single crochet. This leaves the unused front loop visible on the front of the work and creates a raised horizontal ridge.
Starting the Blanket
With Color A, chain 135. The turning chain does not count as a stitch. The first row therefore contains 134 stitches.
Rows 1 to 10: Color A, Textured Body
Row 1: Sc in 2nd ch from hook, dc in next ch. Continue alternating sc and dc across the foundation chain. You will finish the row with a dc. Stitch count: 134 sts.
Row 2: Ch 1, turn. The ch-1 does not count as a stitch. Sc in the first stitch, dc in the next stitch, then continue alternating sc and dc across. Because the previous row ended with dc, begin the new row with sc and finish with dc. Stitch count: 134 sts.
Rows 3 to 10: Repeat Row 2. At the end of Row 10, do not fasten off. The working loop can remain on the hook while changing colors.
Rows 11 to 13: Color B, Raised Ridge
Change to Color B. For a clean color change, work the final yarn-over of the last stitch of Row 10 with Color B.
Row 11: Ch 1, turn. Sc BLO across all 134 stitches. Stitch count: 134 sts.
Row 12: Ch 1, turn. Sc BLO in each stitch across. Stitch count: 134 sts.
Row 13: Ch 1, turn. Sc BLO in each stitch across. Stitch count: 134 sts.
Change back to Color A at the end of Row 13 by completing the final yarn-over with Color A.
Rows 14 to 36: Color A, Textured Body
Row 14: Ch 1, turn. Sc in the first stitch, dc in the next stitch. Continue alternating sc and dc across. Stitch count: 134 sts.
Rows 15 to 36: Ch 1, turn. Continue the alternating texture stitch, working sc into the dc of the previous row and dc into the sc of the previous row. Keep the sequence consistent from edge to edge. Stitch count: 134 sts on every row.
Rows 37 to 39: Color B, Raised Ridge
Change to Color B.
Rows 37 to 39: Ch 1, turn. Sc BLO in every stitch across. Stitch count: 134 sts per row.
Change back to Color A at the end of Row 39.
Rows 40 to 62: Color A, Textured Body
Rows 40 to 62: Ch 1, turn. Work the alternating texture stitch across the row, maintaining the established sequence of sc and dc. Stitch count: 134 sts per row.
Rows 63 to 65: Color B, Raised Ridge
Change to Color B.
Rows 63 to 65: Ch 1, turn. Sc BLO across. Stitch count: 134 sts per row.
Change back to Color A at the end of Row 65.
Rows 66 to 88: Color A, Textured Body
Rows 66 to 88: Ch 1, turn. Work alternating sc and dc across, maintaining the established texture. Stitch count: 134 sts per row.
Rows 89 to 91: Color B, Raised Ridge
Change to Color B.
Rows 89 to 91: Ch 1, turn. Sc BLO in every stitch across. Stitch count: 134 sts per row.
Change back to Color A at the end of Row 91.
Rows 92 to 114: Color A, Textured Body
Rows 92 to 114: Ch 1, turn. Work the alternating sc and dc texture across. Stitch count: 134 sts per row.
Rows 115 to 117: Color B, Raised Ridge
Change to Color B.
Rows 115 to 117: Ch 1, turn. Sc BLO across all stitches. Stitch count: 134 sts per row.
Change back to Color A at the end of Row 117.
Rows 118 to 140: Color A, Final Textured Section
Rows 118 to 140: Ch 1, turn. Continue the alternating sc and dc texture stitch across. Maintain 134 stitches in every row. After Row 140, fasten off Color A, leaving a yarn tail of approximately 6 inches (15 cm) for weaving in.
The five ivory bands appear at Rows 11 to 13, 37 to 39, 63 to 65, 89 to 91, and 115 to 117. The oatmeal sections between them create the broad neutral stripes seen in the overall design.
Border Round 1: Even Foundation Edge
For a clean border, rejoin Color B at a top corner. This round prepares the straight edges and gives the final scallops a stable foundation.
Work 3 sc in the first corner stitch. Sc across the remaining top edge. At the opposite corner, work 3 sc in the final corner stitch. Along the side edge, work 2 sc around each row-end for all 140 rows. At the bottom corner, work 3 sc in the corner stitch, sc across the bottom edge, then work 3 sc in the final corner stitch. Continue up the remaining side, working 2 sc around each of the 140 row-ends. Join with a sl st to the first sc.
This round intentionally uses two single crochets per row-end along the long sides. If your personal row height differs substantially from the suggested gauge, you may need to distribute the side stitches evenly so the blanket lies flat without rippling or pulling.
Border Round 2: Stabilizing Single Crochet
Ch 1. Sc in each stitch around. At each corner, work 3 sc into the center stitch of the previous round’s corner group. Join with a sl st to the first sc.
Fasten off Color B if you want the scallops to remain ivory. For a softer monochromatic border, you can instead use Color A for this round and Color B only for the final shell round.
Border Round 3: Scalloped Shell Edge
Rejoin Color B at any corner. The shell pattern is 5 dc in the designated shell stitch, skip the next 4 stitches. Continue this rhythm around each straight section. At each corner, work 5 dc into the center corner stitch to create a rounded corner shell, then continue the skip-four rhythm along the next edge.
Because side-edge stitch counts can vary slightly with individual tension, distribute the skipped stitches evenly if the final shell does not land perfectly at the corner. Do not force the fabric. A slightly adjusted skip near a corner will produce a flatter, more attractive edge than pulling the scallop into place.
After the final shell, join to the starting point with a sl st. Fasten off and weave in all remaining ends securely through the wrong side of the blanket.
Finishing the Blanket
Inspect the entire blanket for missed stitches, loose color-change tails, or uneven border sections. Weave yarn tails back and forth through several stitches on the wrong side before trimming them close to the fabric.
For the neatest appearance, avoid leaving long yarn tails near the outer edge. The border should remain flexible, especially around the corners, so the scallops can naturally curve outward.
Customization and Size Adjustments
This free crochet baby blanket pattern is easy to resize because the body is worked in simple rows. The finished width is controlled by the starting chain, while the length is controlled by the number of rows.
Changing the Width
For the main textured stitch, begin with an odd-numbered foundation chain so the first working row contains an even number of stitches. This allows the alternating sc and dc sequence to begin with sc and finish with dc.
For example, a foundation chain of 125 creates 124 body stitches, while a chain of 145 creates 144 body stitches. Always make a small swatch before committing to a larger blanket because your yarn and tension determine the actual finished width.
Changing the Length
Simply add or remove complete row groups. Keeping each ivory stripe at three rows makes it easier to preserve the visual balance. A practical sequence is to work a broad Color A section, three Color B rows, another broad Color A section, and repeat.
For a smaller stroller blanket, reduce the number of main-color rows between stripes. For a larger toddler blanket, add more main-color rows while keeping the stripe widths consistent.
Color Ideas
- Oatmeal and ivory for a warm neutral nursery style.
- Soft sage and cream for a natural botanical palette.
- Dusty blue and ivory for a classic baby boy color combination.
- Blush and cream for a gentle pastel version.
- Gray and white for a modern minimalist blanket.
- Three shades of the same color for a subtle tonal effect.
Customization Tip: If you want the blanket to resemble the soft neutral styling most closely, keep the contrast between Colors A and B moderate. High-contrast colors will make the horizontal stripes much more prominent.
Common Mistakes and Troubleshooting
The Edges Are Sloping
The most common cause is accidentally skipping a stitch or adding an extra stitch at the end of a textured row. Count the stitches before turning. Every main-body row should contain 134 stitches.
The Blanket Feels Too Stiff
Try a larger hook or relax your tension. Dense crochet fabric can become firm when worked tightly, particularly with worsted-weight yarn. The finished blanket should have enough flexibility to fold easily.
The Border Ruffles
Too many stitches along the edge can cause ruffling. If the border is wavy before the shell round begins, check the number of stitches placed around the side edges. Aim for an even distribution rather than squeezing extra stitches into a short space.
The Border Pulls Inward
A tight border can draw the blanket edges inward. Use a relaxed tension and avoid pulling the stitches around the corners. If necessary, increase the hook size by 0.5 mm for the border.
The Color Change Looks Uneven
Make each color change on the final yarn-over of the last stitch in the old color. Carrying the new color into the final yarn-over keeps the transition cleaner and prevents a small contrasting loop from appearing along the edge.
Finishing, Blocking, and Care
Once the blanket is complete, gently wash it according to the yarn manufacturer’s care instructions. Avoid aggressive agitation, especially if using a fiber that can stretch or felt.
For blocking, lay the damp blanket on a clean, dry surface and gently smooth it into a rectangle. Pay particular attention to the four corners and the scalloped edge. Use rust-resistant pins only if the yarn and surface allow them, and let the blanket dry completely before removing the pins.
Blocking is not intended to dramatically change the dimensions. It is mainly useful for evening out the rows, straightening the sides, and helping the scalloped border settle into a consistent shape.
For baby use, choose soft washable yarn and secure every yarn tail carefully. Avoid buttons, beads, charms, detachable appliques, long loose ties, or other small decorations. Handmade blankets should not be assumed to be medically or sleep safe for infants. Follow appropriate infant-sleep and supervision guidance, and use the blanket only in situations where an adult can supervise the baby.
At a Glance
- Best yarn: Soft, washable worsted-weight acrylic or acrylic-cotton blend.
- Skill level: Confident beginner to easy intermediate.
- Key technique: Alternating single crochet and double crochet with back-loop-only accent stripes.
- Approximate size: 40 x 45 inches (102 x 114 cm).
- Finishing: Two stabilizing border rounds plus a five-double-crochet scalloped edge.
A Timeless Crochet Gift for a Little One
This free crochet baby blanket pattern is a practical project when you want something handmade, textured, and classic without relying on complicated stitch combinations. The alternating texture gives the fabric personality, while the ivory ridges and scalloped edge add just enough decoration to make the blanket feel special.
Before beginning, choose your yarn, make a small gauge swatch, and read through the complete pattern so the color changes and stripe sequence are familiar. If you want a more personalized result, adjust the width, length, or color palette while keeping the stitch counts consistent.
Whether you make it in warm neutrals for a minimalist nursery or choose soft pastels for a more colorful baby gift, this free crochet baby blanket pattern offers plenty of room for personalization while keeping the construction straightforward and enjoyable.
Tags
Crochet Baby Blanket
Free Crochet Pattern
Baby Blanket Pattern
Easy Crochet Project
Textured Crochet
Crochet Gift Idea
Neutral Baby Blanket
Beginner Crochet Pattern