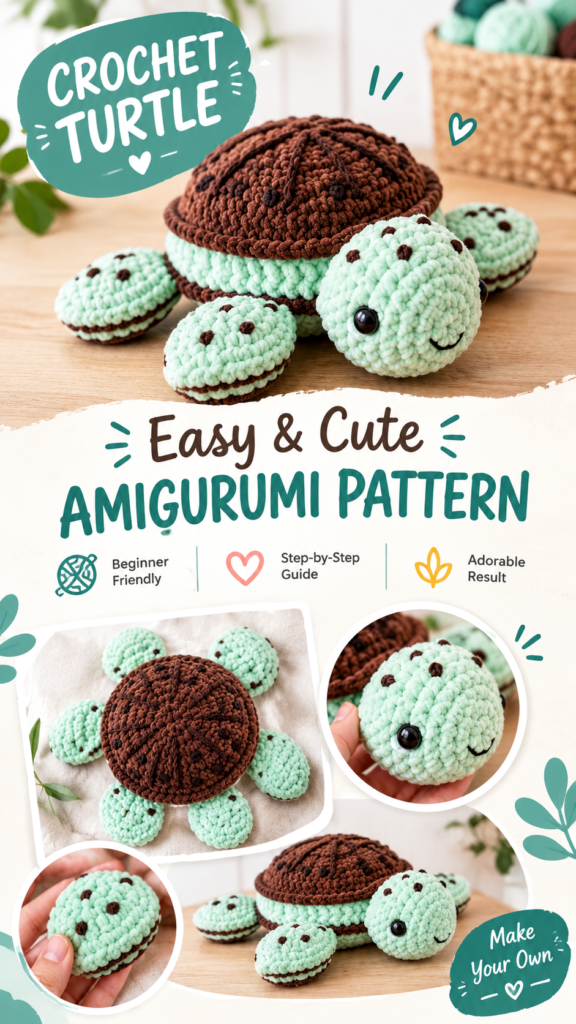
Bring a little handmade charm to your crochet collection with this baby turtle crochet pattern, an original amigurumi-inspired design featuring a soft mint-green body, rounded flippers, a friendly head, and a textured chocolate-brown shell. The finished turtle has the playful proportions of the pictured style while using a practical construction that can be followed by confident beginners who are comfortable with basic shaping and sewing.
This baby turtle crochet pattern uses separate crocheted components so the shell can have a rounded, dimensional profile while the underside stays soft and slightly flatter. The shell is built in continuous rounds, the belly is worked as an oval, and the flippers are made as padded two-layer pieces. Surface slip stitches create the shell’s raised radial sections, while small embroidered brown dots add the distinctive speckled detail.
Key Takeaways
- A cute baby turtle crochet pattern made from separate shell, belly, head, and flipper pieces.
- Continuous single crochet rounds provide a firm amigurumi-style fabric.
- Suggested bulky or chunky yarn gives the plush, rounded appearance shown in the design.
- The shell can be personalized with different browns, greens, or embroidered details.
- The pattern is approximately 10 inches long by 7 inches wide when made with the suggested materials.
- Embroidered facial features make the project suitable for makers who want to avoid detachable embellishments.
Meet This Cute Baby Turtle Crochet Project
This handmade turtle is designed as a soft decorative plush, cuddly crochet animal, or thoughtful crochet gift idea. Its body combines a pale mint shade with a rich chocolate-brown shell, creating a playful contrast that resembles a sweet illustrated turtle. The rounded head sits toward the front of the shell, while four broad flippers extend from underneath.
The shell is the main visual feature. Rather than leaving it completely flat, the original interpretation uses a gently domed crocheted piece. Raised lines running from the center toward the outer edge imitate the segmented texture visible on the shell. The mint-colored body forms a narrow band beneath the brown shell, helping the finished turtle keep a layered appearance.
The finished piece is intentionally plush and rounded rather than anatomically realistic. That makes it especially suitable for a nursery shelf, children’s room decoration, handmade gift basket, crochet animal collection, or simply a cheerful desk companion.
What Makes the Design Work?
The proportions are built around three visual ideas: a large domed shell, a compact rounded head, and chunky paddle-shaped flippers. The shell remains the widest component, while the head is positioned low enough to give the turtle a friendly, slightly oversized expression.
Single crochet is used throughout because it creates a dense fabric that supports stuffing and keeps the small shapes from becoming too loose. The shell’s raised lines are added afterward rather than relying on a complicated stitch pattern. This makes the basic construction easier to follow while still giving the finished turtle plenty of surface texture.
Crochet Construction and Stitch Analysis
The most practical construction for this design is a combination of continuous amigurumi rounds and flat crocheted pieces. The head and shell are worked from the center outward in continuous rounds. The belly is crocheted as an oval, while each flipper consists of two matching flat pieces joined around the edge with a small amount of stuffing between them.
The recommended yarn is a bulky or chunky, soft, washable yarn. A chenille-style yarn can create the especially plush appearance associated with the pictured turtle, although a smooth bulky acrylic or cotton-blend yarn will make the stitch definition easier to see. Because yarn thickness varies considerably between brands, the finished measurements should be treated as approximate.
The suggested hook is a 5.0 mm US H-8 hook. This is slightly smaller than some manufacturers recommend for bulky yarn, which helps create the dense fabric needed for stuffing. If your stitches are loose, go down to a 4.5 mm hook. If the yarn is difficult to work with, a 5.5 mm hook may be more comfortable.
The shell texture is created with surface slip stitches. These lines are decorative and do not change the underlying stitch count. Six evenly spaced lines are enough to create a convincing segmented-shell effect without making the surface overly busy.
Free Crochet Pattern: Baby Turtle Amigurumi
Free Crochet Pattern
Pattern name: Sweet Shell Baby Turtle
This original interpretation uses simple amigurumi shaping, a domed shell, padded flippers, embroidered details, and surface crochet to create a similar visual character to the pictured turtle. The exact original photographed construction is not assumed.
| Skill Level | Advanced beginner to intermediate |
| Finished Size | Approximately 10 x 7 x 4 inches / 25.5 x 18 x 10 cm |
| Yarn | Bulky/chunky yarn, approximately 130 yards / 119 meters total |
| Hook | 5.0 mm US H-8 crochet hook |
| Gauge | Approximately 15 sc x 16 rounds = 4 x 4 inches / 10 x 10 cm, worked firmly in continuous rounds |
| Terminology | US crochet terminology |
Materials
- Approximately 85 yards / 78 meters mint-green bulky yarn for the body, head, and flippers.
- Approximately 45 yards / 41 meters chocolate-brown bulky yarn for the shell.
- A small amount of dark-brown yarn for spots and facial embroidery.
- 5.0 mm US H-8 crochet hook.
- Polyester fiberfill stuffing.
- Yarn needle with a blunt tip.
- Locking stitch marker or removable stitch marker.
- Optional 12 mm safety eyes for older-child or decorative use.
Crochet Abbreviations
- ch: chain
- sc: single crochet
- sl st: slip stitch
- inc: single crochet increase, 2 sc in the same stitch
- dec: single crochet decrease, worked as an invisible decrease when possible
- st/sts: stitch/stitches
- FO: fasten off
- BLO: back loop only
UK equivalent note: US single crochet is called double crochet in UK terminology. The instructions below use US terminology only.
Special Stitch: Surface Slip Stitch
Insert the hook from the front through the fabric along the chosen path, yarn over with the contrast yarn, pull the loop through to the front, then pull it directly through the loop already on the hook. Continue along the marked line. This creates a raised decorative ridge on the surface without changing the stitch count.
Construction Notes
All circular pieces are worked in continuous rounds unless specifically stated otherwise. Do not join the rounds with a slip stitch. Place a stitch marker in the first stitch of every round and move it upward as you work.
The finished turtle consists of one mint belly, one mint head, four padded flippers, one brown shell top, and one mint side band. The shell top is attached to the side band, and the side band is then sewn to the belly. The head and flippers are attached afterward.
Part 1: Mint Belly
Use mint-green yarn. The belly is an oval foundation that provides the underside of the turtle.
- Round 1: Ch 17. Sc in the 2nd ch from hook and in the next 14 ch, 3 sc in the last ch. Working along the opposite side of the foundation chain, sc in the next 14 ch, 2 sc in the final ch. 36 sts.
- Round 2: Inc in the first st, sc in the next 14 sts, 3 inc, sc in the next 14 sts, 2 inc. 40 sts.
- Round 3: Inc, sc, inc, sc in the next 14 sts, 3 inc, sc in the next 14 sts, inc, sc, inc. 48 sts.
- Round 4: Sc in each st around. 48 sts.
- Round 5: Sc in each st around. 48 sts.
FO and weave in the starting tail. Leave the final tail long enough to help with assembly if desired.
Part 2: Brown Domed Shell
Use chocolate-brown yarn. Work continuously and place the marker in the first stitch of each round.
- Round 1: Make a magic ring and work 6 sc into the ring. 6 sts.
- Round 2: Inc in each st around. 12 sts.
- Round 3: (Sc in next st, inc) 6 times. 18 sts.
- Round 4: (Sc in next 2 sts, inc) 6 times. 24 sts.
- Round 5: (Sc in next 3 sts, inc) 6 times. 30 sts.
- Round 6: (Sc in next 4 sts, inc) 6 times. 36 sts.
- Round 7: (Sc in next 5 sts, inc) 6 times. 42 sts.
- Round 8: (Sc in next 6 sts, inc) 6 times. 48 sts.
- Round 9: Sc in each st around. 48 sts.
- Round 10: Sc in each st around. 48 sts.
- Round 11: Sc in each st around. 48 sts.
- Round 12: (Sc in next 6 sts, dec) 6 times. 42 sts.
- Round 13: (Sc in next 5 sts, dec) 6 times. 36 sts.
- Round 14: (Sc in next 4 sts, dec) 6 times. 30 sts.
- Round 15: (Sc in next 3 sts, dec) 6 times. 24 sts.
- Round 16: (Sc in next 2 sts, dec) 6 times. 18 sts.
- Round 17: (Sc in next st, dec) 6 times. 12 sts.
- Round 18: Dec 6 times. 6 sts.
FO, leaving a long tail. Do not overstuff the shell. The shape should remain gently rounded rather than becoming a firm ball.
Part 3: Mint Shell Side Band
The side band creates the mint-colored layer visible between the brown shell and the underside.
- Round 1: Ch 49 and join with a sl st to the first chain, taking care not to twist the chain. Ch 1. Sc in each ch around. Join with a sl st to the first sc. 48 sts.
- Round 2: Ch 1. Sc in each st around. Join with a sl st to the first sc. 48 sts.
- Round 3: Ch 1. Sc in each st around. Join with a sl st to the first sc. 48 sts.
- Round 4: Ch 1. Sc in each st around. Join with a sl st to the first sc. 48 sts.
FO and weave in the ends. The band should measure approximately 2 inches / 5 cm high. If your yarn is particularly thick, three rounds may be sufficient.
Part 4: Rounded Head
Use mint-green yarn. Work in continuous rounds. Stuff progressively rather than waiting until the final rounds.
- Round 1: Magic ring, 6 sc. 6 sts.
- Round 2: Inc around. 12 sts.
- Round 3: (Sc, inc) 6 times. 18 sts.
- Round 4: (Sc in next 2 sts, inc) 6 times. 24 sts.
- Round 5: (Sc in next 3 sts, inc) 6 times. 30 sts.
- Round 6: (Sc in next 4 sts, inc) 6 times. 36 sts.
- Round 7: Sc around. 36 sts.
- Round 8: Sc around. 36 sts.
- Round 9: Sc around. 36 sts.
- Round 10: (Sc in next 4 sts, dec) 6 times. 30 sts.
- Round 11: (Sc in next 3 sts, dec) 6 times. 24 sts.
- Round 12: (Sc in next 2 sts, dec) 6 times. 18 sts.
Stuff the head firmly but gently, concentrating stuffing toward the lower half so the face stays rounded.
- Round 13: (Sc, dec) 6 times. 12 sts.
- Round 14: Dec 6 times. 6 sts.
FO and close the remaining opening with a yarn needle. Pull the yarn through the front loops of the six remaining stitches, tighten, and weave the tail securely inside the head.
Part 5: Padded Flippers
Make 4 flippers. Each flipper is made from two identical flat pieces. This construction produces the rounded, padded appearance while keeping the shaping simple and symmetrical.
For each layer, use mint-green yarn.
- Row 1: Ch 7. Sc in the 2nd ch from hook and across. 6 sts.
- Row 2: Ch 1, turn. Inc in the first st, sc in the next 4 sts, inc in the last st. 8 sts.
- Row 3: Ch 1, turn. Sc across. 8 sts.
- Row 4: Ch 1, turn. Inc in the first st, sc in the next 6 sts, inc in the last st. 10 sts.
- Row 5: Ch 1, turn. Sc across. 10 sts.
- Row 6: Ch 1, turn. Dec, sc in the next 6 sts, dec. 8 sts.
- Row 7: Ch 1, turn. Sc across. 8 sts.
- Row 8: Ch 1, turn. Dec, sc in the next 4 sts, dec. 6 sts.
- Row 9: Ch 1, turn. Sc across. 6 sts.
- Row 10: Ch 1, turn. Dec, sc in the next 2 sts, dec. 4 sts.
- Row 11: Ch 1, turn. Sc across. 4 sts.
FO the first layer and weave in its short starting tail. Make a second identical layer but do not weave in the final working tail.
Place the two pieces together with their edges aligned. Using the working yarn, sc around the outer perimeter, working through both layers. At the wide sides, place approximately one sc into each row end. At corners, add an extra sc if needed to prevent puckering.
Before completely closing the flipper, add a small amount of fiberfill. Keep the stuffing light so the flipper remains flexible. Finish the final stitches, sl st to the first joining sc, FO, and weave in the tail.
Repeat until you have four matching flippers.
Part 6: Shell Texture
Use a darker brown yarn or the same brown yarn held slightly tighter. The shell already has its dome from the shaping rounds, so the surface ridges are purely decorative.
Mark the center of the shell and visually divide the outer edge into six approximately equal sections. Beginning near the center, work a surface slip-stitch line toward the outer edge. Repeat to create six radial lines.
For a more segmented appearance, add a second short surface-slip line between selected long ridges, stopping approximately one-third of the way from the center. Keep the lines slightly irregular rather than perfectly geometric for a soft handmade look.
Construction Note
- Do not pull the surface slip stitches tightly.
- Let each line follow the curve of the shell.
- Leave the central area slightly raised for a rounded shell effect.
Part 7: Assemble the Shell
First insert the mint side band inside the lower edge of the brown shell. Align the top edge of the side band with the outer edge of the shell around the 48-stitch circumference. Use the long brown shell tail to sew the two pieces together with small whip stitches.
Do not sew the bottom edge of the mint band closed yet. The opening allows you to position and attach the belly neatly.
Next, place the mint belly against the lower edge of the side band. Align the long axis of the belly with the long axis of the shell. Pin or clip the pieces together at the front, back, and both sides before sewing.
Using mint yarn, sew the belly to the lower edge of the side band with small whip stitches. Work around the entire circumference and keep the stitches close to the edges. Secure the yarn firmly and weave the end inside the body.
The result should be a shallow, rounded shell with a mint-colored side layer and a mint underside.
Part 8: Attach the Head
Place the head at the front of the turtle, centered between the front flippers. The head should overlap the front edge of the shell slightly. A position approximately 1 inch / 2.5 cm below the front edge of the shell gives the turtle a friendly forward-facing posture.
Use mint yarn and a yarn needle to sew the lower portion of the head securely to the belly and the front edge of the shell band. Work through several layers of stitches rather than attaching only to a single loose strand.
After sewing, gently move the head from side to side. If it feels unstable, add a second line of stitches farther underneath the head.
Part 9: Attach the Four Flippers
Position two flippers toward the front and two toward the rear. The front pair should sit slightly behind the head, while the rear pair should begin approximately one-third of the way forward from the back edge.
Angle each flipper outward rather than pointing all four directly forward. This gives the finished turtle a natural crawling pose similar to the broad paddle shapes visible in the design.
Sew each flipper securely to the mint belly and, where possible, catch a few stitches along the lower edge of the mint shell band. Use several passes through the attachment area so the pieces do not rotate easily.
Part 10: Face and Decorative Details
For the eyes, position them approximately level with the middle of the head. If using safety eyes, insert them before closing and stuffing the head completely so the washers can be secured from inside.
For a baby-safe or toddler-accessible version, do not use plastic safety eyes. Instead, embroider the eyes securely with black or very dark brown yarn. This also gives the turtle a softer handmade expression.
Embroider a small curved smile beneath the eyes using dark brown yarn. Keep the line short and gently curved upward at both ends.
Add several small dark-brown dots to the top of the head and the four flippers. These can be made with tiny embroidered French knots or short stitches. For younger children, embroidered dots are preferable to beads or other loose decorations.
Keep every embroidered detail securely anchored and trim internal yarn tails carefully.
Customization and Size Adjustments
This baby turtle crochet pattern is easy to personalize because the main pieces are based on simple increases and decreases. The safest way to change the overall size is to keep the proportions of the shell, belly, head, and flippers similar rather than enlarging only one component.
Make a Smaller Turtle
Use worsted-weight yarn with a 4.0 mm US G-6 hook and make the shell to 42 stitches instead of 48. Stop the increase section after Round 7, work two even rounds, then decrease in the reverse sequence. Make the head to 30 stitches at its widest point and reduce the flipper dimensions by one increase section.
Always check the resulting fabric. A smaller hook may be necessary if the stitches become loose.
Make a Larger Turtle
For a larger plush turtle, use a larger yarn category and increase the shell beyond 48 stitches in multiples of six. For example, after Round 8, work an additional increase round of (sc in next 7 sts, inc) 6 times to reach 54 stitches. Add one or two even rounds before beginning the decreases.
The belly should be enlarged proportionally so it continues to fit the shell circumference. The head can be increased to 42 stitches at its widest point, following the same six-section increase structure used in the original head.
Color Ideas
- Swap mint for sage green and chocolate brown for warm caramel.
- Use forest green with a dark olive shell for a more natural turtle.
- Try pale blue with a cocoa shell for a soft nursery palette.
- Use two shades of brown for stronger shell ridges.
- Replace embroidered shell spots with subtle stitched accents for a minimalist look.
For the closest visual balance to the pictured style, keep the body noticeably lighter than the shell. A high-contrast shell also makes the radial surface texture easier to see.
Common Mistakes and Troubleshooting
The Shell Looks Flat
If the shell does not develop enough height, check your stuffing first. The dome should be gently supported from inside without being packed hard. If the yarn is much thinner than the suggested bulky yarn, the shell may also look smaller and flatter. Consider moving up to a thicker yarn or adding an extra even round before beginning the decreases.
The Shell Has Ripples
Rippling usually means there are too many stitches for the circumference or the increases have been worked incorrectly. Count the stitches after every increase round. The shell should progress through 6, 12, 18, 24, 30, 36, 42, and 48 stitches.
The Head Looks Too Small
Different yarns can produce very different proportions. If the shell is correct but the head feels undersized, remake the head with one additional increase round, taking it from 36 to 42 stitches. Add one or two even rounds before starting the decrease section.
The Flippers Curl
Make sure the turning chains are not being pulled tightly. A tight turning chain can shorten the row edge and cause the paddle shape to curl. Blocking the finished pieces lightly with your fingers before assembly can also help.
The Shell Texture Is Uneven
Surface crochet naturally varies with tension. If one ridge is noticeably tighter than another, gently loosen the loops with the hook before moving to the next section. The lines should sit on top of the shell rather than pulling the fabric inward.
Finishing, Shaping, and Care
Once all components have been attached, inspect every seam. The shell should sit securely over the mint body without large gaps. Check the head attachment, flipper seams, and embroidered details before trimming any remaining yarn tails.
Use a blunt yarn needle to weave each end through several stitches on the inside of the project. For bulky yarn, weaving a tail in one direction and then back through neighboring stitches gives a more secure finish.
Light shaping can be done by hand. Gently press the shell into a rounded dome and arrange the flippers so they angle naturally outward. Avoid aggressive wet blocking because excessive moisture or heat can change the surface of some bulky and chenille yarns.
For washable yarn, follow the care instructions appropriate for that yarn. Hand washing or a gentle wash cycle in a protective bag is generally preferable for a stuffed crochet toy, followed by careful reshaping and complete air drying.
Safety Reminder: Plastic safety eyes may not be appropriate for babies or children under three because they can become a choking hazard if they detach. For a child-accessible version, embroider the eyes, smile, and decorative dots securely with yarn. Avoid buttons, beads, loose ribbons, and other detachable decorations.
Never describe a handmade crochet toy as sleep safe or medically safe. If the turtle is intended for a young child, inspect the seams and embroidered details regularly and discontinue use if any component becomes loose or damaged.
At a Glance
- Best yarn: Soft bulky or chunky yarn with enough structure for dense single crochet.
- Skill level: Advanced beginner to intermediate, especially for amigurumi assembly and surface crochet.
- Key technique: Continuous single crochet rounds combined with simple increases, decreases, and surface slip stitches.
- Size adjustment: Change yarn and hook size or add six-stitch increase sections while maintaining the same proportions.
- Finishing: Stuff gently, sew the shell and body securely, position four flippers, then embroider the facial and spot details.
Why You Will Love This Baby Turtle Crochet Pattern
This baby turtle crochet pattern combines simple amigurumi techniques with enough texture and shaping to make the finished project feel special. The separate pieces make it easier to control the shape, while the domed shell gives the turtle its recognizable character.
Before beginning, choose your yarn carefully, check the suggested gauge if you want a predictable finished size, and read through the complete pattern so you understand how the pieces fit together. Because bulky yarns differ in thickness, your turtle may turn out slightly larger or smaller than the approximate measurements.
Most importantly, personalize the finished crochet turtle. Change the shell color, add embroidered spots, adjust the flipper angles, or use a different facial expression. A small change in yarn color can completely transform the personality of this handmade crochet animal.
With its rounded mint body, textured brown shell, soft flippers, and friendly face, this baby turtle crochet pattern makes a charming crochet gift idea and a fun project for anyone who enjoys cute amigurumi animals. Gather your yarn, check your hook tension, read the instructions once from beginning to end, and then enjoy building your own little turtle one piece at a time.
Tags
Baby Turtle Crochet
Free Crochet Pattern
Turtle Amigurumi
Crochet Turtle
Amigurumi Crochet
Easy Crochet Project
Crochet Animal
Handmade Crochet