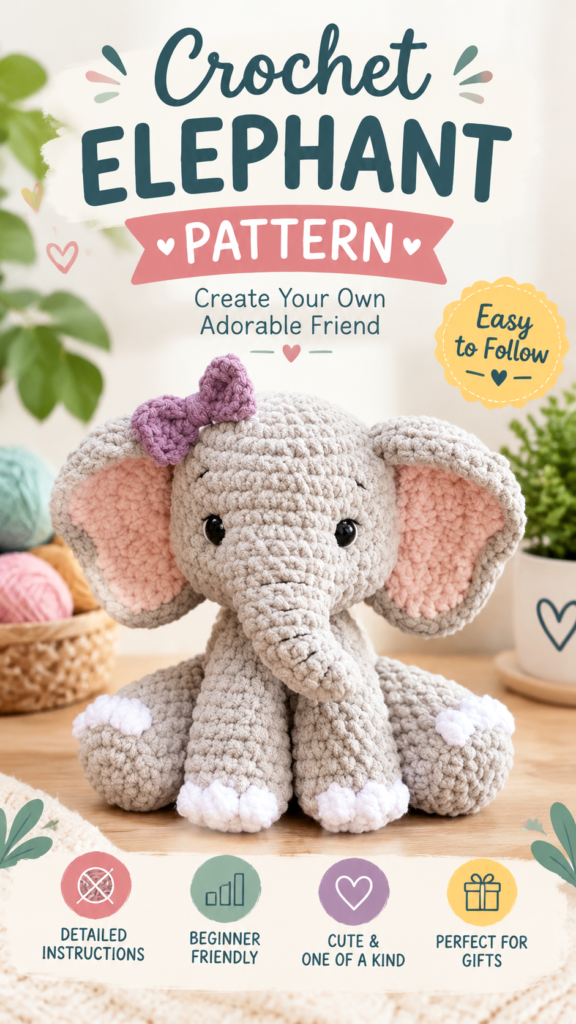
Create a sweet handmade friend with this baby elephant crochet pattern inspired by a soft plush amigurumi style. This adorable crochet elephant features a rounded head, oversized floppy ears, a gently curved trunk, tiny embroidered facial details, and a cuddly textured body made with plush yarn. It is designed as a charming nursery decoration, keepsake toy, or thoughtful crochet gift idea.
The original interpretation of this project uses a classic amigurumi construction method with separate crocheted pieces joined together after stuffing. The suggested design uses soft chenille-style yarn, single crochet stitches, and simple shaping techniques to create a beginner-friendly stuffed elephant with a cozy handmade finish.
Key Takeaways
- Project type: Soft amigurumi baby elephant plush toy.
- Skill level: Confident beginner with basic shaping skills.
- Main technique: Continuous rounds with single crochet stitches.
- Recommended yarn: Soft bulky or super bulky plush yarn.
- Finished size: Approximately 9 inches (23 cm) tall.
- Customization options include colors, ears, and embroidered details.
Adorable Baby Elephant Crochet Project Description
This baby elephant crochet pattern creates a lovable stuffed animal with a soft, rounded silhouette. The elephant is designed with a large head, wide ears, short legs, a small tail, and a curved trunk that gives it a playful expression.
The visible texture of this style of crochet comes from dense single crochet stitches worked tightly with plush yarn. The fabric creates a smooth, fuzzy surface that works beautifully for amigurumi animals because it hides stuffing and gives the finished toy a squishy appearance.
This crochet elephant is suitable for handmade gifts, baby room decorations, shelf displays, and animal-themed collections. For baby-safe versions, embroidered eyes and facial details are recommended instead of removable plastic pieces.
Important: Safety should always come first when creating toys for babies and young children. Plastic safety eyes may not be appropriate for children under three. Use securely embroidered facial features whenever the finished item may be handled by small children.
Crochet Construction and Stitch Analysis
This elephant is constructed using an amigurumi technique where each body section is crocheted separately in continuous rounds. The body, head, trunk, ears, legs, arms, and tail are created individually, lightly stuffed, and assembled with careful placement.
- Body construction: A rounded oval shape formed with increases and decreases.
- Head design: A larger sphere shape with gradual shaping for a cute plush appearance.
- Ears: Flat circular pieces folded slightly to create natural elephant ear curves.
- Trunk: A narrow tube shape with gentle downward shaping.
- Stitch texture: Dense single crochet stitches create a compact plush fabric.
The recommended yarn is a soft chenille-style bulky or super bulky yarn. A smaller hook than normally used for the yarn weight helps create firm stitches and prevents stuffing from showing through.
Free Crochet Pattern: Mini Plush Baby Elephant
Free Crochet Pattern
Project Details
| Project Name | Cozy Little Elephant Amigurumi |
| Skill Level | Confident beginner |
| Finished Size | Approximately 9 inches (23 cm) tall |
| Yarn | Approximately 220 yards (200 meters) bulky chenille yarn |
| Hook | Recommended 4.5 mm crochet hook (US 7) |
| Gauge | Approximate: 16 single crochet stitches x 18 rounds = 4 inches (10 cm) |
| Terminology | US crochet terms |
Materials
- Bulky or super bulky plush yarn in elephant gray.
- Small amount of pink yarn for ear centers.
- Small amount of white yarn for toes if desired.
- Polyester fiberfill stuffing.
- Embroidery thread for facial details.
- Yarn needle.
- Stitch marker.
- Scissors.
Abbreviations
- MR: Magic ring
- sc: Single crochet
- inc: Increase, 2 sc in one stitch
- dec: Invisible decrease
- sl st: Slip stitch
- ch: Chain
- FO: Fasten off
- st/sts: Stitch/stitches
Special Stitch Explanation
Invisible decrease: Insert the hook into the front loop only of the next two stitches, yarn over, pull through both loops, yarn over again, and complete a single crochet. This creates a smooth decrease.
Construction Notes
All main pieces are worked in continuous rounds. Do not join rounds unless instructed. Place a stitch marker in the first stitch of every round and move it upward as you work.
Head
- Round 1: 6 sc in MR. (6)
- Round 2: Inc around. (12)
- Round 3: (Sc, inc) repeat 6 times. (18)
- Round 4: (2 sc, inc) repeat 6 times. (24)
- Round 5: (3 sc, inc) repeat 6 times. (30)
- Round 6-11: Sc around. (30)
- Round 12: (3 sc, dec) repeat 6 times. (24)
- Round 13: (2 sc, dec) repeat 6 times. (18)
- Round 14: (Sc, dec) repeat 6 times. (12)
- Stuff firmly.
- Round 15: Dec around. (6)
- FO and close opening.
Body
- Round 1: 6 sc in MR. (6)
- Round 2: Inc around. (12)
- Round 3: (Sc, inc) repeat 6 times. (18)
- Round 4: (2 sc, inc) repeat 6 times. (24)
- Round 5-10: Sc around. (24)
- Round 11: (2 sc, dec) repeat 6 times. (18)
- Round 12: Sc around. (18)
- Round 13: (Sc, dec) repeat 6 times. (12)
- Stuff firmly.
- Round 14: Dec around. (6)
- FO and close.
Trunk
- Round 1: 6 sc in MR. (6)
- Round 2-5: Sc around. (6)
- Round 6: (Sc, inc) repeat 3 times. (9)
- Round 7-10: Sc around. (9)
- Lightly stuff and leave a long tail for sewing.
Ears
Make 2 ears.
- Round 1: 6 sc in MR. (6)
- Round 2: Inc around. (12)
- Round 3: (Sc, inc) repeat 6 times. (18)
- Round 4: (2 sc, inc) repeat 6 times. (24)
- FO, leaving a sewing tail.
Optional: Add a smaller pink circle using the same method and sew it onto the center of each ear.
Legs and Arms
Make 4 pieces for legs and arms.
- Round 1: 6 sc in MR. (6)
- Round 2: Inc around. (12)
- Round 3-5: Sc around. (12)
- Stuff lightly.
- FO, leaving a tail for sewing.
Assembly
- Sew the head securely onto the body.
- Attach ears evenly on both sides of the head.
- Sew the trunk below the center of the face.
- Attach arms near the upper sides of the body.
- Sew legs evenly along the bottom edge.
- Add embroidered eyes and a small mouth.
- Weave in all yarn ends securely.
Customization and Size Adjustment Ideas
This baby elephant crochet pattern can easily be personalized. To make a larger elephant, use thicker yarn and a larger hook while maintaining tight stitches. To create a smaller version, choose lightweight yarn and a smaller hook.
- Add a tiny crochet bow or scarf for a decorative version.
- Create different elephant colors using pastel, natural, or bright shades.
- Adjust ear size by adding or removing increase rounds.
- Make a family of elephants by changing the yarn weight.
Common Mistakes and Troubleshooting
- Loose stitches: Use a smaller hook if stuffing is visible.
- Uneven shaping: Count stitches at the end of each round.
- Loose attachments: Sew pieces several times through strong stitches.
- Overstuffing: Add stuffing gradually to keep the shape soft.
Finishing, Care, and Assembly Guidance
After assembly, gently shape the elephant with your hands to create a balanced plush appearance. Avoid pulling the stitches while positioning the ears and trunk.
For care, spot cleaning is recommended for plush crochet toys. If washing is necessary, follow the yarn manufacturer’s instructions and allow the toy to dry completely before use.
At a Glance
- Best yarn choice: Soft chenille-style plush yarn.
- Skill level: Beginner-friendly amigurumi project.
- Key technique: Continuous rounds with single crochet.
- Customization: Change colors, ear size, and facial details.
- Finishing method: Secure sewing and gentle shaping.
Create Your Own Baby Elephant Crochet Pattern
This baby elephant crochet pattern is a charming project for anyone who enjoys creating handmade animals with soft textures and playful shapes. Choose your favorite yarn, prepare your crochet hook, and follow the instructions carefully while adding your own creative touches.
Remember to check your gauge when changing yarn sizes, read through the full pattern before beginning, and personalize your elephant with colors and details that match your style. Handmade crochet animals make meaningful keepsakes and enjoyable creative projects.
Tags
Baby Elephant Crochet Pattern
Amigurumi Elephant
Free Crochet Pattern
Crochet Animal Toy
Beginner Crochet Project
Handmade Crochet Gift