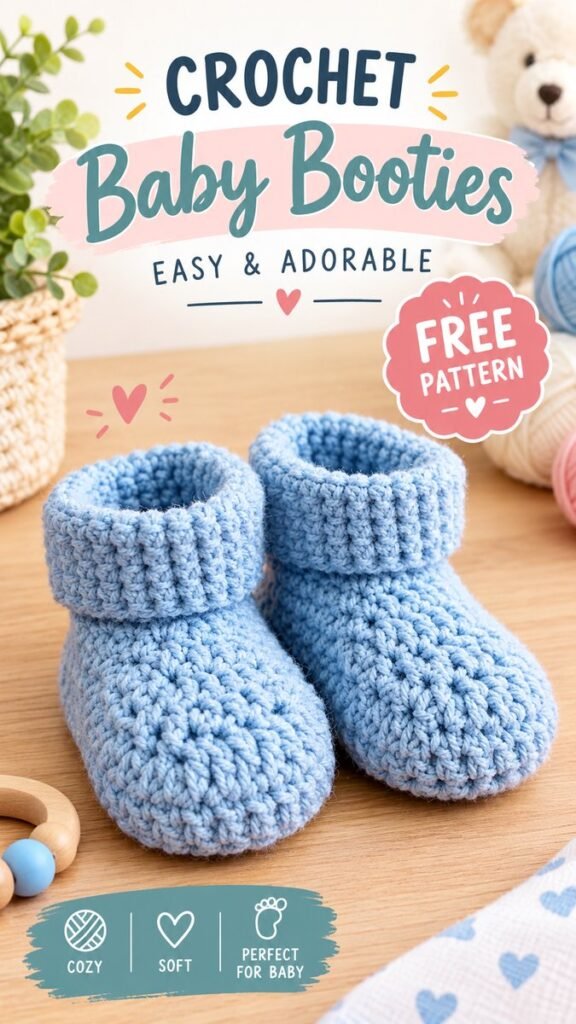
There is something especially charming about a pair of handmade baby booties. They are small, practical, cozy, and full of the personal touch that makes handmade gifts memorable. This free baby booties crochet pattern is inspired by the soft blue booties shown in the featured design, with a rounded toe, textured body, and comfortable ribbed-looking cuff. The simple silhouette makes these booties a lovely project for a baby shower gift, newborn keepsake, or handmade addition to a little wardrobe.
Key Takeaways
- Create soft crochet baby booties with a classic rounded shape.
- Use gentle yarn colors for a sweet newborn or baby gift.
- Adjust the length and width to create a better fit.
- Choose comfortable, soft yarn suitable for baby projects.
- Customize the cuff and colors to create a unique handmade pair.
Why Crochet Baby Booties Make Wonderful Handmade Gifts
Crochet baby booties are one of those projects that can feel both useful and wonderfully sentimental. Because they use relatively little yarn, they are also an approachable way to create something handmade without committing to a large blanket or complicated garment.
The pictured booties have a soft baby-blue appearance that gives them a calm, classic nursery feel. Their rounded toes and higher cuffs create the familiar look of cozy little slippers, while the textured crochet fabric adds dimension and visual interest.
These characteristics make the design easy to adapt. You can recreate the same general idea in cream, blush, sage, lavender, gray, yellow, or any other soft shade. A contrasting cuff can also give the finished booties a playful two-tone effect.
Materials for a Free Baby Booties Crochet Pattern
A small pair of baby booties does not require an extensive supply list. Keeping the materials simple is part of what makes this type of crochet project so appealing.
- Soft baby-friendly yarn: Choose a smooth yarn with a comfortable texture and suitable care instructions.
- Crochet hook: Select a hook size appropriate for your yarn and desired fabric density.
- Yarn needle: Useful for weaving in ends and neatly finishing the project.
- Scissors: A small sharp pair makes trimming yarn simple.
- Optional stitch marker: Helpful when working continuous rounds.
For baby footwear, softness and comfort should be priorities. Avoid yarn that feels scratchy or overly rough. A washable fiber can also be particularly convenient because baby items may need frequent cleaning.
Important: Crochet fabric should feel flexible and comfortable rather than stiff. Before finishing a pair, check that the opening is not overly tight and that there are no loose ends or decorative pieces that could become detached.
Understanding the Shape of the Booties
The design shown has several recognizable elements that can guide your crochet construction. The toe area is rounded, the foot gradually widens toward the middle, and the upper section rises around the ankle. A textured stitch pattern gives the body a plush appearance, while the cuff provides a more structured finish.
For a simple handmade version, think of the bootie as three connected areas: the sole, the upper foot, and the cuff. Building the sole first creates the foundation. The upper then grows upward around the edge, and the cuff adds height near the ankle.
A Simple Construction Plan
- Work an oval-shaped sole using crochet stitches suited to the yarn.
- Build the sides around the sole without dramatically increasing the stitch count.
- Shape the toe area so the front remains rounded and comfortable.
- Continue upward around the ankle to create the bootie opening.
- Finish with a slightly taller cuff and weave in all ends securely.
Beginner-Friendly Crochet Bootie Pattern Guide
The following construction guide is an original, adaptable starting point inspired by the visual characteristics of the pictured booties. Because babies grow quickly and yarn thickness varies, use measurements rather than relying solely on a fixed stitch count when adjusting the size.
Step 1: Create the Sole
Begin with a foundation chain approximately the length of the desired sole minus the rounded ends. Work crochet stitches around both sides of the chain to form an oval. Increase gradually around each end so the sole curves naturally rather than creating sharp corners.
Continue for enough rounds to reach the desired sole length. Keep the stitch tension consistent throughout this stage. The sole should lie relatively flat and have a smooth outline.
Step 2: Build the Foot
Once the sole reaches the desired size, begin working around the outer edge with fewer increases. This encourages the fabric to turn upward and creates the sides of the bootie.
For the textured appearance seen in the inspiration, a compact stitch such as single crochet or half double crochet can create a dense fabric with attractive stitch definition. Working through different parts of the stitch can also create subtle vertical or raised textures.
Step 3: Shape the Toe
The toe should remain rounded and roomy without becoming excessively wide. If the front begins to look flat, use carefully positioned decreases to bring the upper fabric inward. Spread decreases evenly rather than placing them all in one location.
This is also a good point to try the bootie against the intended foot size if you are making it for a specific baby. The crochet fabric should have enough room for comfortable movement without being so loose that the bootie easily slips off.
Step 4: Add the Ankle and Cuff
After the toe and foot have been shaped, continue working upward around the ankle. A few additional rounds can create the boot-like height visible in the design.
For a cuff with a ribbed appearance, you can experiment with stitches worked into the back loop only. Alternating these rows creates subtle ridges and gives the top section a flexible, knitted-inspired texture.
Pro Tip: The cuff is an easy place to personalize baby booties. Make it slightly taller for a cozy winter-inspired look, or keep it short and simple for a lightweight everyday pair.
Expert Insight
Consistent tension matters more than chasing an exact stitch count when adapting baby booties. Two crocheters can use the same yarn and hook while producing noticeably different fabric densities, so checking the finished measurements is the most reliable way to fine-tune the fit.
How to Choose the Right Yarn Color
The soft blue color in the featured booties creates a timeless baby aesthetic, but there are plenty of ways to make the pattern your own. Pastel shades work beautifully for traditional nursery-inspired projects, while deeper colors can give the same silhouette a more contemporary appearance.
Try ivory with a beige cuff for a neutral gift. Pale pink and cream create a delicate combination, while sage and natural tones offer a modern look. If you are making booties for siblings or twins, use the same pattern in two coordinating colors.
Small color changes can also highlight the construction. A contrasting sole, ankle band, or toe section can make the stitch pattern easier to see without adding complicated techniques.
Tips for a Better Crochet Fit
Baby booties should be comfortable above everything else. Since sizing can vary considerably, measurements are more useful than assuming a particular number of rounds will work for every baby.
- Measure the sole: Compare the finished length with the intended size before completing the upper.
- Watch your tension: Very tight stitches can create a stiff bootie.
- Keep the opening comfortable: The ankle should not be difficult to put on.
- Check symmetry: Make the second bootie using the first as a visual reference.
- Finish securely: Weave in yarn ends carefully so they do not become exposed during use.
Easy Ways to Personalize Baby Crochet Booties
Once you are comfortable with the basic construction, there are many ways to turn a simple pair into a personalized handmade gift. Add a contrasting cuff, experiment with stripes, or use a textured stitch for the ankle section.
You can also coordinate the booties with other handmade baby accessories. A matching crochet hat, small blanket, or soft cardigan can turn a pair of booties into a thoughtful gift set.
For a minimalist style, keep everything in one soft neutral shade. For a playful nursery theme, combine two or three gentle colors. The compact size of baby footwear makes it a great project for using leftover yarn from other crochet creations.
Common Mistakes to Avoid
Small projects can sometimes make mistakes more noticeable, but most common issues are easy to prevent.
Uneven Increases
If increases are concentrated in one area of the sole, the shape may become pointed or uneven. Distributing increases around the rounded ends helps maintain a balanced oval.
Inconsistent Tension
Changing tension from one round to another can make the bootie look lumpy or cause the second bootie to come out a different size. Take occasional breaks and relax your hands if your stitches begin becoming unusually tight.
Skipping the Measurement Check
A pattern is only a starting point when yarn weight, hook size, tension, and intended fit can vary. Measuring the sole before finishing the upper can save time and help you create a more useful finished pair.
A Sweet Project for Baby Showers and Handmade Gifts
A pair of crochet baby booties makes a particularly charming gift because it is both decorative and practical. They are small enough to package beautifully and can be paired with a handmade card or another baby accessory.
The soft blue style shown here works especially well for a classic handmade presentation. Wrap the finished booties in tissue paper or place them in a small gift box. A simple yarn bow can reinforce the handmade character without overwhelming the project.
If you are creating several pairs for gifts, keep a small note of the yarn, hook size, sole measurements, and number of rounds used. This makes it much easier to reproduce the same design later while allowing you to adjust the size as needed.
Quick Points
- Start with an oval sole.
- Shape the toe gradually for a rounded finish.
- Build the ankle upward with comfortable tension.
- Use a ribbed-style cuff for extra texture.
- Measure carefully before finishing the pair.
Conclusion: A Cozy Handmade Crochet Project
This free baby booties crochet pattern idea is a lovely way to create something small, useful, and full of handmade character. The rounded silhouette, textured stitches, soft color palette, and cozy cuff shown in the design provide plenty of inspiration while leaving room for your own creative choices.
Whether you are making your first pair of crochet baby shoes or adding another quick project to your handmade gift collection, focus on soft materials, consistent tension, comfortable proportions, and secure finishing. Once the basic shape becomes familiar, you can experiment with colors, stitch textures, cuff heights, and coordinated baby accessories.
Save this idea for your next crochet session and keep it nearby whenever you need inspiration for a sweet newborn gift. A tiny pair of handmade booties can turn a simple ball of yarn into a memorable keepsake.