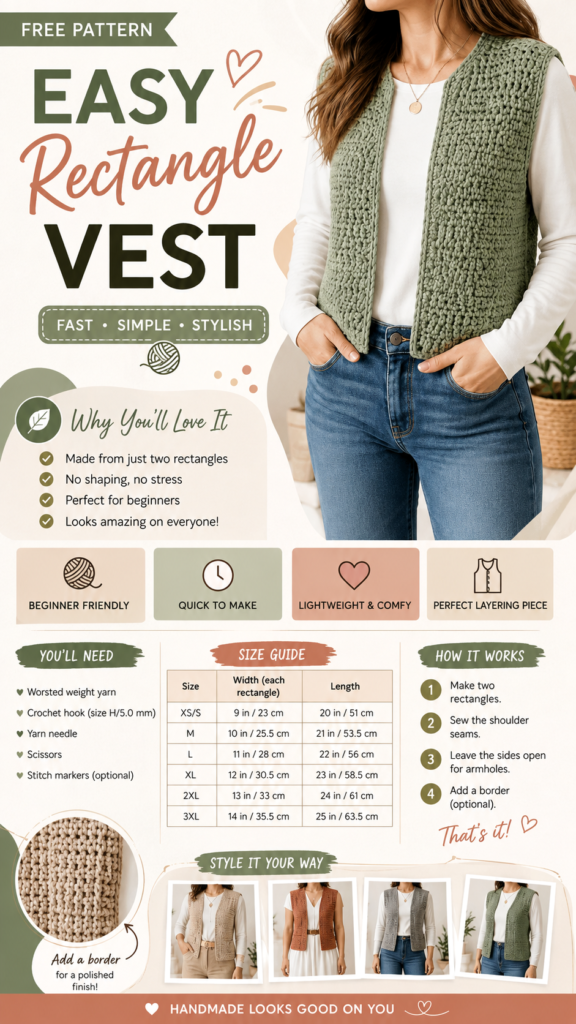
Looking for a crochet vest pattern that feels stylish without turning into a complicated project? An easy rectangle crochet vest is a wonderful place to start. With a simple construction based on two rectangular pieces, this type of handmade layer can give you the look of a polished wardrobe staple while keeping the crochet process approachable and enjoyable.
Key Takeaways
- A rectangle vest can be beginner-friendly and straightforward to construct.
- The basic design uses two crocheted rectangles joined at the shoulders.
- Basic crochet stitches are enough to create a clean, wearable texture.
- A simple border can give the finished vest a more polished appearance.
- Yarn color, length, and styling can easily change the overall look.
Why an Easy Crochet Rectangle Vest Is Worth Making
One of the best things about a simple crochet vest is how much impact you can get from a relatively uncomplicated construction. Instead of shaping multiple sections, working complicated armholes, or managing intricate increases and decreases, the basic concept focuses on creating two similarly sized rectangles and assembling them into a wearable layer.
That simplicity makes this project especially appealing to newer crocheters. It gives you an opportunity to practice consistent tension, stitch rhythm, measuring, seaming, and finishing without requiring an advanced garment-making technique.
The finished vest also has plenty of everyday appeal. Wear it over a long-sleeve top with jeans for a casual outfit, layer it over a dress for a softer look, or choose a chunky yarn when you want something cozy for cooler days. The basic silhouette is flexible enough to suit different wardrobes and personal styles.
Important: The beauty of a rectangle crochet vest is that the construction stays simple while the finished piece can look surprisingly refined. Consistent sizing, neat seams, and a clean border often make more difference than complicated stitch patterns.
Understanding the Simple Rectangle Vest Construction
The construction shown by this style of vest is refreshingly straightforward. You crochet two rectangular panels, position them side by side, and sew selected sections together to form the shoulder seams. The remaining openings become the armholes and sides of the vest.
This approach is useful because it removes much of the guesswork associated with traditional fitted garments. Rather than shaping a curved neckline or carefully sculpting an armhole, you are working with simple geometric pieces.
Step 1: Make Two Matching Rectangles
Begin by crocheting two rectangles using your chosen yarn and stitch combination. The width and length should be selected according to the desired finished fit. A longer rectangle creates a longer vest, while a shorter piece produces a cropped silhouette.
Try to keep both rectangles as consistent as possible. Matching dimensions make assembly easier and help the finished vest sit evenly on the body.
Step 2: Check the Dimensions Before Assembly
Before sewing anything together, lay the pieces flat and compare them. This is a good moment to measure the width and length and make sure neither panel has become noticeably wider or narrower because of changes in crochet tension.
If you are making a vest for yourself, measuring against a favorite garment can also be helpful. Place the crochet pieces over a similar vest, cardigan, or loose-fitting top to get a visual idea of the finished proportions.
Step 3: Sew the Shoulder Seams
Place the two rectangles together and sew the designated shoulder sections. The center and lower areas remain open to create the armholes and sides.
The amount you sew at the shoulders affects the opening around the neck and arms, so take a moment to test the placement before making permanent seams. If possible, gently fold or pin the pieces first and try the shape over your clothing.
Step 4: Add a Border if Desired
A border is optional, but it can be an excellent finishing detail. Working a simple round around the edges can make the vest feel more complete while helping the openings look intentional and neat.
You do not need an elaborate edging. A basic single crochet border can provide enough definition around the front, armholes, and lower edge.
Expert Insight
When making a simple garment, finishing quality matters. Keep your tension as consistent as possible, measure before joining pieces, and weave in ends securely. These small details can make a basic construction look much more professional.
Choosing Yarn for an Easy Crochet Vest
The yarn you choose can completely change the personality of your finished vest. A medium-weight yarn is a practical option for a versatile everyday layer because it provides enough structure to show the stitches while remaining comfortable to wear.
For a lightweight spring or transitional vest, consider a smoother yarn with a softer drape. Cotton or cotton-blend options can create a crisp handmade texture and work well with casual outfits.
For a cozy cold-weather layer, a warmer yarn can make the same simple construction feel completely different. Chunkier yarn may also allow the project to work up more quickly, although it can create a heavier finished garment.
Before beginning the entire project, crochet a small sample. This gives you a chance to see how the yarn behaves, evaluate the texture, and check your tension before committing to the full rectangles.
Basic Crochet Stitches for a Beginner Vest
A simple rectangle vest does not need a complicated stitch pattern to look attractive. Basic stitches can create a beautiful fabric when worked evenly and paired with an appealing yarn.
Single Crochet
Single crochet creates a relatively firm fabric with a defined texture. It can be a good choice when you want the vest to have structure and a more substantial appearance.
Half Double Crochet
Half double crochet sits between single and double crochet in height. It can provide a comfortable balance of texture, coverage, and speed, making it useful for wearable crochet projects.
Double Crochet
Double crochet creates taller stitches and a more open fabric. It can be useful when you want a lighter-looking vest or want the project to progress more quickly.
The key is not necessarily choosing the most impressive stitch. For a beginner crochet vest, consistency often creates the most attractive result.
How to Choose the Right Vest Size
Garment sizing is one area where taking measurements before you crochet can save considerable frustration. The reference design presents a range of sizes, showing how the width and length of the rectangles can be adjusted to create different finished proportions.
Instead of relying only on a standard clothing size, consider your preferred amount of ease. A close-fitting vest will feel very different from an oversized layering piece, even when both use the same construction method.
- Measure the part of your body where you want the vest to sit.
- Compare that measurement with a garment you already like wearing.
- Consider whether you will wear the vest over a thin shirt or a thicker sweater.
- Adjust the rectangle length if you prefer a cropped or longer style.
Pro Tip: Do not assume that changing only the width will give you the perfect fit. Length is equally important. A quick measurement before starting can help you create a vest that matches the way you actually want to wear it.
Simple Ways to Customize Your Crochet Vest
Once you understand the basic rectangle construction, it becomes easy to make the design your own. You can experiment with colors, yarn weights, borders, lengths, and styling without changing the fundamental idea.
Change the Color
A neutral cream, beige, gray, or soft green can create a versatile vest that works with many outfits. If you prefer something more playful, try a warm rust, muted pink, blue, or another favorite shade.
Color changes can also be introduced between rows to create stripes. Even a simple two-color combination can give a basic rectangle vest a completely different personality.
Adjust the Length
A cropped vest can pair nicely with high-waisted jeans, skirts, or dresses. A longer version can create a relaxed layering piece that works well over leggings or a simple top.
Try a Different Border
A plain border keeps the project minimalist, while a contrasting color can create a decorative frame. You can also experiment with a slightly wider edging if you want the vest to have more visual definition.
Styling Ideas for a Handmade Crochet Vest
The versatility of this design is one of its biggest strengths. A handmade vest does not have to look overly formal or costume-like. With the right combination of basics, it can become an easy everyday wardrobe layer.
- Casual weekend: Layer the vest over a fitted long-sleeve shirt with jeans and simple shoes.
- Soft and feminine: Wear it over a flowing dress for an extra handmade texture.
- Minimalist: Choose a neutral yarn and pair the vest with a plain top and denim.
- Cozy autumn look: Combine a warmer yarn with boots, jeans, and a long-sleeve sweater.
- Layered spring outfit: Select a lighter yarn and wear the vest over a simple cotton blouse.
The examples of different colors and outfits demonstrate how one basic shape can support many personal styles. You can keep the construction simple while changing the overall mood through color and accessories.
Common Mistakes to Avoid
Simple projects are not completely mistake-proof. Because the design depends on two matching rectangles, uneven tension or inconsistent measurements can become noticeable during assembly.
Skipping a Gauge Check
If your stitches are significantly larger or smaller than expected, the final dimensions can change. A small swatch helps you understand your tension before you begin.
Ignoring Measurements
Counting rows alone is not always enough. Yarn, hook size, stitch choice, and personal tension can all affect the finished dimensions. Measure the actual fabric whenever possible.
Joining Without Checking the Fit
Before sewing the shoulder seams permanently, position the rectangles and check the openings. A few minutes of adjustment can make the finished vest much more comfortable.
Forgetting the Finishing Details
Loose yarn ends should be woven in securely, and edges should be checked for consistency. These finishing steps may seem small, but they help your crochet vest look tidy and ready to wear.
Quick Points
- Use two matching rectangles for the basic construction.
- Measure your desired width and length before crocheting.
- Choose yarn based on the season, drape, and texture you want.
- Keep the border simple for an easy, polished finish.
- Customize the color and length to make the vest uniquely yours.
Why This Beginner Crochet Project Works
A good beginner project should teach useful skills without becoming overwhelming. This rectangle vest does exactly that. You practice foundational crochet stitches while also learning how individual fabric pieces can become a wearable garment.
It is also a project that rewards experimentation. Once you have made one version, you can start thinking about how a different yarn weight, stitch, color, or length might change the result. That makes the design useful beyond a single finished vest.
Most importantly, the straightforward construction leaves room to focus on craftsmanship. You can concentrate on keeping your rows neat, maintaining consistent tension, creating clean seams, and choosing finishing details that make the piece feel intentional.
Final Thoughts on the Easy Crochet Rectangle Vest
An easy crochet vest is a perfect example of how simple construction can create something genuinely useful and stylish. With two basic rectangles, a few essential crochet techniques, and thoughtful finishing, you can create a versatile handmade layer without taking on an overly complicated garment pattern.
Whether you are completely new to crochet clothing or simply want a quick project for your handmade wardrobe, the rectangle vest offers plenty of possibilities. Start with a comfortable yarn, check your measurements, keep your stitches consistent, and give yourself permission to customize the details.
From neutral everyday layers to colorful statement pieces, the same basic idea can be adapted again and again. Add a simple border for extra polish, change the length for a different silhouette, or experiment with colors that reflect your personal style.
Most of all, enjoy the process. A beginner-friendly crochet vest does not need complicated shaping to become a favorite handmade piece. Sometimes the simplest designs are the ones that make the most satisfying projects.