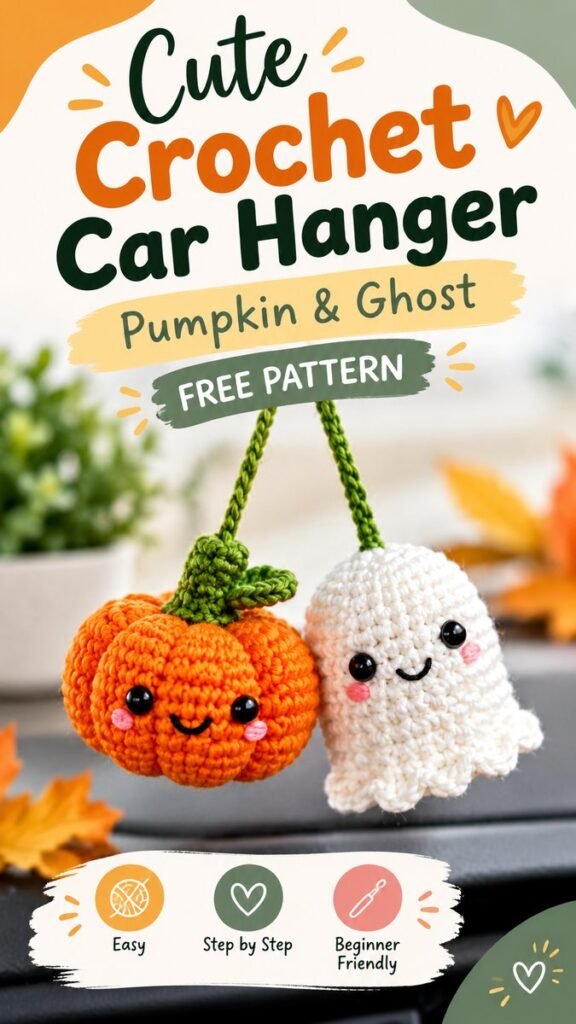
Turn a few basic crochet stitches into a charming seasonal accessory with this easy crochet pumpkin and ghost car hanger idea. The playful pair combines a bright orange pumpkin, a soft white ghost, green hanging cords, and simple stitched details to create a cheerful decoration that can add personality to a car, bedroom, craft space, or seasonal display. It is a fun project for anyone who enjoys beginner-friendly crochet and wants to make something small, colorful, and useful.
Key Takeaways
- A pumpkin and ghost make a fun seasonal crochet combination.
- Small crochet shapes are ideal for practicing basic techniques.
- Simple stuffing helps create rounded, dimensional decorations.
- Green crochet cords provide an easy way to hang the finished pieces.
- The project can be customized with different colors, faces, and sizes.
- These handmade charms can also make thoughtful seasonal gifts.
Easy Crochet Pumpkin and Ghost Car Hanger
Small crochet projects have a special appeal because they can often be completed without the commitment required by a blanket, sweater, or large home decoration. This pumpkin and ghost car hanger is a perfect example. The finished design features two compact amigurumi-style shapes suspended from long crochet cords, creating a lighthearted seasonal accent.
The pumpkin has a rounded, plump silhouette with a textured orange surface and a green stem and leaf detail. Beside it, the white ghost has a softly rounded body and a gently ruffled lower edge. Together, the contrasting shapes create an eye-catching display while keeping the overall project approachable.
Important: The visual design works because the shapes are simple and recognizable. You do not need complicated stitch patterns to create an attractive crochet decoration. Careful shaping, consistent tension, and thoughtful finishing can make even basic stitches look polished.
Why Make a Crochet Car Hanger?
A crochet car hanger is a small project with plenty of personality. Unlike a large crochet item, it uses relatively little yarn and gives you an opportunity to experiment with colors and shapes. Seasonal designs are especially enjoyable because they can be displayed for a limited period and then replaced with another handmade decoration.
The pumpkin and ghost combination also offers a nice balance of colors. Orange immediately gives the pumpkin a warm autumn feeling, while white creates a clean contrast for the ghost. Green adds a natural accent through the pumpkin stem and hanging cords.
You can make the pair as shown or treat the concept as a starting point. A smaller pumpkin can be paired with a larger ghost, several tiny pumpkins can be grouped together, or different facial expressions can be used to create a completely different personality.
Materials for This Easy Crochet Project
The pictured project can be recreated with common crochet supplies. Exact yarn quantities and hook size can vary depending on how large you want the finished decorations to be and how tightly you crochet.
- Orange yarn for the pumpkin
- White yarn for the ghost
- Green yarn for the pumpkin stem, leaf, and hanging cords
- A crochet hook appropriate for your yarn weight
- Polyester fiberfill or another suitable stuffing material
- Yarn needle for sewing and finishing
- Stitch marker
- Scissors
- Small black safety eyes or embroidered black yarn for facial details
If the decoration will be handled frequently, embroidered facial features can be a practical alternative to safety eyes. This also allows you to control the expression and keeps the design completely customizable.
Choosing Yarn and Colors
Color is one of the easiest ways to personalize an easy crochet project. A vivid pumpkin orange creates the classic seasonal appearance shown in the design, while a soft cream or bright white works beautifully for the ghost.
For the green elements, choose a shade that contrasts clearly with the orange. A deep forest green creates a traditional autumn look, while a brighter green gives the decoration a more playful appearance.
A smooth yarn is particularly helpful for small stuffed crochet shapes because it makes the stitch definition easy to see. Medium-weight yarn can also make the project easier to handle when learning basic shaping techniques.
Expert Insight
For small stuffed crochet decorations, consistent tension is often more important than using complicated stitches. Keep your stitches firm enough to prevent large gaps, but avoid crocheting so tightly that the fabric becomes difficult to shape or stuff.
How the Pumpkin Shape Comes Together
The pumpkin can be approached as a simple rounded crochet form. The basic construction begins near the center and expands gradually before narrowing again toward the top. This creates the plump silhouette associated with a pumpkin.
For an easy crochet version, work in continuous rounds using single crochet stitches. Increase stitches during the early rounds to build the width, continue with several even rounds to establish the body, and then decrease gradually toward the opening.
Basic Pumpkin Construction
- Begin with a small adjustable ring or another preferred crochet foundation.
- Work a first round of single crochet stitches into the center.
- Increase evenly around subsequent rounds to create a rounded shape.
- Continue working even rounds once the desired width is reached.
- Begin decreasing gradually near the upper portion.
- Add stuffing before the opening becomes too small.
- Finish the decreases and secure the yarn neatly.
The exact number of stitches and rounds depends on the yarn, hook, tension, and desired finished size. Rather than relying on a single fixed measurement, watch the shape as you work. The pumpkin should look rounded rather than tall and narrow.
Adding Pumpkin Details
A small green stem instantly makes the orange crochet shape recognizable as a pumpkin. You can crochet a compact stem separately and sew it securely to the top. A small crocheted leaf adds another layer of detail and visually connects the pumpkin to the green hanging cord.
For a more defined pumpkin appearance, you can gently shape the finished stuffed body with yarn. A yarn needle and matching orange yarn can be used to create subtle sections running from the top toward the bottom. Keep the shaping gentle so the pumpkin retains its soft, rounded appearance.
Creating the Crochet Ghost
The ghost is another simple stuffed shape, but its silhouette differs from the pumpkin. Instead of creating a symmetrical round body, aim for a slightly elongated shape that becomes wider toward the lower section.
Start with a small rounded top and gradually increase the number of stitches. Continue working around the body until the desired height is reached. The lower edge can then be finished with a simple ruffled or scalloped treatment to reproduce the playful movement visible in the design.
Shaping the Ghost
- Create the rounded upper portion using single crochet rounds.
- Increase gradually to give the body a gentle width.
- Work several rounds without increases to establish the height.
- Add stuffing as the body develops.
- Shape the bottom edge with simple increases or a decorative finish.
- Close the top neatly and weave in the remaining yarn.
The goal is not perfect symmetry. A slightly uneven, soft silhouette can actually make a handmade ghost feel more charming. Small variations in the lower edge can add movement and character.
Adding the Faces
The facial details are what give these crochet shapes their personality. The design uses simple dark eyes that stand out strongly against the orange and white yarn. Keeping the face minimal helps the small decorations remain visually clear.
You can use safety eyes, embroidered eyes, or small stitched details. If you want a softer handmade appearance, embroidery gives you complete control over the size and placement.
Before permanently attaching facial features, place them temporarily and step back to inspect the expression. Moving the eyes slightly closer together or farther apart can noticeably change the personality of the finished piece.
Making the Crochet Hanging Cords
The long green cords are an important visual part of the project. They suspend the pumpkin and ghost while tying the colors together. A simple chain can work well for this purpose because it is lightweight, flexible, and easy to make.
Create two cords at a similar length if you want the pieces to hang evenly. Alternatively, make one slightly shorter so the pumpkin and ghost sit at different heights. This staggered arrangement can give the car hanger more movement and visual interest.
Attach the cords securely to the stuffed shapes and connect their upper ends into a stable hanging loop. Because the finished decoration may move while hanging, check every connection carefully and weave in the yarn ends thoroughly.
Why This Matters
- Secure attachments help the decoration maintain its shape during movement.
- Balanced cord lengths make the finished hanger look intentional.
- Firmly woven yarn ends help prevent small pieces from loosening.
Tips for a Neat Easy Crochet Finish
Small crochet pieces can sometimes reveal imperfections more easily than large projects, so finishing is worth a little extra attention. Keep your stitch tension consistent and use a stitch marker when working continuous rounds. This makes it easier to keep track of increases and decreases.
Stuff Gradually
Add stuffing in small amounts rather than filling the entire piece at once. This allows you to push the fiberfill evenly into the corners and maintain a smooth shape. Avoid overstuffing, particularly around the closing rounds, because excessive filling can stretch the stitches.
Check the Shape as You Work
Do not wait until the final round to decide whether your pumpkin or ghost has the right proportions. Hold the piece in your hand regularly and compare its height, width, and overall balance. Small adjustments are much easier before the piece is completely finished.
Keep the Details Simple
The charm of this project comes from its simple silhouettes. A few well-placed details can have more impact than a complicated surface pattern. Focus on clean stitching, attractive color choices, and secure finishing.
Easy Ways to Customize the Car Hanger
Once you understand the basic construction, there are many ways to make the design your own. Try changing the color of the pumpkin, using cream instead of bright white for the ghost, or adding different facial expressions.
- Use pastel orange and ivory for a softer seasonal palette.
- Make miniature pumpkins in several colors.
- Add a tiny crocheted leaf to each pumpkin.
- Use embroidered smiles for a friendly expression.
- Vary the cord lengths to create a layered arrangement.
- Make a larger or smaller version by changing yarn weight and hook size.
- Turn the individual shapes into ornaments instead of a car hanger.
Pro Tip: If you want the finished decoration to look cohesive, choose one accent color and repeat it in several small details. In this design, green appears in the stem, leaf, and hanging cords, which visually connects the separate crochet pieces.
Where to Display Your Handmade Crochet Charms
The concept is designed as a car hanger, but the individual crochet pieces can be adapted for many decorative uses. A finished pumpkin or ghost can become a seasonal ornament, a small gift topper, a decorative hook accessory, or part of a handmade display.
If using the project in a vehicle, keep the decoration positioned so that it does not obstruct the driver’s view, interfere with controls, or create a distraction. Lightweight handmade pieces are best kept securely attached and placed where they can move freely without interfering with safe driving.
A Fun Project for Beginners
This easy crochet idea is especially useful for beginners who want to move beyond flat practice pieces. Working small stuffed shapes introduces several useful skills at once, including crocheting in rounds, increasing, decreasing, stuffing, sewing pieces together, and weaving in ends.
The project also provides quick visual feedback. Instead of spending many hours on a large item, you can see a recognizable shape develop within a relatively small number of rounds. That makes it satisfying for experienced crocheters and approachable for someone learning the basics.
If you are teaching someone to crochet, the pumpkin and ghost shapes can also serve as practice projects. Start with the simplest body shape, then introduce the stem, leaf, facial details, and hanging cord as separate skills.
Quick Points
- Theme: Cute seasonal crochet decoration
- Main shapes: Pumpkin and ghost
- Technique: Basic crochet shaping and stuffing
- Customization: Colors, faces, sizes, and cord lengths
- Best for: Beginners and quick handmade projects
Conclusion
This easy crochet pumpkin and ghost car hanger is a delightful example of how simple handmade shapes can become a memorable seasonal decoration. The combination of bright orange, clean white, and natural green creates a cheerful palette, while the rounded stuffed forms give the project plenty of texture and personality.
Whether you are learning crochet for the first time or simply looking for a quick project between larger makes, this idea offers plenty of room for creativity. Start with basic shapes, keep the details simple, and customize the colors and expressions to suit your style. Once you have mastered the construction, you can easily turn the same techniques into ornaments, gifts, charms, and other small crochet decorations.
The best part of an easy crochet project is its flexibility. A few rounds of yarn can become something cheerful, personal, and completely handmade.