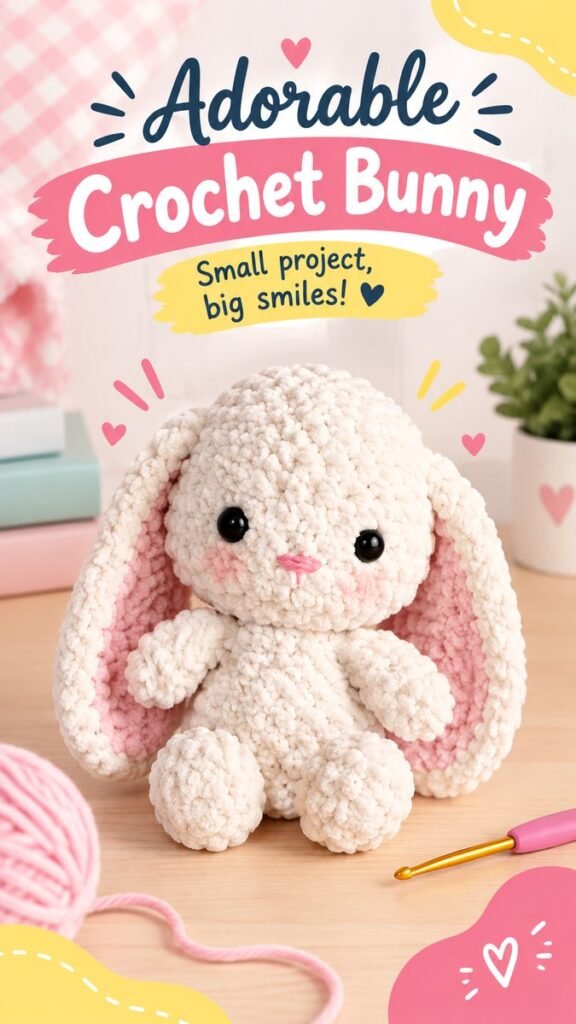
There is something wonderfully cheerful about an easy crochet bunny. With its soft texture, floppy ears, rounded shape, and sweet little face, this kind of handmade project has all the charm of a treasured keepsake without needing an overly complicated design. The cozy cream yarn and gentle pink details create a warm, playful look that works beautifully for handmade gifts, nursery inspiration, Easter crafts, or simply a relaxing crochet project.
If you love cute crochet projects but do not want to spend weeks working through complicated instructions, an easy crochet bunny is a great place to start. The basic design can be built from simple rounded shapes, while small details such as ears, paws, cheeks, and facial features give the finished bunny plenty of personality.
Key Takeaways
- An easy crochet bunny can be designed around simple rounded shapes and beginner-friendly techniques.
- Soft, plush yarn creates the cozy texture seen in cuddly bunny designs.
- Floppy ears, tiny paws, and embroidered facial details make a simple project feel special.
- Neutral yarn paired with subtle pink accents creates a timeless, gentle color palette.
- A handmade crochet bunny can make a thoughtful gift or charming nursery decoration.
- Small variations in yarn, colors, and proportions can make each bunny completely unique.
Why Easy Crochet Bunny Projects Are So Appealing
Crochet bunnies have a natural appeal because their shape is simple, recognizable, and easy to personalize. A rounded head, compact body, long ears, and small limbs are enough to create an instantly lovable character. That simplicity also makes the project approachable for crocheters who are still building confidence.
The design shown here has a particularly soft and cuddly appearance. The cream-colored yarn gives the bunny a warm handmade feel, while the pink inside the ears and small pink facial details add just enough contrast. The result is sweet without looking overly complicated.
Another advantage of an easy crochet bunny is that the project can be adapted to different skill levels. A beginner can focus on basic construction and simple details, while a more experienced crocheter can experiment with shaping, embroidery, color changes, or decorative accessories.
Important: The charm of a handmade bunny does not come from making every detail complicated. Simple shapes, consistent stitching, soft materials, and carefully placed features can create an adorable finished piece.
Choosing Yarn for a Soft Crochet Bunny
Yarn choice can dramatically change the appearance and feel of a crochet bunny. For a plush, cuddly result, many crocheters enjoy using soft chenille or blanket-style yarn. These yarns create a thick surface that makes the stitches look rounded and fluffy, similar to the cozy texture of the bunny pictured here.
Cream, ivory, oatmeal, and other gentle neutrals are especially versatile. They create a classic bunny appearance and allow small accents to stand out. Pink can be used inside the ears, on the nose, or for subtle cheeks, while pastel blue, lavender, peach, or soft yellow can create completely different personalities.
Yarn Texture Matters
Plush yarn can make a crochet bunny look wonderfully soft, but it can also make individual stitches harder to see. Beginners may find it easier to practice the basic construction with a smooth yarn first. Once the shapes and stitch techniques feel comfortable, switching to a plush yarn can create the soft texture desired for a finished toy.
If you prefer a more defined handmade appearance, cotton or acrylic yarn can also work beautifully. These materials make stitch placement easier to see and can produce a more structured bunny with clearly defined details.
The Basic Shape of an Easy Crochet Bunny
One of the reasons bunny projects are so accessible is that their overall form can be broken into manageable components. Instead of thinking about the finished toy as one complicated object, consider it as a collection of small shapes that come together at the end.
- Head: A rounded shape forms the main facial area.
- Body: A slightly smaller or elongated rounded piece creates the torso.
- Ears: Long oval or tapered shapes give the bunny its recognizable silhouette.
- Arms: Small rounded pieces can be attached to the sides of the body.
- Legs: Compact shapes add stability and a playful seated appearance.
- Face: Simple eyes, a tiny nose, and subtle cheek details complete the character.
These components can be adjusted according to the look you want. Longer ears create a classic floppy-eared bunny, while shorter ears can give the character a more compact appearance. Larger feet can make the bunny look extra playful, while smaller limbs create a minimalist style.
Keep the Shapes Simple
For an easy crochet bunny, there is no need to chase complicated shaping unless you specifically want a more advanced project. Smooth curves and rounded forms often look especially cute when made with plush yarn. The softness of the material naturally hides minor imperfections and gives the project a cozy handmade character.
Creating Sweet Floppy Bunny Ears
The ears are one of the most important visual features of a crochet bunny. Long floppy ears immediately communicate the animal’s shape and give the finished piece a gentle, playful personality.
For a design inspired by the soft bunny aesthetic, consider making the outer ears in the same cream or neutral yarn as the body. A smaller inner-ear section can then be added in pink or another soft contrasting color. This creates depth without requiring a complicated color palette.
The position of the ears also changes the expression. Ears resting alongside the head create a relaxed look, while ears angled slightly outward can make the bunny appear more energetic. Try arranging the pieces before permanently attaching them so you can compare different silhouettes.
Expert Insight
When making a plush crochet bunny, the placement of the facial features and ears can influence the entire personality of the finished piece. Before securing the pieces, lightly position them and step back to check the overall expression and balance.
Adding the Face and Personality
A crochet bunny can have a very simple face and still look incredibly expressive. Small black eyes create strong contrast against light yarn, making the face immediately noticeable. A tiny embroidered nose and a hint of pink can then add softness.
For a clean, modern look, keep the facial details minimal. Two evenly positioned eyes, a small nose, and subtle cheek accents are often enough. The simpler the face, the more the texture and shape of the crochet work become part of the design.
Placement Makes a Difference
Facial placement deserves patience. Before attaching or embroidering anything permanently, mark the approximate positions and look at the bunny from several angles. Features that are only slightly too high, low, or far apart can change the character’s expression.
If you are creating a crochet bunny as a gift, you can also personalize the face to match the recipient’s style. A sleepy expression, tiny embroidered smile, colorful nose, or different ear position can turn a basic pattern into something that feels completely one of a kind.
Beginner-Friendly Crochet Techniques to Focus On
An easy crochet bunny is an excellent project for practicing foundational techniques. Depending on the pattern, you may use several familiar methods to build the rounded pieces.
- Magic ring: Useful for beginning many rounded crochet pieces from the center.
- Single crochet: A common stitch for compact amigurumi-style shapes.
- Increasing: Helps create rounded forms by adding stitches.
- Decreasing: Gradually narrows a shape and helps close stuffed pieces.
- Joining: Used to connect ears, arms, legs, and other components.
- Basic embroidery: Helpful for adding tiny facial details and decorative accents.
You do not need to master every advanced crochet technique before beginning. The most useful approach is to choose a pattern that matches your current ability and learn additional skills as they appear in the project.
Stuffing and Shaping Your Crochet Bunny
Stuffing is another important part of creating a soft crochet bunny. The amount of filling affects the shape, firmness, and overall personality of the finished piece. Too little stuffing can leave the body looking flat, while too much can stretch the stitches and make the surface uneven.
Add stuffing gradually rather than filling the entire piece at once. Work small amounts into the corners and rounded sections, then gently shape the piece with your fingers. This gives you more control and helps maintain a smooth silhouette.
Pro Tip: Add small amounts of stuffing as you crochet or assemble each section. Pause regularly to check the shape from the front and sides. A balanced shape usually looks more polished than a tightly packed one.
Easy Ways to Personalize a Crochet Bunny
Once you understand the basic structure, personalization becomes one of the most enjoyable parts of the project. The same simple crochet bunny can look completely different with a few thoughtful changes.
- Change the main yarn color to create a brown, gray, beige, pastel, or multicolored bunny.
- Add contrasting inner ears for extra dimension.
- Experiment with different ear lengths and positions.
- Use embroidery to create tiny smiles, noses, or decorative details.
- Add a small crochet bow, scarf, collar, or simple accessory.
- Adjust the proportions to create a miniature or oversized bunny.
Soft neutral colors are especially attractive when you want a timeless handmade aesthetic. Pastels can create a playful nursery-inspired look, while earthy tones can give the bunny a more natural and rustic personality.
Ideas for Using a Handmade Crochet Bunny
A finished crochet bunny can be much more than a decorative craft. Its small size and friendly appearance make it suitable for many handmade projects and gift ideas.
Use one as a shelf accent, place it beside other handmade crochet animals, or include it in a cozy nursery-inspired display. A bunny can also become part of a seasonal decorating collection, especially when made in soft pastel colors.
For gifting, consider creating a small collection with coordinated colors. A bunny paired with a handmade blanket, crocheted basket, or other simple fiber craft can create a thoughtful handmade presentation.
For children, always choose construction methods and materials appropriate for the intended age. Decorative features that could become loose should be handled with particular care when making items intended for very young children.
Common Mistakes to Avoid
Even a simple crochet project can become frustrating if a few small details are overlooked. Fortunately, most common problems are easy to prevent.
Inconsistent Tension
Uneven tension can cause one part of the bunny to look tighter or larger than another. Try to keep your hand position and yarn tension consistent throughout the project.
Uneven Facial Features
Eyes and other facial details can easily become slightly misaligned. Take time to position them before securing them permanently. A quick visual check from the front can make a significant difference.
Overstuffing
Adding too much filling can distort the crochet fabric and make the bunny look less soft. Build the shape gradually and use your fingers to distribute the stuffing evenly.
Rushing the Finishing Details
Assembly and finishing may seem like small steps, but they have a major effect on the final appearance. Secure loose ends carefully, position each part thoughtfully, and give the finished bunny a gentle reshaping before calling the project complete.
Making the Project More Beginner Friendly
If you are new to crochet, choose a pattern that clearly explains stitch counts, increases, decreases, assembly, and finishing. Visual tutorials can also be helpful when learning how to form rounded shapes or attach small pieces.
Work slowly and check your stitch count regularly. If you notice an error early, it is usually much easier to correct than after several additional rounds. Keep your yarn, hook, stuffing, scissors, stitch marker, and finishing needle together so the project stays organized.
Most importantly, do not worry about making your first bunny perfectly symmetrical. Handmade projects have character because they are handmade. Small differences can give your bunny a unique expression and make it feel more personal.
At a Glance
- Choose soft yarn for a cuddly texture.
- Build the bunny from simple rounded shapes.
- Use contrasting details to define the face and ears.
- Stuff gradually for better control over the shape.
- Personalize colors, proportions, and accessories to create your own style.
Conclusion
An easy crochet bunny is a charming project for anyone who enjoys soft textures, simple shapes, and handmade details. The combination of a rounded body, floppy ears, tiny paws, and an expressive face creates a design that feels cheerful and comforting without requiring an overly complicated construction.
Whether you are learning crochet for the first time or simply looking for a relaxing project, this style of bunny offers plenty of room for creativity. Experiment with plush yarn, gentle colors, different ear shapes, and personalized facial details until you find a look that feels like your own.
The most rewarding part is that a simple pattern can become something much more personal through small choices. A different yarn color, a tiny embroidered detail, or a new accessory can completely change the finished character. Start with the basics, enjoy the process, and let your handmade crochet bunny develop its own personality.
Quick Reminder
Simple crochet projects can be incredibly rewarding. Focus on soft materials, balanced shapes, careful assembly, and a few thoughtful details, and you can create a bunny that feels warm, playful, and uniquely handmade.