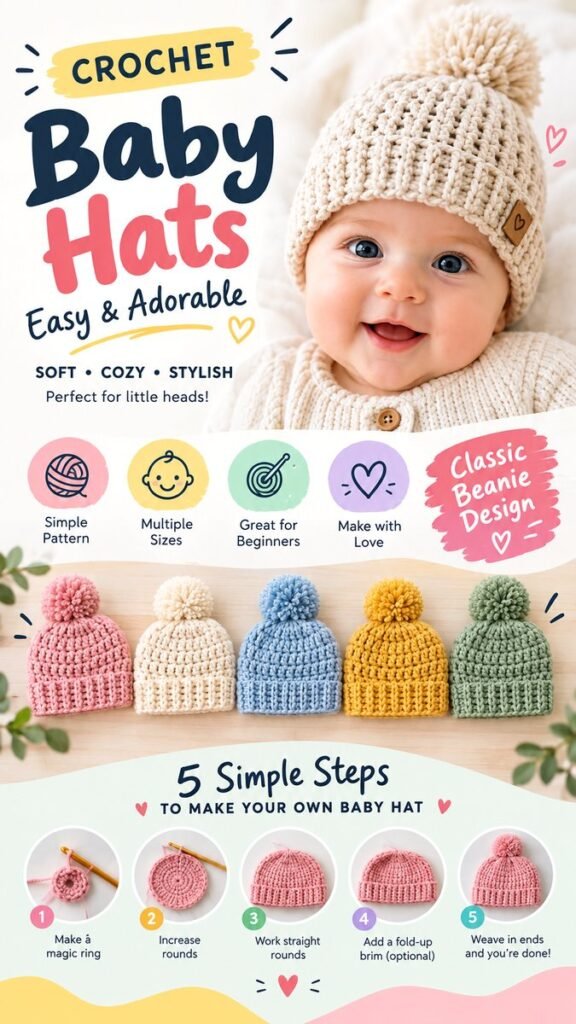
Few handmade projects are as sweet and practical as a crochet baby beanie. A soft little hat can add warmth, comfort, and plenty of charm to a newborn or growing baby’s wardrobe. This crochet baby beanie pattern is built around a classic shape that is simple enough for beginners while leaving plenty of room for creativity. With a comfortable rounded crown, straight body, and optional fold-up brim, it is an easy project to personalize for different ages, seasons, and gifting occasions.
The beauty of a classic crochet baby hat is its versatility. You can keep the design minimal in a soft neutral shade, choose cheerful pastel colors, or make several hats in different shades for a coordinated handmade collection. The basic construction is also easy to understand, making it a useful project for anyone who wants to practice working in the round and creating a neatly shaped crown.
Key Takeaways
- A classic baby beanie is a practical beginner-friendly crochet project.
- Working from the crown downward makes the hat easy to shape and customize.
- Soft DK or worsted weight yarn works well for a cozy everyday hat.
- Sizing should be adjusted according to the baby’s head circumference and desired fit.
- A fold-up brim can add extra warmth and create a polished finished look.
Why Crochet Baby Beanies Make Great Handmade Projects
Baby beanies are small projects, which makes them especially satisfying for crocheters. Unlike a large blanket or garment, a hat can often be completed without committing to a lengthy project. That makes it a great choice when you want to practice a new stitch, experiment with yarn, or create a handmade gift in a short amount of time.
A simple crochet baby beanie also has a timeless quality. Classic shapes do not depend heavily on changing trends, so the finished hat can remain useful throughout the season. Neutral colors create an understated look, while shades such as dusty pink, cream, soft blue, mustard, and sage can bring more personality to the finished piece.
Important: The best baby beanie is comfortable before it is decorative. Choose a soft yarn, avoid scratchy textures, and make sure the finished hat has enough stretch for a gentle, comfortable fit.
Understanding the Classic Crochet Baby Beanie Shape
The design shown here uses a straightforward construction. The hat begins at the crown with a small starting circle. Increase rounds gradually expand that circle until it reaches the approximate diameter needed for the intended size. Once the crown is wide enough, the increases stop and the sides are worked straight.
This construction is one reason a crochet baby beanie pattern is so approachable. Instead of shaping several separate pieces and sewing them together, the hat can be built as one continuous form. The basic structure is easy to remember, and small adjustments can be made as you work.
The Crown
The crown is the rounded top portion of the hat. It begins with a small magic ring or another preferred circular starting method. Single crochet increases are then worked around the circle to gradually create a flat shape.
The important goal during these early rounds is to keep the circle relatively flat. If the crown begins curling upward too quickly, more increases may be needed. If it becomes wavy or ruffled, the increases may be too frequent for the chosen yarn and hook combination.
The Body
After the crown reaches the desired width, the hat transitions into the body. At this stage, the stitch count remains consistent instead of increasing. Working straight allows the sides to grow downward and creates the familiar beanie shape.
This is also the easiest stage for experimenting with length. A shorter body creates a snug cap, while additional rounds create more coverage. If you are making a crochet baby hat for a particular child, compare the work with the baby’s head measurements rather than relying only on a generic age label.
The Optional Fold-Up Brim
A fold-up brim adds another layer of visual interest while making the hat feel more structured. It can be created by working several additional rounds near the bottom edge and folding the finished section upward.
The brim does not have to be complicated. Even a simple section worked in single crochet can provide a clean finish. A contrasting color can also be used for the brim if you want a more playful look.
Materials for a Simple Crochet Baby Hat
One advantage of this type of crochet baby beanie is that the supply list is short. Keeping the materials simple allows the shape and yarn texture to remain the focus.
- DK or worsted weight yarn: Choose a soft yarn appropriate for baby projects. Approximately 50 to 60 yards can be enough for a small hat, depending on size and construction.
- Crochet hook: A 4.0 mm hook is a useful starting point for this type of project, although the best hook size depends on the yarn and your personal tension.
- Yarn needle: Use this for weaving in the loose ends after finishing.
- Scissors: A sharp pair makes trimming yarn tails quick and neat.
When choosing yarn, prioritize softness and comfort. A yarn that feels pleasant against your own skin is a useful starting point, but remember that babies can be especially sensitive to rough or irritating fibers.
Basic Crochet Techniques to Know
You do not need an extensive stitch library to make a classic crochet baby beanie. The design can be based on a few foundational techniques that are useful for many other crochet projects.
Magic Ring
A magic ring creates an adjustable center for crocheting in the round. It is particularly useful for hats because it helps create a neat, closed crown without leaving a large hole in the center.
Single Crochet
Single crochet is a compact stitch that produces a sturdy fabric with a little natural structure. It is a practical choice for a baby beanie because the finished fabric can provide warmth while retaining enough flexibility for a comfortable fit.
Increasing
A single crochet increase is made by working two single crochets into the same stitch. Repeating increases around the crown allows the circular piece to expand. Keeping the increases distributed evenly helps maintain a smooth, rounded shape.
Working in the Round
Working in the round means building the hat continuously around its circumference instead of turning back and forth across rows. Depending on your preferred method, you can work in joined rounds or a continuous spiral. Either approach can create a lovely result when your tension is consistent.
Expert Insight
The most useful measurement is not simply the baby’s age. Head circumference and the amount of desired ease provide a much better guide. Check the fit as you work, especially when using a different yarn weight or crochet hook.
How to Approach the Crochet Baby Beanie Pattern
The exact number of rounds will vary according to yarn, hook size, tension, and the size you are making. Rather than treating one stitch count as universal, think of the pattern as a flexible framework.
- Start the crown: Form a magic ring and work the first group of single crochet stitches into the center.
- Build the circle: Work increase rounds, distributing the increases evenly around the crown.
- Check the diameter: Measure the flat circle before moving on. The crown should be wide enough for the intended size.
- Work straight: Stop increasing and continue working rounds with the same stitch count to create the sides.
- Add the brim: If desired, work extra rounds at the bottom edge to create a fold-up brim.
- Finish carefully: Fasten off and weave in the yarn ends securely for a clean appearance.
Pro Tip: Measure the flat crown before you start working straight. This simple check can prevent a hat from becoming too small or too large and saves you from having to unravel several finished rounds later.
Choosing the Right Size
Baby hats need enough stretch to fit comfortably without feeling tight. A useful size guide can include newborn, 0 to 3 months, 3 to 6 months, 6 to 12 months, and 1 to 3 years. These categories are convenient starting points, but individual babies can vary considerably.
For a newborn-size hat, the crown may measure roughly 4.5 to 5 inches across before the sides are worked. Larger sizes require a wider crown. The finished circumference should provide a comfortable amount of negative ease so the beanie stays in place without creating unnecessary pressure.
Because yarn and tension can dramatically change the final dimensions, measuring as you crochet is more reliable than simply following a stitch count from another project. If your stitches are tighter than expected, the hat may come out smaller. If your stitches are loose, the same number of stitches may create a larger piece.
Yarn Colors and Style Ideas
A classic baby beanie looks beautiful in understated colors. Cream and ivory create a soft, timeless appearance, while blush pink, muted blue, warm mustard, and sage green add gentle color without overwhelming the simple design.
You can make one hat in a single shade for a minimalist finish or create a small collection using coordinated colors. Changing colors between the body and brim can add definition without requiring a more complicated stitch pattern.
Texture can also become part of the design. A softly textured yarn can give the hat a cozy handmade character, while a smoother yarn allows the stitch definition to stand out. Keep the baby’s comfort as the main consideration when selecting fibers and decorative details.
Common Crochet Baby Hat Mistakes to Avoid
Even a beginner-friendly crochet baby beanie can develop problems if the crown or tension is not monitored. Fortunately, most issues are easy to identify early.
- Uneven crown: Make sure increases are distributed consistently so the circular crown remains smooth.
- Too much curling: Check your increase pattern and tension before continuing with more rounds.
- Wavy crown: Too many increases can cause excess fabric. Adjust the increase frequency if necessary.
- Wrong length: Measure the hat as the body grows instead of relying entirely on a fixed number of rounds.
- Inconsistent tension: Try to maintain an even grip and stitch height throughout the project.
Making a Crochet Baby Beanie as a Gift
Handmade baby hats make thoughtful gifts because they are useful, personal, and easy to coordinate with other handmade items. A single beanie can become part of a baby shower gift, newborn outfit, seasonal wardrobe, or small collection of handmade accessories.
Consider making two or three hats in complementary colors rather than producing several identical pieces. A neutral beanie paired with a soft pastel version and a slightly brighter option can create a charming little set.
If you are gifting a hat, keep the presentation simple. Fold the brim neatly, smooth the stitches, and check that all yarn ends are securely woven in. A clean finish makes even a very simple crochet pattern feel polished.
Ways to Personalize the Pattern
Once you understand the basic construction, there are many ways to make the crochet baby beanie your own. You can adjust the length, experiment with color combinations, change the brim treatment, or explore different stitch textures while maintaining the same basic shape.
Try a Colorful Collection
Make several hats using soft pink, cream, blue, yellow, and green yarn. A coordinated palette creates a cheerful collection that works especially well for handmade photography and gift sets.
Adjust the Brim
Keep the brim subtle for a minimalist look or make it wider for a more noticeable folded cuff. A contrasting brim can also create a two-tone design without changing the overall construction.
Add Simple Texture
If you are comfortable experimenting, substitute a textured stitch for selected sections of the body. Keep the crown relatively simple so the hat retains its smooth rounded shape.
At a Glance
- Start at the crown and increase evenly.
- Measure the crown before working straight.
- Use soft yarn and maintain comfortable stretch.
- Add an optional fold-up brim for extra style and coverage.
- Customize colors and length to create your own signature baby hat.
Final Thoughts on the Crochet Baby Beanie Pattern
A classic crochet baby beanie is one of those projects that proves simple does not have to mean boring. With a basic circular crown, straightforward single crochet construction, and an optional fold-up brim, you can create a comfortable handmade hat that looks polished and timeless.
The most important part is to focus on fit, softness, and consistent tension. Once those foundations are in place, the creative possibilities are wide open. Try different pastel shades, create a matching set, adjust the brim, or make a few versions for different stages of growth.
Whether you are learning to crochet, preparing a baby shower gift, or simply looking for a quick handmade project, this crochet baby beanie pattern is a practical place to start. Save the idea, gather your favorite soft yarn, and enjoy creating a cozy little hat made with care.
Tags
Crochet Baby Beanie Baby Hat Pattern Crochet Baby Hats Easy Crochet Pattern Beginner Crochet Handmade Baby Gifts Crochet Baby Accessories Baby Shower Crochet