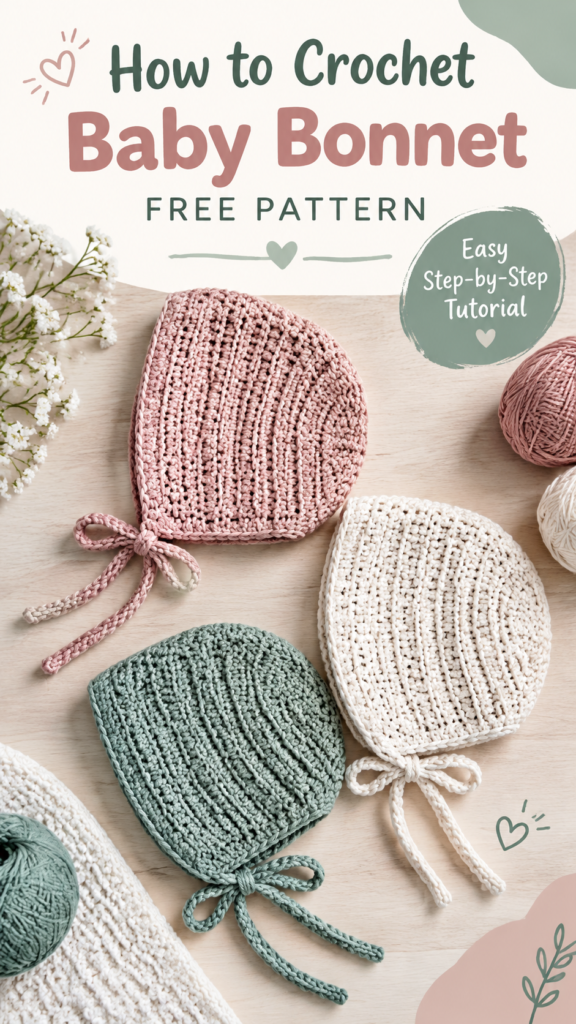
A handmade crochet baby bonnet pattern is a timeless project that combines softness, simplicity, and a beautiful vintage-inspired style. This cozy baby accessory features a rounded bonnet shape, delicate textured stitches, and comfortable ties that create a sweet finish for newborns and little ones. Designed with gentle yarn and beginner-friendly techniques in mind, this original interpretation focuses on creating a practical bonnet with a smooth fit and charming handmade appearance.
This crochet baby bonnet pattern uses a simple construction method with a rectangular crown section shaped into a curved bonnet silhouette, followed by an attached border and soft tie straps. The texture is inspired by the subtle vertical lines often created by working crochet stitches in specific loops, giving the fabric a flexible and elegant look.
Key Takeaways
- This project is a soft crochet baby bonnet designed for newborns and young babies.
- The bonnet uses beginner-friendly rows and textured crochet stitches.
- Suggested yarn is lightweight, washable, and gentle against sensitive skin.
- The design can be customized with different colors, sizes, and edging details.
- The finished accessory makes a thoughtful handmade crochet gift idea.
About This Crochet Baby Bonnet Pattern
This crochet baby bonnet pattern creates a classic bonnet shape with a softly curved back and comfortable front opening. The pictured style is commonly associated with minimalist baby accessories, using neutral and pastel shades that highlight the stitch texture rather than complicated colorwork.
The original design in this article uses a suggested construction method that creates a similar look: a main bonnet panel worked flat in rows, folded and shaped, then finished with a neat edging and crocheted ties. This approach keeps the project approachable while allowing the maker to adjust the fit easily.
Project Details and Visual Style
- Project category: Baby accessory
- Construction: Flat rows with shaping, folding, and simple assembly
- Texture: Ribbed vertical texture created with back loop crochet techniques
- Recommended yarn: Soft lightweight cotton or cotton blend
- Skill level: Confident beginner
- Best use: Baby shower gifts, newborn photography props, and everyday layering accessories
The bonnet shape is designed to sit gently around the baby’s head while leaving enough room for comfort. The tie straps provide a decorative finish, but because this is a baby item, they should always be used with appropriate supervision and care.
Crochet Construction and Stitch Analysis
The visible style of this crochet baby bonnet is best recreated with textured stitches that create raised vertical lines. A practical way to achieve this effect is by using half double crochet stitches worked through the back loop only. This produces a flexible fabric with a soft ribbed appearance.
The bonnet is designed using a simple rectangular panel that becomes curved through shaping decreases. After the main section is completed, the back seam is joined to create the rounded crown. The lower edge receives a clean single crochet border, and matching ties are added to both sides.
Free Crochet Pattern: Sweet Little Ribbed Baby Bonnet
Free Crochet Pattern
Pattern Description: This original crochet baby bonnet pattern creates a soft, rounded bonnet with a ribbed texture, gentle shaping, and simple tie straps. It is designed as an image-inspired interpretation using practical crochet construction methods.
| Skill Level | Confident beginner |
| Finished Size | Newborn size: approximately 14 inches (35.5 cm) head circumference |
| Yarn | Suggested category 3 light cotton or cotton blend, approximately 120 yards (110 meters) |
| Hook | 4 mm crochet hook (US G/6) |
| Gauge | 18 stitches x 12 rows in 4 inches (10 cm) in half double crochet back loop only |
| Terminology | US crochet terms |
Materials
- Approximately 120 yards (110 meters) of category 3 light weight soft cotton yarn
- 4 mm crochet hook (US G/6)
- Yarn needle for weaving ends
- Scissors
- Stitch markers for shaping assistance
Abbreviations
- ch: chain
- hdc: half double crochet
- hdcblo: half double crochet through back loop only
- sc: single crochet
- sl st: slip stitch
- st: stitch
- dec: decrease
- rep: repeat
Special Stitch
HDCLBO: Yarn over, insert hook into the back loop only of the indicated stitch, yarn over and pull up a loop, yarn over and pull through all three loops on the hook.
Construction Notes
Turning chains do not count as stitches. Turn after every row. The bonnet is worked flat from the bottom edge upward, then folded and joined at the back to create the rounded shape.
Bonnet Main Panel
- Row 1: Ch 58. Hdc in the second ch from hook and across. Turn. (57 hdc)
- Row 2: Ch 1. Hdc blo across. Turn. (57 sts)
- Rows 3-18: Repeat Row 2. After Row 18, you should have a textured rectangle measuring approximately 10 inches (25.5 cm) long.
- Row 19: Ch 1. Hdc blo in first 48 sts, hdc2tog over next 2 sts, hdc blo in remaining 7 sts. Turn. (56 sts)
- Row 20: Ch 1. Hdc blo across. Turn. (56 sts)
- Row 21: Ch 1. Hdc blo in first 47 sts, hdc2tog over next 2 sts, hdc blo in remaining 7 sts. Turn. (55 sts)
- Row 22: Ch 1. Hdc blo across. Turn. (55 sts)
- Row 23: Ch 1. Hdc blo in first 46 sts, hdc2tog over next 2 sts, hdc blo in remaining 7 sts. Turn. (54 sts)
Back Seam Assembly
Fold the panel in half so the shorter edges meet. Using the same yarn, slip stitch or whip stitch the back seam together from the crown downward. Keep the textured rows aligned for a neat finish.
Edging
- Attach yarn at the front opening edge.
- Work 1 round of sc evenly around the opening.
- Place 2 sc in corners if needed to prevent pulling.
- Join with a sl st and fasten off.
Tie Straps
- Attach yarn at one lower front corner.
- Ch 45 for a tie strap.
- Work back across the chain with sl sts.
- Fasten off and repeat on the opposite side.
Weave in all yarn ends securely. Avoid adding buttons, beads, or detachable decorations to baby items.
Customization and Size Adjustment Guide
This crochet baby bonnet pattern can be adjusted by changing the starting chain and the number of rows. Always create a gauge swatch before modifying the size to keep the fabric soft and the measurements consistent.
- Smaller size: Reduce the starting chain by 4 to 6 stitches and create fewer rows for a shorter bonnet.
- Larger size: Add stitches in multiples of 2 and increase the number of rows before shaping.
- Color ideas: Try cream, dusty pink, sage green, soft gray, or natural cotton shades.
- Texture options: Replace the ribbed stitch with regular half double crochet for a smoother fabric.
Common Mistakes and Troubleshooting
Uneven Edges
Count stitches at the end of every row. Missing the final stitch is a common reason crochet panels become narrower over time.
Bonnet Feels Too Firm
Try a slightly larger hook or a softer yarn. Baby accessories should have gentle flexibility and comfortable drape.
Shaping Looks Uneven
Place stitch markers at decrease points and check that decreases are worked in the correct rows.
Finishing, Blocking, and Care
Light blocking can help the stitches relax and create a smoother bonnet shape. Gently wash the finished piece according to the yarn label instructions, reshape it while damp, and allow it to dry completely.
For baby items, choose washable yarn whenever possible. Avoid loose embellishments and decorative pieces that could become detached.
At a Glance
- Best yarn choice: Soft washable cotton or cotton blend
- Skill level: Confident beginner crochet
- Main technique: Half double crochet back loop texture
- Adjustment method: Change starting chain and row count
- Finishing method: Simple seam, edging, and tie straps
Create Your Own Handmade Crochet Baby Bonnet
This crochet baby bonnet pattern is a charming way to practice textured crochet while creating a meaningful handmade accessory. Choose a soft yarn, check your gauge when adjusting the size, and read through the full pattern before beginning. Small changes in color and finishing details can create a completely personalized crochet gift.
Whether you are making a newborn keepsake, a baby shower present, or a cozy everyday accessory, this free crochet pattern offers a simple foundation for a beautiful handmade crochet project.
Tags
Crochet Baby Bonnet Pattern
Free Crochet Pattern
Baby Crochet Ideas
Beginner Crochet Project
Handmade Baby Gift
Crochet Tutorial