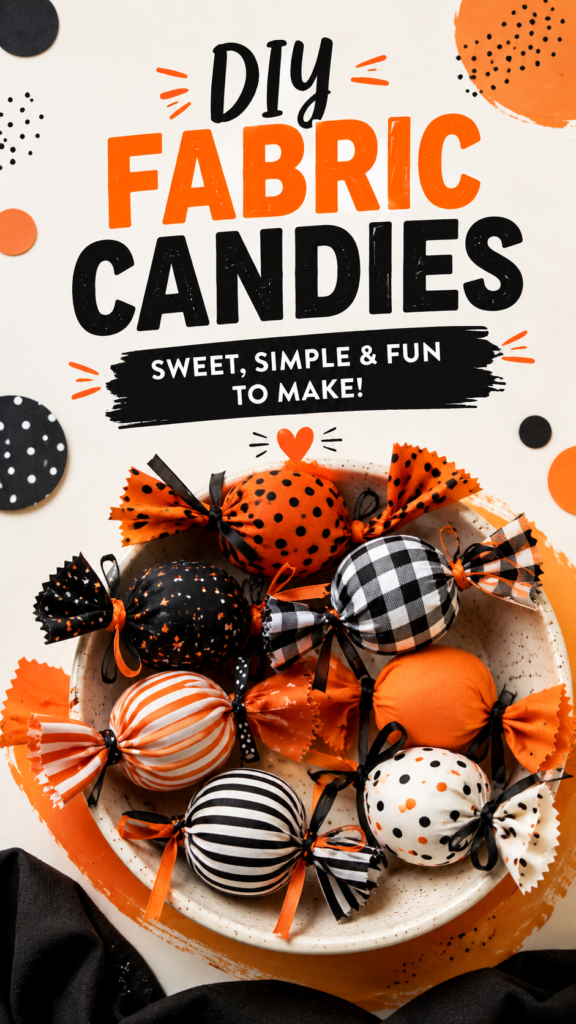
Halloween crafts become even more charming when they combine simple materials, playful patterns, and a little imagination. These handmade fabric candies are a perfect example. With bright orange fabric, black-and-white checks, polka dots, stripes, ribbons, and soft rounded centers, they create the look of oversized wrapped sweets without the mess of real candy. They are a fun way to bring handmade personality to a Halloween display, party table, craft corner, or seasonal arrangement.
Key Takeaways
- Fabric candy crafts can turn colorful scraps into playful Halloween decorations.
- Orange, black, white, gingham, stripes, and polka dots create an instantly festive palette.
- Different fabrics and ribbons can give every handmade candy its own personality.
- These decorative pieces work well for bowls, trays, shelves, party tables, and seasonal displays.
- Mixing patterns and textures creates a more interesting handmade Halloween arrangement.
Why Fabric Candy Makes a Fun Halloween Craft
Traditional Halloween decorating often focuses on pumpkins, ghosts, bats, and other familiar seasonal motifs. Fabric candy offers a different approach. It keeps the cheerful, playful feeling of Halloween while adding a handmade look that feels cozy and creative.
The wrapped candy shape is especially appealing because it is easy to recognize. A rounded center surrounded by gathered fabric ends immediately suggests a piece of old-fashioned wrapped candy. Instead of using edible ingredients, you can create the shape from textiles and embellish it with ribbons, contrasting prints, and seasonal colors.
Important: The beauty of a fabric candy craft is its flexibility. There is no single correct combination of colors or patterns. Mixing prints is part of the charm, so use the project as an opportunity to experiment with scraps you already have.
The examples shown feature several combinations, including vivid orange with black dots, black fabric with colorful spots, orange-and-white patterns, gingham, and bold stripes. The result feels festive without requiring complicated decoration.
Choosing Fabrics for DIY Halloween Candy
Fabric selection is one of the most enjoyable parts of making decorative candy. Since these pieces are designed to be visually playful, you can combine fabrics that might not normally appear together. The key is to keep at least one visual element consistent, such as color, pattern, or ribbon.
Build a Halloween Color Palette
Orange and black are natural starting points for Halloween crafts. Orange provides warmth and energy, while black adds contrast and gives the arrangement a stronger seasonal identity. White, cream, gray, or natural fabric can soften the overall look.
You can also introduce small touches of green, purple, brown, or other colors through tiny dots and accents. The goal is not to make every piece identical. A coordinated collection usually looks more interesting when each candy is slightly different.
Mix Polka Dots, Stripes, and Checks
Patterns are particularly effective for fabric candy because the rounded center gives prints plenty of space to stand out. Polka dots create a cheerful, whimsical effect. Stripes can make the candy look bold and graphic, while gingham and plaid introduce a cozy farmhouse-inspired touch.
Try pairing a busy print with a simpler solid fabric. For example, a black-and-white check center can be surrounded by a solid orange fabric, while a bright polka-dot center can be finished with a striped ribbon.
Think About Texture Too
Pattern is only one part of the visual effect. Smooth cotton, slightly textured fabric, lightweight prints, and rustic-looking textiles can all create different moods. Combining a few textures can make a bowl of finished fabric candies feel fuller and more dimensional.
Basic Materials for Fabric Candy Crafts
You do not need a huge collection of supplies to explore this DIY Halloween craft. The exact materials can vary depending on the technique and the size you want, but a simple project can begin with fabric, a soft filling material, and ribbon.
- Halloween-themed fabric scraps or fat quarters
- Soft stuffing or another suitable lightweight filler
- Orange, black, white, or patterned ribbon
- Fabric scissors
- Thread and a needle or a sewing machine
- Optional fabric glue for suitable decorative details
- A ruler or measuring tape for keeping pieces consistent
If you are making decorations for a particular display, consider choosing your fabric palette before you begin. Having a small group of coordinated fabrics nearby makes it easier to create a collection that looks intentional.
Expert Insight
The most attractive handmade candy arrangements usually rely on repetition with variation. Repeat a few colors, but change the patterns. Repeat the basic candy shape, but vary the fabric and ribbon combinations. This creates unity without making the display look overly uniform.
How to Create the Look of Wrapped Fabric Candy
The basic concept is simple: create a soft, rounded center and surround it with fabric that extends beyond both ends. The extended fabric is then gathered or shaped to mimic the twisted ends of a wrapped sweet.
1. Choose Your Fabric
Start with a fabric that fits your Halloween color scheme. For a traditional look, try orange and black. For something softer, combine cream, warm orange, gingham, and muted neutrals. If you want a more playful result, use colorful dots or contrasting stripes.
2. Shape the Center
The center should have a rounded, candy-like appearance. A soft filler can help create volume while keeping the finished decoration lightweight. Aim for a pleasing oval or rounded shape rather than making the center completely flat.
The amount of filling affects the personality of the finished craft. A fuller center creates a plump candy appearance, while a slightly flatter shape can look more relaxed and handmade.
3. Create the Wrapped Ends
Once the center is shaped, gather the fabric at both ends. The loose fabric should fan outward so that it resembles the ends of a wrapped candy. Scalloped or pinked edges can add an extra decorative touch if the fabric and cutting method allow it.
4. Finish With Ribbon
Ribbon is the detail that really completes the illusion. Tie it securely around each gathered side and adjust the loops or tails until they look balanced. Orange-and-black striped ribbon works especially well for Halloween, but solid black, orange, gingham, or polka-dot ribbon can also create beautiful combinations.
Pro Tip: Do not be afraid to use contrasting ribbon. A bold ribbon can make a simple fabric center look much more decorative, while a subtle ribbon can let a busy print remain the main attraction.
Creative Ways to Customize Halloween Fabric Candy
Once you understand the basic shape, there are plenty of ways to personalize the project. Think of each finished piece as a small decorative canvas.
Make a Monochrome Collection
For a modern Halloween display, limit your palette to black, white, and one accent color. Black-and-white stripes, checks, dots, and solid orange can create a clean collection that feels contemporary while still being unmistakably seasonal.
Create a Scrap Fabric Collection
This craft is also a wonderful way to use small fabric leftovers. Instead of searching for identical pieces, embrace the mismatched look. Combine gingham with polka dots, stripes with solids, and tiny prints with larger patterns.
Using scraps can make every piece unique. It also gives you an easy way to build a larger decorative collection over time without needing to purchase a large amount of new fabric.
Coordinate the Ribbons
When the fabrics are highly varied, matching the ribbons can bring the collection together. For example, use the same black-and-orange ribbon on several different fabric candies. The centers can be completely different while the repeated ribbon creates visual consistency.
How to Display DIY Fabric Candies
Once your handmade Halloween candies are finished, the next question is where to put them. Their compact shape makes them surprisingly versatile for seasonal decorating.
Fill a Decorative Bowl
A bowl is one of the easiest display options. Place several fabric candies together and allow the different patterns to overlap naturally. A neutral ceramic bowl can keep attention on the colorful textiles, while a dark bowl can make orange fabrics pop.
Style a Party Table
Fabric candy can add a playful accent to a Halloween gathering. Arrange several pieces along a table, place them in a decorative container, or combine them with other handmade seasonal decorations.
Because the pieces are fabric rather than edible candy, they can also become reusable decorations that return year after year when stored carefully between seasons.
Create a Seasonal Craft Display
Place fabric candies on a shelf, entryway table, craft station, or decorative tray. Pair them with pumpkins, autumn textiles, candles, or other non-religious Halloween and fall accents for a layered seasonal arrangement.
Tips for a More Polished Handmade Finish
Small details can make a simple craft look much more finished. Keep the gathered ends reasonably balanced, trim loose threads, and arrange the ribbon tails so they fall naturally.
- Choose fabrics that share at least one color.
- Use enough filling to create a rounded center without making it overly stiff.
- Keep the wrapped ends visually balanced on both sides.
- Secure ribbons firmly and shape the loops before displaying the finished piece.
- Combine large and small patterns to avoid a visually crowded arrangement.
- Step back and view the complete collection before making final adjustments.
Remember that handmade crafts do not need to look factory-perfect. Slight variations in shape, pattern, and ribbon placement can make the finished collection feel more personal. The goal is a cheerful handmade appearance, not absolute uniformity.
Why Handmade Halloween Decor Feels So Special
Seasonal decorating is often more meaningful when you can see the time and creativity behind each piece. Handmade fabric candy brings that feeling to Halloween decor through simple materials and familiar shapes.
It is also a practical project for anyone who enjoys sewing, fabric crafts, scrap-busting projects, or DIY seasonal decorations. You can make one statement piece or create an entire collection of different candies in an afternoon of crafting.
Most importantly, the design leaves room for your own style. You can make the colors bright and playful, keep them sophisticated and neutral, or use whatever fabric scraps are already waiting in your craft supplies.
Quick Points
- Use orange, black, white, and seasonal prints for instant Halloween appeal.
- Mix dots, checks, stripes, and solids for visual variety.
- Use coordinating ribbons to tie different patterns together.
- Display finished fabric candies in bowls, trays, shelves, or party spaces.
- Save your favorite fabric scraps for future seasonal craft projects.
Conclusion: Make Halloween Crafting Extra Sweet
DIY fabric candies are a simple, cheerful way to turn ordinary textiles into memorable Halloween decorations. Their wrapped shape, bright seasonal colors, playful patterns, and ribbon details make them instantly eye-catching, while the handmade construction gives them a warm personal touch.
Whether you create a bowl full of mismatched fabric candies or make a coordinated set using just a few favorite prints, this project offers plenty of room for creativity. Experiment with orange and black, bring in gingham and polka dots, layer stripes with solids, and use ribbons to give each piece its own character.
Best of all, these Halloween crafts can become part of your seasonal decorating collection for years to come. A handful of fabric scraps, a little stuffing, and a few beautiful ribbons can become a display that feels festive, colorful, and completely your own.
Tags
Halloween Crafts DIY Halloween Decor Fabric Crafts Halloween DIY Sewing Projects Scrap Fabric Crafts Fall Crafts Handmade Halloween Decor