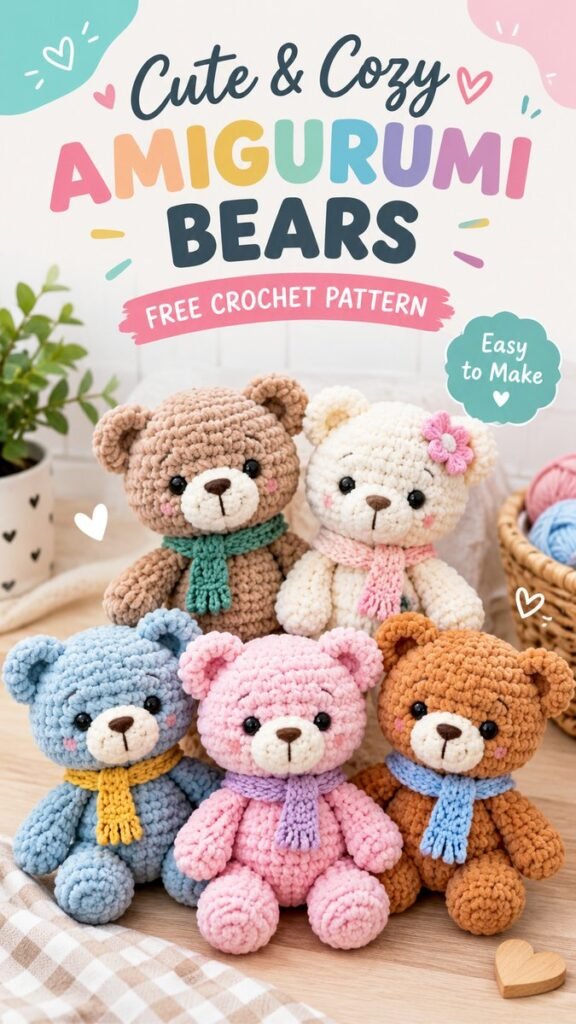
There is something especially charming about a handmade crochet stuffie. Soft yarn, simple shapes, tiny embroidered faces, and cheerful colors come together to create a little friend that feels personal from the very first stitch. These cute crochet stuffies are a wonderful example of how a basic amigurumi construction can become an adorable finished toy with just a few thoughtful details.
The teddy bear style shown here has a rounded head, plump body, small ears, short arms, and compact legs. The pastel color palette makes the finished bears especially sweet, while plush yarn gives them a soft, cuddly appearance. This type of project is also easy to customize, making it suitable for handmade gifts, nursery decorations, craft fairs, or simply adding a collection of colorful crochet plushies to your home.
Key Takeaways
- Plush yarn creates the soft, rounded texture that makes crochet stuffies extra cuddly.
- Simple amigurumi shapes can be combined to create an adorable teddy bear.
- Pastel pink, blue, green, cream, and brown yarn offer plenty of color options.
- Safety eyes and embroidered facial details give each bear a distinct personality.
- The pattern can be adjusted with different yarn weights and hook sizes.
- Small handmade stuffies make thoughtful gifts for many occasions.
Why Cute Crochet Stuffies Are So Fun to Make
Crochet stuffies are satisfying projects because they turn a handful of basic stitches into a three-dimensional character. Unlike flat crochet pieces, amigurumi gradually develops as you work in the round, allowing the head, body, limbs, and ears to take shape with very little sewing.
Teddy bears are particularly beginner-friendly because their design does not require complicated shaping. A rounded head, oval body, small ears, and simple limbs are enough to create a recognizable bear. The face is where the personality really comes alive.
Another advantage is the freedom to experiment. You can make one bear in soft cream, another in dusty pink, another in baby blue, or combine several colors to create an entire collection. Small changes to the ears, muzzle, expression, or accessories can make each crochet stuffie feel completely unique.
Materials for a Soft Crochet Bear
For a plush teddy bear inspired by the cozy style shown here, choose a soft yarn that produces a dense but flexible fabric. Chenille or velvet-style yarn is particularly effective because its fuzzy surface gives the bear a cuddly texture and helps hide small imperfections in the stitches.
- Plush or chenille yarn in your preferred main color
- A coordinating yarn for the muzzle
- A small amount of darker yarn for embroidery
- A crochet hook suitable for your yarn, often around 3.5 mm to 5 mm for plush yarn
- Polyester fiberfill stuffing
- Black safety eyes or embroidery thread
- Yarn needle
- Stitch marker
- Small scissors
If the stuffie is intended for a young child, consider embroidered eyes instead of safety eyes. Always choose materials appropriate for the intended recipient and follow the manufacturer’s instructions for safety components.
Important: When crocheting amigurumi, use a relatively tight tension so the stuffing does not show through the stitches. A fabric that looks slightly firm while crocheting will usually create a smoother and more polished finished stuffie.
An Original Crochet Stuffie Bear Pattern
The following pattern creates a compact, rounded teddy bear with a plush appearance. It is designed as an original, adaptable project rather than a reproduction of any particular published pattern. You can make the bear larger or smaller by changing the yarn weight and hook size.
Abbreviations
- MR: magic ring
- sc: single crochet
- inc: increase, two single crochet stitches in one stitch
- dec: decrease, two stitches worked together
- sl st: slip stitch
- FO: fasten off
- st: stitch
Work in continuous rounds unless otherwise indicated. Place a stitch marker in the first stitch of each round so you can easily keep track of your position.
Head
- Round 1: Make a magic ring and work 6 sc into the ring. (6)
- Round 2: Inc in each stitch around. (12)
- Round 3: Sc around. (12)
- Round 4: Sc 1, inc around. (18)
- Round 5: Sc 2, inc around. (24)
- Round 6: Sc 3, inc around. (30)
- Rounds 7 to 11: Sc around. (30)
- Round 12: Sc 3, dec around. (24)
- Round 13: Sc 2, dec around. (18)
- Round 14: Sc 1, dec around. (12)
- Stuff the head firmly but gently.
- Round 15: Dec around. (6)
FO, leaving a long yarn tail. Use the yarn needle to close the remaining opening. Before completely closing the head, add a little more stuffing if the shape needs additional fullness.
Muzzle
Use cream, white, or another contrasting color for the muzzle.
- Round 1: MR with 6 sc. (6)
- Round 2: Inc around. (12)
- Round 3: Sc around. (12)
- Round 4: Sc 1, inc around. (18)
- Round 5: Sc around. (18)
FO and leave a sewing tail. Add a small amount of stuffing if desired, then sew the muzzle securely to the lower center of the face.
Body
- Round 1: MR with 6 sc. (6)
- Round 2: Inc around. (12)
- Round 3: Sc 1, inc around. (18)
- Round 4: Sc 2, inc around. (24)
- Rounds 5 to 9: Sc around. (24)
- Round 10: Sc 2, dec around. (18)
- Round 11: Sc 1, dec around. (12)
- Stuff the body gradually as you work.
- Round 12: Dec around. (6)
FO and close the opening. The body should be comfortably plump without being stretched so tightly that the stitches become distorted.
Ears
Make two ears in the main yarn color.
- Round 1: MR with 6 sc. (6)
- Round 2: Inc around. (12)
- Round 3: Sc around. (12)
- Round 4: Sc 1, dec around. (8)
FO and leave a sewing tail. Do not overstuff the ears. Flatten each piece gently between your fingers and sew them near the top of the head, positioning them symmetrically.
Arms
Make two arms.
- Round 1: MR with 6 sc. (6)
- Round 2: Inc around. (12)
- Rounds 3 to 7: Sc around. (12)
- Round 8: Sc 1, dec around. (8)
Lightly stuff the lower part of each arm. Flatten the top opening and sew it closed. Attach the arms to the sides of the body, checking the position from the front before sewing them permanently.
Legs
Make two short legs using the same main color.
- Round 1: MR with 6 sc. (6)
- Round 2: Inc around. (12)
- Rounds 3 to 5: Sc around. (12)
- Round 6: Sc 1, dec around. (8)
Add a small amount of stuffing and close the opening. Sew the legs onto the lower part of the body, keeping them evenly spaced so the bear can sit comfortably.
Putting the Bear Together
Assembly is one of the most important stages of making crochet stuffies. Even when every individual piece is crocheted neatly, the final character can look quite different depending on placement.
Start by attaching the head to the body. Position it slightly forward if you want a cute, rounded teddy bear posture. Sew around the connection several times, working through sturdy stitches on both pieces.
Next, attach the arms and legs. Look at the bear from several angles before securing each piece. Symmetry does not have to be absolutely perfect, but keeping the major features balanced will give the finished stuffie a polished appearance.
Creating the Face
Place the eyes above the muzzle with enough space between them to create a friendly expression. The image style works especially well with small dark eyes and a simple embroidered nose and mouth.
For the nose, use dark brown or black yarn and make several small horizontal stitches over the center of the muzzle. Add a short vertical stitch underneath to create the mouth. A few tiny embroidered cheek details can also give the bear a softer, more playful appearance.
Why This Matters
The face often determines the entire personality of a crochet stuffie. Before permanently attaching the eyes and muzzle, place the pieces temporarily and experiment with spacing. A slightly wider eye placement can create a sweet expression, while a closer arrangement can make the bear look more curious and playful.
Choosing Colors for Cute Crochet Stuffies
Color is one of the easiest ways to turn one crochet bear pattern into an entire collection. The soft palette associated with plush teddy bears works beautifully because it keeps the finished characters gentle and approachable.
- Blush pink: sweet and playful for a cheerful gift.
- Baby blue: fresh, calm, and perfect for a soft pastel collection.
- Mint green: adds a modern handmade feel.
- Cream: creates a classic teddy bear appearance.
- Warm brown: gives the traditional teddy bear look.
- Peach or caramel: adds warmth without becoming too dark.
Try making the muzzle in a contrasting cream shade even when the body is brightly colored. This simple color change makes the face easier to see and gives the stuffie a recognizable teddy bear appearance.
Pro Tip: If you want a coordinated group of crochet stuffies, keep the pattern and facial style consistent while changing only the body colors. The result will look like a charming handmade collection rather than five completely unrelated toys.
How to Get a Neat Plush Finish
Plush yarn can be wonderfully forgiving, but it can also make individual stitches difficult to see. Counting carefully is therefore important, especially during increases and decreases.
Use a stitch marker from the beginning of every round. If you lose your place, count the visible stitches around the round instead of guessing. Consistent tension will also help maintain the rounded proportions of the head and body.
Stuff the bear gradually rather than adding all the filling at the end. Small amounts worked into the piece as you crochet allow you to control the shape. Pay particular attention to the cheeks, lower body, and sides of the head.
Avoiding a Lumpy Shape
If the head looks uneven, gently massage the stuffing through the fabric before closing the piece. Do not pack the fiberfill so tightly that the stitches stretch apart. The goal is a firm but flexible shape.
For limbs, less stuffing is usually preferable. Slightly softer arms and legs help the bear maintain the relaxed, floppy appearance that makes many crochet stuffies so appealing.
Creative Ways to Customize Your Bear
Once you have completed the basic teddy bear, there are countless ways to personalize it. Add a tiny crocheted scarf, a simple bow, a flower, a miniature sweater, or a small embroidered detail. Accessories can completely change the personality of the same basic design.
You can also experiment with proportions. Make the head slightly larger for a classic kawaii-inspired look, or lengthen the body and limbs for a more traditional teddy bear silhouette. Changing the ears from rounded to slightly pointed can create another character while keeping the same basic construction.
- Make matching bears in several pastel shades.
- Add contrasting inner ears for extra dimension.
- Embroider tiny blush marks onto the cheeks.
- Create miniature scarves using leftover yarn.
- Use different facial expressions for each bear.
- Make a smaller version as a bag charm or decorative accessory.
Crochet Stuffies as Handmade Gifts
Cute crochet stuffies are naturally suited to gifting because they feel personal and handmade. A small bear can be paired with a handwritten note, tucked into a gift basket, or displayed as part of a handmade collection.
For birthdays, baby showers, holidays, or simply as a thoughtful surprise, a handmade plush character offers something that a mass-produced toy cannot quite replicate. Choosing the recipient’s favorite color is an easy way to make the project feel even more personal.
If you are making crochet stuffies for children, always consider age-appropriate construction and materials. Secure every component carefully, and choose embroidered facial features when appropriate. Handmade does not have to mean complicated. A simple, carefully finished bear can be just as special as a highly detailed design.
At a Glance
- Use plush yarn for a soft, cuddly texture.
- Build the bear from simple rounded amigurumi pieces.
- Keep stuffing firm but flexible for a smooth shape.
- Experiment with pastel colors to create a coordinated collection.
- Personalize the face and accessories to give every bear character.
Final Thoughts on Cute Crochet Stuffies
Cute crochet stuffies are a wonderful way to combine simple crochet techniques with creativity and personality. A basic teddy bear shape can become something completely different through color choices, facial details, proportions, and tiny handmade accessories.
The soft, colorful teddy bear style is especially appealing for anyone who enjoys cozy amigurumi projects. Whether you make one bear as a quick weekend craft or create an entire family of colorful characters, the process offers plenty of opportunities to practice shaping, sewing, stuffing, and decorative details.
Most importantly, do not worry about making every bear exactly identical. Handmade crochet has its charm in those small differences. Experiment with yarn colors, adjust the expression, try a new accessory, and let each finished stuffie develop its own personality. With a simple pattern and a little imagination, you can turn a few skeins of yarn into a collection of adorable crochet friends.
Tags
Refine the crochet stuffie article
Create Pinterest pin copy
Add SEO meta title and description