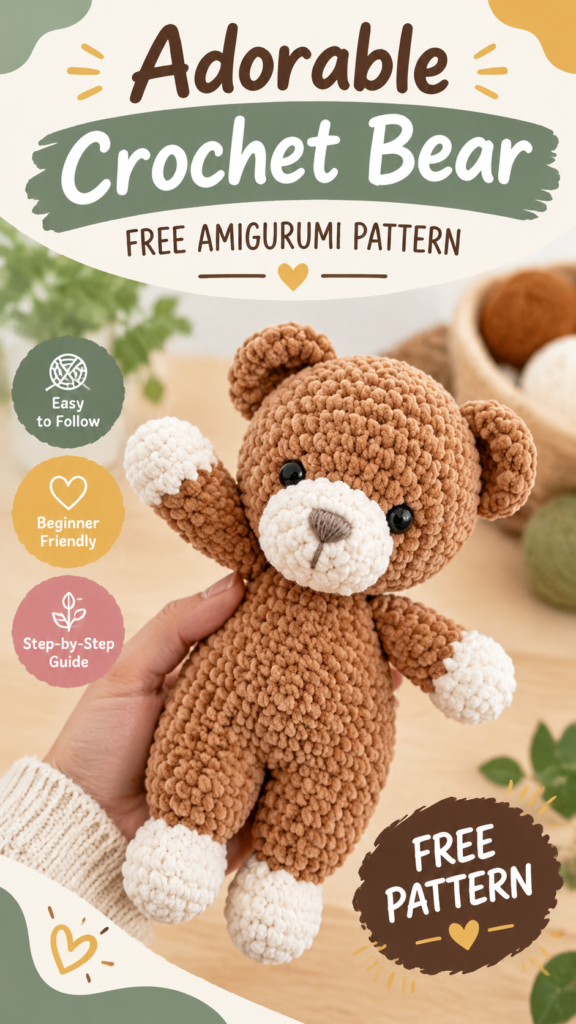
The adorable crochet baby bear amigurumi shown here is a charming handmade plush project designed with soft textures, rounded shapes, and a sweet teddy bear personality. This original crochet baby bear amigurumi pattern is inspired by the classic look of a cuddly stuffed bear, featuring a rounded head, small ears, embroidered facial details, short arms and legs, and a cozy two-tone color arrangement. It is an ideal easy crochet project for makers who enjoy creating handmade gifts, nursery decorations, or cute keepsake toys.
This pattern uses a practical amigurumi construction method with pieces worked mostly in continuous rounds. The smooth fabric appearance comes from tight single crochet stitches worked with plush yarn, creating a dense surface that holds stuffing beautifully. The finished bear has a soft, squishy feel while maintaining its recognizable teddy bear shape.
Key Takeaways
- A beginner-friendly crochet baby bear amigurumi made with simple single crochet stitches.
- Worked in continuous rounds with separate pieces assembled after crocheting.
- Suggested plush yarn creates a soft texture similar to the pictured stuffed bear.
- Perfect as a crochet gift idea, nursery accent, or handmade toy project.
- Customizable with different colors, embroidered details, and facial expressions.
Description of This Crochet Baby Bear Amigurumi Project
The project is a small crochet teddy bear amigurumi with a rounded head, oval body, little ears, stubby arms, and short legs. The visible design uses a warm brown main color with lighter cream accents on the muzzle, paws, and feet. The face is kept simple with dark eyes and a small embroidered nose, giving the bear a gentle expression.
The design is best suited for confident beginners because it uses basic amigurumi techniques including magic rings, increases, decreases, stuffing, and sewing separate parts together. While the stitches are simple, careful shaping and neat finishing create the polished handmade appearance.
Suggested materials include soft chenille or plush yarn because it creates a velvety texture and helps the finished bear feel extra cuddly. A smooth acrylic or cotton yarn can also be used for a more defined stitch look.
Important: If this crochet baby bear amigurumi is intended for babies or young children, embroidered eyes and facial features are recommended. Plastic safety eyes may not be appropriate for children under three because small attached parts can create a choking hazard.
Crochet Construction and Stitch Analysis
This original interpretation uses a classic amigurumi technique. The head, body, arms, legs, ears, and muzzle are crocheted as separate pieces and joined during finishing. The main stitch is single crochet worked tightly in continuous rounds to create a firm stuffed shape.
The bear does not require complex stitch patterns. Instead, the shape comes from controlled increases and decreases. Increasing creates the rounded sections of the head and body, while decreasing narrows areas such as the neck and limb ends.
Free Crochet Pattern: Cozy Baby Bear Amigurumi
Free Crochet Pattern
Project Name: Cozy Snuggle Baby Bear Amigurumi
Description: A soft stuffed crochet bear featuring a rounded head, small ears, short limbs, and embroidered facial details.
| Skill Level | Confident beginner |
| Finished Size | Approximately 8 inches (20 cm) tall |
| Yarn | Super bulky chenille yarn, approximately 120 yards (110 meters) brown and 30 yards (27 meters) cream |
| Hook | Recommended 4.0 mm crochet hook (US G-6) |
| Gauge | Approximate: 16 single crochet stitches x 18 rounds in 4 inches (10 cm) |
| Terminology | US crochet terms |
Materials and Supplies
- Brown plush yarn, approximately 120 yards (110 meters)
- Cream plush yarn, approximately 30 yards (27 meters)
- 4.0 mm crochet hook (US G-6)
- Polyester fiberfill stuffing
- Yarn needle
- Stitch marker
- Black embroidery thread for facial details
- Scissors
Abbreviations
- MR: Magic ring
- ch: Chain
- sc: Single crochet
- inc: Increase, 2 sc in one stitch
- dec: Decrease, single crochet two stitches together
- sl st: Slip stitch
- st: Stitch
- FO: Fasten off
Special Stitch Explanation
Invisible decrease: Insert the hook into the front loop only of the next two stitches, yarn over, pull through both loops, yarn over again, and complete the single crochet. This creates a smoother amigurumi finish.
Construction Notes
All pieces are worked in continuous rounds unless noted. Do not join rounds. Use a stitch marker and move it after every round.
Head
- Round 1: MR, 6 sc. (6)
- Round 2: Inc in each stitch around. (12)
- Round 3: (Sc, inc) repeat 6 times. (18)
- Round 4: (2 sc, inc) repeat 6 times. (24)
- Round 5: (3 sc, inc) repeat 6 times. (30)
- Rounds 6-11: Sc around. (30)
- Round 12: (3 sc, dec) repeat 6 times. (24)
- Round 13: (2 sc, dec) repeat 6 times. (18)
- Round 14: (Sc, dec) repeat 6 times. (12)
- Round 15: Dec around. (6)
Stuff firmly before closing. Leave a yarn tail for sewing if needed.
Body
- Round 1: MR, 6 sc. (6)
- Round 2: Inc in each stitch around. (12)
- Round 3: (Sc, inc) repeat 6 times. (18)
- Round 4: (2 sc, inc) repeat 6 times. (24)
- Rounds 5-10: Sc around. (24)
- Round 11: (2 sc, dec) repeat 6 times. (18)
- Round 12: Sc around. (18)
- Round 13: (Sc, dec) repeat 6 times. (12)
- Round 14: Sc around. (12)
Add stuffing gradually while shaping the body. Leave the bottom slightly rounded and close with decreases.
Arms (Make 2)
- Round 1: MR, 6 sc. (6)
- Rounds 2-6: Sc around. (6)
- FO and leave a sewing tail.
Legs (Make 2)
- Round 1: MR, 6 sc. (6)
- Round 2: Inc around. (12)
- Rounds 3-7: Sc around. (12)
- FO and leave a sewing tail.
Ears (Make 2)
- Round 1: MR, 6 sc. (6)
- Round 2: Inc around. (12)
- Round 3: Sc around. (12)
- Flatten the circle and FO, leaving a tail for sewing.
Muzzle
- Round 1: With cream yarn, MR, 6 sc. (6)
- Round 2: Inc around. (12)
- Round 3: Sc around. (12)
- FO and leave a sewing tail.
Assembly
- Sew the muzzle to the lower center of the head.
- Embroider a small nose and curved mouth using black thread.
- Attach ears near the upper sides of the head.
- Sew the head securely to the body.
- Attach arms to the sides of the body.
- Sew legs evenly at the bottom of the body.
Weave in all yarn ends securely inside the pieces. Adjust the placement before final stitching to create the desired expression.
Customization and Size Adjustment Guidance
This crochet baby bear amigurumi can easily be personalized. To create a larger bear, use thicker yarn and a larger hook while keeping the same shaping sequence. For a smaller version, choose lighter yarn and a smaller hook.
- Change the main yarn color for different bear styles.
- Add a small crochet bow or scarf for decoration.
- Create embroidered cheeks using soft pink thread.
- Use different ear and muzzle colors for a unique look.
Common Mistakes and Troubleshooting
- Losing stitch count: Always move the stitch marker after every round.
- Loose stuffing showing: Use a smaller hook if holes appear between stitches.
- Lumpy shaping: Add stuffing slowly instead of filling the piece all at once.
- Uneven facial placement: Pin pieces temporarily before sewing.
Finishing, Care, and Assembly Guidance
For the best finish, gently shape the stuffed bear after assembly by adjusting the fiberfill inside. Avoid overstuffing because it can stretch the crochet fabric and change the intended proportions.
Because plush yarn can collect dust, spot cleaning with mild soap and cool water is recommended. Allow the bear to air dry completely while reshaping the limbs and body.
At a Glance
- Best yarn choice: Soft plush or chenille yarn for a cuddly texture.
- Skill level: Confident beginner amigurumi project.
- Key technique: Continuous rounds with single crochet shaping.
- Size adjustment: Change yarn weight and hook size for different dimensions.
- Finishing method: Secure sewing, stuffing, and embroidered details.
Create Your Own Crochet Baby Bear Amigurumi
This crochet baby bear amigurumi pattern is a sweet way to practice shaping techniques while creating a handmade keepsake. Choose a soft yarn, prepare your hook, and read through the complete pattern before starting. Small changes in color, facial details, and accessories can turn this simple teddy bear into a truly personal crochet gift idea.
Whether you are making a nursery decoration, a thoughtful handmade present, or a new addition to an amigurumi collection, this easy crochet project offers plenty of room for creativity. Enjoy the process, check your stitch counts, and personalize your finished bear with your own crochet style.
Tags
Crochet Baby Bear Amigurumi
Free Crochet Pattern
Easy Amigurumi
Crochet Plush Toy
Handmade Crochet
Amigurumi Tutorial