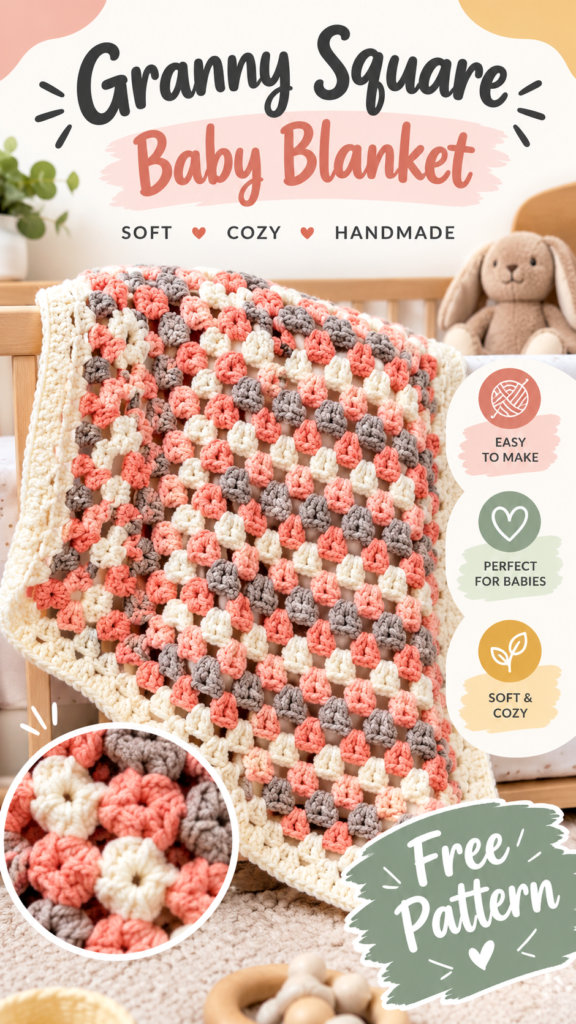
This cozy crochet granny square baby blanket is inspired by the soft, raised texture and gentle color palette of classic handmade baby blankets. The design combines plush puff clusters with the familiar geometry of a granny square, creating a blanket that feels playful, warm, and wonderfully tactile. Cream, coral, and soft gray work beautifully together, but the pattern is easy to customize with your favorite nursery colors.
The original interpretation below uses individual textured granny squares joined into a simple rectangular blanket. The exact yarn, hook size, gauge, and dimensions of any photographed blanket cannot be determined visually, so the specifications are practical recommendations designed to create a similar chunky, dimensional effect.
Key Takeaways
- A textured crochet granny square baby blanket made from individual puff-cluster motifs.
- Confident beginner friendly once the puff stitch and granny-square construction are understood.
- Suggested yarn is soft worsted-weight yarn in cream, coral, and gray.
- Each finished square measures approximately 5 inches, or 12.7 cm.
- The base blanket uses 42 squares arranged in a 6 by 7 layout.
- Colors, square count, blanket dimensions, and border can all be customized.
A Soft and Textured Crochet Granny Square Baby Blanket
Granny squares are one of the most versatile crochet motifs because they can be made separately, arranged in endless color combinations, and joined into blankets of almost any size. This version adds extra dimension by replacing the traditional double-crochet clusters with small groups of rounded puff stitches.
The result is a highly textured square with a plush surface. The raised stitches catch the light and give the blanket a soft, almost floral appearance. Cream provides a calm background, while coral and gray add gentle contrast without making the blanket feel overly bright.
This is a lovely crochet gift idea for a baby shower, nursery, first birthday, or handmade keepsake. Because the squares are made individually, the project is also convenient to carry and work on gradually. You can make a few squares at a time rather than keeping a large blanket in your lap from the beginning.
Important: Handmade baby blankets should be used according to current infant-safety guidance. Do not use a loose crochet blanket as an unattended sleep surface for an infant, and always supervise its use appropriately.
What Makes This Crochet Baby Blanket Special?
The most noticeable feature is the dimensional stitch texture. Instead of a flat granny-square fabric, the puff clusters sit above the surface and create a series of small rounded shapes. This makes the blanket visually similar to a traditional textured granny design while giving it a softer, more sculptural appearance.
Construction
The blanket is built from separate square motifs. Each motif begins at the center and grows outward in joined rounds. Every round adds another set of textured clusters, while chain spaces at the four corners maintain the square shape.
Once all 42 squares are complete, they are arranged into six columns and seven rows. The squares are joined with a neat mattress stitch, followed by several rounds of a simple edging. This construction makes the blanket easy to resize because you can add or remove complete motifs.
Texture and Stitch Choice
The main texture comes from a five-yarn-over puff stitch. Each puff is worked into one stitch or chain space and closed into a single stitch. Three puff stitches are grouped together to form a textured cluster.
The puff clusters are arranged using granny-square geometry. Corner spaces receive two clusters, while the spaces along each side receive one cluster. This creates the familiar four-corner expansion of a granny square while maintaining a much fuller surface.
Color Arrangement
A soft cream, warm coral, and medium gray palette works especially well with this stitch because the raised texture naturally creates shadows between colors. For a coordinated blanket, repeat the same six-round color sequence for every square.
For a more eclectic look, make some squares begin with coral, others with cream, and others with gray. Keep the final round the same color across every motif to visually connect the entire blanket.
Free Crochet Granny Square Baby Blanket Pattern
Free Crochet Pattern: Cozy Puff Granny Baby Blanket
Pattern type: Original image-inspired textured granny-square blanket
Pattern clarification: This is an original interpretation designed to capture the plush, multicolored granny-square appearance and raised texture of the pictured style. The specifications below are suggested measurements and materials rather than a reconstruction of an unseen original pattern.
| Skill Level | Confident beginner |
| Finished Size | Approximately 32.5 x 37.5 inches (82.5 x 95.25 cm) |
| Motif Size | Approximately 5 x 5 inches (12.7 x 12.7 cm) |
| Motif Quantity | 42 squares, arranged 6 columns by 7 rows |
| Yarn | Suggested #4 worsted-weight washable acrylic or acrylic blend |
| Yarn Quantity | Approximately 2,700 to 3,000 yards (2,470 to 2,740 meters) total |
| Hook | 5.0 mm US H-8 crochet hook |
| Gauge | Approximately 12 puff stitches across 4 inches after blocking |
| Terminology | US crochet terminology |
Materials
- Approximately 2,700 to 3,000 yards (2,470 to 2,740 meters) of #4 worsted-weight yarn.
- Approximately 1,000 yards (915 meters) cream.
- Approximately 900 yards (823 meters) coral.
- Approximately 700 yards (640 meters) soft gray.
- 5.0 mm US H-8 crochet hook.
- Yarn needle for weaving in ends and seaming.
- Scissors.
- Removable stitch marker, optional but helpful for the first stitch of each round.
- Rust-resistant blocking pins and a blocking surface, optional.
Abbreviations
- ch: chain
- sl st: slip stitch
- sc: single crochet
- dc: double crochet
- yo: yarn over
- puff: five-yarn-over puff stitch
- puff cluster: three puff stitches worked in the same space
- st/sts: stitch/stitches
- sp: space
- RS: right side
- WS: wrong side
UK terminology note: US single crochet is called double crochet in UK terminology, and US double crochet is called treble crochet. This pattern uses US terminology throughout.
Special Stitch: Five-Yarn-Over Puff
Puff: Yarn over, insert the hook into the indicated stitch or space, yarn over and pull up a loop to approximately the height of a normal double crochet. Repeat this sequence four more times in the same location. You will have 11 loops on the hook. Yarn over and pull through all 11 loops. Chain 1 to secure the puff.
For this pattern, the securing chain after a puff is considered part of the puff stitch and does not count as a separate stitch.
Puff cluster: Work 3 puff stitches into the same indicated space. Do not place a chain between the three puffs. Each puff counts as one stitch, so one puff cluster contains 3 stitches.
Construction Notes
Each square is worked from the center outward in six joined rounds. The turning chain is not used in this pattern. Slip stitches are used to move into the next corner or side space, and joining slip stitches do not count as stitches.
Every round contains four corner spaces. The number of puff clusters increases by four with each round. Round 1 contains 4 clusters, Round 2 contains 8 clusters, Round 3 contains 12 clusters, Round 4 contains 16 clusters, Round 5 contains 20 clusters, and Round 6 contains 24 clusters.
Because every cluster contains three puff stitches, the puff-stitch counts are 12, 24, 36, 48, 60, and 72 respectively.
Color Sequence
For the sample-style palette, use the following six-round sequence for each square:
- Round 1: Coral
- Round 2: Soft gray
- Round 3: Coral
- Round 4: Cream
- Round 5: Soft gray
- Round 6: Cream
Fasten off after each round when changing colors. If you prefer fewer ends, you may carry a color for short distances, but fastening off gives cleaner color boundaries in this highly textured design.
Round 1: Four-Corner Foundation
- With Coral yarn, make a magic ring.
- Work 3 puff stitches into the ring, ch 2.
- Repeat [3 puff stitches into the ring, ch 2] three more times.
- Join with a sl st to the top of the first puff.
- Pull the magic ring closed firmly, but do not distort the center.
- Fasten off and weave in the end.
Stitch count: 12 puff stitches, 4 corner spaces.
Round 2: First Expansion
- Join Soft Gray in any corner ch-2 space.
- Work 3 puff stitches, ch 2, 3 puff stitches in the same corner space.
- Ch 1.
- In the next corner space, work 3 puff stitches, ch 2, 3 puff stitches.
- Ch 1.
- Repeat the previous two steps around the remaining two corners.
- After the fourth corner, ch 1 and join with a sl st to the top of the first puff.
- Fasten off and weave in the end.
Stitch count: 24 puff stitches in 8 clusters, 4 corner spaces, and 4 side ch-1 spaces.
Round 3: Adding Side Clusters
- Join Coral in any corner ch-2 space.
- Work 3 puff stitches, ch 2, 3 puff stitches in the corner space.
- Ch 1.
- Work 3 puff stitches in the next side ch-1 space.
- Ch 1.
- In the next corner ch-2 space, work 3 puff stitches, ch 2, 3 puff stitches.
- Repeat Steps 3 through 6 around the square until all four sides have been completed.
- After the final corner, ch 1 and join with a sl st to the top of the first puff.
- Fasten off and weave in the end.
Stitch count: 36 puff stitches in 12 clusters, 4 corner spaces, and 8 side ch-1 spaces.
Round 4: Building the Square
- Join Cream in any corner ch-2 space.
- Work 3 puff stitches, ch 2, 3 puff stitches in the same corner.
- Ch 1.
- Work 3 puff stitches in the next side ch-1 space.
- Ch 1.
- Work 3 puff stitches in the next side ch-1 space.
- Ch 1.
- Work 3 puff stitches, ch 2, 3 puff stitches in the next corner space.
- Repeat Steps 3 through 8 around the remaining three sides.
- After the final corner, ch 1 and join with a sl st to the top of the first puff.
- Fasten off and weave in the end.
Stitch count: 48 puff stitches in 16 clusters, 4 corner spaces, and 12 side ch-1 spaces.
Round 5: Full Textured Expansion
- Join Soft Gray in any corner ch-2 space.
- Work 3 puff stitches, ch 2, 3 puff stitches in the corner.
- Ch 1.
- Work 3 puff stitches in each of the next 3 side ch-1 spaces, placing ch 1 between each cluster.
- Work 3 puff stitches, ch 2, 3 puff stitches in the next corner space.
- Repeat Steps 3 through 5 around the remaining three sides.
- After the fourth corner, ch 1 and join with a sl st to the top of the first puff.
- Fasten off and weave in the end.
Stitch count: 60 puff stitches in 20 clusters, 4 corner spaces, and 16 side ch-1 spaces.
Round 6: Cream Finishing Round
- Join Cream in any corner ch-2 space.
- Work 3 puff stitches, ch 2, 3 puff stitches in the corner.
- Ch 1.
- Work 3 puff stitches in each of the next 4 side ch-1 spaces, placing ch 1 between each cluster.
- Work 3 puff stitches, ch 2, 3 puff stitches in the next corner.
- Repeat Steps 3 through 5 around the remaining three sides.
- After the fourth corner, ch 1 and join with a sl st to the top of the first puff.
- Fasten off and weave in the end.
- Weave the remaining tail securely through the backs of several stitches before trimming.
Stitch count: 72 puff stitches in 24 clusters, 4 corner spaces, and 20 side ch-1 spaces.
After Round 6, gently flatten the square without stretching it. The target measurement is approximately 5 inches (12.7 cm) on each side. If your square is significantly smaller or larger, adjust your hook size before making all 42 motifs.
Make the Remaining Motifs
Make a total of 42 textured granny squares. Arrange them into 6 columns and 7 rows.
For a balanced three-color arrangement, avoid placing identical color combinations directly beside one another. Lay all 42 squares on the floor or another clean flat surface before joining. This allows you to move colors around until the distribution looks balanced.
Blocking the Squares
- Lightly dampen each finished square according to the yarn-care instructions.
- Place the square on a flat blocking surface.
- Gently shape all four sides until the motif measures approximately 5 inches (12.7 cm).
- Pin the four corners first, then pin the centers of the sides if necessary.
- Allow the square to dry completely before removing the pins.
Blocking is particularly useful for puff-stitch motifs because the dense texture can cause the edges to pull inward slightly. Do not stretch the squares aggressively. The goal is to even out the shape rather than force the fabric into an unnatural size.
Assembly: Joining the Granny Squares
Arrange the 42 squares into a rectangle measuring 6 squares across and 7 squares down. Keep the right side of each motif facing upward while checking the arrangement.
- Place two squares side by side with their right sides facing upward.
- Thread a yarn needle with a matching or neutral yarn.
- Align the edges and corner spaces carefully.
- Use a mattress stitch to sew the two edges together.
- Work through the corresponding stitches along both square edges, alternating from one side to the other.
- Pull the seam gently every few stitches so it closes without puckering.
- Continue until the two squares are completely joined.
- Repeat until all six squares in the first row are connected.
- Join the remaining rows in the same way.
- Finally, sew the seven completed rows together across their horizontal seams.
- Weave all joining tails securely into the wrong side of the blanket.
For a softer, more visible seam, you can use a whip stitch instead. A flat slip-stitch seam is another option, although it can make the joins more noticeable on thick puff-stitch fabric.
Crochet Border
The border uses simple single crochet to create a clean frame around the heavily textured center.
Border Round 1
- Join Cream yarn at any corner.
- Ch 1. This chain does not count as a stitch.
- Work 1 sc in every stitch and chain space along the first side.
- At each corner, work 3 sc in the corner space.
- Continue around all four sides.
- Join with a sl st to the first sc.
Because the exact number of stitches around the assembled blanket depends on how tightly each motif was joined, distribute the single crochet stitches evenly rather than forcing a precise stitch count along the long edges.
Border Round 2
- Ch 1.
- Work 1 sc in each stitch around.
- Work 3 sc in the center stitch of each 3-sc corner group.
- Join with a sl st to the first sc.
Border Round 3
- Ch 1.
- Work 1 sc in each stitch around.
- Work 3 sc in the center stitch at each corner.
- Join with a sl st to the first sc.
- Fasten off and weave in the ends.
The three-round border adds approximately 1.25 inches (3.2 cm) to each side, producing an approximate final blanket size of 32.5 x 37.5 inches (82.5 x 95.25 cm).
Choosing Yarn and Matching the Plush Texture
A soft worsted-weight yarn is a practical choice for this crochet granny square baby blanket. Acrylic and acrylic-blend yarns are especially convenient because they are generally lightweight, washable, and available in a wide range of nursery-friendly colors.
If you want an especially soft finish, choose a yarn with a smooth surface rather than a highly fuzzy yarn. The puff stitch already provides substantial texture, and a smooth strand makes it easier to see every individual stitch.
For the photographed color feeling, try combining warm cream with muted coral and soft gray. Other combinations that work well include cream with dusty pink and taupe, ivory with sage and beige, or cream with pale blue and gray.
Customization and Size Adjustments
The motif-based construction makes this blanket unusually easy to resize. Instead of changing the stitch pattern, simply change the number of squares.
Smaller Baby Blanket
For a compact stroller or lap-size blanket, make 5 columns by 6 rows for a total of 30 squares. Before edging, the approximate size will be 25 x 30 inches (63.5 x 76.2 cm). Add the three-round border for a finished size of roughly 27.5 x 32.5 inches (69.9 x 82.5 cm).
Larger Blanket
For a larger blanket, use 7 columns by 8 rows for 56 squares. With 5-inch motifs and the same border, the finished size will be approximately 37.5 x 42.5 inches (95.25 x 108 cm).
Changing the Motif Size
You can make each granny square smaller or larger by stopping after a different round. Each additional round adds another four puff clusters, one to each side section. Because puff stitches can consume considerable yarn, make one complete test square before committing to a large blanket.
Size Tip: If your squares are too small, try a 5.5 mm US I-9 hook. If they are too large or the fabric feels loose, try a 4.5 mm US 7 hook. Always make a complete six-round test motif after changing hook size because puff-stitch tension can affect both dimensions and yarn consumption.
Common Mistakes and Troubleshooting
The Square Is Curling
A small amount of curling during the first few rounds is normal with puff stitches. If the square becomes strongly cupped, your puff stitches may be too tight or too short. Try making the yarn-over loops taller and avoid pulling the closing yarn-over excessively tight.
The Edges Are Wavy
Wavy edges usually mean that extra stitches or spaces have been added accidentally. Check each corner first. Every corner should contain exactly two three-puff clusters separated by a ch-2 space. Along the sides, there should be one three-puff cluster in each side ch-1 space.
The Squares Are Different Sizes
Uneven puff height is the most likely cause. Count the rounds on every square and measure them before assembly. If some squares are slightly different, gentle blocking can help. Larger differences are better corrected before joining rather than pulled into place during seaming.
The Puff Stitches Look Too Flat
Do not rush the yarn-over loops. Each loop should be pulled up to approximately the height of a double crochet. If you pull the loops too short, the puff becomes compressed and loses the rounded appearance that gives this blanket its signature texture.
The Blanket Feels Too Heavy
Puff stitches naturally create a denser fabric than ordinary granny clusters. If the finished blanket feels heavier than you prefer, switch to a lighter worsted-weight yarn or use a slightly larger hook while maintaining consistent tension. Avoid using very bulky yarn for this particular construction because the fabric can become excessively thick.
Finishing, Blocking, and Care
After the final border is complete, inspect the blanket for loose ends. Because each square may contain several color changes, weaving in ends securely is an important part of the finishing process.
Thread each end onto a yarn needle and weave it back and forth through the wrong side of several stitches. Change direction once or twice before trimming the excess yarn close to the fabric. Avoid tying large knots because they can create hard bumps on the back of a baby blanket.
If the blanket looks slightly uneven after assembly, lightly dampen it and lay it flat. Smooth the edges into a rectangle and allow the blanket to dry completely. Avoid aggressive stretching, especially with acrylic yarn.
Always follow the care instructions for the specific yarn used. If the yarn is machine washable, a gentle cycle and appropriate drying method can make this project easier to maintain. For handmade baby items, avoid harsh treatments that could damage the fibers or leave irritating residues.
Keep the finished blanket free from detachable decorations. Buttons, beads, charms, safety eyes, ribbons, and other small loose pieces are not appropriate additions to an infant blanket because they can create choking or entanglement hazards.
Crochet Insight: Let the Texture Do the Decorating
When a stitch pattern is naturally dimensional, you do not need complicated colorwork or decorative appliques to make the blanket interesting. The puff clusters create enough visual movement on their own.
- Use a consistent cream border to visually connect different color combinations.
- Alternate coral and gray rounds to create soft contrast.
- Keep the yarn palette limited if you want a calm nursery aesthetic.
This approach also makes the blanket easier to personalize. The same motif can become a neutral baby blanket, a colorful toddler throw, or a larger home accessory simply by changing the yarn palette and number of squares.
At a Glance
- Best yarn choice: Soft #4 worsted-weight washable acrylic or acrylic blend.
- Skill level: Confident beginner, especially after practicing the puff stitch.
- Key technique: Five-yarn-over puff stitches arranged in three-stitch granny clusters.
- Base size: 42 squares arranged 6 by 7, approximately 32.5 x 37.5 inches after edging.
- Finishing: Block individual squares, mattress stitch them together, then add a three-round single-crochet border.
A Cozy Crochet Granny Square Baby Blanket to Personalize
This crochet granny square baby blanket combines the timeless structure of granny squares with rich puff-stitch texture for a soft, dimensional finish. The individual motifs make the project approachable because you can complete one square at a time, experiment with color placement, and assemble the blanket when all the pieces are ready.
Before beginning the full project, make one complete test square and check its measurement, texture, and drape. Read through the entire pattern before starting, especially the corner and side-space instructions. Once your tension is consistent, repeat the six-round motif until you have enough squares for your preferred blanket size.
Choose washable yarn in a palette that suits your nursery or gift recipient, keep your puff stitches consistent, and take time with blocking and seaming. With those simple details, this textured design becomes a beautiful handmade crochet gift idea that can be customized long after the first square is finished.
Tags
Crochet Baby Blanket
Granny Square Blanket
Puff Stitch Crochet
Free Crochet Pattern
Beginner Crochet
Baby Shower Crochet Gift
Textured Crochet Blanket
Handmade Baby Blanket