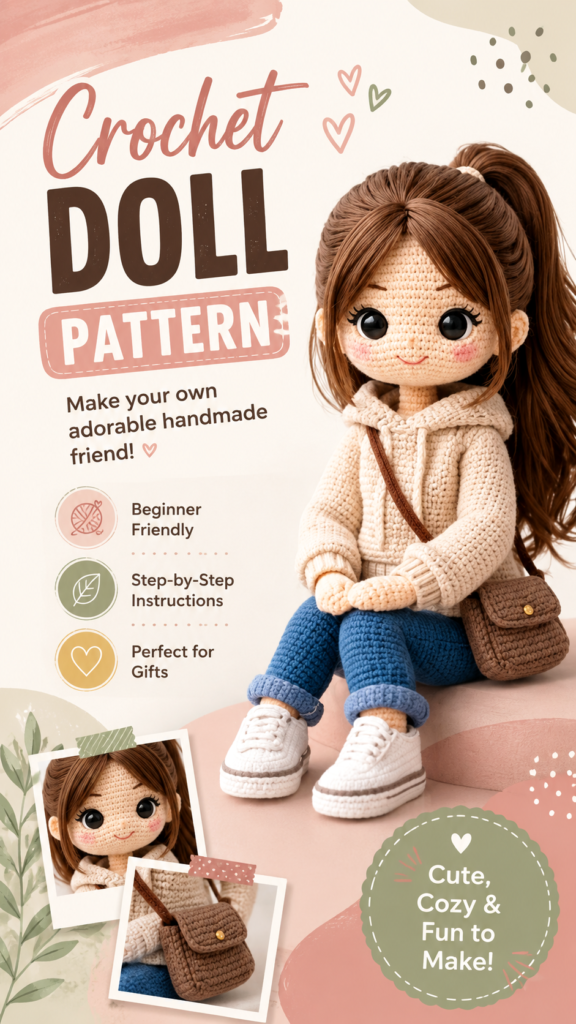
There is something irresistibly charming about a handmade crochet doll, especially one dressed with the kind of tiny details that make a finished amigurumi character feel full of personality. A crochet doll tutorial can be a wonderful project for beginners and experienced crocheters alike, combining familiar crochet techniques with opportunities to experiment with clothing, hair, colors, and accessories. The doll featured here has a cozy, modern look with a textured hoodie, blue cuffed jeans, white sneakers, a long brown ponytail, and a small crossbody bag, making it an excellent source of inspiration for anyone who wants to create a fashionable handmade character.
Key Takeaways
- A crochet doll combines basic amigurumi construction with creative styling.
- Simple clothing pieces can give a handmade doll a completely different personality.
- Hair, facial features, shoes, and miniature accessories create the finishing details.
- Neutral yarn shades create a cozy aesthetic, while brighter colors can make the character more playful.
- Breaking the project into small sections makes a detailed crochet doll feel much more manageable.
Why Crochet Dolls Are So Fun to Make
Crochet dolls offer much more creative freedom than many smaller crochet projects. Instead of making one simple shape, you can build an entire character and decide how that character looks and feels. The body provides the foundation, while clothing, hairstyle, facial expression, and accessories allow you to personalize the finished doll.
The illustrated style of this doll is particularly appealing because it blends the softness of traditional amigurumi with a modern fashion-inspired outfit. The oversized hoodie gives the character a cozy appearance, while the jeans and sneakers create a casual everyday look. The small shoulder bag adds another layer of detail without making the design feel overly complicated.
Important: The most memorable crochet dolls are not necessarily the most complicated ones. A simple body paired with thoughtful color choices, expressive eyes, neat hair, and one or two miniature accessories can create a remarkably polished result.
Understanding the Basic Crochet Doll Structure
Before beginning a crochet doll tutorial, it helps to understand how the character is generally constructed. Amigurumi dolls are typically made from separate crocheted components that are stuffed and assembled. This approach makes it easier to control proportions and work on individual sections without feeling overwhelmed by the entire project at once.
A doll inspired by the pictured design can be thought of as several main components:
- Head: A rounded crocheted form that provides the main space for the eyes, nose, mouth, and hair.
- Body: The central section that supports the character and connects the head and limbs.
- Arms and legs: Smaller pieces that can be crocheted separately and attached during assembly.
- Hair: Yarn strands or crocheted sections arranged to create the desired hairstyle.
- Clothing: Removable or integrated garments such as hoodies, pants, dresses, or sweaters.
- Accessories: Tiny bags, hats, shoes, scarves, or other decorative elements.
Keeping these sections separate is useful when learning. You can concentrate on one technique at a time and make adjustments before moving on to the next part.
Choosing Yarn and Colors for an Amigurumi Doll
Color selection has a major influence on the personality of a crochet doll. The pictured character uses a soft neutral palette for the skin, hoodie, and shoes, with deeper blue jeans and brown details in the hair and bag. This combination creates a warm, understated appearance that feels cozy and contemporary.
For your own crochet doll tutorial project, you can use a similar palette or create an entirely different character. Pastel shades can produce a sweet, whimsical effect, while vibrant colors can make the doll look energetic and playful. A monochrome outfit can also create a sophisticated handmade aesthetic.
Helpful Color Pairing Ideas
- Cream, beige, and warm brown for a soft neutral character.
- Blush pink, lavender, and white for a gentle pastel theme.
- Denim blue, cream, and brown for a casual everyday outfit.
- Sage green, tan, and oatmeal for a natural cozy palette.
- Mustard, rust, and chocolate brown for an autumn-inspired doll.
When choosing yarn, consistency matters as much as color. Using similar yarn weights throughout the main doll pieces helps keep proportions predictable. If you change yarn thickness dramatically, the size of individual pieces may no longer match.
Creating the Doll’s Face
The face is one of the most important parts of an amigurumi doll because tiny changes can completely alter the character’s expression. The pictured doll has large dark eyes, rosy cheeks, a small nose area, and a delicate smiling mouth. Together, these details give her a friendly and approachable appearance.
Safety eyes are a popular choice for amigurumi because they create a clean, polished look. If the finished doll is intended for a young child, however, consider whether embroidered facial features would be more appropriate for your intended use. Embroidered eyes and facial details can also provide excellent control over the expression.
Getting Balanced Facial Features
Take time to position the eyes before permanently securing them. Even a small difference in height or spacing can change the appearance of the face. Place temporary markers or pins first, step back, and check the face from several angles.
For cheeks, a subtle touch is often enough. The reference-inspired design uses soft pink coloring that complements the warm complexion without overpowering the eyes. If you are recreating the general aesthetic, restraint can help preserve the gentle handmade appearance.
Designing a Cute Crochet Hairstyle
Hair can transform an otherwise simple crochet doll into a distinctive character. The long brown ponytail shown in the design adds movement and gives the doll a fashionable silhouette. The loose strands around the face also make the hairstyle feel softer and more natural.
There are several ways to create crochet doll hair. Yarn strands can be attached individually, grouped into sections, or incorporated into a crocheted hair cap. The best approach depends on the look you want and how much time you want to spend styling the character.
Simple Hair Styling Ideas
- Use a high ponytail for a cheerful, youthful appearance.
- Create two braids for a playful handmade character.
- Add a short bob for a clean, modern silhouette.
- Combine loose strands with a ponytail for a soft, detailed style.
Expert Insight
Treat the hairstyle as part of the character design rather than an afterthought. The hair color, length, and shape can work together with the clothing palette to give your crochet doll a recognizable personality.
Making a Cozy Crochet Hoodie
The oversized hoodie is one of the strongest visual features of this doll’s outfit. Its chunky appearance creates a comfortable, cozy mood and provides an excellent opportunity to experiment with texture. A hood, sleeves, cuffs, and front opening can all add dimension to a relatively simple garment.
For a beginner crochet doll project, clothing can be simplified. You do not need to reproduce every tiny detail to achieve a convincing result. A basic sweater shape with a contrasting cuff or collar can already make the character look dressed and complete.
Tips for Better Miniature Clothing
- Measure the doll before finalizing the garment dimensions.
- Keep the stitch tension consistent so sleeves and cuffs remain even.
- Choose a yarn that is comfortable to manipulate at a small scale.
- Test the garment around the doll before adding permanent finishing details.
- Use subtle texture to make the clothing visually interesting without making it bulky.
Adding Jeans and Tiny Sneakers
The blue jeans and white sneakers give this crochet doll a casual, everyday style. These pieces are also a great example of how color contrast can make small details easier to see. Darker blue legs stand out against the pale hoodie, while the white shoes provide a clean finishing point.
Miniature shoes can be among the most satisfying parts of a crochet doll project. Even a basic shoe shape can look detailed when you add a sole, contrasting trim, or simple stitched lines. If you are still learning, focus first on making both shoes the same size and shape.
Pro Tip: When making pairs of miniature items, complete one piece and use it as your visual reference for the second. Matching proportions is often easier when you compare the pieces side by side instead of relying only on memory.
Don’t Forget the Mini Crochet Bag
The small brown crossbody bag is a charming finishing detail. Accessories like this are not essential to the doll’s basic construction, but they can dramatically increase the finished character’s visual appeal. A tiny bag can also be customized with a flap, button, strap, pocket, or decorative stitch.
Accessories are an excellent place to use leftover yarn. Because they require relatively small amounts of material, they give you the freedom to experiment with colors and shapes without committing to a large quantity of yarn.
A Beginner-Friendly Approach to the Project
If this is your first crochet doll, avoid trying to perfect every detail at the beginning. Start by becoming comfortable with the basic amigurumi techniques required for the body and head. Once those pieces are complete, you can gradually add the elements that make the doll unique.
A practical workflow can look like this:
- Gather materials: Choose yarn, a suitable crochet hook, stuffing, a tapestry needle, scissors, and your preferred facial-detail materials.
- Build the main body: Work on the head, torso, arms, and legs while keeping the proportions consistent.
- Shape the face: Position and secure the eyes, then add the small facial details.
- Create the hair: Attach and style the yarn to achieve your chosen hairstyle.
- Make the outfit: Add the hoodie, pants, shoes, or another clothing combination.
- Finish with accessories: Add a small bag, hat, scarf, or other details that match the character.
- Inspect the finished doll: Check seams, loose ends, proportions, and attachment points before displaying or gifting it.
How to Make Your Crochet Doll Look More Polished
Neat finishing is one of the biggest differences between a project that looks homemade and one that looks professionally crafted. You do not need complicated stitches to create a polished crochet doll. Consistent tension, careful stuffing, clean joins, and secure yarn ends can make a significant difference.
Stuffing should be firm enough to give the doll structure while still allowing the crocheted fabric to maintain its shape. Add small amounts gradually rather than filling the entire piece at once. This gives you greater control over the final silhouette and helps prevent uneven lumps.
Pay special attention to the joining points. Arms and legs should be positioned evenly, particularly if the doll is designed to sit upright like the character shown. Taking a few extra minutes to check symmetry before sewing can save considerable frustration later.
Ways to Personalize Your Crochet Doll
One of the best things about a crochet doll tutorial is that it provides a starting point rather than limiting your creativity. Once you understand the basic construction, you can turn the same general concept into many different characters.
Change the Outfit
Swap the cozy hoodie for a cardigan, dress, sweater, raincoat, or seasonal jacket. Different clothing styles can completely change the mood of the finished doll.
Experiment With Hair
Try short hair, braids, pigtails, curls, buns, or a side ponytail. You can also use unusual yarn colors if you want your character to feel more imaginative.
Create Seasonal Versions
A single doll design can inspire an entire collection. Make a warm winter version with a scarf and boots, a spring version with a light sweater, or a summer character with a simple outfit and colorful accessories.
Crochet Doll Projects Make Thoughtful Handmade Gifts
A handmade crochet doll can be a memorable gift because it carries a personal touch that mass-produced toys often cannot provide. You can select colors based on the recipient’s preferences, customize the outfit, and add small accessories that reflect a favorite style or hobby.
They can also make attractive handmade decorations for craft rooms, nurseries, shelves, and cozy reading spaces. Because the character can be personalized so easily, crocheters can create dolls that feel distinctly their own.
Quick Points
- Start with the head and body before tackling decorative details.
- Use consistent yarn weight and tension for balanced proportions.
- Treat hair and clothing as opportunities to show personality.
- Small accessories can make a simple doll feel much more complete.
- Save your favorite color combinations for future crochet doll projects.
Conclusion
A crochet doll tutorial is more than a way to learn another amigurumi pattern. It is an invitation to build a tiny character from yarn and give it a personality through thoughtful details. The cozy doll design featured here shows how an expressive face, long hairstyle, casual hoodie, cuffed jeans, sneakers, and miniature crossbody bag can work together to create a charming handmade figure.
Whether you are completely new to amigurumi or already enjoy making miniature crochet projects, focus on the process rather than trying to make every detail perfect on the first attempt. Begin with the basic shapes, work carefully through the assembly, and then have fun with the styling. Experiment with colors, hairstyles, clothing, and accessories until the doll feels like your own creation.
The most exciting part is that one crochet doll can become the beginning of many more. Once you are comfortable with the construction, you can create different outfits, characters, seasons, and personalities while using the same core skills. Keep your favorite ideas saved, gather your yarn, and let your next little handmade character take shape one stitch at a time.
Tags
Crochet Doll Crochet Doll Tutorial Amigurumi Doll Amigurumi Crochet Crochet Pattern Crochet for Beginners Handmade Doll DIY Crochet