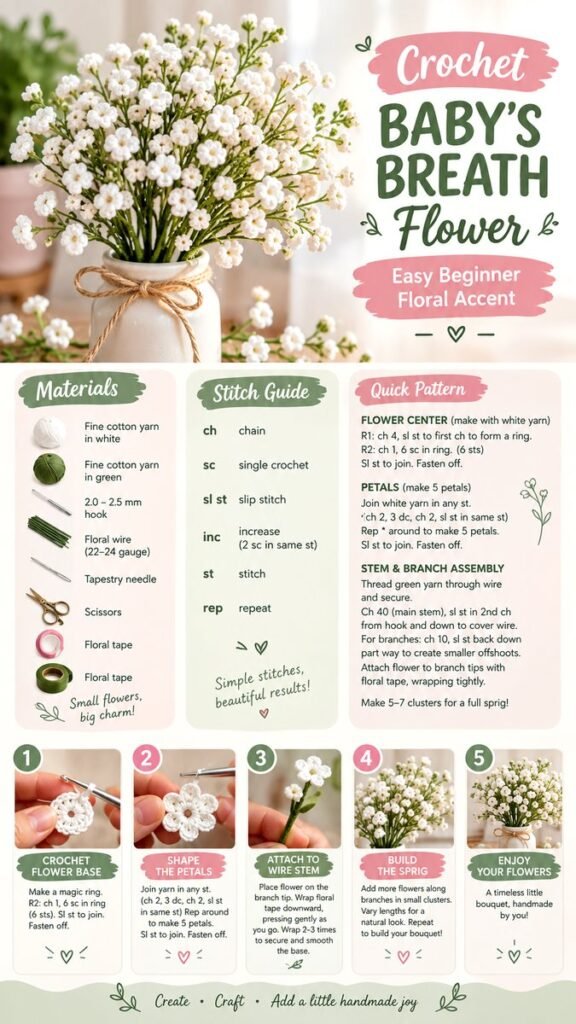
Bring a soft, handmade touch to your craft collection with a charming crochet baby’s breath flower. These tiny blossoms have a delicate, airy appearance that makes them especially lovely for bouquets, floral arrangements, gifts, nursery accents, and handmade home decor. With fine yarn, a small crochet hook, floral wire, and a few basic supplies, you can create a cluster of petite flowers that looks wonderfully light and natural.
Key Takeaways
- Use fine cotton yarn to create small, neat crochet blossoms.
- A 2.0 to 2.5 mm crochet hook works well for a delicate floral look.
- Simple stitches can be combined to shape five-petal flowers.
- Floral wire gives the stems and branches useful structure.
- Making several small flowers creates a fuller baby’s breath-inspired sprig.
- Varying branch lengths helps the finished bouquet look naturally airy.
Why Crochet Baby’s Breath Flowers Are So Charming
Baby’s breath is loved for its tiny flowers and cloud-like appearance, and a crochet version captures that same visual idea in a lasting handmade form. Instead of relying on a single large floral motif, this project focuses on many petite blossoms gathered together on slender stems. The result is understated, graceful, and easy to adapt.
A crochet baby’s breath flower can also be used in many different craft projects. Individual flowers can become embellishments, while groups of flowers can be assembled into miniature bouquets. The neutral white blossoms shown in this style are particularly versatile because they pair naturally with green stems and a wide range of decorative colors.
Important: The beauty of this project comes from repetition rather than complicated construction. Once you are comfortable making one tiny flower, you can repeat the same simple process to build a complete sprig or bouquet.
Materials for a Crochet Baby’s Breath Flower
The project is designed around a compact set of crochet and floral-making supplies. Keeping the materials lightweight helps the finished flowers maintain their delicate appearance.
- Fine cotton yarn in white: This forms the small flower centers and petals.
- Fine cotton yarn in green: Green yarn can be used to cover or complement the floral wire.
- 2.0 to 2.5 mm crochet hook: A small hook is suitable for working tiny floral details.
- Floral wire: Thin wire provides structure for stems and branches.
- Tapestry needle: Useful for securing yarn ends and working yarn around the stem.
- Scissors: Keep a sharp pair nearby for clean yarn cuts.
- Floral tape: This helps wrap and secure the wire when assembling branches.
- Stitch marker: Helpful when working small rounds.
Choosing the Right Yarn
Fine cotton yarn is a practical choice for tiny crochet flowers because it can produce crisp stitches while keeping the petals lightweight. White yarn gives the blossoms their classic baby’s breath-inspired appearance, while green yarn helps create a cohesive floral stem.
You do not have to limit yourself to white, however. Soft cream, pale blush, muted lavender, or another gentle shade can create a different decorative effect. If your goal is a realistic-looking arrangement, keeping the flowers small and the colors subtle will help preserve the airy character of the design.
Crochet Stitches and Abbreviations
One reason this crochet flower project is approachable is that it uses familiar basic stitches. The reference design highlights several common abbreviations that are useful when following a compact floral pattern.
- ch: chain
- sc: single crochet
- sl st: slip stitch
- inc: increase
- st: stitch
- rep: repeat
If you are new to crochet flowers, it helps to practice these stitches on a small scrap of yarn before beginning the blossoms. Tiny motifs can feel different from larger crochet pieces because there is less space to manipulate the yarn and hook.
How to Crochet the Tiny Flower Base
Begin the flower with a small center. The illustrated pattern uses a magic ring as the starting point, followed by a compact round of stitches. This creates a neat circular foundation from which the petals can grow.
- Make a small magic ring using white yarn.
- Work the indicated stitches into the ring to form the flower center.
- Join the round with a slip stitch.
- Fasten off or prepare the yarn for the petal section as directed.
The center does not need to be oversized. A compact foundation is useful because the finished flower should remain petite. Keep your stitches controlled, but avoid pulling the yarn so tightly that the center becomes difficult to work into.
Creating Five Soft Petals
Once the center is ready, the next step is shaping the petals. The visual design shows small rounded petals arranged evenly around the center. A sequence of chains and taller stitches creates each petal shape before a slip stitch brings the working yarn back to the flower.
- Join the white yarn in an appropriate stitch around the center.
- Work the chain and taller stitches used to form one petal.
- Return to the center with a slip stitch.
- Repeat the petal sequence around the flower.
- Complete approximately five petals for the small blossom.
- Join and fasten off neatly.
Pro Tip: Keep the petal tension relaxed. Tight stitches can make tiny flowers look stiff, while slightly softer tension helps the petals open outward and gives the blossom a more natural, airy shape.
Building the Stem and Branches
The flower becomes much more versatile once it is attached to a flexible stem. Floral wire provides the internal support, while green yarn and floral tape help transform the bare wire into a finished-looking botanical stem.
For a main stem, create a long chain and work slip stitches back along it while covering or incorporating the wire. The exact length can be adjusted according to the arrangement you want to create. Shorter stems work nicely for small decorative pieces, while longer stems can be grouped into a bouquet.
Adding Branches for an Airy Shape
Baby’s breath-inspired arrangements depend on branching. Rather than placing every flower along one straight stem, add smaller branches that extend in different directions. A chain worked away from the main stem and then secured back along its length can create a simple branch structure.
Attach individual flowers or small clusters near the ends of the branches. Wrap floral tape around the connection points to keep everything secure and tidy. Gentle bends in the wire can then be used to spread the blossoms apart.
Expert Insight
- Use different branch lengths instead of making every stem identical.
- Place flowers in small clusters to create visual fullness without making the arrangement heavy.
- Gently curve the finished stems to imitate the loose shape of a natural floral spray.
Assembling a Full Crochet Baby’s Breath Sprig
One flower looks sweet on its own, but several blossoms together create the most recognizable baby’s breath-inspired effect. Start by making a collection of tiny flowers. The number you need will depend on how full you want your arrangement to be.
Prepare a central stem and several smaller branches. Attach blossoms near branch tips first, then add a few additional flowers farther down the branches. Avoid placing every flower at the same height. Slight variations create a more organic silhouette.
- Prepare several finished crochet flowers.
- Create one longer main stem with covered floral wire.
- Add shorter branching sections.
- Attach flowers securely at the branch tips.
- Wrap connection points with floral tape.
- Spread the stems gently to create a soft, full sprig.
- Repeat the process to build a larger bouquet.
The illustrated style suggests building multiple clusters rather than one dense mass. This is an important design detail because the small spaces between blossoms help the flowers retain their light and delicate quality.
Tips for Neat and Natural-Looking Crochet Flowers
Small crochet flowers reward patience. Because the motifs are tiny, even minor differences in tension or finishing can change their appearance. A few simple techniques can make the finished arrangement look much more polished.
Keep Petal Tension Consistent
Try to maintain similar tension from petal to petal. If one petal is significantly tighter than the others, the flower may twist or become uneven. At the same time, avoid over-tightening your stitches. A little flexibility allows the petals to sit naturally.
Secure Every Connection
Small flowers can shift easily during assembly. Take time to secure the yarn and wire at each attachment point. Floral tape is particularly useful for smoothing the transition between branch sections and keeping the arrangement together.
Think in Clusters
Instead of treating every blossom as an isolated piece, think about how several flowers will look together. A few blooms grouped near a branch tip can create the illusion of a fuller floral spray without requiring an enormous number of individual flowers.
Important: Do not worry about making every branch perfectly symmetrical. Slight differences in stem length, flower placement, and direction are what give a handmade floral arrangement its relaxed character.
Creative Ways to Use Crochet Baby’s Breath
Once you have a few finished sprigs, there are many ways to incorporate them into handmade projects. Their small scale makes them particularly useful when you want a floral detail without overwhelming the main design.
- Miniature bouquets: Group several sprigs together for a simple handmade floral display.
- Home decor: Place a small arrangement in a decorative vase or container.
- Gift wrapping: Attach one or two flowers to ribbon, twine, or handmade packaging.
- Crochet projects: Use individual blossoms as embellishments on suitable accessories or decor.
- Nursery accents: Soft white flowers can complement gentle, neutral decorative themes.
- Seasonal arrangements: Change the yarn colors or combine the blossoms with other handmade flowers.
Making Your Bouquet Look Fuller
If your first sprig looks sparse, the easiest solution is usually to add more small clusters rather than making each individual flower larger. Baby’s breath gets much of its visual character from quantity and spacing.
Try building five to seven small clusters for a fuller sprig, then evaluate the shape before adding more. Place some clusters toward the outside and keep others closer to the center. This creates depth and prevents the arrangement from looking like a flat row of flowers.
You can also experiment with stem direction. Bend a few branches slightly outward and leave some more upright. The finished bouquet will feel more dimensional and naturally arranged.
A Simple Project for Crochet Beginners
Crochet baby’s breath flowers are a wonderful way to practice working on a small scale. The project introduces several useful techniques, including working in a small round, shaping repeated motifs, handling fine yarn, attaching crochet pieces to wire, and assembling multiple components into one finished decoration.
If you are just beginning, start with a few flowers instead of committing to a large bouquet. Once your hands become comfortable with the tiny stitches, you can increase the number of blossoms and experiment with more elaborate branch arrangements.
Another advantage is that each flower is relatively small, making it an approachable project for using leftover fine yarn. A handful of blossoms can gradually become a decorative sprig, so you can build the project at your own pace.
Quick Points
- Fine yarn keeps the flowers light and delicate.
- Five-petal motifs create a classic tiny-flower shape.
- Floral wire makes branches easier to position.
- Small clusters create a fuller baby’s breath effect.
- Vary stem lengths for a relaxed handmade bouquet.
Finishing Your Handmade Floral Display
Before placing your finished flowers into a vase or using them as an embellishment, take a moment to inspect the stems and connections. Trim loose yarn ends, make sure the flowers are firmly attached, and gently arrange the branches until the composition feels balanced.
The final styling does not need to be complicated. A simple container can provide an attractive home for a handmade sprig, while a few grouped branches can create a soft decorative centerpiece. The neutral palette of white flowers and green stems also makes the project easy to combine with other crochet florals.
Most importantly, embrace the handmade character of the finished piece. Tiny variations between blossoms are not flaws. They are part of what makes a crochet bouquet feel personal and crafted rather than mass-produced.
Conclusion
A crochet baby’s breath flower is a small project with plenty of decorative potential. By combining simple crochet stitches with fine cotton yarn, floral wire, and thoughtful assembly, you can create delicate blossoms that work beautifully as individual accents or as part of a fuller handmade bouquet.
The key is to focus on the details that create an airy floral effect: relaxed petal tension, compact blossoms, secure stems, varied branch lengths, and carefully spaced clusters. Once you have mastered the basic flower, repeating the motif becomes a relaxing way to build an arrangement that reflects your own style.
Whether you are looking for a beginner-friendly crochet flower project, a handmade decor idea, or a creative way to use fine yarn, these tiny blooms are a lovely place to start. Make a few flowers, experiment with your branch arrangement, and let the finished bouquet grow naturally one little blossom at a time.
Tags
Crochet Baby Breath Crochet Flowers Easy Crochet Beginner Crochet Crochet Flower Pattern DIY Crochet Decor Crochet Bouquet Handmade Flowers