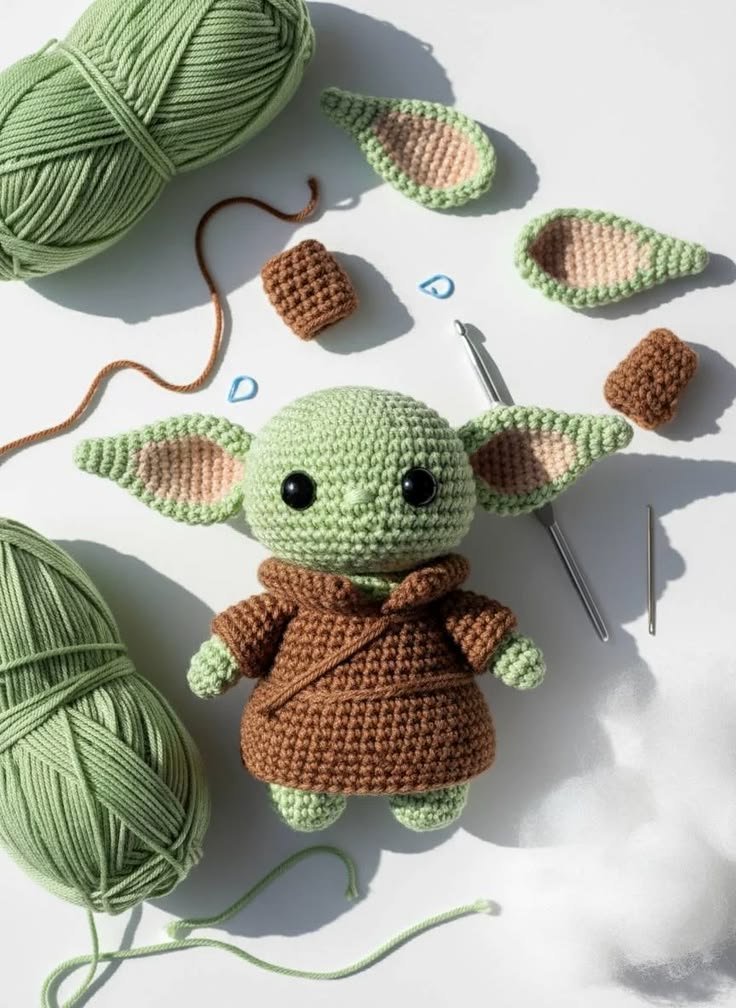
Bring a little handmade charm to your crochet collection with a cute crochet Baby Yoda pattern free project inspired by classic amigurumi techniques. This adorable character features a round green head, oversized pointed ears, shiny black eyes, tiny hands and feet, and a cozy brown robe. The combination of soft colors, simple shapes, and detailed stitching makes this a fun project for crochet lovers who enjoy making small character dolls.
Key Takeaways
- A cute green amigurumi character can be built from simple crocheted shapes.
- Oversized ears are the standout feature and give the doll its recognizable look.
- Green and brown yarn create a simple, cozy color combination.
- Small finished pieces can be assembled into a charming handmade character.
- Careful stuffing and even stitches help create a neat, rounded finish.
Crochet Baby Yoda Pattern Free Inspiration
This crochet character is a wonderful example of how a few basic amigurumi forms can come together to create an expressive handmade doll. The main body is rounded and compact, while the large ears extend outward from the sides of the head. A simple brown robe adds contrast and gives the finished piece a cozy, recognizable appearance.
The visual appeal comes from the balance between texture and shape. Tight crochet stitches create a softly textured surface, while the smooth curves of the head and body make the doll look plush and inviting. The small black eyes add a strong focal point without requiring complicated facial embroidery.
Important: For character amigurumi, consistent tension is especially helpful. Even stitches make rounded pieces look smoother and help separate components fit together neatly during assembly.
What Makes This Amigurumi So Cute?
Several design details work together to create the playful look. The large green head immediately draws attention, but the ears are what give the character its distinctive personality. They are shaped as elongated, pointed pieces with a lighter center that creates visual depth.
The oversized glossy eyes also contribute to the sweet expression. Because the eyes are much larger than the tiny nose and mouth details, the face has a soft, cartoon-inspired appearance. This proportion is common in charming amigurumi designs because it creates an instantly friendly look.
The Rounded Head
The head is constructed as a compact sphere or oval using continuous crochet rounds. Maintaining similar stitch tension throughout the piece helps prevent visible gaps and keeps the shape symmetrical. A firm but not overly tight stuffing technique can help the head hold its rounded form.
When shaping a crocheted head, pay attention to increases and decreases. Even spacing creates a smoother silhouette. Before completely closing the piece, check the stuffing from different angles and add small amounts where necessary to prevent dents.
The Oversized Ears
The ears are among the most visually important parts of this project. Their broad bases and pointed ends create the distinctive silhouette seen in the finished doll. A green outer section combined with a muted peach or beige center gives each ear additional dimension.
Because the ears extend away from the head, their placement matters. Attach them at matching heights and check the angle before securing them permanently. Slight differences can give a handmade doll personality, but keeping the basic alignment balanced creates a cleaner finished result.
The Cozy Brown Robe
The brown clothing provides a warm contrast against the pale green body. Instead of adding many colors, the design relies on two main shades to create a cohesive appearance. The robe also introduces additional texture and structure around the lower half of the doll.
A simple collar or overlapping front detail can make the clothing appear more dimensional. Small crocheted sleeves and hands complete the look while allowing the green color to peek through at the cuffs.
Materials for a Crochet Character Doll
A project like this can be approached with a relatively small collection of crochet supplies. Exact yarn weights and hook sizes depend on the desired finished size and the pattern being followed, but the visual design suggests a few essential materials.
- Green yarn for the head, ears, hands, and feet
- Brown yarn for the robe and clothing details
- A lighter yarn shade for the inner ears
- Black safety eyes or suitable embroidered eye details
- A crochet hook appropriate for the selected yarn
- Polyester fiberfill or another suitable stuffing material
- Yarn needle for sewing pieces together
- Scissors and stitch markers
Choosing a yarn with good stitch definition is useful for small amigurumi because it makes the individual stitches easy to see. A smooth yarn can also make shaping and assembly more predictable.
How to Approach a Free Crochet Baby Yoda Pattern
If you are following a free crochet pattern, read through the complete instructions before beginning. Character projects often contain several separate components, including the head, ears, body, clothing, arms, and legs. Understanding the construction order can make the project feel much easier.
- Gather the yarn and tools before starting.
- Begin with the main rounded pieces and maintain consistent tension.
- Make the ears carefully so their shapes and sizes match.
- Complete the body and clothing separately when the design calls for it.
- Stuff rounded pieces gradually instead of filling them all at once.
- Arrange the parts before sewing them together.
- Add the facial details after checking the overall expression.
Working in stages is particularly helpful when making amigurumi. It allows you to compare matching pieces and correct small inconsistencies before the final assembly.
Expert Insight
- Place safety eyes before completely closing the head so you can adjust their position.
- Compare both ears side by side before attaching them.
- Use small amounts of stuffing at a time to maintain smooth curves.
Tips for Creating Neat Amigurumi Stitches
Small crochet dolls look their best when the stitches are firm and consistent. For amigurumi, many crocheters use a smaller hook than they would for a loose garment made with the same yarn. This can create a denser fabric and reduce visible gaps between stitches.
Keep your tension steady, especially when working increases and decreases. If your stitches become noticeably looser during some rounds, the finished piece may develop uneven areas. Taking short breaks can help maintain comfortable, consistent hand positioning.
Keep the Stuffing Balanced
Stuffing affects the final shape just as much as the crochet itself. Too little stuffing can make a head look flat, while too much can stretch the stitches. Add fiberfill gradually and rotate the piece as you work so you can check the shape from every side.
Check Assembly Before Sewing
Lay the head, ears, body, arms, and legs together before permanently attaching anything. This simple step makes it easier to identify uneven placement. Use temporary pins or small removable markers when necessary to hold pieces in position.
Color Ideas for Your Crochet Baby Yoda
The classic green and brown combination works beautifully, but handmade crochet gives you plenty of room to experiment. You can keep the original earthy feel while changing the intensity of each shade. A soft sage green can create a gentle pastel version, while a deeper olive green gives the character a richer appearance.
The robe can also be customized. Warm tan, caramel, taupe, cream, or chocolate brown can all complement green yarn. For the inner ears, a muted peach, dusty pink, beige, or soft cream can provide subtle contrast.
- Soft nursery style: sage green, cream, and light beige.
- Earthy palette: olive green, warm brown, and muted peach.
- Playful palette: bright green with a lighter contrasting robe.
- Neutral palette: muted green, taupe, and warm ivory.
Creative Ways to Use a Finished Crochet Character
A small amigurumi character can become more than a crochet practice project. Its compact size makes it suitable for handmade displays, gift baskets, craft collections, and decorative shelves. A finished doll can also be paired with other crocheted characters or miniature accessories to create a themed display.
For gifts, consider making a simple presentation using tissue paper, a small gift box, or a reusable fabric pouch. If the recipient enjoys handmade crafts, the texture and personality of a crocheted figure can make the present feel especially thoughtful.
For craft enthusiasts, making several versions can also be a fun way to experiment with yarn colors and facial expressions. Small changes to ear placement, robe color, or eye positioning can give each finished piece a slightly different personality.
Common Crochet Mistakes to Avoid
Even a simple amigurumi project can become frustrating when small construction issues accumulate. Fortunately, most problems are easy to prevent with a little preparation.
- Uneven tension: Keep your stitches as consistent as possible throughout each piece.
- Loose fabric: Consider whether your hook is appropriate for dense amigurumi construction.
- Uneven ears: Count rounds and stitches carefully when making matching pieces.
- Overstuffing: Add filling gradually so the fabric does not become stretched.
- Misplaced facial features: Position the eyes and small details temporarily before securing them.
- Rushed assembly: Check proportions and placement before sewing everything together.
Pro Tip: Take a quick photo of your assembled pieces before sewing them permanently. Seeing the character as a picture can make small proportion or placement issues much easier to notice.
Making the Project Beginner Friendly
If you are new to amigurumi, focus on learning the construction rather than trying to work quickly. Basic techniques such as the magic ring, single crochet, increases, decreases, working in rounds, fastening off, and sewing pieces together are enough to build a strong foundation for many small crochet projects.
Start by practicing a small sphere if you are unfamiliar with shaping. Once your stitches are comfortable, move on to the larger head and body. The ears and clothing can then be treated as separate mini-projects.
Keeping track of stitch counts is another valuable habit. A stitch marker can help identify the beginning of each round, while written notes can make it easier to remember where increases or decreases occur.
At a Glance
- Focus: cute crochet character amigurumi
- Main colors: soft green and warm brown
- Key feature: large pointed ears
- Useful skills: single crochet, shaping, stuffing, and assembly
- Style: compact, cozy, handmade character doll
Conclusion
A crochet Baby Yoda pattern free project is a charming way to practice amigurumi while creating a character filled with handmade personality. The rounded green head, oversized ears, tiny limbs, and warm brown robe create a balanced design that feels both playful and cozy.
Whether you are an experienced crocheter or learning the basics of amigurumi, breaking the project into individual shapes makes the process approachable. Focus on consistent stitches, careful shaping, balanced stuffing, and thoughtful assembly. Once the main construction is complete, small details can transform a collection of simple crocheted pieces into a memorable finished doll.
Save this idea for your next crochet session and use it as inspiration for experimenting with colors, proportions, and handmade character designs. With a little patience and attention to detail, you can turn a few balls of yarn into a delightful crochet creation that is fun to make and display.
Tags
Crochet Baby Yoda Free Crochet Pattern Amigurumi Crochet Character Crochet Doll Easy Crochet Ideas Amigurumi Pattern