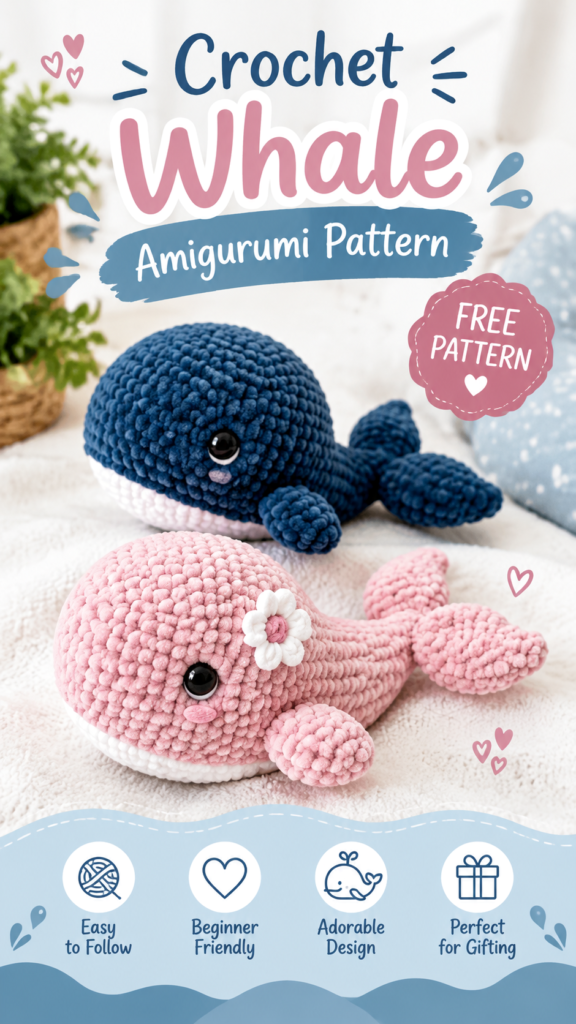
The crochet baby whale is a charming amigurumi project that brings a soft ocean-inspired friend to life with simple shapes, plush yarn texture, and sweet handmade details. This original crochet baby whale pattern is designed as a cozy stuffed toy featuring a rounded body, tiny side fins, a curved tail, and embroidered facial options. It is a wonderful choice for crochet lovers who enjoy creating cute handmade gifts, nursery decorations, or beginner-friendly amigurumi animals.
The design uses suggested materials and construction methods inspired by the visible style of a small plush whale. The whale is worked in continuous rounds with single crochet stitches, making it easy to shape the rounded body while keeping the fabric dense enough for stuffing. Soft cotton or acrylic yarn creates the smooth, squishy appearance often desired for amigurumi toys.
Key Takeaways
- This crochet baby whale is a beginner-friendly amigurumi stuffed animal.
- The project uses continuous rounds and basic single crochet stitches.
- Suggested worsted weight yarn creates a soft, rounded plush texture.
- The pattern includes separate fins, tail flukes, and body shaping.
- Colors can be customized for ocean themes, gifts, or nursery decor.
Description of the Crochet Baby Whale Project
This crochet baby whale is a small amigurumi creature with a rounded body, gentle curves, and a playful expression. The main body is shaped like a soft oval, wider at the front and gradually narrowing toward the tail area. Small side fins add dimension, while the split tail creates the recognizable whale silhouette.
The pictured style features a dark blue whale and a pastel pink whale variation, showing how color choices can completely change the personality of the finished toy. A small flower accent or embroidered detail can also be added for a decorative touch.
This crochet baby whale works beautifully as a handmade crochet gift idea for ocean lovers, a cute shelf decoration, or a small plush companion. Because the design uses simple shapes, it is suitable for confident beginners who want to practice amigurumi techniques.
Crochet Construction and Stitch Analysis
The whale is constructed using an amigurumi method with separate crocheted components that are sewn together after completion. The body is worked from the nose toward the tail in continuous rounds. A stitch marker is recommended because continuous rounds do not use turning chains or joined rounds.
The visible fabric has a dense, textured appearance similar to traditional single crochet amigurumi. A slightly smaller hook than normally used for the yarn weight helps create tight stitches that prevent stuffing from showing through.
The suggested construction uses worsted weight yarn, but plush yarn can also be used for a larger, extra-soft whale. The finished size will vary depending on yarn thickness, hook size, and personal tension.
Construction Note
For a smooth amigurumi shape, add stuffing gradually while crocheting. Filling the body too late can make it difficult to create an even rounded form.
Free Crochet Pattern: Baby Whale Amigurumi
Project Details
| Project Name | Ocean Baby Whale Amigurumi |
| Skill Level | Confident beginner |
| Finished Size | Approx. 7 inches long x 4 inches tall (18 x 10 cm) |
| Yarn | Suggested worsted weight yarn, approximately 120 yards (110 meters) |
| Hook | Recommended 3.25 mm hook (US D-3) |
| Gauge | Approx. 20 single crochet stitches x 22 rounds in 4 inches (10 cm) |
| Terminology | US crochet terms |
Materials
- Worsted weight yarn in whale color of choice
- Small amount of white yarn for optional eye highlights
- Polyester fiberfill stuffing
- 3.25 mm crochet hook
- Stitch marker
- Tapestry needle
- Embroidery thread for facial details
Crochet Terminology and Abbreviations
- MR: Magic ring
- ch: Chain
- sc: Single crochet
- inc: Increase, two single crochet stitches in one stitch
- dec: Invisible decrease, crochet two stitches together through front loops
- sl st: Slip stitch
- st: Stitch
- FO: Fasten off
All rounds are worked continuously unless stated otherwise. Do not join rounds. Place a stitch marker in the first stitch of each round and move it upward as you crochet.
Body Instructions
- Round 1: Make a magic ring. Work 6 sc into the ring. (6)
- Round 2: Inc in each stitch around. (12)
- Round 3: (Sc in next stitch, inc) repeat 6 times. (18)
- Round 4: (Sc in next 2 stitches, inc) repeat 6 times. (24)
- Round 5: (Sc in next 3 stitches, inc) repeat 6 times. (30)
- Rounds 6-12: Sc in each stitch around. (30)
- Round 13: (Sc in next 3 stitches, dec) repeat 6 times. (24)
- Round 14: Sc in each stitch around. (24)
- Round 15: (Sc in next 2 stitches, dec) repeat 6 times. (18)
- Round 16: Sc in each stitch around. Begin stuffing firmly. (18)
- Round 17: (Sc in next stitch, dec) repeat 6 times. (12)
- Round 18: Dec around. (6)
Cut yarn, leaving a tail. Close the remaining opening by weaving the yarn through the front loops of the final stitches and pulling tight. Secure and weave in the end.
Side Fin Instructions Make 2
- Round 1: Make a magic ring. Work 6 sc into the ring. (6)
- Round 2: Inc around. (12)
- Round 3: Sc around. (12)
- Round 4: (Sc in next 2 stitches, dec) repeat 3 times. (9)
- Round 5: Sc around. (9)
Flatten the fin slightly and leave a long sewing tail. Do not stuff. Make a second fin following the same instructions.
Tail Fluke Instructions Make 2
- Round 1: Make a magic ring with 6 sc. (6)
- Round 2: Inc around. (12)
- Round 3: Sc around. (12)
- Round 4: (Sc in next 2 stitches, inc) repeat 4 times. (16)
- Round 5: Sc around. (16)
Fasten off one tail piece. For the second piece, leave a sewing tail. Place the two flukes together at the narrow end and stitch them securely before attaching them to the body.
Assembly Instructions
- Sew the tail fluke pieces to the back end of the body.
- Attach one fin on each side of the whale approximately 2 rounds below the widest part of the body.
- Place eyes between rounds 7 and 9, leaving several stitches between them for a gentle expression.
- Embroider the eyes and facial details if making the whale for a baby or young child.
- Secure all yarn ends inside the toy before finishing.
Safety Reminder: Plastic safety eyes may not be appropriate for babies or children under three. For baby-safe crochet items, use embroidered eyes and securely stitched details instead.
Customization and Size Adjustment Guidance
This crochet baby whale pattern can easily be adjusted to create different sizes. To make a larger whale, use thicker yarn with a larger hook and add extra plain rounds to the body before beginning decreases. For a smaller whale, choose lighter yarn and a smaller hook.
- Change colors to create gray, aqua, lavender, or rainbow whale designs.
- Add a small crocheted flower or heart applique for decoration.
- Create a whale family by making several sizes with different yarn weights.
- Use embroidered waves or tiny bubbles as decorative details.
Common Mistakes and Troubleshooting
Loose Stitches
If stuffing is visible through the stitches, your hook may be too large. Try reducing the hook size while keeping the same yarn.
Uneven Shape
Make sure increases and decreases are placed correctly. A stitch marker helps prevent losing track of the beginning of each round.
Crooked Facial Features
Before sewing eyes permanently, place pins where you want the features positioned. This allows you to adjust the expression before securing them.
Finishing, Shaping, and Care Guidance
After assembly, gently shape the whale by pressing the stuffing evenly throughout the body. A small amount of extra stuffing near the head helps maintain the rounded silhouette.
For washable yarn, hand washing with mild soap and air drying is recommended. Avoid high heat because it can change the shape and texture of handmade amigurumi.
At a Glance
- Best yarn choice: Soft worsted weight cotton or acrylic yarn.
- Skill level: Beginner-friendly amigurumi project.
- Main technique: Continuous rounds with single crochet stitches.
- Size adjustment: Change yarn weight and add or remove body rounds.
- Finishing method: Stuff, sew pieces securely, and embroider details.
Create Your Own Crochet Baby Whale
This crochet baby whale pattern is a fun way to explore amigurumi shaping while creating a soft handmade ocean friend. Choose your favorite yarn colors, prepare your materials, and read through the complete instructions before beginning. Checking your tension and adjusting the design to match your preferred style will help you create a whale that feels uniquely yours.
Whether you are making a crochet gift idea, a nursery accent, or a cute collection of handmade crochet animals, this free crochet pattern offers a simple foundation for creativity. Enjoy experimenting with colors, textures, and small details to personalize your finished whale.
Tags
Crochet Baby Whale
Amigurumi Pattern
Free Crochet Pattern
Crochet Stuffed Animal
Beginner Crochet
Handmade Crochet Gift