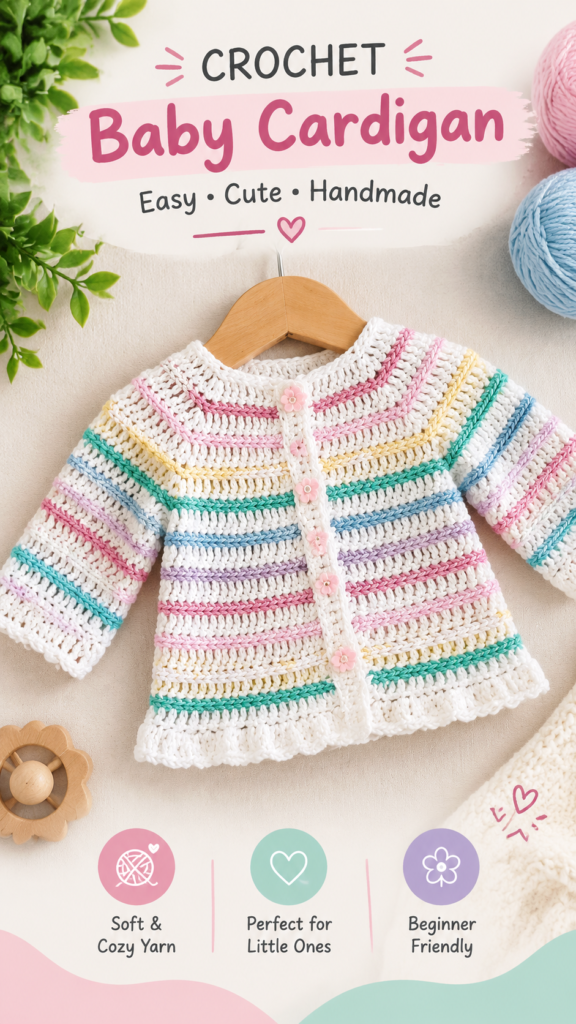
This crochet baby sweater pattern is inspired by the soft, cheerful look of a lightweight baby cardigan with a creamy base, delicate pastel stripes, a simple button front, and a gently flared hem. The original interpretation below uses a practical seamed construction with double crochet panels, making it approachable for confident beginners while still giving plenty of room for customization.
The design is especially suited to spring and autumn layering, nursery photography, baby shower gifts, or everyday outfits. The colorful accent rows can be changed to match a nursery palette, a favorite baby outfit, or leftover yarn from your stash. The pattern is written as an original interpretation of the pictured style rather than a reproduction of an unseen original pattern.
Key Takeaways
- A soft crochet baby sweater pattern designed as a lightweight button-front cardigan.
- Uses simple double crochet panels with colorful surface slip-stitch stripes.
- Designed around an approximate 6 to 12 month size with practical adjustment guidance.
- Suggested DK-weight washable yarn keeps the cardigan soft, comfortable, and easy to care for.
- A gently gathered bottom edging creates a playful ruffled finish similar to the inspiration.
- The color stripes can be customized with pastel, bright, neutral, or gender-neutral combinations.
A Sweet Pastel Crochet Baby Cardigan
The pictured style has the charm of a classic handmade baby cardigan, but the details keep it fresh and playful. A light neutral foundation lets narrow stripes of pink, yellow, turquoise, blue, and lavender stand out without making the garment look overly busy. The repeated horizontal lines also emphasize the simple construction of the sweater.
For this original crochet baby sweater pattern, the main fabric is worked in rows of double crochet. Instead of changing yarn at every decorative row, contrasting colors are added afterward with surface slip stitches. This approach has two advantages: the body remains consistent in height, and the decorative colors can be changed without carrying several yarns through the garment.
The cardigan is made from one back panel, two front panels, and two sleeves. The pieces are seamed at the shoulders and sides, then the sleeves are attached. A narrow front band provides a neat button opening, while a simple neckline border finishes the top edge. The bottom receives a fuller ruffle for the soft, playful appearance seen in the inspiration.
Crochet Construction and Stitch Analysis
Panel Construction
The practical construction for this interpretation is a simple flat-panel method. The back is wider than either front panel, while the two fronts are mirror images. This creates a classic open cardigan shape without requiring complicated top-down raglan calculations.
The body panels are worked from the lower edge upward. The back remains rectangular through most of the body, with a small neckline opening created near the top. Each front begins with half the back width and gradually decreases along the neckline edge during the final eight rows. The resulting shoulder sections align with the back shoulders for straightforward seaming.
Stitch Texture
Double crochet creates the primary fabric because it is lightweight, flexible, and grows quickly. The relatively open structure is useful for a baby layering piece because it avoids producing an overly dense fabric.
The decorative stripes are made with surface slip stitches worked horizontally across selected rows. This produces a narrow raised line that visually resembles a contrasting crochet row while keeping the main panels easy to size.
The sleeves use the same double crochet fabric. They begin narrower at the cuff and increase gradually toward the upper arm. The bottom edge is finished with a small cuff treatment, while the body receives the more noticeable ruffled edging.
Free Crochet Pattern: Pastel Stripe Baby Cardigan
Free Crochet Pattern
Pattern interpretation: This original design uses a simple seamed cardigan construction to create a similar soft, striped baby sweater appearance. Exact details of the photographed garment cannot be determined from appearance alone, so the yarn, hook, gauge, measurements, and construction below are suggested specifications for a practical handmade version.
| Skill Level | Confident beginner to intermediate |
| Finished Size | Approximately 21.5 inches / 55 cm chest circumference; 12.5 inches / 32 cm body length |
| Suggested Size | Approximately 6 to 12 months |
| Yarn | DK-weight washable yarn, approximately 350 to 400 yd / 320 to 365 m main color plus 75 to 100 yd / 70 to 90 m total accent colors |
| Hook | 3.5 mm US E/4 crochet hook |
| Gauge | 16 double crochet x 9 rows = approximately 4 x 4 inches / 10 x 10 cm |
| Terminology | US crochet terminology |
Finished Measurements
- Chest circumference: approximately 21.5 inches / 55 cm
- Back length from shoulder to bottom: approximately 12.5 inches / 32 cm
- Front panel width before neckline shaping: approximately 5.25 inches / 13.5 cm
- Back panel width: approximately 10.5 inches / 26.5 cm
- Sleeve length from shoulder area to cuff: approximately 8 inches / 20.5 cm
- Upper sleeve width: approximately 7 inches / 18 cm
Materials and Notions
- 350 to 400 yd / 320 to 365 m DK-weight washable yarn in a soft cream, white, or light neutral shade
- Approximately 15 to 20 yd / 14 to 18 m each of five pastel accent colors
- 3.5 mm US E/4 crochet hook
- Yarn needle
- Stitch markers
- Scissors
- Measuring tape
- Three small, securely sewn buttons if appropriate for the child and intended use
Abbreviations
- ch = chain
- sc = single crochet
- hdc = half double crochet
- dc = double crochet
- sl st = slip stitch
- st = stitch
- sts = stitches
- dc2tog = double crochet two stitches together
- BLO = back loop only
- RS = right side
- WS = wrong side
UK equivalents, if needed for reference, are sc = double crochet, hdc = half treble crochet, and dc = treble crochet. The instructions themselves use US terminology only.
Special Stitch
Surface slip stitch: Insert the hook from the front of the fabric into the horizontal line of the selected double crochet row. Place the contrasting yarn on the wrong side, draw a loop through to the front, and make a slip stitch in each stitch across. Keep the working yarn loose enough that the fabric does not pucker.
General Pattern Notes
- Turning chains do not count as stitches unless specifically stated.
- Slip stitches used for surface decoration do not count as structural stitches.
- Each main-color body row is worked in double crochet.
- Turn after every body and sleeve row.
- Keep the same yarn tension throughout each panel.
- Check the gauge before beginning if the finished size matters.
Back Panel
- With the main color, chain 44.
- Row 1: Dc in the 3rd chain from the hook and in each chain across. 42 dc.
- Rows 2 to 25: Ch 2, turn. Dc in each stitch across. 42 dc.
- Row 26: Ch 2, turn. Dc in the first 13 stitches, skip the next 16 stitches for the back neckline, then dc in the remaining 13 stitches. 26 dc worked in two separated shoulder sections.
For the remaining two rows, work each shoulder separately. Attach yarn to the first shoulder section if necessary.
- Rows 27 to 28, first shoulder: Ch 2, turn. Dc in each of the 13 shoulder stitches. 13 dc.
- Fasten off after Row 28 and weave in the end.
- Join yarn to the second shoulder and repeat Rows 27 to 28 over the remaining 13 stitches. Fasten off.
The back should measure approximately 10.5 inches / 26.5 cm wide. The center neckline opening is approximately 4 inches / 10 cm wide.
Left Front Panel
- With the main color, chain 23.
- Row 1: Dc in the 3rd chain from the hook and in each chain across. 21 dc.
- Rows 2 to 20: Ch 2, turn. Dc in each stitch across. 21 dc.
- Row 21: Ch 2, turn. Dc2tog over the first 2 stitches, then dc in each remaining stitch. 20 dc.
- Row 22: Ch 2, turn. Dc2tog over the first 2 stitches, then dc across. 19 dc.
- Row 23: Ch 2, turn. Dc2tog over the first 2 stitches, then dc across. 18 dc.
- Row 24: Ch 2, turn. Dc2tog over the first 2 stitches, then dc across. 17 dc.
- Row 25: Ch 2, turn. Dc2tog over the first 2 stitches, then dc across. 16 dc.
- Row 26: Ch 2, turn. Dc2tog over the first 2 stitches, then dc across. 15 dc.
- Row 27: Ch 2, turn. Dc2tog over the first 2 stitches, then dc across. 14 dc.
- Row 28: Ch 2, turn. Dc2tog over the first 2 stitches, then dc across. 13 dc.
The decreases are placed along the neckline edge. The opposite edge remains straight so it can be joined to the back shoulder.
Right Front Panel
Work the right front as a mirror image of the left front. Follow the same starting chain and Rows 1 to 20.
- Row 21: Ch 2, turn. Dc across until 2 stitches remain, then dc2tog over the final 2 stitches. 20 dc.
- Row 22: Ch 2, turn. Dc across until 2 stitches remain, then dc2tog. 19 dc.
- Row 23: Ch 2, turn. Dc across until 2 stitches remain, then dc2tog. 18 dc.
- Row 24: Ch 2, turn. Dc across until 2 stitches remain, then dc2tog. 17 dc.
- Row 25: Ch 2, turn. Dc across until 2 stitches remain, then dc2tog. 16 dc.
- Row 26: Ch 2, turn. Dc across until 2 stitches remain, then dc2tog. 15 dc.
- Row 27: Ch 2, turn. Dc across until 2 stitches remain, then dc2tog. 14 dc.
- Row 28: Ch 2, turn. Dc across until 2 stitches remain, then dc2tog. 13 dc.
Sleeves
Make two identical sleeves. Each sleeve starts with a 20-stitch cuff edge and gradually increases to 28 stitches at the upper edge.
- With the main color, chain 22.
- Row 1: Dc in the 3rd chain from the hook and across. 20 dc.
- Row 2: Ch 2, turn. Dc in each stitch. 20 dc.
- Row 3: Ch 2, turn. Work 2 dc in the first stitch, dc across to the last stitch, then 2 dc in the last stitch. 22 dc.
- Rows 4 to 6: Ch 2, turn. Dc in each stitch across. 22 dc.
- Row 7: Ch 2, turn. Work 2 dc in the first stitch, dc across to the last stitch, then 2 dc in the last stitch. 24 dc.
- Rows 8 to 10: Ch 2, turn. Dc in each stitch. 24 dc.
- Row 11: Ch 2, turn. Work 2 dc in the first stitch, dc across to the last stitch, then 2 dc in the last stitch. 26 dc.
- Rows 12 to 14: Ch 2, turn. Dc in each stitch. 26 dc.
- Row 15: Ch 2, turn. Work 2 dc in the first stitch, dc across to the last stitch, then 2 dc in the last stitch. 28 dc.
- Rows 16 to 18: Ch 2, turn. Dc in each stitch. 28 dc.
Fasten off both sleeves and leave a long tail on each piece for sewing if desired.
Pastel Surface Stripes
Once all five major panels are complete, add the decorative stripes. This method avoids carrying contrasting yarn through the garment.
- Lay the back panel flat with the right side facing you.
- Using pastel pink, work surface slip stitches across Row 4.
- Using soft yellow, work surface slip stitches across Row 8.
- Using turquoise, work surface slip stitches across Row 12.
- Using pale blue, work surface slip stitches across Row 16.
- Using lavender, work surface slip stitches across Row 20.
- Using pastel pink again, work surface slip stitches across Row 24.
- Repeat the same stripe placement on both front panels.
- Repeat the same color sequence on each sleeve wherever the corresponding row exists.
When reaching a neckline decrease or panel edge, simply stop the surface slip-stitch line at the edge. Do not force the stripe to extend beyond the available stitches.
Shoulder Assembly
- Place the back and front panels with right sides facing inward.
- Align one front shoulder with one back shoulder. Each shoulder contains 13 stitches.
- Using the main color and a yarn needle, whip stitch or mattress stitch the 13 stitches together.
- Repeat for the second shoulder.
- Turn the cardigan right side out and check that the neckline sits evenly.
Side Seams and Armholes
For each side, align the lower edges of the front and back panels. Sew the side seam upward through 14 rows. Leave the upper 14 rows open to form the armhole.
- Begin at the lower hem.
- Measure approximately 6.25 inches / 16 cm upward, corresponding to about 14 rows at the suggested gauge.
- Seam the front and back together from the hem to this point.
- Leave the remaining upper section open.
- Repeat on the opposite side.
The open armhole perimeter should accommodate the approximately 28-stitch upper edge of the sleeve. Small differences caused by individual tension can be eased gently during sleeve attachment.
Sleeve Assembly
- Fold one sleeve in half with the right side facing inward and align the long edges.
- Seam the sleeve from the cuff to the upper edge.
- Turn the sleeve right side out.
- Place the sleeve inside the cardigan armhole with right sides facing each other.
- Match the sleeve top edge around the armhole opening.
- Use clips or stitch markers to distribute the sleeve evenly.
- Sew around the complete armhole perimeter.
- Repeat for the second sleeve.
If the sleeve edge is slightly larger or smaller than the opening, distribute the difference gradually instead of creating a single bulky gather. The double crochet fabric has enough flexibility to accommodate minor gauge variation.
Cuff Finish
Join the main color at the cuff edge. Work one round or row of single crochet evenly around the 20-stitch cuff opening, joining with a slip stitch if working around the completed sleeve opening. For a subtle ribbed effect, work one additional round of single crochet in the back loop only.
Bottom Ruffle
After all body seams have been completed, work around the entire lower edge. The combined bottom edge contains approximately 84 stitches: 42 from the back and 21 from each front.
- Join the main color at one lower front corner.
- Ruffle Round 1: Ch 1, sc in each of the approximately 84 bottom-edge stitches. Join with a sl st to the first sc. 84 sc.
- Ruffle Round 2: Ch 2. Work 2 dc in each stitch around. Join with a sl st to the first dc. 168 dc.
- Ruffle Round 3: Ch 1. Sc in each stitch around. Join with a sl st to the first sc. 168 sc.
- Fasten off and weave in the end.
The second round doubles the number of stitches and creates the gentle flare. If a softer, less pronounced ruffle is preferred, replace Round 2 with one dc in each stitch and use Round 3 as the final edging.
Button Bands
Work a narrow band along each front opening. Keep the cardigan flat while attaching the band so the edge does not become stretched.
- Join the main color at the lower edge of one front opening.
- Band Row 1: Ch 1, sc evenly up the front edge, placing approximately 28 sc along the 28-row edge. Turn.
- Band Row 2: Ch 1, sc in the first 4 stitches, ch 1, skip the next stitch, sc in the next 7 stitches, ch 1, skip the next stitch, sc in the next 7 stitches, ch 1, skip the next stitch, sc in the final 4 stitches. 28 working positions including the three chain-1 spaces.
- Band Row 3: Ch 1, sc in each stitch and work 1 sc into each chain-1 space. Turn.
- Band Row 4: Ch 1, sc in each stitch across. Fasten off.
Repeat Rows 1, 3, and 4 on the opposite front without buttonholes. Sew three small buttons opposite the openings, checking placement carefully before attaching them.
Important Safety Note: Baby garments should not contain loose buttons, beads, charms, or detachable decorations. If the cardigan is intended for a young infant, consider replacing buttons with securely embroidered thread closures. If buttons are used, sew them extremely securely, inspect them regularly, and keep the garment under appropriate adult supervision.
Neckline Finish
- Join the main color at the back neckline.
- Work 1 sc into each of the 16 back-neck stitches.
- Work 1 sc into each of the 8 decrease-edge stitches on the first front.
- Continue around the neckline and work 1 sc into each of the 8 decrease-edge stitches on the opposite front.
- Join with a slip stitch. This gives approximately 32 stitches around the neckline.
- Work two additional rounds of sc, placing one stitch in each stitch around.
- Fasten off and weave in the end.
Customization and Size Adjustment Guide
The easiest way to adjust this crochet baby sweater pattern is to change the width and length of the main panels before adding the finishing details. Always make a gauge swatch first when modifying the size substantially.
Making the Cardigan Wider
For extra chest width, add an even number of stitches to the back and add half that amount to each front. For example, adding 4 stitches to the back means adding 2 stitches to each front. At the suggested gauge, 4 stitches add approximately 1 inch / 2.5 cm to the back width.
Remember that the front panels should remain approximately half the width of the back panel before neckline shaping. This keeps the shoulder seams aligned.
Making the Cardigan Longer
Add complete double crochet rows to the body before beginning neckline shaping. At the suggested gauge, 9 rows equal approximately 4 inches / 10 cm. Adding 2 rows therefore increases the body by roughly 0.9 inch / 2.2 cm.
For the most balanced proportions, lengthen the body before beginning the final neckline shaping rather than extending only the shoulder area.
Adjusting Sleeve Width
To make the sleeve wider, add additional increase rows following the established method. Each increase row adds 2 stitches, one at each sleeve edge. To make the sleeve narrower, omit one or more increase rows while maintaining the same spacing between increases.
Measure the child’s upper arm rather than relying solely on age. Add approximately 1 inch / 2.5 cm of ease around the upper arm for a comfortable cardigan sleeve.
Changing the Stripe Palette
The stripe colors are completely interchangeable. The neutral base works particularly well with dusty pink, pale yellow, aqua, soft blue, lavender, peach, sage, or light gray. For a more modern look, use only two accent colors. For a cheerful rainbow effect, assign a different shade to every decorative row.
Stitch Tip
- Keep surface slip stitches relaxed to prevent puckering.
- Insert the hook consistently along the same horizontal row for clean stripes.
- Block the finished panels lightly before sewing if the edges appear uneven.
Common Mistakes and Troubleshooting
The Panel Is Wider Than Expected
Check your gauge before changing the stitch count. A larger hook or looser tension creates fewer stitches per inch and therefore produces a wider garment. If your panel is noticeably too wide, move down one hook size and make a fresh gauge swatch.
The Neckline Looks Uneven
Make sure every neckline decrease removes exactly one stitch. The left front decreases at the beginning of each designated row, while the right front decreases at the end. Reversing these positions can make the two fronts look asymmetrical.
The Surface Stripes Pucker
The most common cause is pulling the accent yarn too tightly. Surface slip stitches should sit on top of the fabric without drawing the double crochet rows inward. Undo a few stitches and repeat them with a looser working loop.
The Sleeve Does Not Fit the Armhole
Small differences are normal when working garments by hand. Pin or clip the sleeve around the opening before sewing. Distribute any extra fullness evenly around the armhole rather than placing it all at the shoulder seam.
The Ruffle Waves Too Much
A ruffle is intentionally fuller than the garment edge, but excessive waving can occur when your tension is very loose. Try using a slightly smaller hook for the edging or replace the 2-dc increase with alternating 2 dc and 1 dc around the bottom edge.
Finishing, Blocking, and Care
Once the cardigan has been assembled, weave every yarn tail securely into the wrong side of the fabric. Because the garment is intended for a baby, avoid leaving long loose ends inside seams or around the neckline.
For a gentle blocking treatment, place the cardigan flat on a clean towel or suitable blocking surface. Smooth the panels into shape without aggressively stretching them. Pay particular attention to the front edges, shoulder seams, sleeves, and bottom ruffle.
Use the care instructions appropriate for the yarn selected. A washable DK-weight fiber is practical for baby clothing because handmade garments often need frequent cleaning. Avoid high heat unless the yarn label specifically permits it.
Pro Tip: Check the cardigan after washing before putting it on a child. Confirm that the seams remain secure, the buttons or closures are firmly attached, and no loose yarn ends or decorative elements have appeared.
How to Make This Crochet Baby Sweater Your Own
One of the best features of this crochet baby sweater pattern is its simple canvas for personalization. The basic construction works beautifully with a neutral foundation, but the surface stripes can be completely redesigned.
For a delicate nursery-inspired cardigan, combine ivory with blush, butter yellow, pale aqua, and lavender. For a brighter version, substitute coral, turquoise, sunny yellow, and sky blue. A monochromatic cardigan using several shades of the same color can create a more understated appearance.
You can also replace the ruffled hem with a straight single crochet border if you prefer a cleaner silhouette. A reverse single crochet edge gives the bottom a firmer finish, while a second row of half double crochet creates a soft but less decorative border.
The button band can also be personalized. Three buttons create a classic baby cardigan appearance, while two larger securely attached buttons can produce a simpler look. For very young babies, embroidered closure details can be considered instead of detachable buttons.
At a Glance
- Best yarn: Soft, washable DK-weight yarn with comfortable drape.
- Skill level: Confident beginner to intermediate, using basic double crochet, decreases, increases, and seaming.
- Key technique: Flat double crochet panels combined with surface slip-stitch stripes.
- Size adjustment: Add or remove even numbers of stitches for width and complete rows for length.
- Finishing: Secure seams, simple front bands, neckline edging, pastel surface stripes, and a gently flared ruffle.
Conclusion
This crochet baby sweater pattern combines an easy double crochet structure with soft pastel detailing to create a charming handmade cardigan for a growing baby. The separate panels make the construction approachable, while the neckline shaping, sleeves, button bands, and ruffled hem provide enough detail to make the finished garment feel special.
Choose a soft washable yarn, make a gauge swatch when accurate sizing matters, and read through the complete pattern before beginning. Take a few minutes to compare the finished measurements with the intended wearer, especially around the chest, sleeve, and body length.
Most importantly, personalize the color sequence and finishing details to suit your project. Whether you keep the delicate pastel palette or create your own combination, this original crochet baby sweater pattern offers a practical foundation for a handmade baby cardigan that can be adapted as your crochet skills grow.
Tags
Crochet Baby Sweater
Baby Crochet Pattern
Crochet Baby Cardigan
Free Crochet Pattern
Baby Crochet Clothes
Easy Crochet Project
Crochet Gift Idea
Pastel Crochet