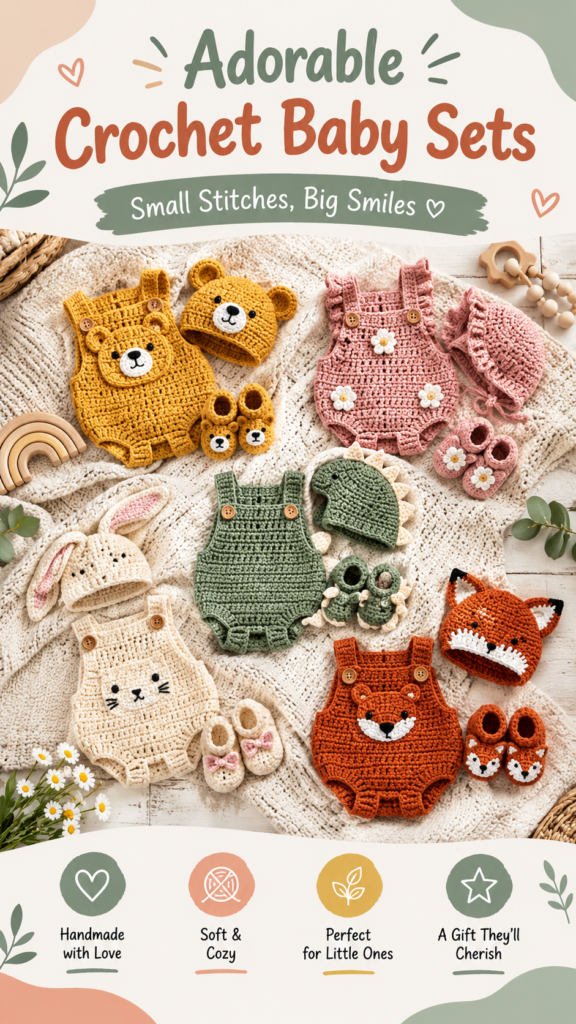
Sweet, soft, and full of handmade charm, this crochet baby romper is designed to capture the cozy animal-inspired look of classic nursery crochet. The finished style combines a simple textured romper with playful proportions, button-style straps, and an optional pair of tiny animal ears for an especially adorable finish. It works beautifully in warm neutrals, creamy ivory, cinnamon, honey, sage, gray, or gentle pastel shades.
This original interpretation uses two crocheted body panels joined at the sides and crotch, followed by a front bib and adjustable shoulder straps. The construction is intentionally approachable, making it a useful beginner-friendly crochet pattern for anyone comfortable with single crochet, increases, decreases, and basic seaming.
Key Takeaways
- A cozy crochet baby romper with a simple flat-panel construction.
- Suitable for confident beginners who know basic US crochet stitches.
- Suggested DK weight yarn creates a soft, flexible fabric without excessive bulk.
- The front bib and shoulder straps give the romper its classic handmade babywear look.
- Neutral or earthy colors can create an animal-inspired nursery aesthetic.
- The basic measurements can be adjusted for a longer body, wider fit, or different strap placement.
Crochet Baby Romper Project Description
The featured style is best described as a soft, animal-inspired crochet baby romper or crocheted diaper-cover romper. The overall silhouette has a compact lower body, a gently shaped front bib, narrow shoulder straps, and rounded proportions suited to baby clothing. The look is enhanced by warm, natural color combinations and small decorative details.
The most practical construction for recreating this style is to crochet the main body in two flat panels. After the panels are joined at the side seams, the lower center section is sewn to create the crotch while leaving two leg openings. A bib is then worked directly onto the front upper edge, and two narrow straps are added to the back.
This approach avoids complicated shaping while still producing a garment with a recognizable romper silhouette. It also makes sizing easier because the width, body length, bib height, and strap length can each be modified independently.
The visible crochet texture is closest to dense rows of single crochet. Single crochet is a practical choice for baby garments because it produces an even fabric with good stitch definition. A DK weight yarn gives the fabric enough drape for comfortable movement while keeping the finished garment relatively light.
Crochet Construction and Stitch Analysis
Main Stitch Texture
The main body uses single crochet worked in rows. Working through the back loop on selected rows creates a subtle horizontal ridge that adds visual interest without making the fabric overly complicated. The majority of the romper remains in regular single crochet so the finished piece stays soft and stable.
The bib uses the same stitch family, with simple decreases near the upper edges to create a gently tapered shape. Narrow shoulder straps are made separately in rows and finished with a buttonhole. This keeps the construction straightforward and gives the finished garment an adjustable quality.
Suggested Yarn and Hook
A soft DK weight category 3 yarn is recommended. Cotton, cotton-bamboo, cotton-acrylic, or another washable baby-friendly blend can work well. Choose yarn that feels smooth against delicate skin and can tolerate repeated washing.
The suggested hook is a 3.5 mm US E-4 crochet hook. This is a starting recommendation rather than a claim about the hook used for any original photographed garment. If your fabric feels stiff, try a slightly larger hook. If it feels too loose or floppy, try a smaller hook.
Pro Tip: Baby garments benefit from a fabric that bends easily without becoming excessively open. Make a gauge swatch before beginning, especially if you plan to change yarn brands or fibers.
Difficulty and Intended Use
This is an easy to confident-beginner crochet project. The most important techniques are making consistent single crochet stitches, working rows evenly, making basic decreases, sewing seams, and creating a simple buttonhole.
The romper is particularly suitable as a baby shower gift, newborn photography outfit, nursery keepsake, or handmade everyday layer. Because crochet fabric can be warmer and less stretchy than commercial baby clothing, choose a breathable yarn and avoid making the garment excessively tight.
Free Crochet Baby Romper Pattern
Original Pattern Notes
This is an original image-inspired interpretation of the animal-themed baby romper style. Exact yarn, hook size, gauge, measurements, and construction details cannot be established from appearance alone, so the specifications below are practical recommendations for creating a similar handmade garment.
| Specification | Recommended Details |
|---|---|
| Project | Animal-Inspired Crochet Baby Romper |
| Skill Level | Easy to confident beginner |
| Sizes | 0-3 months, 3-6 months, 6-12 months |
| Approximate Finished Chest | 20, 22, 24 in / 51, 56, 61 cm |
| Yarn | DK weight category 3, washable baby-friendly fiber |
| Yarn Quantity | 220, 270, 330 yd / 201, 247, 302 m |
| Hook | 3.5 mm US E-4 |
| Gauge | 18 sc x 20 rows = 4 x 4 in / 10 x 10 cm |
| Terminology | US crochet terminology |
Finished Measurements
- 0-3 months: approximately 20 in / 51 cm chest circumference, 6 in / 15 cm body height from waist to lower edge, and 4 in / 10 cm bib height.
- 3-6 months: approximately 22 in / 56 cm chest circumference, 6.8 in / 17 cm body height, and 4.5 in / 11.5 cm bib height.
- 6-12 months: approximately 24 in / 61 cm chest circumference, 7.6 in / 19 cm body height, and 5 in / 12.5 cm bib height.
These are finished-garment measurements with modest ease. For a looser fit, use the next size or add stitches to both body panels. For a closer fit, work to the child’s actual chest measurement while retaining enough ease for movement.
Materials
- DK weight category 3 yarn in a main color, approximately 220 to 330 yd / 201 to 302 m depending on size.
- Optional small amounts of a contrast color for ears or decorative edging.
- 3.5 mm US E-4 crochet hook.
- Yarn needle for sewing and weaving in ends.
- Stitch marker for counting rows if desired.
- Two small, securely attached buttons for the straps. For infant use, embroidered closures or securely sewn flat fabric loops are preferable to loose decorative buttons.
- Scissors and measuring tape.
US Crochet Abbreviations
- ch: chain
- sc: single crochet
- sc2tog: single crochet two stitches together
- sl st: slip stitch
- st: stitch
- sts: stitches
- RS: right side
- WS: wrong side
- BLO: back loop only
- inc: two single crochet stitches worked into the same stitch
UK terminology note: US single crochet is called double crochet in UK terminology. The instructions below use US terminology exclusively.
Gauge
Work a flat single crochet swatch until you can measure at least 4 x 4 in / 10 x 10 cm. The target is 18 single crochet stitches and 20 rows per 4 inches / 10 cm.
If you have more than 18 stitches across 4 inches, your stitches are smaller and you should try a larger hook. If you have fewer than 18 stitches, your stitches are larger and you should try a smaller hook. Match gauge before relying on the finished measurements.
Construction Overview
The romper is made from two matching body panels. The front panel receives the bib, while the back panel receives the shoulder straps. The side edges are seamed first. The lower center edges are then seamed to form the crotch. Finally, the leg openings, bib, straps, and optional decorative ears are finished.
Turning chains do not count as stitches throughout this pattern. Slip stitches do not count as stitches. When a row begins with a chain 1, make the first single crochet in the first stitch.
Main Body Panels
Make 2 panels, one for the front and one for the back.
Size 0-3 Months
- Ch 46.
- Row 1: Sc in 2nd ch from hook and in each ch across. You have 45 sts.
- Rows 2-6: Ch 1, turn, sc in each st across. 45 sts.
- Row 7: Ch 1, turn, sc in BLO across. 45 sts.
- Row 8: Ch 1, turn, sc in each st across. 45 sts.
- Rows 9-29: Ch 1, turn, sc in each st across. 45 sts each row.
- Row 30: Ch 1, turn, sc in BLO across. 45 sts. Fasten off.
Size 3-6 Months
- Ch 50.
- Row 1: Sc in 2nd ch from hook and in each ch across. 49 sts.
- Rows 2-6: Ch 1, turn, sc across. 49 sts.
- Row 7: Ch 1, turn, sc in BLO across. 49 sts.
- Row 8: Ch 1, turn, sc across. 49 sts.
- Rows 9-33: Ch 1, turn, sc across. 49 sts each row.
- Row 34: Ch 1, turn, sc in BLO across. 49 sts. Fasten off.
Size 6-12 Months
- Ch 54.
- Row 1: Sc in 2nd ch from hook and in each ch across. 53 sts.
- Rows 2-6: Ch 1, turn, sc across. 53 sts.
- Row 7: Ch 1, turn, sc in BLO across. 53 sts.
- Row 8: Ch 1, turn, sc across. 53 sts.
- Rows 9-37: Ch 1, turn, sc across. 53 sts each row.
- Row 38: Ch 1, turn, sc in BLO across. 53 sts. Fasten off.
Side Seams and Crotch
Place the front and back panels together with the right sides facing inward. Align the side edges and use a yarn needle to mattress stitch or whip stitch the side seams.
For a flexible baby garment, seam the side edges from the top down to the bottom without pulling the yarn tightly. Repeat on the opposite side.
Next, lay the garment flat with the lower edges aligned. Locate the center of each lower edge. Sew the center section together to form the crotch.
- 0-3 months: sew the center 10 stitches of the front to the center 10 stitches of the back.
- 3-6 months: sew the center 10 stitches of the front to the center 10 stitches of the back.
- 6-12 months: sew the center 12 stitches of the front to the center 12 stitches of the back.
The remaining lower-edge stitches become the leg openings. Each leg opening is formed from the corresponding front and back sections, so the finished opening is approximately twice the flat width of one panel section.
Leg Opening Edging
Join yarn at the center of either leg opening.
- Ch 1.
- Work 1 sc evenly around the entire leg opening, placing approximately one sc in each visible stitch along the front and back edges.
- Join with a sl st to the first sc.
- Ch 1 and work one more round of sc around the opening.
- Join with a sl st, fasten off, and weave in the end.
Repeat for the second leg. Do not pull the edging tightly. The opening should lie flat and stretch gently around the baby’s thigh.
Front Bib
Work the bib onto the upper edge of the front panel. Count inward from each side and mark the center section.
- 0-3 months: mark 21 center stitches.
- 3-6 months: mark 23 center stitches.
- 6-12 months: mark 25 center stitches.
Join yarn at the first marked stitch.
Bib Base
- Row 1: Ch 1, sc in each marked stitch. Do not turn the garment. The stitch count is 21, 23, or 25 depending on size.
- Rows 2-5: Ch 1, turn, sc across. Maintain the same stitch count.
Bib Shaping
Continue shaping with a decrease at both ends of alternating rows.
- Next row: Ch 1, turn, sc2tog, sc across until 2 sts remain, sc2tog. You now have 2 fewer stitches.
- Following row: Ch 1, turn, sc across.
- Repeat the previous two rows until the bib has 13 stitches remaining for 0-3 months, 15 stitches remaining for 3-6 months, or 17 stitches remaining for 6-12 months.
- Work 2 additional rows of sc without decreases.
- Fasten off and weave in the end.
For a rounder bib, gently steam-block the finished panel while keeping the shaping symmetrical. Avoid flattening the fabric aggressively.
Shoulder Straps
Make 2 straps. The straps are worked separately from the back of the romper and later attached to the front bib.
- Join yarn to the back upper edge approximately 5 stitches inward from one side seam.
- Row 1: Ch 1, sc in the same joining point and the next 2 sts. 3 sts.
- Rows 2-12: Ch 1, turn, sc across. 3 sts.
- Buttonhole row: Ch 1, turn, sc in first st, ch 2, skip the next 2 sts, sc in final st. 2 sc plus a 2-chain space.
- Next row: Ch 1, turn, sc in first st, work 2 sc into the chain-2 space, sc in final st. 3 sts.
- Fasten off, leaving a sewing tail.
For a longer strap, add any number of complete 3-sc rows before making the buttonhole. Measure the strap against the intended wearer rather than relying only on the written length.
Repeat for the second strap, keeping both straps the same length and the same distance from the side seams.
Bib and Strap Edging
For a neat finished edge, join yarn at one lower corner of the bib and work single crochet evenly around the two sides and top.
- Ch 1.
- Sc evenly up the first side of the bib.
- At the upper corner, work 2 sc into the corner stitch.
- Sc across the top edge.
- At the opposite upper corner, work 2 sc into the corner stitch.
- Sc evenly down the opposite side.
- Sl st to the starting point.
- Fasten off and weave in the end.
Do not crochet over the shoulder straps while making the bib edging. The straps should remain separate so they can be adjusted and attached cleanly.
Optional Animal Ear Details
The animal-inspired appearance can be customized with two small crocheted ears. This is an optional decorative component and is not necessary for the basic romper.
Simple Rounded Ear
- Ch 7.
- Sc in 2nd ch from hook, sc in next 5 sts, 3 sc in final chain stitch.
- Turn your work so you can crochet along the opposite side of the starting chain. Sc in the next 5 sts, then 2 sc in the final stitch. Join with a sl st. 16 sts.
- Ch 1. Sc in each st around. Join with a sl st. 16 sts.
- Fasten off, leaving a long tail for sewing.
Make a second ear using the same instructions. Fold each ear gently in half at the lower edge and make a few small stitches through the base to create a slight curve. Sew the ears securely to the upper bib area or to a coordinating crochet accessory.
For an infant garment, keep decorative components simple. Avoid loose beads, bells, detachable appliques, long cords, or unsecured plastic pieces.
Safety: If this romper is intended for a baby or child under three, embroidered facial details are preferable to plastic safety eyes, buttons, beads, or other detachable decorations. Secure every seam and decorative element firmly, and inspect the garment regularly for loose components. This handmade garment should not be treated as sleep-safe equipment.
Attaching the Straps
Place the romper flat with the front bib facing upward. Cross-check the strap positions before sewing. Each strap should reach naturally from the back shoulder area to the upper portion of the bib.
- Place one strap over the shoulder.
- Position the buttonhole approximately 1 to 1.5 inches / 2.5 to 4 cm below the top edge of the bib.
- Mark the location.
- Sew the strap end securely to the back of the romper using several passes of the yarn needle.
- Repeat for the second strap.
- Attach a small, securely sewn button to each marked position on the bib, checking that the button passes comfortably through the strap buttonhole.
For very young babies, a securely sewn flat fabric closure can be substituted for a decorative button. The closure should never have a loose or detachable component.
Finishing the Romper
- Inspect all seams and reinforce any area that feels loose.
- Weave in all yarn tails on the wrong side of the garment.
- Trim excess yarn only after the ends have been securely woven through several stitches.
- Lay the romper flat and gently smooth the side seams, bib, straps, and leg openings.
- Lightly steam-block if the yarn manufacturer permits it, or damp-block the garment and allow it to dry naturally.
- Check that the leg openings remain comfortable and that the bib lies flat.
- Attach any optional embroidered animal details after the main construction is complete.
Customization and Size-Adjustment Guide
The simple panel construction makes this crochet baby romper particularly easy to modify. Always measure the intended wearer when possible rather than choosing a size based solely on age.
Adjusting Width
Each additional stitch in a body panel adds approximately 0.22 inch / 0.56 cm at the stated gauge. Add the same number of stitches to both panels so the side seams remain aligned.
For example, adding 4 stitches to each panel adds approximately 0.9 inch / 2.2 cm to each panel. Together, this increases the finished circumference by approximately 1.8 inches / 4.4 cm.
Adjusting Length
Add or remove complete rows from the main body before making the bib. At the stated gauge, every 5 rows changes the body length by approximately 1 inch / 2.5 cm.
For a longer torso, add rows evenly before the final ridge row. For a shorter torso, remove rows from the center section rather than changing the starting chain.
Choosing Colors
To recreate the cozy animal-inspired appearance, try a creamy main color with cinnamon, rust, honey, caramel, gray, sage, or chocolate accents. A single neutral shade gives the garment a minimalist nursery look, while contrasting bib edging can make the animal-inspired details more noticeable.
For a fox-inspired version, combine warm rust with cream. For a bear-inspired version, try caramel with a darker brown accent. For a panda-inspired version, use ivory with black details. For an elephant-inspired version, soft gray paired with cream creates a gentle palette.
Customization Tip
- Use a contrasting yarn only for the bib edging, straps, or optional ears.
- Add a simple embroidered heart, star, flower, or animal nose for personality.
- Keep all baby-facing details flat, securely attached, and free from loose pieces.
Common Crochet Baby Romper Mistakes and Troubleshooting
The Panels Are Different Sizes
Count the stitches at the end of every row, particularly after the foundation chain. If one panel has fewer stitches, the side seams will pull unevenly and the bib may not sit in the center.
The Fabric Feels Too Stiff
A tight crochet fabric can make a baby garment uncomfortable. Try moving up from the 3.5 mm US E-4 hook to a 3.75 mm or 4 mm hook, then check the gauge again. A softer yarn fiber can also improve drape.
The Bib Is Crooked
Make sure the same number of stitches is marked from each side of the front panel. Count the bib stitches before beginning the shaping rows. When decreasing, make the first and last decrease in matching positions.
The Leg Openings Feel Too Tight
Check whether the edging has been pulled too firmly. The edging should follow the natural opening without gathering the fabric. If the opening is still too small, remove the edging and work the first round with fewer stitches so the edge remains flexible.
The Straps Do Not Match
Measure both straps before sewing them permanently. Because three stitches make a narrow strap, even one extra row can be noticeable. Count every row or make both straps side by side.
Finishing, Washing, and Care
Baby garments need practical finishing because they are likely to be washed frequently. Weave yarn ends deeply into the wrong side of the fabric, especially around the straps, bib, and crotch where movement can create additional stress.
Follow the washing instructions for the specific yarn you choose. A washable cotton or cotton blend is particularly convenient for baby clothing. When possible, wash gently and reshape the garment while damp.
Lay the romper flat to dry rather than hanging it while wet. Hanging can stretch the shoulder straps and distort the side seams. Avoid high heat unless the yarn label specifically allows it.
Expert Crochet Tip: Before gifting the finished romper, check every seam, strap attachment, button, and embroidered detail by gently tugging each one. Any component that shifts should be reinforced before the garment is worn.
At a Glance
- Best yarn: Soft, washable DK weight category 3 yarn with a smooth baby-friendly texture.
- Skill level: Easy to confident beginner.
- Key technique: Flat single crochet panels joined with simple seams, followed by a bib and straps.
- Size adjustment: Add or remove body stitches for width and rows for length while maintaining matching front and back panels.
- Finishing: Secure seams, gently shape the garment, weave in ends thoroughly, and use only securely attached baby-safe details.
Final Thoughts on This Crochet Baby Romper
This crochet baby romper is a charming project when you want handmade baby clothing with a soft animal-inspired personality. The simple construction keeps the project approachable while the bib, straps, textured ridge, and optional ears provide plenty of opportunities for customization.
Before beginning, choose a washable yarn, measure the intended wearer when possible, and make a gauge swatch. Read the complete pattern from beginning to end so you understand how the panels, crotch, bib, and straps fit together before starting.
Most importantly, personalize the project thoughtfully. Try a warm fox palette, soft elephant gray, creamy bear tones, playful panda contrast, or a muted woodland combination. Small changes in color and edging can create a completely different character while keeping the same dependable construction.
With careful stitch counting, secure finishing, and comfortable sizing, this handmade crochet baby romper can become a sweet wardrobe piece or thoughtful crochet gift idea. Take your time with the seams, check the fit before adding permanent closures, and enjoy creating a practical little garment with plenty of handmade charm.
Tags
Crochet Baby Romper
Free Crochet Pattern
Baby Crochet
Crochet Baby Clothes
Beginner Crochet Pattern
Animal Crochet
Handmade Baby Gift
Crochet Baby Gift