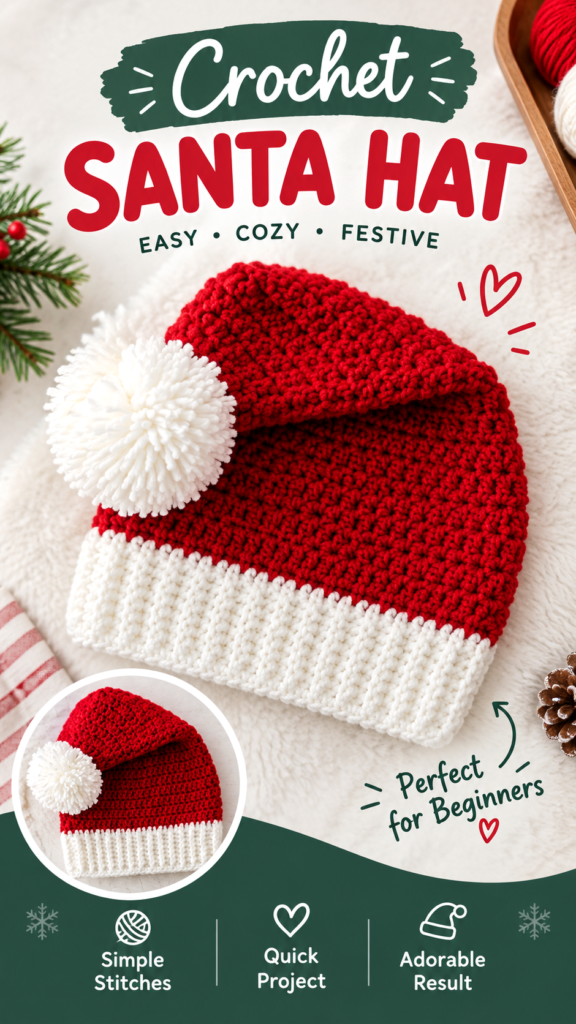
This festive crochet baby Santa hat is a cozy little Christmas accessory with a classic red body, a soft white ribbed brim, and a fluffy white pom-pom at the tip. The simple silhouette makes it a fun seasonal crochet project for confident beginners, while the textured fabric gives the finished hat a handmade look without requiring complicated stitch combinations.
This original interpretation uses a bottom-up construction with a separate ribbed brim and a tapered red crown worked in joined rounds. The exact yarn, hook, gauge, and measurements of a photographed handmade item cannot be determined visually, so the specifications below are practical recommendations designed to create a similar shape and appearance.
Key Takeaways
- A festive crochet baby Santa hat with a red textured crown and white ribbed brim.
- The hat is made from a ribbed brim joined into a ring, followed by tapered joined rounds.
- Suggested worsted-weight yarn creates a warm, structured fabric suitable for holiday wear.
- The base pattern is designed for approximately 6 to 12 months, with easy circumference and length adjustments.
- The white pom-pom is optional and should be attached securely for supervised wear.
- The project is suitable for confident beginners familiar with single crochet, half double crochet, decreases, and seaming.
A Festive Crochet Baby Santa Hat for Christmas
The charm of this crochet baby Santa hat comes from its simple color palette and recognizable holiday shape. Bright red yarn forms the tapered crown, while a contrasting white brim adds softness and definition. A fluffy white pom-pom completes the traditional Santa-inspired look.
The finished hat works especially well for holiday photographs, Christmas gatherings, seasonal outfits, and thoughtful handmade gifts. Because babies grow quickly, the pattern also includes practical instructions for changing the circumference and height without having to redesign the entire hat.
The crown is intentionally kept fairly simple. Instead of relying on elaborate stitch motifs, the texture comes from working half double crochet through the back loop. This creates subtle horizontal ridges that add visual interest while keeping the fabric dense and warm.
Important: A baby hat should fit comfortably without being tight. Measure the intended wearer’s head when possible and use the finished circumference as a guide rather than relying only on age labels.
What This Crochet Baby Santa Hat Looks Like
The project is a classic pointed Santa-style hat with a slightly relaxed crown. The lower edge is finished with a white ribbed band that visually separates the brim from the red body. The crown narrows progressively toward the top, ending in a small point where the pom-pom can be attached.
The visible construction is well suited to a crocheted tube. The brim can be made as a flat ribbed strip, seamed at the ends, and then used as the foundation for the red crown. The crown is worked upward in joined rounds, with strategically spaced decreases that create the triangular silhouette.
The white brim is intentionally thicker and more textured than the red crown. Single crochet worked through the back loop produces raised vertical ribs when the strip is viewed around the finished hat. The red section uses half double crochet through the back loop for a coordinated but slightly more open texture.
Color Arrangement
- White: ribbed brim and optional pom-pom.
- Red: main crown.
- Optional: a small amount of white yarn can also be used for a decorative top or a second pom-pom layer.
The strong red-and-white contrast is what gives this handmade accessory its unmistakable Christmas character. For a softer interpretation, the red can be replaced with burgundy, cranberry, or deep berry, while the white can be substituted with cream.
Crochet Construction and Stitch Analysis
The most practical construction for this design is a separate ribbed brim followed by joined crochet rounds. This approach creates a neat lower edge while making the crown easy to size.
The brim is worked flat in rows of single crochet through the back loop. The number of rows determines the hat circumference. Once the two short ends are seamed together, the long edge becomes the foundation for the red crown.
The crown uses half double crochet through the back loop. Every few rounds, evenly spaced decreases remove eight stitches from the circumference. Keeping several plain rounds between decrease rounds prevents the crown from becoming too sharply pointed too quickly.
Why Half Double Crochet Works Well
Half double crochet gives the red crown more height per round than single crochet while maintaining a reasonably dense fabric. Working through the back loop creates ridges that catch the light and make the solid red yarn more visually interesting.
For a smoother Santa hat, work the same pattern in regular half double crochet instead of through the back loop. For a more pronounced ribbed appearance, the brim can be made slightly taller by adding extra rows before joining it.
Free Crochet Baby Santa Hat Pattern
Free Crochet Baby Santa Hat Pattern
Project name: Classic Baby Santa Hat
Pattern style: Original image-inspired crochet design using a ribbed brim and tapered crown.
Skill level: Confident beginner
Base size: Approximately 6 to 12 months
Approximate finished circumference: 16 inches / 40.5 cm
Approximate finished height: 7.25 inches / 18.5 cm from lower brim edge to crown tip, excluding the pom-pom
Recommended head circumference: Approximately 16.5 to 17.5 inches / 42 to 44.5 cm
| Specification | Recommendation |
|---|---|
| Yarn | Worsted-weight yarn, category 4 |
| Fiber | Soft acrylic or washable acrylic blend |
| Red yarn | Approximately 75 yards / 69 meters |
| White yarn | Approximately 45 yards / 41 meters |
| Hook | 5.0 mm, US H-8 |
| Gauge | Approximately 16 hdc x 12 rounds = 4 x 4 inches / 10 x 10 cm |
| Terminology | US crochet terminology |
Materials
- Approximately 75 yards / 69 meters of red worsted-weight yarn.
- Approximately 45 yards / 41 meters of white worsted-weight yarn.
- 5.0 mm US H-8 crochet hook.
- Yarn needle with a blunt tip.
- Removable stitch marker.
- Scissors.
- Small piece of cardboard or a pom-pom maker for the optional pom-pom.
Gauge
With the 5.0 mm hook, work half double crochet through the back loop. Aim for approximately 16 stitches and 12 rounds in 4 inches / 10 cm.
Gauge is especially important for the circumference. If your fabric produces more than 16 stitches in 4 inches, the hat will be smaller. If it produces fewer than 16 stitches, the hat will be larger. Adjust the hook size rather than forcing your stitches to match the gauge.
Abbreviations
- ch: chain
- sc: single crochet
- hdc: half double crochet
- hdc2tog: half double crochet two together
- sl st: slip stitch
- BLO: back loop only
- st: stitch
- sts: stitches
- rnd: round
- RS: right side
UK equivalents, if useful: US single crochet is UK double crochet, and US half double crochet is UK half treble crochet. The instructions themselves use US terminology only.
Special Stitch: hdc2tog
Yarn over, insert the hook into the indicated stitch, yarn over and pull up a loop. Yarn over, insert the hook into the next stitch, yarn over and pull up a loop. Yarn over and pull through all five loops on the hook. This counts as one stitch.
Construction Notes
The brim is worked first as a flat strip of single crochet through the back loop. It is then seamed into a ring. The red crown is worked upward from the long edge of the brim in joined rounds. The turning chain does not count as a stitch, and slip stitches used to join rounds do not count as stitches.
Each crown round begins with chain 2. The first half double crochet is worked into the same stitch as the joining slip stitch. Join every round with a slip stitch to the first half double crochet. Do not work into the chain-2 space when counting stitches.
Part 1: White Ribbed Brim
- With white yarn, chain 9.
- Row 1: Sc in the 2nd chain from hook and in each chain across. You have 8 sc. Turn.
- Rows 2 through 64: Ch 1, sc BLO in each of the 8 stitches across. You have 8 sc. Turn after every row.
At the end of Row 64, fasten off leaving a yarn tail of approximately 12 inches / 30 cm for seaming.
Seam the Brim
Fold the strip so the first and last rows meet. Align the short edges carefully. Using the white yarn tail and a yarn needle, whip stitch or mattress stitch the two edges together. Secure the seam firmly, then weave in the end.
The finished brim should form a soft ring approximately 16 inches / 40.5 cm around. The ribbed strip should measure approximately 1.5 inches / 3.8 cm tall.
Part 2: Attach the Red Crown
Turn the white brim so the cleaner side faces outward. Join red yarn with a slip stitch to any stitch along the long upper edge of the brim. Work evenly around the edge, placing one half double crochet into each of the 64 foundation-edge stitches.
- Round 1: Ch 2. Hdc in the same stitch as the join and in each stitch around. Join with a sl st to the first hdc. 64 hdc.
- Round 2: Ch 2. Hdc BLO in each stitch around. Join with a sl st to the first hdc. 64 hdc.
From this point forward, all half double crochet stitches are worked through the back loop unless otherwise stated.
Part 3: Shape the Santa Hat Crown
- Round 3: Ch 2. Repeat [6 hdc BLO, hdc2tog BLO] 8 times around. Join with a sl st to the first hdc. 56 hdc.
- Round 4: Ch 2. Hdc BLO in each stitch around. Join. 56 hdc.
- Round 5: Ch 2. Hdc BLO in each stitch around. Join. 56 hdc.
- Round 6: Ch 2. Repeat [5 hdc BLO, hdc2tog BLO] 8 times around. Join. 48 hdc.
- Round 7: Ch 2. Hdc BLO in each stitch around. Join. 48 hdc.
- Round 8: Ch 2. Hdc BLO in each stitch around. Join. 48 hdc.
- Round 9: Ch 2. Repeat [4 hdc BLO, hdc2tog BLO] 8 times around. Join. 40 hdc.
- Round 10: Ch 2. Hdc BLO in each stitch around. Join. 40 hdc.
- Round 11: Ch 2. Hdc BLO in each stitch around. Join. 40 hdc.
- Round 12: Ch 2. Repeat [3 hdc BLO, hdc2tog BLO] 8 times around. Join. 32 hdc.
- Round 13: Ch 2. Hdc BLO in each stitch around. Join. 32 hdc.
- Round 14: Ch 2. Hdc BLO in each stitch around. Join. 32 hdc.
- Round 15: Ch 2. Repeat [2 hdc BLO, hdc2tog BLO] 8 times around. Join. 24 hdc.
- Round 16: Ch 2. Hdc BLO in each stitch around. Join. 24 hdc.
- Round 17: Ch 2. Hdc BLO in each stitch around. Join. 24 hdc.
- Round 18: Ch 2. Repeat [1 hdc BLO, hdc2tog BLO] 8 times around. Join. 16 hdc.
- Round 19: Ch 2. Hdc BLO in each stitch around. Join. 16 hdc.
- Round 20: Ch 2. Hdc BLO in each stitch around. Join. 16 hdc.
- Round 21: Ch 2. Repeat hdc2tog BLO 8 times around. Join. 8 hdc.
- Round 22: Ch 2. Repeat hdc2tog BLO 4 times around. 4 hdc.
Do not work another round after Round 22. Fasten off, leaving a yarn tail approximately 10 inches / 25 cm long. Thread the tail onto a yarn needle and weave it through the remaining four stitches. Pull gently to close the opening. Secure the yarn on the inside of the hat and weave in the remaining end.
Part 4: Make the White Pom-Pom
A fluffy white pom-pom gives the hat its traditional Santa finish. For a baby item, the most important consideration is secure attachment rather than simply making the pom-pom large.
- Wrap white yarn around a pom-pom maker or a piece of cardboard approximately 2.5 inches / 6.5 cm wide.
- Continue wrapping until the bundle is thick and full.
- Tie the center very tightly with a separate length of white yarn.
- Cut the loops on both sides.
- Trim the fibers into an even round shape.
- Leave two long tying strands at the center.
- Thread the strands through the closed top of the crochet hat.
- Tie them securely on the inside of the crown.
- Use a yarn needle to reinforce the attachment through several nearby stitches.
- Trim and weave in the remaining yarn ends.
Baby Safety: Avoid loose buttons, beads, bells, detachable ornaments, or unsecured decorations. If using a pom-pom on a baby hat, attach it very firmly and inspect the hat before every use. Handmade hats should be used with adult supervision and should not be treated as sleepwear or as medically safe sleep equipment.
Finishing the Hat
Turn the hat inside out and inspect every seam and yarn end. Make sure the white brim is securely joined to the red crown and that the crown closure is tight. Weave all remaining ends through several stitches before trimming.
Gently shape the crown with your hands. Because the fabric is made with washable worsted-weight yarn, aggressive blocking is unnecessary. If the hat needs slight shaping, lightly dampen it and place it over a smooth, appropriately sized rounded form. Allow it to dry completely before removing it.
Avoid stretching the brim excessively during shaping. The ribbing is intended to provide gentle flexibility around the head.
How to Customize the Crochet Baby Santa Hat
The base pattern is intentionally easy to modify. The most important measurement is the finished circumference of the brim. For a comfortable baby hat, compare the finished circumference with the intended head measurement and allow a small amount of negative ease so the hat stays comfortably in place without squeezing.
Adjusting the Circumference
For the ribbed brim, the starting chain controls the brim height, while the number of rows controls its circumference. Keep the chain at 9 for the approximate 1.5-inch / 3.8 cm brim shown in this pattern.
To make the circumference smaller or larger, add or remove brim rows. Each row contributes approximately 0.25 inch / 0.6 cm at the suggested gauge. For example, 4 fewer rows reduce the circumference by approximately 1 inch / 2.5 cm, while 4 additional rows increase it by approximately the same amount.
Because the crown is designed around 64 foundation stitches, major circumference changes should be matched by adjusting the number of crown stitches. For a small increase or decrease, use a foundation stitch count divisible by 8 so the eight evenly spaced decreases remain mathematically clean.
Adjusting the Height
To make the hat taller without significantly changing its circumference, add plain hdc BLO rounds between the decrease rounds. Adding one plain round increases the crown height by approximately 0.3 to 0.35 inch / 0.8 to 0.9 cm at the suggested gauge.
For a shorter hat, remove one or more plain rounds. Keep at least one plain round between major decrease rounds so the crown maintains a gradual Santa-hat shape instead of becoming abruptly pointed.
Changing the Colors
The traditional combination is bright red and white, but this design can easily be personalized. Try cranberry and ivory for a softer vintage appearance, forest green and cream for a winter-inspired variation, or burgundy and white for a deeper holiday palette.
For a striped crown, change colors at the joining slip stitch at the end of selected rounds. Keep the color changes consistent so the stripes remain even. A solid red crown with a white brim and pom-pom will produce the closest classic Santa appearance.
Crochet Insight: Getting the Ribbed Brim Right
The brim is one of the most noticeable details on this crochet baby Santa hat. When working single crochet through the back loop, avoid pulling the stitches too tightly. A relaxed tension creates a flexible ribbing that stretches around the head more comfortably.
- Keep the turning chain loose enough that the edge does not curl.
- Count the 8 stitches on every brim row.
- Keep the ribbing seam flat before attaching the red crown.
Common Mistakes and Troubleshooting
The Brim Is Too Loose
If the brim feels loose, first check your gauge and the actual head measurement. A loose brim can also result from overly relaxed stitches or too many foundation rows. Remove several rows from the brim strip and test the circumference before completing the crown.
The Crown Looks Twisted
Make sure every round is joined to the first actual hdc rather than the chain-2 turning chain. The chain 2 does not count as a stitch. Also check that every decrease round contains exactly eight decreases.
The Point Is Too Short
Add one or two plain rounds before the final decrease rounds. This lengthens the crown while preserving the basic shaping. Another option is to use a slightly larger pom-pom, which visually emphasizes the pointed silhouette without changing the crochet structure.
The Crown Is Too Tall
If the finished hat extends too far down the back of the head, remove one or more plain rounds between decrease rounds. Measuring the crown against the intended head before adding the pom-pom is the easiest way to catch this issue.
The Decreases Are Visible
A small amount of shaping texture is normal. If the decrease lines are more noticeable than desired, make sure the decreases are spread evenly and that your tension remains consistent. Blocking the completed hat gently can also soften minor irregularities.
Care, Blocking, and Finishing Tips
For a baby accessory, washable yarn is a practical choice. Soft acrylic or an acrylic blend can be easier to maintain than delicate fibers because the hat can be washed according to the yarn manufacturer’s care instructions.
Before washing, check that the pom-pom remains firmly attached and that all yarn ends are securely woven in. Place the finished hat in a laundry bag if machine washing is appropriate for the chosen yarn. Reshape it while damp and allow it to dry naturally.
There is no need for aggressive blocking. The primary goal is to smooth the stitches and encourage the crown to settle into its tapered shape. Avoid stretching the hat over an oversized form because this can permanently enlarge the ribbed brim.
For gifting, weave in every yarn tail carefully and inspect the inside of the hat for scratchy ends. The finished piece should feel comfortable against delicate skin.
Choosing Yarn for a Baby Santa Hat
A soft, washable worsted-weight yarn is a useful choice for this crochet baby Santa hat. The yarn should have enough structure to hold the pointed crown while remaining comfortable against the skin.
Very fuzzy yarn can make the ribbed stitches difficult to see, while a very stiff yarn can make the brim uncomfortable. Smooth medium-weight yarn makes it easier to check stitch counts and maintain even tension.
If the intended recipient is sensitive to wool, choose a soft non-wool alternative. Whatever fiber you choose, follow its care instructions and consider how the fabric feels against the baby’s skin before finishing the hat.
At a Glance
- Best yarn: Soft washable worsted-weight category 4 yarn.
- Skill level: Confident beginner.
- Key technique: Single crochet BLO ribbing, hdc BLO, and evenly spaced decreases.
- Base size: Approximately 16 inches / 40.5 cm finished circumference.
- Finishing: Secure the crown, weave in all ends, shape gently, and attach the optional white pom-pom firmly.
Final Thoughts on This Crochet Baby Santa Hat
This crochet baby Santa hat is a cheerful seasonal project that combines a familiar Christmas silhouette with straightforward crochet techniques. The white ribbed brim provides a comfortable-looking foundation, while the textured red crown gradually narrows into the signature Santa point.
Before beginning, choose a soft yarn, check your gauge, and measure the intended recipient whenever possible. Read through the complete pattern so the decrease sequence and stitch counts are familiar before you start shaping the crown.
The pattern is also easy to personalize. Adjust the brim circumference for a better fit, add or remove plain crown rounds to change the height, or experiment with different shades of red and white. A securely attached pom-pom gives the finished accessory an especially festive touch.
With its simple construction and classic color combination, this crochet baby Santa hat makes a lovely handmade Christmas accessory and a fun addition to a holiday crochet collection. Take your time with the gauge and finishing details, then enjoy adding your own creative touch to the final hat.
Tags
Crochet Baby Santa Hat
Free Crochet Pattern
Christmas Crochet
Baby Crochet Hat
Easy Crochet Project
Santa Hat Crochet
Baby Christmas Outfit
Holiday Crochet Pattern