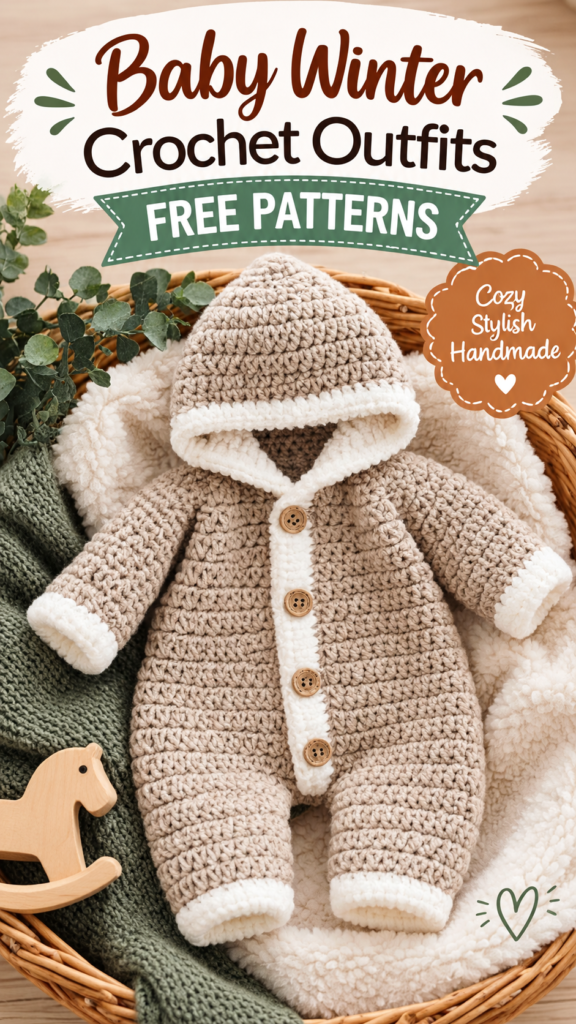
This cozy crochet baby boy set is designed around the soft, bundled-up look of a classic winter romper: a textured one-piece silhouette, roomy sleeves and legs, a snug hood, and creamy contrast trim. The original interpretation below uses simple half double crochet worked through the back loop to create the neat horizontal texture seen throughout the garment, making it a practical project for confident beginners who are ready to assemble a multi-piece baby garment.
Key Takeaways
- A cozy hooded baby romper with a soft, textured crochet fabric.
- Designed as an approximate 3 to 6 month size with easy adjustment options.
- Uses half double crochet in the back loop for a simple ribbed appearance.
- Suggested worsted weight yarn provides warmth without making the fabric overly bulky.
- Separate front and back panels make shaping and assembly straightforward.
- Neutral yarn with cream trim can easily be customized for any baby wardrobe.
A Cozy Crochet Baby Boy Set for Winter
A handmade crochet baby boy set is a lovely way to create a warm layer for cool-weather outings, family photographs, stroller walks, or relaxed days at home. This design has a classic neutral appearance, combining a warm oatmeal shade with soft ivory edging. The result feels timeless rather than overly seasonal, so the romper can coordinate with blankets, socks, booties, and other handmade accessories.
The garment is intentionally designed with a straightforward construction. Two main panels form the body, while separate sleeves and a hood are added afterward. The legs begin independently and are joined at the crotch, creating the distinctive one-piece romper shape. The fabric is made primarily with half double crochet through the back loop, which creates subtle horizontal ridges while keeping the fabric flexible.
The measurements and materials below are suggested specifications for an original interpretation of the pictured style rather than a claim about an unseen original pattern. Always compare the finished measurements with the baby’s actual measurements and make a gauge swatch before committing to the full garment.
What Makes This Crochet Baby Boy Set Special?
The strongest visual feature is the dense, softly ridged texture. Half double crochet worked through the back loop creates horizontal lines that echo the look of a cozy knitted fabric while remaining completely crochet. The stitch also has enough stretch to make a baby garment comfortable and forgiving.
The body is roomy rather than fitted, allowing a baby to move comfortably underneath the garment. The sleeves and legs taper slightly toward their cuffs, while the hood adds extra coverage around the head and neck. Cream-colored edging provides definition around the cuffs and front opening.
For a baby wardrobe, worsted weight yarn in a washable acrylic, acrylic blend, or soft superwash wool blend is a practical choice. If the finished item will be worn directly against sensitive skin, choose a yarn specifically marketed as soft and suitable for baby garments.
Crochet Construction and Stitch Analysis
The main body uses flat panels, while the legs begin as two individual sections and are joined across the crotch. This approach avoids complicated raglan calculations and makes it easier to adjust the length of the garment. After the body is assembled, sleeves are crocheted directly around the armholes.
Main Texture
Half double crochet in the back loop only, or HDC BLO, is used for the main fabric. Working into only the back loop leaves the front loop visible and creates a series of raised horizontal ridges. It is an especially useful stitch for baby garments because it creates texture without complicated stitch combinations.
Color Arrangement
The suggested version uses one main oatmeal or warm beige shade with ivory for the cuffs, hood edging, and front trim. You can reverse those colors, use a dusty blue accent, or choose sage, taupe, cream, or soft gray for a modern nursery-inspired palette.
Difficulty Level
Skill level: Confident beginner to intermediate. The individual stitches are simple, but the project involves several pieces, garment assembly, shaping, and careful finishing. Anyone comfortable with HDC, working into the back loop, counting stitches, seaming, and crocheting around an opening should be able to follow the pattern.
Free Crochet Pattern: Cozy Cabin Hooded Baby Romper
Free Crochet Pattern
Pattern note: This is an original, image-inspired interpretation using practical construction methods. Exact yarn, gauge, dimensions, and construction details cannot be determined from appearance alone, so the specifications below are recommended starting points.
| Skill Level | Confident beginner to intermediate |
| Base Size | Approximate 3 to 6 months |
| Finished Chest | Approximately 18 1/4 in / 46.5 cm |
| Finished Length | Approximately 18 1/3 in / 46.5 cm from cuff to shoulder |
| Inseam | Approximately 6 3/4 in / 17 cm |
| Sleeve Length | Approximately 5 1/4 in / 13.5 cm |
| Yarn | Worsted weight, category 4, approximately 600 yd / 549 m total |
| Hook | 5.5 mm, US I-9 |
| Gauge | Approximately 3.5 HDC BLO stitches and 3 rows = 1 in / 2.5 cm |
| Terminology | US crochet terminology |
Materials
- Approximately 520 yd / 475 m of worsted weight category 4 yarn in oatmeal, beige, taupe, or another main shade.
- Approximately 80 yd / 73 m of worsted weight category 4 yarn in ivory or cream for trim.
- 5.5 mm US I-9 crochet hook.
- Removable stitch marker.
- Yarn needle.
- Scissors.
- Tape measure.
- Optional measuring pins for blocking.
Abbreviations
| Abbreviation | US Meaning |
|---|---|
| ch | chain |
| sc | single crochet |
| hdc | half double crochet |
| sl st | slip stitch |
| BLO | back loop only |
| st | stitch |
| inc | increase, 2 stitches in the indicated stitch |
Special Stitch
HDC BLO: Yarn over, insert the hook into the back loop only of the indicated stitch, yarn over and pull up a loop, yarn over and pull through all three loops on the hook. The turning chain does not count as a stitch throughout this pattern.
Construction Notes
The romper is made from one front body panel and one back body panel. Each panel begins with two separate legs. The legs are joined at the crotch, then the body widens gradually with increases. The front and back are sewn at the shoulders and sides, with the upper side sections left open for sleeves.
All main body rows are worked flat and turned. The sleeves are worked in joined rounds directly around the armholes. The hood is made separately and sewn to the neckline. The cream edging is added last.
Front Body Panel
Left Leg
- With main color, ch 17.
- Row 1: Hdc in 2nd ch from hook and across. Turn. 16 sts.
- Rows 2 to 20: Ch 1, hdc BLO across. Turn. 16 sts each row. Fasten off after Row 20 and leave a yarn tail for weaving in.
Right Leg
- Repeat the Left Leg instructions to make a second 16-stitch leg.
- Do not fasten off the second leg.
Join the Legs
- Row 21: Ch 1, hdc BLO across the 16 stitches of the right leg, ch 4, hdc BLO across the 16 stitches of the left leg. Turn. 36 sts total.
- Row 22: Ch 1, 2 hdc BLO in first st, hdc BLO across to last st, 2 hdc BLO in last st. Turn. 38 sts.
- Rows 23 to 35: Repeat Row 22 thirteen times, increasing by 2 stitches on every row. The stitch counts are 40, 42, 44, 46, 48, 50, 52, 54, 56, 58, 60, 62, and finally 64 sts on Row 35.
- Rows 36 to 45: Ch 1, hdc BLO across. Turn. 64 sts each row.
Construction Note: The gradual increases turn the two narrow legs into a wider body. Count at the end of every increase row. You should have exactly 64 stitches before beginning the upper front opening.
Shape the Front Neck Opening
- Row 46: Ch 1, hdc BLO across the first 20 sts only. Turn. Leave the remaining 44 sts unworked.
- Rows 47 to 55: Ch 1, hdc BLO across. Turn. 20 sts each row. Fasten off.
- Join yarn to the opposite side of Row 46, leaving the center 24 stitches unworked.
- Row 46, second side: Ch 1, hdc BLO across the remaining 20 sts. Turn. 20 sts.
- Rows 47 to 55: Ch 1, hdc BLO across. Turn. 20 sts each row. Fasten off.
The center 24-stitch opening forms the upper front opening and gives the garment a practical hooded neckline. The shoulder sections are each 20 stitches wide.
Back Body Panel
Make the back using the same construction as the front through Row 45.
- Make a left leg with 16 stitches and 20 rows of HDC BLO.
- Make a right leg with 16 stitches and 20 rows of HDC BLO.
- Join the legs on Row 21 with 16 hdc, ch 4, and 16 hdc for 36 stitches.
- Work Rows 22 to 35 exactly as for the front, increasing by 2 stitches per row until you have 64 stitches.
- Work Rows 36 to 45 in HDC BLO without increases. 64 sts.
Back Neckline
- Row 46: Ch 1, hdc BLO across the first 20 sts. Turn.
- Rows 47 to 55: Ch 1, hdc BLO across. Turn. 20 sts each row. Fasten off.
- Join yarn to the opposite side of Row 46, leaving the center 24 stitches unworked.
- Row 46, second side: Ch 1, hdc BLO across the final 20 sts. Turn. 20 sts.
- Rows 47 to 55: Ch 1, hdc BLO across. Turn. 20 sts each row. Fasten off.
The front and back now have matching 20-stitch shoulders and a 24-stitch neckline opening. When the shoulders are sewn together, the front and back neckline sections create a 48-stitch opening for the hood.
Body Assembly
- Place the front and back panels together with the right sides facing inward.
- Align the corresponding legs.
- Using the main-color yarn and a yarn needle, sew the outer side of each leg from the cuff upward to the crotch.
- Sew each inner leg seam from the cuff to the center crotch join.
- Continue sewing each side edge upward through Row 33.
- Leave Rows 34 to 45 open at each side. These openings form the armholes.
- Align each front shoulder with the matching back shoulder and seam the 20 stitches together.
- Repeat on the second shoulder.
Take time to match the ridges before sewing. A mattress stitch or neat whip stitch can both work well. The goal is a secure seam that remains flexible rather than a stiff, bulky join.
Sleeves
Each armhole is created by the 12 unseamed rows on the front and 12 corresponding rows on the back, giving approximately 24 stitch positions around the opening.
- Join main-color yarn at the lower edge of one armhole.
- Ch 1. Work 24 hdc evenly around the armhole, placing approximately one hdc into each row-end. Join with a sl st to the first hdc. Do not count the joining slip stitch as a stitch.
- Place a stitch marker in the first hdc.
- Round 2: Ch 1, hdc BLO around. Join. 24 sts.
- Round 3: Ch 1, hdc BLO around. Join. 24 sts.
- Round 4: Ch 1, hdc BLO around, working hdc2tog at the underarm. Join. 23 sts.
- Round 5: Ch 1, hdc BLO around. Join. 23 sts.
- Round 6: Ch 1, hdc BLO around. Join. 23 sts.
- Round 7: Ch 1, hdc BLO around, working hdc2tog at the underarm. Join. 22 sts.
- Round 8: Ch 1, hdc BLO around. Join. 22 sts.
- Round 9: Ch 1, hdc BLO around. Join. 22 sts.
- Round 10: Ch 1, hdc BLO around, working hdc2tog at the underarm. Join. 21 sts.
- Round 11: Ch 1, hdc BLO around. Join. 21 sts.
- Round 12: Ch 1, hdc BLO around. Join. 21 sts.
- Round 13: Ch 1, hdc BLO around, working hdc2tog at the underarm. Join. 20 sts.
- Round 14: Ch 1, hdc BLO around. Join. 20 sts.
- Round 15: Ch 1, hdc BLO around. Join. 20 sts.
- Round 16: Ch 1, hdc BLO around. Join. 20 sts. Fasten off.
Repeat the entire sleeve for the second armhole. The four gradual decreases create a gentle taper toward the wrist without making the sleeve tight.
Cream Cuffs
Change to ivory or cream yarn.
- Join yarn at the underarm edge of a sleeve cuff.
- Round 1: Ch 1, sc evenly around the 20-stitch cuff. Join with a sl st. 20 sts.
- Round 2: Ch 1, sc BLO around. Join. 20 sts.
- Fasten off and weave in the ends securely.
- Repeat for the second sleeve.
Leg Cuffs
Work around each leg opening with cream yarn.
- Join yarn at the inner leg seam.
- Round 1: Ch 1, sc evenly around the 16-stitch opening. Join. 16 sts.
- Round 2: Ch 1, sc BLO around. Join. 16 sts.
- Fasten off and weave in the ends.
- Repeat for the second leg.
Front Trim
For a baby-safe version, the front trim can remain decorative without adding loose buttons, beads, toggles, or detachable ornaments.
- With cream yarn, join at the lower edge of the left front opening.
- Work 1 sc into each row-end up the opening, placing 2 sc at the upper corner.
- Continue around the neckline with sc, placing approximately 1 sc into each stitch of the neckline edge.
- Continue down the opposite front opening with 1 sc in each row-end.
- At the lower corner, place 2 sc and fasten off.
- For a stronger contrast band, work a second round of sc, keeping the stitch count even and avoiding tight tension.
Hood
The hood is made as a separate rectangular panel and shaped with a centered crown seam. This creates a soft hood that can be pulled comfortably around the head without requiring complicated crown shaping.
- With main-color yarn, ch 49.
- Row 1: Hdc in 2nd ch from hook and across. Turn. 48 sts.
- Rows 2 to 20: Ch 1, hdc BLO across. Turn. 48 sts each row.
- Fasten off, leaving a long tail for seaming.
- Lay the rectangle flat with Row 20 at the top.
- Bring the first 24 stitches of Row 20 toward the final 24 stitches so the top edge forms a centered crown seam.
- Using the long yarn tail, sew the first 24 stitches securely to the final 24 stitches. This creates a 24-stitch crown seam while keeping the 48-stitch foundation edge open for the neckline.
- Weave in the remaining tail.
Attach the Hood
- Place the 48-stitch foundation edge of the hood against the 48-stitch neckline opening.
- Match the center of the hood crown seam with the center back of the neckline.
- Using main-color yarn, sew the hood to the neckline one stitch at a time.
- Distribute the stitches evenly rather than pulling the hood tightly.
- Secure the seam and weave in the ends.
Hood Edging
- Join cream yarn at one lower front edge of the hood.
- Work sc evenly along the first hood side edge, placing approximately 1 sc in each row-end.
- Work 2 sc at the crown corner.
- Continue sc across the visible crown edge created by the 24-stitch seam.
- Work 2 sc at the opposite crown corner.
- Work sc evenly down the second hood side edge.
- Turn and work a second round of sc BLO around the same opening.
- Join with a sl st, fasten off, and weave in the ends.
Safety Reminder: Baby garments should not have loose buttons, beads, charms, long cords, or detachable decorations. For this design, embroidered circles can provide the button-inspired appearance without adding loose pieces. Check all seams and embellishments before every use and discontinue use if anything becomes loose or damaged.
Optional Button-Look Details
The photographed style has a simple button-front appearance. To recreate that visual detail safely, use a blunt yarn needle and the cream or brown yarn to embroider three small circular motifs down the front. Work each circle with several small satin-style stitches or short radial stitches. Keep the embroidery firmly secured on the garment and avoid adding hard, detachable pieces.
Finishing the Garment
- Weave in every yarn end on the wrong side of the garment.
- Check the leg seams, crotch seam, shoulder seams, and sleeve joins for secure stitching.
- Lay the garment flat and gently shape the sleeves, legs, and hood.
- Steam block lightly only if the yarn manufacturer permits steaming. Otherwise, use gentle wet blocking.
- Allow the garment to dry completely before dressing the baby.
Customization and Size Adjustment
This crochet baby boy set is intentionally built around simple stitch counts so the proportions can be changed without redesigning the entire garment. Measure the baby around the fullest part of the chest, from shoulder to ankle for total length, and from crotch to ankle for inseam length.
Adjusting the Width
At the stated gauge, approximately 3.5 stitches equal 1 inch. For a wider garment, add 4 stitches to the maximum width of each main panel. This adds approximately 2 1/4 inches to the total chest circumference once the front and back are joined. Keep the front center opening centered and divide the added stitches evenly between the shoulder sections.
Adjusting Leg Circumference
Each leg begins with 16 stitches. To make a roomier leg, increase the starting chain by 2 stitches and work the same number of rows. To make a narrower leg, remove 2 stitches. Keep the same adjustment on both legs so the garment remains symmetrical.
Adjusting Length
Because the gauge is approximately 3 rows per inch, adding 3 body rows gives roughly 1 extra inch of length. Add or remove rows from the straight section after the body reaches 64 stitches whenever possible. For a longer inseam, add rows to both leg sections before joining them.
Choosing Colors
For a classic baby boy palette, try oatmeal with ivory, dusty blue with cream, sage with natural beige, or soft gray with white. A single-color romper with contrasting cuffs is another easy option. Keep the trim color light and simple if you want the textured stitches to remain the main feature.
Crochet Insight
- HDC BLO creates texture without requiring complicated stitch patterns.
- Count every increase row before moving forward to prevent uneven side seams.
- When changing the size, adjust both front and back panels equally.
Common Mistakes and Troubleshooting
The Body Is Getting Wider Too Quickly
Check that each increase row contains exactly two increases, one at the first stitch and one at the final stitch. The body should grow by exactly 2 stitches per increase row. If the stitch count jumps by more than 2, you may have accidentally worked into the turning chain or added an extra stitch at an edge.
The Fabric Looks Too Loose
Try a smaller hook while maintaining the same yarn category, then make another gauge swatch. Avoid simply tightening your hand because inconsistent tension can make the garment change width from one section to another.
The Armhole Feels Too Small
Armhole size depends on both row gauge and the number of unseamed side rows. If additional room is needed, leave 2 to 3 more side rows unseamed and increase the sleeve starting round accordingly. Always make the same adjustment on both sides.
The Hood Does Not Sit Correctly
Check that the crown seam is centered at the back of the neckline. If the hood pulls forward, the attachment may be too tight. If it falls too far backward, the hood may need a little additional depth. Blocking the hood gently can also improve its shape.
The Ridges Look Uneven
Make sure every main body row is worked through the back loop only. Accidentally working through both loops will create a flatter section. If one row looks noticeably different, carefully undo it before continuing because the texture becomes more obvious after several rows.
Finishing, Care, and Baby-Safe Use
Choose a washable yarn whenever possible because baby clothing needs frequent cleaning. Follow the care instructions provided for the specific yarn rather than assuming every acrylic or wool blend can be machine dried.
For a soft finish, wash the completed garment according to the yarn label and reshape it flat while damp. Avoid aggressive stretching, especially around the hood and shoulder seams.
Before each use, inspect the garment for loose yarn ends, weakened seams, detached embroidery, or stretched openings. Baby clothing should never be treated as a sleep-safe product simply because it is soft or handmade. Follow appropriate clothing and supervision practices for the baby’s age and environment.
Important: A handmade crochet garment should fit comfortably without restricting movement. Check the hood, neckline, sleeves, and cuffs for tightness, and avoid long cords or loose decorative elements that could create a hazard.
At a Glance
- Best yarn: Soft, washable worsted weight category 4 yarn.
- Skill level: Confident beginner to intermediate.
- Key technique: Half double crochet through the back loop with simple increases.
- Best customization: Adjust panel width, leg circumference, and body length to suit the baby.
- Finishing: Cream single crochet edging, careful seaming, and gentle blocking.
Final Thoughts on This Crochet Baby Boy Set
This crochet baby boy set combines an approachable stitch pattern with a classic winter silhouette. The HDC BLO texture gives the romper its cozy handmade character, while the contrasting cuffs and hood edging add a clean finished look. Because the construction uses separate panels, sleeves, and a hood, you can adjust individual measurements without having to completely redesign the garment.
Before beginning, choose a soft washable yarn, make the recommended gauge swatch, and compare the finished measurements with the intended wearer. Read the complete pattern once before crocheting so you understand how the legs, body, armholes, shoulders, and hood fit together.
Most importantly, personalize the project. Try a different neutral shade, add subtle embroidered details, or create matching handmade accessories using the same yarn palette. With its simple texture and adaptable construction, this crochet baby boy set makes a thoughtful handmade wardrobe piece for chilly days.
Tags
Crochet Baby Boy Set
Crochet Baby Romper
Baby Crochet Pattern
Crochet Baby Clothes
Baby Winter Outfit
Hooded Crochet Romper
Easy Crochet Project
Handmade Baby Clothes