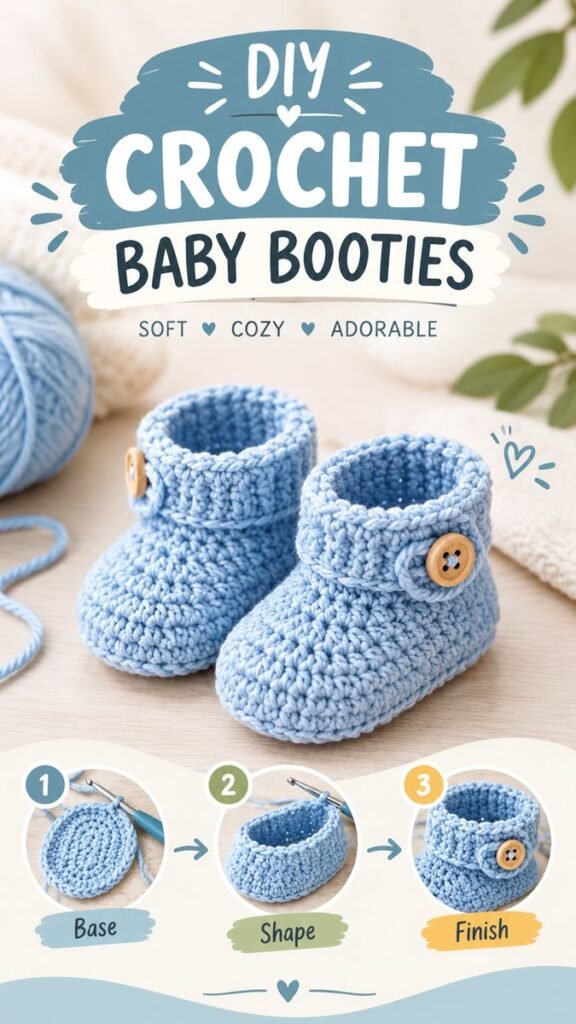
There is something especially charming about a handmade pair of crochet baby booties. Soft yarn, a simple rounded shape, and a cozy cuff can turn a small crochet project into a thoughtful gift or a practical addition to a baby’s wardrobe. This crochet baby booties tutorial is a lovely starting point for anyone who wants to explore an easy baby crochet project with a clean, classic look.
The design features soft blue yarn and a compact bootie shape with a rounded toe, textured body, and gently ribbed ankle section. The finished style is simple enough to suit everyday baby outfits while still looking special enough for gifting. Whether you are learning crochet or searching for a fresh handmade baby project, these booties offer plenty of inspiration.
Key Takeaways
- Crochet baby booties make a practical and thoughtful handmade project.
- A simple sole, shaped upper, and cozy cuff create the classic bootie silhouette.
- Soft yarn and comfortable construction are especially important for baby projects.
- Changing yarn colors, cuff details, or small accents can personalize the finished pair.
- A crochet baby booties tutorial can be adapted for different skill levels and sizes.
Why Crochet Baby Booties Are Such a Great Project
Baby booties are a satisfying crochet project because they are small enough to complete without committing to a large amount of yarn or time. They also provide an opportunity to practice several useful crochet techniques in one project. Working around a foundation shape, creating increases and decreases, shaping the upper, and finishing an ankle cuff can all help build confidence.
Another reason handmade booties are so popular is their versatility. A pair can be made in a soft neutral shade for a minimalist baby wardrobe, or you can introduce cheerful colors for a more playful appearance. The blue version shown here has a calm, cozy feel that works beautifully for a classic handmade aesthetic.
Important: When making crochet items for babies, comfort should always come before decoration. Choose soft materials, avoid loose embellishments, and make sure the finished booties are comfortable rather than overly tight.
Understanding the Crochet Baby Booties Design
The visual design follows a straightforward construction that is easy to understand at a glance. The first stage creates a flat, rounded base. The second stage builds the sides and shapes the front of the bootie. The final stage adds the ankle section, giving the finished piece its recognizable bootie appearance.
This three-part approach is useful for beginners because it breaks the project into manageable sections. Instead of thinking about the entire bootie at once, you can focus on completing the base, shaping the upper, and finishing the cuff one step at a time.
Step 1: Create the Base
The base is the foundation of the entire bootie. In a typical crochet baby bootie pattern, the starting chain is worked around to form an oval shape. Stitches are added near the ends to create smooth curves rather than sharp corners.
The goal is a sturdy but flexible sole that can support the upper portion. Keep your stitches reasonably even as you work around the foundation. Consistent tension will help the sole maintain a balanced shape and make the later sections easier to build.
Before moving forward, take a moment to check the shape of the base. It should look symmetrical, with a rounded toe area and a slightly narrower heel area. Small differences in tension can affect the final proportions, so this is a useful stage for correcting your work.
Step 2: Shape the Bootie
Once the sole is complete, the crochet work begins to rise upward. This creates the sides of the bootie and gradually forms the shape around the foot. The stitches in the image have a dense, textured appearance, giving the finished piece a soft and substantial look.
Pay particular attention to the toe area. This is where the shape becomes especially important. Even tension helps create a smooth rounded front instead of an uneven or overly pointed shape.
As the sides grow, periodically check the proportions against the intended size. The bootie should have enough room for comfortable movement without being excessively loose. If you are working from a written pattern, follow its stitch counts and sizing instructions carefully.
Step 3: Add the Cozy Cuff
The cuff is one of the most recognizable details of the finished design. A ribbed or textured ankle section gives the bootie extra visual interest while creating a comfortable opening around the ankle.
For a classic appearance, keep the cuff in the same yarn color as the rest of the bootie. You can also make the cuff in a contrasting shade if you want a more colorful design. A slightly different stitch texture can create contrast even when the yarn color remains the same.
When finishing the cuff, avoid making the opening unnecessarily tight. A neat edge is attractive, but the opening should remain comfortable and easy to put on.
Why This Matters
The best crochet baby booties balance appearance, flexibility, and comfort. A beautifully shaped bootie is only successful when it is also soft, secure, and appropriately sized. Keep the construction simple and let the texture of the crochet work provide most of the visual interest.
Choosing Yarn for Baby Crochet Projects
Yarn selection can make a noticeable difference in the finished booties. For baby crochet, look for yarn that feels soft against the skin and is comfortable to wear. A smooth yarn also makes stitch definition easier to see, which can be helpful when following a crochet baby booties tutorial.
Light blue is a beautiful choice for the style shown here, but there is no need to limit yourself to one color family. Cream, beige, dusty pink, sage, lavender, soft yellow, and gentle gray can all create attractive results.
Consider choosing a yarn that is practical to care for as well. Baby items can require frequent cleaning, so easy-care yarn can make the finished project more useful for everyday life.
Keep the Texture Comfortable
Dense stitches can create a warm and structured bootie, but extremely stiff fabric may not be ideal for a baby’s feet. Aim for a fabric that holds its shape while still having enough flexibility to move naturally.
Basic Supplies You May Need
A crochet baby booties project does not require a large collection of supplies. Keeping the materials simple also makes this a convenient project to start when you have a small amount of yarn available.
- Soft baby-friendly yarn in your preferred color
- A crochet hook appropriate for the selected yarn
- A yarn needle for weaving in ends
- Small scissors for trimming yarn
- Optional stitch markers for keeping track of rounds
The exact hook size and yarn weight should depend on the pattern you are following. If you change the yarn or hook size, remember that the finished dimensions can also change.
Tips for Getting a Neat Crochet Finish
A polished result often comes down to small details rather than complicated techniques. Keep your tension consistent throughout the project, especially when working the sole and toe. Uneven tension can cause the bootie to twist or look asymmetrical.
Count your stitches regularly if the pattern calls for specific stitch numbers. This is particularly helpful when shaping the toe and heel. Catching a small mistake early is much easier than discovering it several rounds later.
Pro Tip: If your finished fabric feels too stiff, try relaxing your tension slightly or testing a different hook size with a small sample. A quick swatch can save time and help you achieve a softer, more flexible result.
Check Both Booties Together
When making a pair, compare the two booties as you work. Matching stitch counts and construction will help them look like a coordinated set. It can also reveal differences in tension before the project is completely finished.
Weave in Ends Carefully
Once the crochet work is complete, securely weave in loose yarn ends. Trim excess yarn neatly and inspect the inside and outside of the booties. A clean finish helps the handmade project look more polished and keeps loose strands from becoming a distraction.
Easy Ways to Personalize Baby Booties
One of the best things about handmade crochet is the ability to customize small details. The basic bootie shape can become completely different depending on your choice of yarn, colors, stitch texture, and finishing touches.
Experiment With Color
Try a two-tone design by using one color for the main bootie and another for the cuff. You could also create matching pairs in different pastel shades. For a minimalist look, stay within one neutral color family.
Change the Cuff
A ribbed cuff creates a classic cozy appearance, while a simple single-color cuff keeps the design understated. You can experiment with stitch texture to create subtle differences without changing the overall shape.
Make Them Gift-Ready
Crochet baby booties make a lovely handmade addition to a baby shower gift basket. Pair them with other practical handmade items, or present them on their own in simple gift packaging. A coordinated color palette can make the presentation feel especially thoughtful.
Common Mistakes to Avoid
Even a beginner-friendly crochet project can become frustrating if a few basic details are overlooked. Fortunately, most common problems are easy to prevent.
- Skipping stitch counts: Losing or adding stitches can change the shape of the sole and upper.
- Using inconsistent tension: Uneven tension may cause one bootie to look different from the other.
- Making the cuff too tight: The ankle opening should be comfortable and practical.
- Ignoring finished measurements: Yarn and hook changes can alter the final size.
- Leaving loose ends unsecured: Always finish the project carefully and inspect the completed pair.
Making Crochet Baby Booties Beginner-Friendly
If you are new to crochet, do not feel pressured to create a complicated design. A simple bootie with a clean sole, rounded toe, and basic cuff can look beautiful without advanced decorative techniques.
Start by becoming comfortable with the basic stitches used in your chosen pattern. Practice a few rows separately if needed. Once your tension feels more consistent, begin the booties and work slowly through each section.
It is also helpful to complete one bootie before making the second. The first one gives you a chance to understand the construction, while the second can usually be completed more confidently because the shaping is already familiar.
Focus on Progress, Not Perfection
Small handmade projects are a great way to learn. If your first pair has minor differences, consider them part of the process. With each new pair, your stitch tension, shaping, and finishing techniques can become more consistent.
At a Glance
- Choose soft, comfortable yarn.
- Build the project from the sole upward.
- Keep stitch tension consistent.
- Check sizing before finishing both booties.
- Personalize colors and cuff details for a unique handmade look.
Conclusion
A crochet baby booties tutorial is a wonderful project for creating something small, useful, and genuinely personal. The simple construction shown here provides plenty of room for creativity while keeping the overall design clean and approachable. From the rounded sole to the textured upper and cozy cuff, each section contributes to a finished pair that feels handmade and special.
Whether you are making your first pair of baby booties, preparing a handmade baby shower gift, or simply looking for an enjoyable crochet project, this style is easy to adapt. Try different soft colors, experiment with subtle textures, and focus on creating a comfortable fit. With a little patience and consistent stitching, you can turn a small amount of yarn into an adorable handmade keepsake.
Save this crochet baby booties inspiration for your next craft session and come back to it whenever you are ready to make a cozy little pair. 🧶
Tags
Crochet Baby Booties Crochet Tutorial Baby Crochet Easy Crochet Crochet Baby Shoes Baby Crochet Patterns Beginner Crochet Handmade Baby Gifts