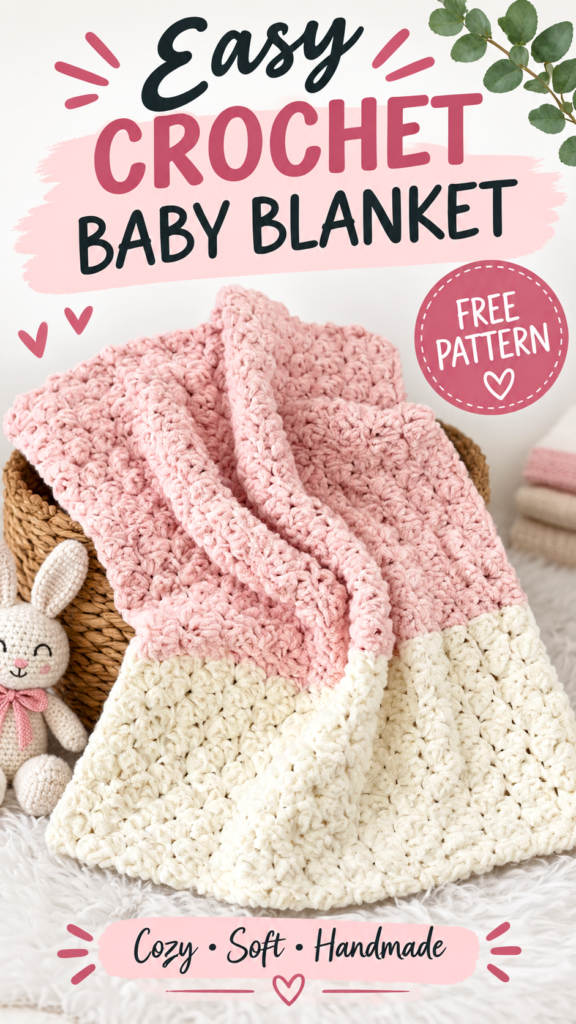
There is something especially inviting about a chunky baby blanket crochet project with a soft, plush texture and gentle two-color palette. This blanket combines a warm blush pink section with a creamy ivory section, creating a simple color-block effect that feels sweet without being overly busy. The raised stitch texture adds dimension and makes the finished blanket look wonderfully cozy, while the rectangular shape keeps the construction approachable for confident beginners.
This original interpretation uses a plush textured stitch made from alternating rows of single crochet and closed puff stitches. The photographed style suggests a thick yarn and dense fabric, so the pattern below uses a suggested bulky yarn and a 6.5 mm crochet hook. Exact yarn weight, gauge, dimensions, and construction cannot be confirmed from a finished photograph, so the specifications are practical recommendations designed to create a similar overall look.
Key Takeaways
- A soft rectangular chunky baby blanket crochet design with a two-color block layout.
- The main texture uses alternating single crochet rows and offset puff-stitch rows.
- Suggested bulky category 5 yarn creates a substantial, cuddly fabric.
- The base size is approximately 36 x 40 inches, or 91 x 102 cm, before edging.
- The width can be adjusted in small increments by changing the starting chain.
- The pattern is suitable for confident beginners who are comfortable working puff stitches.
A Soft Textured Crochet Baby Blanket
The blanket style is defined by three simple visual features: a chunky texture, a soft pink and ivory color combination, and a straightforward rectangular silhouette. The upper portion is predominantly blush pink, while the lower portion changes to warm ivory. The transition is clean and horizontal, allowing the texture to remain the main decorative feature.
The fabric looks dense rather than lacy. That makes a bulky yarn particularly suitable for this interpretation because it can produce substantial stitches without requiring an extremely large number of rows. A washable acrylic, acrylic blend, or soft machine-washable wool blend can work well, depending on the intended care routine.
The raised texture resembles small rounded clusters distributed throughout the fabric. Instead of attempting to identify an unseen original stitch pattern, this original design recreates the same general visual character with closed puff stitches. The puffs are offset between textured rows so that the surface has a gently pebbled appearance rather than forming strict vertical columns.
For a baby gift, the finished blanket can be used as a nursery accent, stroller blanket, supervised cuddle blanket, or decorative layer. As with any handmade baby item, use it according to appropriate age and supervision guidance rather than assuming that a crochet blanket is suitable for unsupervised sleep.
Baby-Safety Tip: Choose a soft washable yarn and keep the finished blanket free from buttons, beads, detachable appliques, long ties, and other loose decorations. For babies and young children, inspect the blanket regularly for loose stitches or damaged areas.
How the Crochet Texture and Construction Work
Rows Rather Than Motifs
This blanket is designed as one continuous rectangular piece worked back and forth in rows. There are no granny squares, separate motifs, or sewn-together panels. Working the blanket as a single piece keeps the construction simple and minimizes bulky seams.
The main stitch repeat alternates two different textured rows with plain single crochet rows. On one textured row, each puff is separated by a single crochet and the row begins with a single crochet. On the next textured row, the puff positions shift so the raised stitches sit between the puffs of the previous textured row. This offset arrangement gives the fabric a balanced, softly irregular surface.
The Main Stitch Texture
The central texture is a closed puff stitch. A puff is formed by making several partial yarn-over stitches into the same stitch and then drawing the working yarn through the accumulated loops. The puff is closed with a chain, which helps define the rounded bump.
Because puff stitches use more yarn than single crochet, they create the thick, tactile surface associated with chunky crochet blankets. Keeping the surrounding stitches simple also prevents the fabric from becoming unnecessarily complicated.
Color Arrangement
The suggested version uses blush pink for the first 84 rows and warm ivory for rows 85 through 140. This creates a pink section approximately 24 inches tall followed by an ivory section approximately 16 inches tall at the recommended gauge.
If you want a more balanced two-color blanket, the color-change point can be moved toward the center. You can also use one color throughout for a classic textured baby blanket.
Construction Note
The stitch pattern is intentionally built around an odd stitch count. This allows the puff positions to alternate between the two textured rows without changing the blanket width. The plain single crochet rows stabilize the fabric and make the color changes especially clean.
Free Crochet Pattern: Blush & Cream Pebble Baby Blanket
Pattern type: Textured crochet baby blanket worked flat in rows
Design concept: An original interpretation inspired by a plush, two-color chunky blanket with offset raised texture.
Pattern Note: The exact specifications of a photographed blanket cannot be determined from appearance alone. This original pattern uses practical suggested materials, gauge, dimensions, and stitch counts to create a similar chunky, plush look.
| Specification | Recommendation |
|---|---|
| Skill Level | Confident beginner |
| Finished Size | Approximately 36 x 40 inches / 91 x 102 cm, including a simple edging |
| Yarn | Bulky category 5, soft washable fiber |
| Yarn Quantity | Approximately 1,350 to 1,500 yards / 1,235 to 1,370 meters total |
| Color A | Blush pink, approximately 800 to 900 yards / 730 to 825 meters |
| Color B | Warm ivory, approximately 500 to 600 yards / 455 to 550 meters |
| Hook | 6.5 mm, US K-10.5 |
| Gauge | 13 stitches x 14 rows = 4 x 4 inches / 10 x 10 cm in single crochet after light blocking |
| Construction | One rectangular piece worked in turned rows, followed by two border rounds |
Materials
- Approximately 800 to 900 yards / 730 to 825 meters of bulky category 5 blush pink yarn.
- Approximately 500 to 600 yards / 455 to 550 meters of bulky category 5 warm ivory yarn.
- 6.5 mm US K-10.5 crochet hook, or the hook needed to obtain gauge.
- Yarn needle with a large eye.
- Scissors.
- Optional removable stitch markers for keeping track of long rows.
- Measuring tape.
US Crochet Terminology and Abbreviations
- ch: chain
- sc: single crochet
- sl st: slip stitch
- st: stitch
- sts: stitches
- YO: yarn over
- RS: right side
- WS: wrong side
- rep: repeat
- puff: closed puff stitch described below
UK terminology note: US single crochet is called double crochet in UK terminology. The instructions themselves use US terminology throughout.
Special Stitch: Closed Puff
Puff: Insert the hook into the indicated stitch. YO and pull up a loop to approximately the height of the working loop. Repeat this action in the same stitch 3 more times, creating 9 loops on the hook. YO and pull through all 9 loops. Ch 1 to close the puff. The closing chain does not count as a separate stitch.
The puff is intentionally kept moderately loose. If the loops are pulled too tightly, the stitch can become difficult to close and the blanket may become stiff. Keep each puff approximately the same height for an even texture.
Construction Notes
- The blanket is worked from the bottom edge upward in turned rows.
- The starting chain does not count as a stitch.
- The ch 1 turning chain does not count as a stitch.
- Every row contains exactly 117 stitches.
- Turn after every row.
- Rows 1 through 84 are Color A, blush pink.
- Rows 85 through 140 are Color B, warm ivory.
- The border is worked around the completed rectangle after fastening off the main body.
Starting the Blanket
- With Color A, loosely ch 118.
- Make sure the chain is relaxed rather than tight. A tight foundation chain can pull the bottom edge inward.
- Single crochet in the second chain from the hook and in each chain across. You will have 117 sc.
Row 1: Ch 1 and turn. Sc in each st across. 117 sts.
Main Texture Repeat
Row 2: Ch 1 and turn. Sc in the first st. Repeat [puff in next st, sc in next st] 58 times. 117 sts.
Row 3: Ch 1 and turn. Sc in each st across. 117 sts.
Row 4: Ch 1 and turn. Puff in the first st. Sc in the next st. Repeat [puff in next st, sc in next st] 57 times. Puff in the final st. 117 sts.
Row 5: Ch 1 and turn. Sc in each st across. 117 sts.
Rows 2 through 5 form one complete four-row texture repeat. The puff positions in Row 4 are shifted by one stitch compared with Row 2. This offset creates the soft pebble effect across the surface.
Rows 6 Through 84: Color A
Rows 6 through 84: Continue the established four-row repeat as follows, keeping 117 stitches in every row:
- On the next row, work the Row 2 sequence: sc in the first st, then repeat [puff in next st, sc in next st] 58 times. 117 sts.
- Work the Row 3 sequence: sc in every stitch across. 117 sts.
- Work the Row 4 sequence: puff in the first st, sc in the next st, repeat [puff in next st, sc in next st] 57 times, then puff in the final st. 117 sts.
- Work the Row 5 sequence: sc in every stitch across. 117 sts.
- Repeat those four exact rows until you have completed Row 84.
At the end of Row 84, do not cut Color A yet. On the next row, the blanket changes to Color B.
Color Change and Ivory Section
Change to Color B at the end of Row 84. For a clean horizontal transition, work the final yarn over of the last stitch of Row 84 with Color B. This places the new color in position for Row 85 without creating a separate knot along the edge.
Row 85: With Color B, ch 1 and turn. Sc in each st across. 117 sts.
Row 86: Ch 1 and turn. Sc in the first st. Repeat [puff in next st, sc in next st] 58 times. 117 sts.
Row 87: Ch 1 and turn. Sc in each st across. 117 sts.
Row 88: Ch 1 and turn. Puff in the first st. Sc in the next st. Repeat [puff in next st, sc in next st] 57 times. Puff in the final st. 117 sts.
Row 89: Ch 1 and turn. Sc in each st across. 117 sts.
Continue the same four-row texture sequence from Rows 86 through 89 until Row 140 is complete. The final row should be a plain single crochet row so that the upper edge is stable and easy to border.
Row 140: Ch 1 and turn. Sc in each st across. 117 sts.
Fasten off, leaving a yarn tail of approximately 6 inches / 15 cm. Pull the tail through the final loop and tighten gently.
Border
The border uses Color B so the ivory section flows naturally around the entire blanket. The edging is deliberately simple to keep the raised main texture as the focus.
Border Round 1: Join Color B with a slip stitch near any corner. Ch 1. Work 3 sc in the corner space or corner stitch. Sc evenly along the first long side, working approximately 2 sc into the end of each row. At the next corner, work 3 sc in the corner. Sc across the short top or bottom edge, placing approximately 1 sc in each stitch. Continue around the remaining two sides in the same manner, placing 3 sc in each corner. Join with a sl st to the first sc. Do not count the ch 1 as a stitch.
Border Round 2: Ch 1. Sc in every stitch around, working 3 sc in the center corner stitch of each three-sc corner group. Join with a sl st to the first sc. Fasten off.
Because the side edges are formed from row ends, the exact number of border stitches along those sides can vary slightly with personal tension. The important goal is an even edge without rippling or pulling. If the side edge waves, use fewer stitches per row-end on the next round. If it pulls inward, add stitches evenly.
Finishing
- Use a yarn needle to weave every yarn tail securely into the wrong side of the blanket.
- Weave the color-change tails back and forth through several stitches without pulling the fabric tightly.
- Trim excess yarn only after the tails are securely woven.
- Check all four edges for loose loops or accidental skipped stitches.
- Measure the blanket before blocking so you can compare the finished size with the target dimensions.
Pro Tip: When weaving in bulky yarn ends, change direction several times through the surrounding stitches instead of pulling one long strand straight across the fabric. This helps the end stay secure while preserving the softness of the blanket.
Customizing Your Chunky Baby Blanket Crochet Project
Adjusting the Width
The pattern begins with 118 chains to create 117 stitches. To change the width, use a starting chain that creates an odd number of stitches. The easiest formula is:
Starting chain = desired number of stitches + 1.
For example, 101 stitches require a starting chain of 102. A wider version with 129 stitches requires a starting chain of 130. Keep the stitch count odd so the alternating puff placement works cleanly.
Because gauge can vary considerably with bulky yarn, measure your swatch before deciding on the final chain length. If your fabric is wider than the suggested gauge, use fewer stitches. If it is narrower, use more.
Adjusting the Length
Length is easier to customize than width because you can simply add or remove four-row texture repeats. At the suggested gauge, four rows measure approximately 1.14 inches / 2.9 cm. Actual measurements will depend on yarn, hook, tension, and how strongly the fabric is blocked.
For a shorter stroller-sized blanket, stop after fewer four-row repeats. For a larger toddler or lap blanket, continue with additional repeats before working the border. If you want the color proportions to remain similar, divide the total number of rows into approximately 60 percent Color A and 40 percent Color B.
Color Ideas
- Blush pink and ivory for a soft nursery-inspired palette.
- Dusty blue and cream for a cool, classic combination.
- Sage green and oatmeal for a natural neutral look.
- Lavender and warm white for a gentle pastel palette.
- Two shades from the same color family for a subtle monochromatic blanket.
For an especially clean design, use one solid color for the entire blanket and reserve the second color for the border. You can also reverse the proportions by making the ivory section larger and the pink section smaller.
Common Mistakes and Troubleshooting
The Puff Stitches Look Too Tight
Puff stitches naturally consume more yarn than single crochet. If you pull each loop tightly against the hook, the finished puff can become small and dense. Keep the loops approximately as tall as the working loop and maintain relaxed tension while drawing the final yarn-over through all loops.
The Blanket Is Getting Wider or Narrower
Count your stitches at the end of every row during the first several repeats. The target is always 117 stitches in the base pattern. A missing stitch can make the blanket shrink, while accidentally working into a turning chain or adding an extra stitch can make it grow.
The turning chain does not count as a stitch. When you reach the final stitch of each row, make sure you work into the actual final stitch rather than the turning chain from the previous row.
The Texture Does Not Alternate Correctly
Rows 2 and 4 use different starting positions. Row 2 begins with a single crochet, while Row 4 begins with a puff. This one-stitch shift is what creates the offset surface pattern. If the puffs line up in straight vertical columns, check that you are following the correct starting stitch on Row 4.
The Color Change Looks Uneven
Work the final yarn over of the last stitch in the old color using the new color. Then turn and begin the next row with the new shade. Avoid tying a bulky knot at the edge because it can create a noticeable bump.
The Border Waves
A wavy border usually means too many stitches have been added along a side edge. A tight or puckered edge usually means too few stitches have been added. Since every crocheter’s row height is slightly different, the side border should be distributed evenly rather than forced into an exact stitch count.
Finishing, Blocking, and Care
Bulky textured crochet generally benefits from gentle shaping rather than aggressive blocking. After weaving in the ends, lay the blanket flat on a clean, dry surface and gently smooth the corners and edges into shape.
If the yarn label permits wet washing, wash according to its care instructions. Avoid high heat unless the yarn specifically allows it. Machine-drying can alter the size and texture of some fibers, particularly when the blanket contains wool or delicate blends.
For light blocking, dampen the finished blanket according to the yarn’s care requirements and lay it flat. Use a measuring tape to check that the blanket is approximately 36 x 40 inches / 91 x 102 cm. Gently ease the sides straight and square the corners without stretching the puff stitches excessively. Allow the blanket to dry completely before moving it.
Because this is a textured baby blanket, avoid pressing the raised puffs flat with an iron. Heat and direct pressure can reduce the dimensional quality of the stitches and may damage some synthetic fibers.
Important: Always follow the specific washing and drying instructions for your chosen yarn. A blanket made for a baby should be checked after washing for stretched stitches, loose ends, or areas that need repair before use.
At a Glance
- Best yarn choice: Soft, washable bulky category 5 yarn in blush pink and warm ivory.
- Skill level: Confident beginner, especially for crocheters familiar with single crochet and puff stitches.
- Key technique: Offset closed puff stitches separated by plain single crochet rows.
- Size adjustment: Change the starting chain while keeping the stitch count odd, then add or remove four-row repeats for length.
- Finishing: Two simple single crochet border rounds, secure ends, and gentle flat shaping.
Final Thoughts on This Chunky Baby Blanket Crochet Pattern
This chunky baby blanket crochet design keeps the construction straightforward while giving the finished fabric plenty of visual and tactile interest. The combination of offset puff stitches, smooth single crochet rows, and a two-tone color block creates a cozy handmade look without requiring complicated motifs or assembly.
Before beginning, choose your yarn carefully, make a gauge swatch, and read the complete pattern from start to finish. Bulky yarn can vary significantly in thickness, so the recommended 6.5 mm US K-10.5 hook is a starting point rather than an absolute requirement. If your swatch is too tight, try a larger hook. If it is too loose, try a smaller hook.
The pattern is also easy to personalize. Change the color proportions, create a one-color version, adjust the width using the odd-stitch formula, or add extra four-row repeats for a longer blanket. Keep the yarn soft and washable, avoid loose decorative additions for baby use, and take time to secure every yarn end neatly.
With its plush texture and gentle color palette, this original crochet baby blanket makes a practical handmade project for a nursery, baby shower gift, or cozy family keepsake. Choose your favorite soft yarn, check your gauge, and let the simple puff texture do the decorative work.
Tags
Chunky Baby Blanket
Crochet Baby Blanket
Free Crochet Pattern
Puff Stitch Crochet
Easy Crochet Blanket
Baby Shower Crochet
Textured Crochet
Handmade Baby Gift