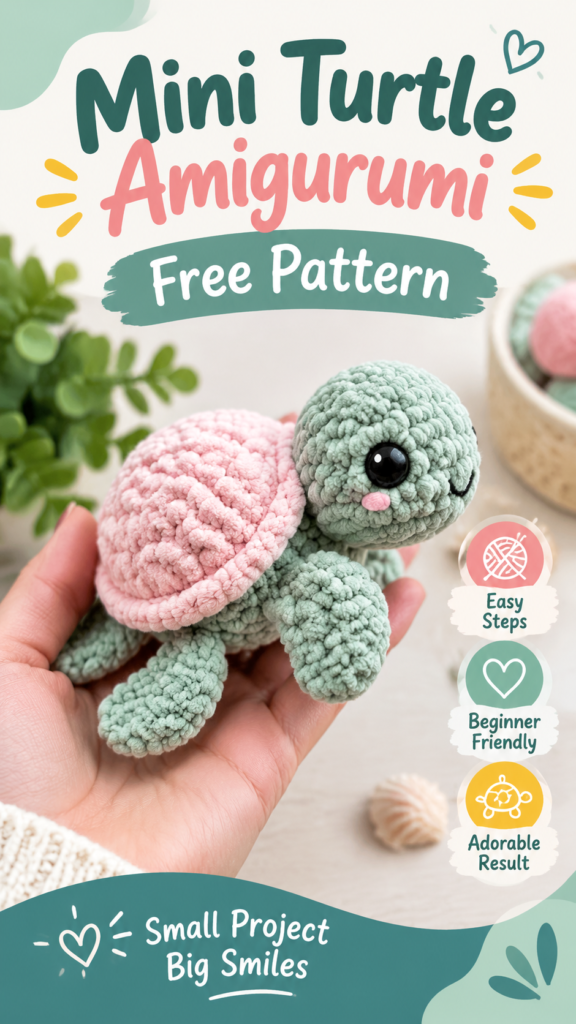
This baby turtle crochet project is a sweet little amigurumi made with plush yarn, simple shaping, and a soft rounded silhouette. The design features a cuddly gray head and body, a gently domed pink shell, four small flipper-like legs, and a tapered tail. Its chunky chenille texture gives the finished turtle a soft, squishy appearance that works especially well as a handmade gift, nursery decoration, shelf friend, or cozy crochet companion.
The original interpretation below is designed to capture the same overall character while giving you a complete, practical pattern that can be worked from start to finish. The exact photographed construction cannot be determined from appearance alone, so the pattern uses suggested yarn, hook, measurements, and stitch counts selected to create a similar mini plush turtle. The shell is worked separately and finished over a stuffed body, while the head, legs, and tail are made as individual pieces and securely attached.
Key Takeaways
- A soft mini amigurumi turtle with a contrasting pink textured shell.
- Designed as a beginner-friendly project using continuous rounds and simple increases and decreases.
- Plush or chenille yarn creates the rounded, cuddly texture seen in the finished style.
- The shell is crocheted separately so its color and texture can be customized easily.
- Four small legs, a head, and a tapered tail complete the turtle silhouette.
- The finished size can be adjusted by changing yarn weight and hook size while maintaining the shaping sequence.
Meet This Baby Turtle Crochet Project
This baby turtle crochet design combines classic amigurumi construction with plush yarn to create a rounded, tactile toy. The body is intentionally compact, allowing the oversized head and domed shell to become the main visual features. A soft gray yarn gives the turtle a natural base, while the pink shell adds a playful contrast.
The project is approximately 5 to 6 inches long when made with the recommended materials. Because chenille yarn varies considerably in thickness, the finished measurements should be treated as approximate rather than exact. A tighter fabric is particularly useful for stuffed amigurumi because it helps prevent polyester fiberfill from showing through the stitches.
The turtle is suitable for confident beginners who are comfortable working single crochet in continuous rounds. You will use magic rings, increases, decreases, stuffing, basic seaming, and simple embroidery. The shell introduces an optional bobble-style texture that gives the surface extra dimension without requiring complicated stitch work.
What Makes the Design So Cute?
The charm comes from proportion. The head is rounded and slightly larger than the legs, while the shell is wider than the body underneath it. Small limbs give the turtle a gentle, relaxed pose rather than a rigid stuffed-animal shape. The shell can remain mostly rounded or be lightly flattened before assembly to create a lower, more turtle-like profile.
The visible plush texture also plays an important role. Chenille yarn naturally softens the appearance of individual stitches, so basic single crochet becomes visually smooth and velvety. This makes the project approachable while still producing a polished finished piece.
Crochet Construction and Stitch Analysis
The most practical construction for this crochet turtle pattern is a collection of small stuffed components. The head, body, legs, and tail are crocheted separately in continuous rounds. The pink shell is also worked separately and attached over the body. This approach gives you better control over the proportions and makes color changes unnecessary within the individual pieces.
Main Stitch Structure
Single crochet is the primary stitch throughout the pattern. Increases create rounded sections, while invisible decreases gradually taper the pieces. The shell uses optional bobble stitches to imitate the raised, plush-looking texture of the inspiration. If you prefer a smoother shell, every bobble can simply be replaced with a single crochet.
The pieces are worked in continuous rounds rather than joined rounds. A stitch marker should be placed in the first stitch of every round because the beginning of the round moves slightly as the work progresses.
Yarn and Hook Characteristics
A bulky or super bulky plush yarn is suggested to achieve the soft appearance of the finished turtle. Polyester chenille is particularly convenient because it is washable, soft, and resistant to the fuzzy appearance that can occur with some natural fibers. A smaller hook than the yarn label may suggest is recommended for amigurumi because it produces a denser fabric.
A 4.0 mm US G-6 hook is a useful starting point for medium plush yarn. If your stitches are loose, move down to 3.5 mm. If the fabric feels extremely difficult to work, move up to 4.5 mm while checking that the stuffing does not show through.
Crochet Insight
- Use a firm but comfortable tension so the stuffing cannot escape.
- Insert the hook under both loops of each stitch unless an instruction says otherwise.
- For an especially smooth finish, use invisible decreases whenever possible.
Free Crochet Pattern: Mini Plush Baby Turtle
Pattern note: This is an original interpretation designed to create a small plush turtle with a gray body and pink textured shell. The yarn, hook, gauge, and finished measurements are suggested specifications rather than claims about the original photographed piece.
Pattern Overview
| Skill Level | Confident beginner |
| Finished Size | Approximately 5.5 inches / 14 cm long and 4 inches / 10 cm wide |
| Yarn | Bulky or super bulky plush chenille, approximately 55 yards / 50 meters total |
| Main Color | Gray plush yarn, approximately 35 yards / 32 meters |
| Shell Color | Pink plush yarn, approximately 20 yards / 18 meters |
| Hook | 4.0 mm / US G-6 crochet hook |
| Gauge | Approximately 15 sc x 16 rounds = 4 inches / 10 cm in plush yarn |
| Construction | Separate continuous-round pieces, stuffed and sewn together |
| Terminology | US crochet terminology |
Materials
- Approximately 35 yards / 32 meters of gray bulky or super bulky plush chenille yarn.
- Approximately 20 yards / 18 meters of pink bulky or super bulky plush chenille yarn.
- 4.0 mm / US G-6 crochet hook.
- Polyester fiberfill.
- Yarn needle with a large eye.
- Stitch marker.
- Small amount of black yarn or embroidery floss for facial features.
- Optional 8 mm safety eyes for an adult display item only.
Terminology and Abbreviations
- ch: chain
- sc: single crochet
- inc: increase, meaning 2 sc in the same stitch
- dec: decrease, preferably worked as an invisible single crochet decrease
- sl st: slip stitch
- st: stitch
- MR: magic ring
- BO: bobble stitch
US single crochet is used throughout. In UK terminology, US single crochet corresponds to UK double crochet.
Special Stitch: Bobble
BO: Yarn over, insert the hook into the indicated stitch, yarn over and pull up a loop. Repeat this process in the same stitch until you have 6 loops on the hook. Yarn over and pull through all 6 loops. Gently push the completed bobble toward the outside of the shell. If working with very thick chenille, a 5-loop bobble may be easier to manage.
Construction Notes
All rounded pieces are worked in continuous rounds. Do not join at the end of each round unless specifically instructed. Place a stitch marker in the first stitch and move it upward after each completed round. Stuff gradually rather than waiting until the final round.
The shell is intentionally slightly larger than the body. After both pieces are complete, the shell is lightly shaped and sewn over the upper body. This creates the raised, rounded appearance of the finished turtle.
Head
Use gray yarn. Work in continuous rounds.
- Round 1: Make an MR and work 6 sc into the ring. Pull closed. (6)
- Round 2: Inc in each stitch around. (12)
- Round 3: [Sc in next stitch, inc in next stitch] 6 times. (18)
- Round 4: [Sc in next 2 stitches, inc in next stitch] 6 times. (24)
- Round 5: [Sc in next 3 stitches, inc in next stitch] 6 times. (30)
- Rounds 6-9: Sc in each stitch around. (30 each round)
- Round 10: [Sc in next 3 stitches, dec over next 2 stitches] 6 times. (24)
- Round 11: Sc in each stitch around. (24)
- Round 12: [Sc in next 2 stitches, dec] 6 times. (18)
- Round 13: [Sc in next stitch, dec] 6 times. (12)
Begin stuffing firmly but gently. Add enough filling to create a smooth rounded head without stretching the stitches.
- Round 14: Dec around. (6)
Fasten off, leaving a long tail. Weave the tail through the front loops of the remaining 6 stitches, pull closed, and weave in the end. Set the head aside for assembly.
Body
Use gray yarn. The body is deliberately smaller than the shell.
- Round 1: MR, 6 sc. (6)
- Round 2: Inc around. (12)
- Round 3: [Sc, inc] 6 times. (18)
- Round 4: [2 sc, inc] 6 times. (24)
- Rounds 5-8: Sc around. (24 each round)
- Round 9: [2 sc, dec] 6 times. (18)
- Round 10: Sc around. (18)
- Round 11: [Sc, dec] 6 times. (12)
Add fiberfill gradually through the opening. Keep the body rounded but slightly flatter than the head because the shell will sit over it.
- Round 12: Dec around. (6)
Fasten off, close the opening, and weave in the yarn end.
Pink Textured Shell
Use pink yarn. Work in continuous rounds. The shell should remain slightly flexible while you crochet it because it will be shaped over the body later.
- Round 1: MR, 6 sc. (6)
- Round 2: Inc around. (12)
- Round 3: [Sc, inc] 6 times. (18)
- Round 4: [2 sc, inc] 6 times. (24)
- Round 5: [3 sc, inc] 6 times. (30)
- Round 6: [4 sc, inc] 6 times. (36)
- Round 7: [2 sc, BO, 3 sc] 6 times. (36)
- Round 8: [5 sc, BO] 6 times. (36)
- Round 9: Sc around. (36)
- Round 10: [2 sc, BO, 3 sc] 6 times. (36)
- Round 11: [4 sc, dec] 6 times. (30)
- Round 12: Sc around. (30)
- Round 13: [3 sc, dec] 6 times. (24)
- Round 14: Sc around. (24)
- Round 15: [2 sc, dec] 6 times. (18)
- Round 16: Sc around. (18)
- Round 17: [Sc, dec] 6 times. (12)
- Round 18: Dec around. (6)
Fasten off, leaving a long sewing tail. Do not stuff the shell. Instead, gently shape it with your hands so the wider rounds form the dome and the narrower final rounds curve inward.
Important: The bobbles are placed on alternating rounds to give the shell a raised texture without making the entire surface excessively bulky. If your chenille is very thick, substitute each bobble with one sc to maintain the shell’s shape.
Front and Back Legs
Make four identical legs in gray yarn. The legs are intentionally short and rounded so they resemble soft turtle flippers.
- Round 1: MR, 6 sc. (6)
- Round 2: Inc around. (12)
- Rounds 3-5: Sc around. (12 each round)
- Round 6: [Sc, dec] 4 times. (8)
Stuff each leg lightly. The legs should remain flexible rather than becoming hard, dense tubes.
- Round 7: Sc around. (8)
- Round 8: Dec 4 times. (4)
Fasten off, leaving a sewing tail. Flatten the final opening gently with your fingers. You do not need to close the 4-stitch opening completely because it will be sewn against the body.
Tail
Use gray yarn.
- Round 1: MR, 6 sc. (6)
- Round 2: [Sc, inc] 3 times. (9)
- Rounds 3-5: Sc around. (9 each round)
- Round 6: [Sc, dec] 3 times. (6)
- Rounds 7-9: Sc around. (6 each round)
Do not overstuff the tail. Flatten it slightly, fasten off, and leave a long tail for sewing.
Assembly
Assembly determines much of the turtle’s final personality, so take time to position every piece before sewing. Place the body with its widest section facing upward. Position the head slightly toward the front and a little above the centerline of the body.
- Place the head against the front of the body so approximately one-third of the head overlaps the body.
- Use the gray yarn tail from the head to sew around the lower head edge.
- Take small stitches through both the head and body, working around the attachment point until the head feels secure.
- Place two front legs on either side of the body, approximately one-third of the way back from the head.
- Position the rear legs farther back, leaving enough room for the tail between them.
- Sew each leg securely around its flattened opening. Add extra stitches at the upper and lower edges if the limbs feel loose.
- Place the tail at the center back of the body and sew it firmly in place.
- Position the pink shell over the upper body. The widest shell round should extend slightly beyond the gray body.
- Pin or hold the shell in place while checking that the head, legs, and tail remain visible.
- Using the long pink yarn tail, sew the lower shell edge to the body with small whip stitches or mattress-style stitches.
- Work around the shell gradually, adjusting the position as you sew so the shell remains centered.
- Fasten off securely and weave the remaining yarn tails into the body.
Face and Eye Placement
For a classic amigurumi appearance, place two small eyes on the head approximately 5 to 6 stitches apart horizontally. Position them slightly above the center of the head so the turtle has a friendly expression.
For an adult display piece, small safety eyes can be inserted before the head is completely closed. For a baby or young-child project, use embroidered eyes instead. Embroider two small dark oval or round shapes using black yarn or embroidery floss and secure the ends inside the head.
Safety: Plastic safety eyes may not be appropriate for babies or children under three because they can become a choking hazard if they detach. For baby-safe projects, use securely embroidered facial features and avoid buttons, beads, bells, loose ribbons, and other detachable decorations.
Customization and Size Adjustments
One of the best features of this baby turtle crochet pattern is how easily the proportions can be changed. You can make a smaller turtle with thinner yarn and a smaller hook, or create a larger plush turtle with thicker yarn and a proportionally larger hook.
Making the Turtle Smaller
For a miniature turtle, use sport or DK weight yarn with a 2.5 to 3.25 mm hook. Keep the same increase and decrease logic but stop the head and shell after fewer expansion rounds. For example, a head that reaches 24 stitches instead of 30 will produce a noticeably smaller face.
Making the Turtle Larger
For a larger plush, use super bulky yarn and a 5.0 to 6.0 mm hook. Add one or two increase rounds before working the straight rounds. If you increase the body’s maximum circumference, increase the shell proportionally so the shell still extends beyond the body.
When modifying the shell, maintain the same relationship between the shell and body. The shell should be wider than the body by approximately 15 to 25 percent. This creates the characteristic overhanging shell shape without making the turtle look unbalanced.
Color Ideas
- Soft pink shell with gray body for a gentle pastel look.
- Mint green shell with cream or light beige body.
- Lavender shell with pale gray body.
- Seafoam shell with sandy beige body for a coastal palette.
- Bright rainbow shell made by changing colors every two rounds.
For a smoother shell, remove the bobbles and work single crochet throughout. For a more textured shell, use alternating bobble rounds and plain rounds as written. You can also embroider simple curved lines across the shell after assembly to suggest traditional turtle-shell sections.
Common Mistakes and Troubleshooting
The Head Looks Too Pointed
A pointed head usually means the stuffing is uneven or the decrease rounds have been pulled too tightly. Add small amounts of fiberfill around the sides before closing the head. Massage the stuffing through the fabric to distribute it evenly.
The Shell Is Too Flat
If the shell does not create enough of a dome, gently shape it over the stuffed body before sewing. You can also add a little more stuffing underneath the center of the shell, but do not overfill the shell itself. The body should provide most of the volume.
The Shell Is Too Large
Different chenille yarns can produce dramatically different dimensions. If your shell is much larger than the body, use a smaller hook or omit the final increase round. The important visual relationship is that the shell remains wider than the body without extending excessively beyond the legs.
The Stitch Count Keeps Changing
Continuous-round amigurumi is easiest to manage with a stitch marker. Count every round before beginning the next one. If you have one extra stitch, look for an accidental increase. If you are missing one stitch, check whether a decrease was accidentally worked across two stitches twice or whether a stitch was skipped.
The Bobbles Disappear
Very plush yarn can hide bobbles. After completing each bobble, push it gently toward the outside of the shell. Avoid making the surrounding stitches too tight. If the bobbles still disappear, use a 5-loop bobble instead of a 6-loop bobble or substitute a slightly thinner yarn for the shell.
Finishing, Shaping, and Care
Once every component has been sewn together, use your fingers to shape the turtle. Gently round the head, flatten the bottom of the body, and spread the legs evenly. The shell should remain slightly domed rather than forming a completely flat disk.
There is usually no traditional wet blocking needed for a plush amigurumi. If the shell becomes uneven, lightly mist it with water and shape it by hand, then allow it to dry completely. Avoid excessive heat because high temperatures can damage synthetic chenille fibers.
For washable yarn, follow the care instructions supplied with your chosen yarn. A gentle wash and thorough air drying are generally preferable to aggressive machine cycles. Because amigurumi contains fiberfill and multiple sewn components, make sure the entire project is completely dry before storing it.
Important: For a baby gift, choose washable yarn, embroider the facial features securely, and avoid small detachable accessories. Handmade toys should be inspected regularly for loose seams or decorations, especially when they will be handled by young children.
Keeping the Plush Texture Looking Fresh
Brushes are usually unnecessary for chenille amigurumi and can disturb the fibers. Instead, gently smooth the surface with your fingers. If small fibers become flattened after washing, allow the piece to dry naturally and gently massage the plush surface back into shape.
At a Glance
- Best yarn: Soft bulky or super bulky polyester chenille for a plush finish.
- Skill level: Confident beginner familiar with continuous amigurumi rounds.
- Key technique: Single crochet shaping with increases, invisible decreases, stuffing, and sewing.
- Size adjustment: Change yarn and hook size or modify the maximum stitch count while keeping the shell proportionally larger than the body.
- Finishing: Stuff the components gradually, sew the head and limbs securely, then attach the shaped textured shell.
Why This Baby Turtle Crochet Pattern Makes a Great Project
This baby turtle crochet pattern is a satisfying way to practice the foundations of amigurumi while creating something with plenty of personality. The simple gray body keeps the construction approachable, while the pink shell provides an opportunity to experiment with texture, color, and shaping.
Before beginning, choose your yarn carefully, check the suggested tension if you want a predictable finished size, and read through the complete pattern so you understand how all of the pieces fit together. With plush yarn, consistent tension and accurate stitch counting are more important than trying to work quickly.
Once you are comfortable with the base pattern, personalize the turtle with different shell colors, embroidered expressions, subtle shell lines, or a slightly longer tail. You can also make a coordinated collection using different pastel shades while keeping the same gray body. Whether you are creating a small handmade gift, adding a soft animal to a crochet collection, or simply practicing amigurumi construction, this baby turtle crochet project offers plenty of room for creativity.
Tags
Baby Turtle Crochet
Crochet Turtle Pattern
Amigurumi Turtle
Free Crochet Pattern
Plush Crochet
Easy Amigurumi
Crochet Gift Idea
Chenille Crochet