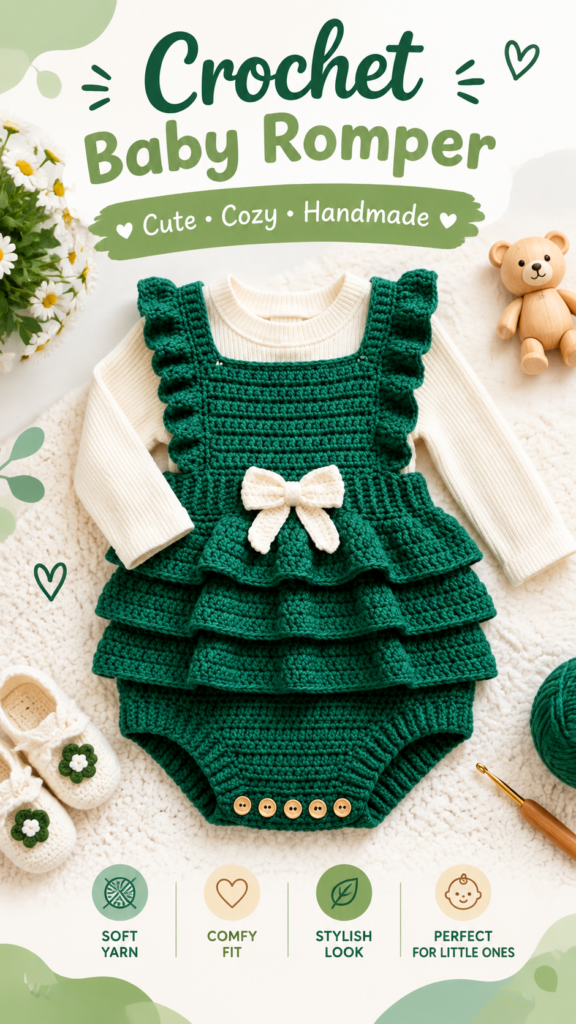
The charm of handmade baby wear comes to life in this adorable crochet baby romper pattern, featuring a sweet layered skirt silhouette, textured stitches, soft ruffled details, and a classic bow accent. This original crochet design is inspired by the look of a cozy green baby outfit with a playful dress-like shape, making it a beautiful project for creating a special handmade crochet gift.
This crochet baby romper combines comfort and style by pairing a simple bodice construction with decorative layers that create movement and dimension. The suggested design uses soft baby-friendly yarn, practical shaping, and easy-to-follow crochet techniques suitable for confident beginners and intermediate crocheters who want to explore garment construction.
Key Takeaways
- This project is an original crochet baby romper with a layered skirt effect.
- The design uses simple crochet stitches, textured rows, and shaped panels.
- Soft worsted or DK baby yarn creates a comfortable wearable garment.
- The pattern is adjustable for different baby sizes and styling preferences.
- Careful gauge checking helps achieve the best fit for handmade baby clothing.
Description of This Crochet Baby Romper Project
The pictured style represents a sweet crochet baby romper with a dress-inspired appearance. The upper section resembles a fitted sleeveless bodice worn over a lightweight long-sleeve layer, while the lower portion features a full diaper-cover style bottom with decorative skirt layers. The overall look is playful, comfortable, and ideal for seasonal baby photography, gifting, or everyday wear.
The suggested construction method for this original crochet baby romper pattern uses separate front and back bodice panels joined at the shoulders and sides. The bottom section is then worked downward in joined rounds to create the diaper cover shape. Decorative skirt layers are added afterward using increases and textured stitch rows to create gentle ruffles.
The visible texture can be recreated with a combination of single crochet, half double crochet, and simple raised stitch techniques. The finished appearance is dense enough for structure while remaining soft when made with an appropriate baby yarn.
Pro Tip: Baby garments should always prioritize softness and flexibility. Choose smooth washable yarn and avoid rough fibers that may irritate delicate skin.
Crochet Construction and Stitch Analysis
This crochet baby romper is designed as a garment project rather than a flat accessory. The bodice uses rows worked back and forth to create a stable fabric, while the lower portion transitions into rounds for a comfortable fit around the waist and legs.
Visible Design Elements
- Bodice: A textured rectangular panel design with decorative side edging.
- Skirt layers: Multiple increased rows create a ruffled effect.
- Waist detail: A small crochet bow adds a delicate finishing touch.
- Bottom section: A rounded diaper-cover construction with leg openings.
- Color style: A deep green body with a soft neutral accent creates a classic handmade appearance.
Recommended Skill Level
This project is approximately an intermediate beginner crochet pattern. Familiarity with basic stitches, increasing, decreasing, joining rounds, and simple garment assembly is recommended.
Free Crochet Pattern: Garden Ruffle Baby Romper
Project Description: This original crochet baby romper pattern creates a soft one-piece outfit with a textured bodice, layered ruffle skirt, and crochet bow detail. The design is inspired by classic handmade baby clothing with a comfortable fit and decorative finish.
| Skill Level | Confident Beginner to Intermediate |
| Finished Size | Approximate 3 to 6 months size, about 17 inches (43 cm) chest circumference |
| Yarn | DK weight washable baby yarn, approximately 350 yards (320 meters) |
| Hook | 4 mm (US G/6) crochet hook |
| Gauge | 20 stitches x 14 rows in 4 inches (10 cm) using half double crochet |
| Terminology | US crochet terms |
Materials
- DK weight baby yarn in green, approximately 300 yards (274 meters)
- Small amount of cream yarn for bow detail
- 4 mm (US G/6) crochet hook
- Yarn needle
- Stitch markers
- Soft measuring tape
Abbreviations
- ch = chain
- sc = single crochet
- hdc = half double crochet
- dc = double crochet
- sl st = slip stitch
- st = stitch
- inc = increase, work 2 stitches into one stitch
- dec = decrease, combine two stitches into one
- sk = skip
Special Stitch
Ruffle Stitch: Work 3 double crochet stitches into the same stitch to create a small fan shape. This creates the soft layered texture used around the skirt.
Construction Notes
The romper is made from a front bodice panel, back bodice panel, joined lower body, leg openings, skirt layers, and a small crochet bow. Turning chains do not count as stitches unless stated. Slip stitches are used only for joining and do not count toward stitch totals.
Bodice Front Panel
- Ch 42.
- Row 1: Hdc in second ch from hook and across. Turn. (41 sts)
- Row 2: Ch 1, hdc across. Turn. (41 sts)
- Repeat Row 2 until you have 14 rows total.
- Fasten off.
Back Bodice Panel
- Repeat the front panel instructions.
- Keep yarn attached if you prefer to join directly at the shoulders.
Joining the Bodice
- Place front and back panels together with right sides facing outward.
- Join shoulders using slip stitches across 8 stitches on each side.
- Seam side edges from the bottom upward, leaving arm openings approximately 4 inches (10 cm).
- Attach yarn at the bottom edge of the bodice.
Lower Body and Diaper Cover
- Round 1: Work 84 hdc evenly around the bottom edge of the bodice. Join with sl st. (84 sts)
- Rounds 2 to 8: Ch 1, hdc around. Join. (84 sts)
- Round 9: Hdc 18, dec, hdc 42, dec, hdc 20. Join. (82 sts)
- Round 10: Hdc around. Join. (82 sts)
- Divide stitches for leg openings by placing markers after 41 stitches.
- Work each leg opening separately with 3 rounds of sc around each opening.
Layered Skirt
- Attach yarn around Round 3 of the bodice lower section.
- Round 1: Ch 2, work 2 dc in each stitch around. Join. (168 sts)
- Round 2: Ch 1, sc around. Join. (168 sts)
- Round 3: Ch 2, *3 dc in next stitch, sk next stitch, repeat from * around. Join.
- Repeat the ruffle section once more at the lower edge for a second layer.
Crochet Bow
- Ch 20.
- Row 1: Dc across. Turn.
- Rows 2 to 5: Ch 2, dc across. Turn.
- Fold rectangle into a bow shape and wrap yarn around the center several times.
- Sew securely to the front center of the romper.
Customization and Size Adjustment Guidance
This crochet baby romper can be adjusted by changing the bodice width, length, and lower-body shaping. Always measure the baby or compare measurements with a favorite garment before beginning.
- For a larger size, increase the starting chain in multiples of 2 and add additional bodice rows.
- For a smaller size, reduce the starting chain while maintaining an even stitch count.
- Add extra skirt layers for a fuller dress effect.
- Change yarn colors to create seasonal designs.
Important: Finished garment measurements depend on yarn choice, tension, and individual crochet style. Always check gauge before making a wearable item.
Common Mistakes and Troubleshooting
- Uneven edges: Count stitches at the end of every row to maintain straight panels.
- Tight fabric: Try a larger hook if the fabric feels stiff.
- Loose skirt layers: Check that increases are evenly distributed.
- Incorrect fit: Compare measurements before joining panels.
Finishing, Blocking, and Care
After completing the romper, gently weave in all yarn ends. Lightly block the panels by shaping them with your hands and allowing them to dry flat. Avoid stretching the garment aggressively because baby clothing should maintain a comfortable shape.
For care, follow the yarn label recommendations. Machine washable baby yarn is usually the most practical option. Wash gently and store the romper folded to preserve the skirt layers.
At a Glance
- Best yarn choice: Soft washable DK baby yarn.
- Skill level: Confident beginner to intermediate.
- Key technique: Textured crochet rows and ruffle increases.
- Size adjustment: Modify bodice width and length using gauge.
- Finishing method: Secure seams, gentle blocking, and careful yarn weaving.
Create Your Own Handmade Crochet Baby Romper
This crochet baby romper pattern is a lovely way to explore handmade baby clothing while creating a personalized piece filled with texture and charm. Choose a soft yarn, check your gauge, and read through the full instructions before beginning. Small changes in color, edging, and decorative details can transform this design into a unique crochet gift idea.
Enjoy the process of creating a handmade crochet garment that combines comfort, creativity, and timeless style.
Tags
Crochet Baby Romper
Baby Clothes Crochet Pattern
Free Crochet Pattern
Handmade Baby Gift
Crochet Baby Outfit
Easy Crochet Project