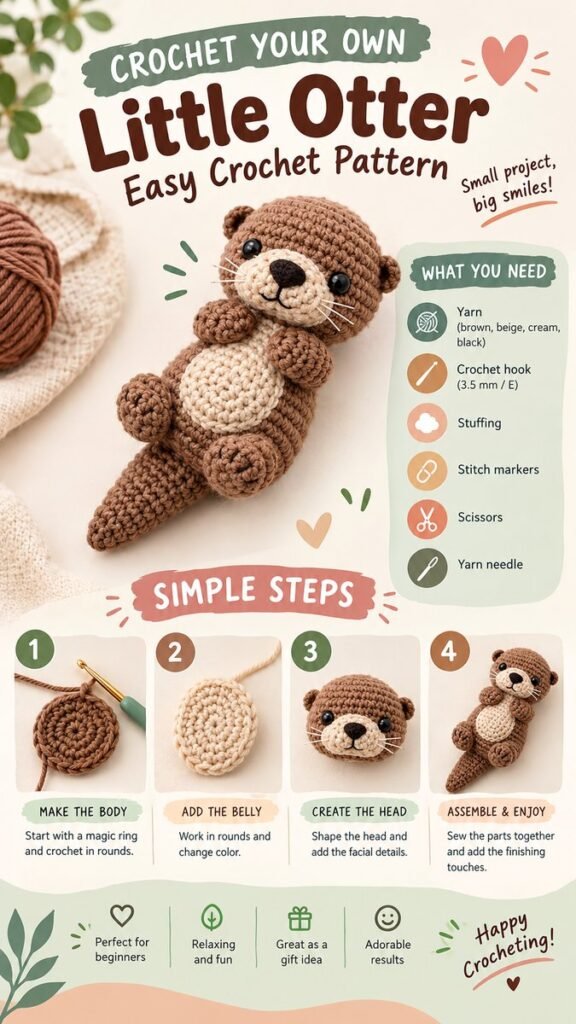
Cute animal crochet patterns are a wonderful way to turn soft yarn into charming handmade companions. The featured project centers on an adorable crocheted otter with a rounded body, contrasting belly, small paws, expressive eyes, whiskers, and a long textured tail. Its cozy appearance makes it an especially appealing idea for anyone who enjoys amigurumi, beginner-friendly crochet projects, or handmade gifts. The design also shows how a simple combination of crochet shapes and thoughtful finishing details can create a character with plenty of personality.
Key Takeaways
- Cute animal crochet patterns can be built from simple rounded crochet shapes.
- An otter-inspired design is a fun choice for amigurumi beginners.
- Soft brown, cream, and neutral yarns create a warm woodland-inspired look.
- Small details such as safety eyes, embroidered features, paws, and whiskers add character.
- Simple construction steps make animal crochet projects easy to personalize.
- Finished crochet animals can become thoughtful handmade gifts or keepsakes.
Why Cute Animal Crochet Patterns Are So Popular
There is something especially satisfying about crocheting an animal. Unlike a basic square, scarf, or repetitive accessory, an amigurumi-style project gradually develops a recognizable character. A few rounds of stitches can become a head, body, paw, or tail, and once those pieces are assembled, the finished project feels almost like a little companion.
Cute animal crochet patterns are also highly adaptable. The same basic techniques can be used to create otters, bears, cats, dogs, rabbits, foxes, woodland creatures, and many other playful designs. Changing the yarn colors, facial details, ears, tails, or proportions can give a familiar construction a completely different personality.
The otter design shown here is a great example of that approach. Its rounded silhouette keeps the project visually soft, while the cream-colored belly and muzzle create contrast against the brown body. The small rounded ears, short arms, feet, and long tail make the animal immediately recognizable without requiring an overly complicated shape.
A Cozy Otter-Inspired Crochet Project
The central appeal of this crochet animal is its combination of simple forms and expressive details. The body has a compact, rounded shape, while the belly provides a lighter focal point. The head is slightly larger and includes a contrasting muzzle, dark nose, shiny eyes, and delicate whiskers.
This type of construction is particularly useful for crocheters who want to learn how separate components work together. Rather than relying on complicated shaping throughout the entire project, an animal can be created from manageable sections and then assembled during the finishing stage.
The result is a handmade piece that looks detailed while still following a logical construction process. That makes cute animal crochet patterns appealing to both new crocheters and experienced makers who enjoy quick character projects.
The Role of Color
Color is one of the easiest ways to make an animal crochet project look polished. The warm brown used for the otter gives it a natural, cozy appearance, while the cream sections help define the belly and face. A small amount of black adds strong contrast to the nose and eyes.
You can use the same idea with other animal crochet patterns. Try combinations such as gray and cream for a koala-inspired character, white and tan for a bunny, orange and cream for a fox, or black and white for a playful puppy. The exact shades are flexible, so leftover yarn can often become an opportunity for experimentation.
Materials for Cute Animal Crochet Patterns
A project like this generally requires a small collection of basic crochet supplies. The visual guide features worsted-weight yarn, a 3.5 mm crochet hook, stitch markers, a yarn needle, safety eyes, polyester fiberfill, and scissors. These are common tools for making stuffed crochet animals.
- Yarn: Choose several coordinating colors for the body, belly, face, and small details.
- Crochet hook: A medium-sized hook such as the 3.5 mm hook shown can create a firm fabric suitable for stuffed projects.
- Stitch markers: These help identify the beginning of continuous rounds.
- Yarn needle: Useful for sewing pieces together and securing yarn ends.
- Safety eyes: These can give an animal a polished, expressive appearance when used appropriately.
- Polyester fiberfill: Stuffing gives the body, head, paws, and other components their three-dimensional form.
- Scissors: Keep a sharp pair nearby for trimming yarn cleanly.
Important: When making stuffed animals for young children, always consider the age suitability of small components such as safety eyes. Embroidered facial features can be an alternative when a project needs to avoid detachable pieces.
Understanding the Basic Crochet Construction
Many cute animal crochet patterns rely on familiar crochet techniques. The visual guide highlights stitches and abbreviations such as chain, single crochet, half double crochet, double crochet, slip stitch, increase, and decrease. Understanding these basic terms makes it much easier to follow amigurumi instructions.
Starting With a Magic Ring
A magic ring is commonly used to begin a circular crochet component. It allows the center of the piece to close neatly, which is useful for stuffed animals because an open center can leave unwanted gaps in the finished shape.
Once the first stitches are worked into the ring, increases can gradually expand the circle. This basic concept can be used for many animal parts, including heads, bodies, muzzles, bellies, and paws.
Working in Continuous Rounds
The body shown in the design is built with rounds of crochet. Continuous rounds create a smooth appearance and are particularly common in amigurumi. A stitch marker is helpful because it makes the beginning of each round easier to identify.
Keeping track of stitch counts is equally important. Even a small change in the number of stitches can alter the proportions of a stuffed animal. Counting carefully as you work can save time during assembly.
Expert Insight
The personality of an amigurumi animal often comes from the finishing details rather than complicated stitches. Careful placement of the eyes, muzzle, nose, paws, and ears can make a simple crocheted shape feel surprisingly expressive.
Building the Animal Step by Step
One of the most useful features of this type of project is the clear progression from basic crochet shapes to a finished character. Breaking the work into stages can make a cute animal crochet pattern feel much more approachable.
- Create the main body: Begin with the central body shape and work in rounds, gradually creating the desired proportions.
- Add the belly: A contrasting crocheted section creates visual interest and helps define the front of the animal.
- Shape the head: Build a rounded head and add the muzzle and facial features.
- Make the smaller pieces: Crochet the arms, feet, ears, and tail as separate components when the pattern calls for them.
- Assemble everything: Sew the pieces securely into position and finish the facial details.
This process can be adapted to many other crochet animals. Once you understand how the major shapes relate to one another, it becomes easier to imagine how a bear could become a panda, how a rounded head could become a cat, or how a different tail could transform the overall character.
How to Get a Neat Amigurumi Shape
The quality of a stuffed crochet animal depends heavily on tension and stuffing. If the stitches are too loose, stuffing can show through the fabric. If the piece is packed too tightly, the shape may become uneven or stretched.
Work with consistent tension and check the fabric as you go. The goal is a firm surface with enough flexibility to form a rounded shape. Add stuffing gradually rather than filling the piece all at once.
Pro Tip: Rotate the project as you add stuffing and gently distribute the fiberfill into corners and curves. Small additions of stuffing usually give you more control over the final shape than trying to pack the entire piece at once.
Keeping the Shape Balanced
Symmetry matters when making animal crochet patterns. Compare the placement of the arms, ears, eyes, and feet before permanently sewing them into place. Even a slight adjustment can change the expression or posture of the finished animal.
It can help to use temporary pins before sewing. Step back and look at the animal from different angles. This simple check can make assembly much easier and helps you create a balanced final result.
Adding Personality With Facial Details
The face is often the most important part of a cute crochet animal. The featured otter uses a dark nose, contrasting muzzle, rounded eyes, and whisker details to create an expressive appearance.
Small changes can make a surprisingly big difference. Eyes positioned slightly closer together can create a different expression from eyes placed farther apart. A muzzle can be made more prominent or subtle, while embroidered whiskers can give the animal a playful finish.
When adding facial features, take your time. It is usually easier to make adjustments before the pieces are permanently secured. Marking approximate positions first can help you compare both sides and maintain symmetry.
Ways to Personalize Your Animal Crochet Project
Once you have the basic construction under control, there are many ways to make a crochet animal feel completely personal. Color is the simplest place to begin, but you can also experiment with proportions, accessories, facial expressions, and textures.
- Use pastel yarn for a soft nursery-inspired look.
- Choose earthy colors for a woodland animal collection.
- Add a tiny scarf, bow, or simple accessory.
- Experiment with embroidered eyes or facial details.
- Make a miniature version using lighter yarn and a smaller hook.
- Create a larger cuddly version by changing the yarn weight and hook size appropriately.
These changes can turn one basic idea into an entire collection of cute animal crochet patterns. A maker could create several animals using the same general approach while giving each one its own colors and personality.
Cute Crochet Animals as Handmade Gifts
Small crochet animals make appealing handmade gifts because they combine creativity with a personal touch. An animal can be made for a birthday, baby shower, holiday, classroom gift, or simply as a thoughtful surprise for someone who enjoys handmade crafts.
The compact size of projects like this also makes them convenient for craft fairs, gift baskets, decorative displays, or a growing amigurumi collection. Because each handmade piece can have slightly different details, the finished result feels personal rather than mass-produced.
For gifting, consider coordinating the animal with the recipient’s favorite colors. A simple handmade tag or small ribbon can also make the finished piece feel extra special without taking attention away from the crochet work.
Common Tips for Crochet Beginners
If you are new to crochet, an animal project may look complicated at first. The key is to focus on one component at a time. You do not need to understand the entire finished animal before beginning.
- Read the stitch abbreviations before starting.
- Keep a stitch marker in the first stitch of each round.
- Count stitches regularly rather than waiting until the end.
- Use consistent tension throughout each component.
- Stuff gradually and check the shape as you go.
- Lay out all finished parts before sewing them together.
- Take your time with facial placement.
Making mistakes is also part of learning. If the shape looks different from what you expected, check your stitch count and tension first. With practice, you will become much more comfortable recognizing how increases, decreases, and round counts affect the final shape.
Why This Matters
- Simple shapes can create surprisingly detailed animal characters.
- Consistent tension helps produce smooth, sturdy stuffed pieces.
- Thoughtful facial placement gives each crochet animal its personality.
Turning One Pattern Into a Crochet Animal Collection
Once you become comfortable with one animal pattern, it can become the foundation for a whole collection. Keep the general body construction while changing the head shape, ears, tail, colors, or facial features.
For example, a rounded body can work as the starting point for several woodland-inspired animals. Longer ears can suggest a rabbit, different ears and a tail can create a cat, while a different color palette can transform the same general structure into a bear or panda-inspired character.
This approach is especially useful when building handmade collections because it allows you to practice familiar techniques while still producing visually different finished pieces.
At a Glance
- Theme: Cute animal crochet and amigurumi
- Featured idea: Adorable crocheted otter
- Key techniques: Magic ring, crochet rounds, increases, decreases, assembly
- Style: Cozy, playful, handmade, and beginner-friendly
- Best use: Gifts, keepsakes, collections, and relaxing craft projects
Conclusion
Cute animal crochet patterns offer a fun way to practice essential crochet skills while creating something full of personality. The otter-inspired design demonstrates how simple rounded shapes, soft colors, careful assembly, and expressive facial details can come together to create an irresistibly charming handmade animal.
Whether you are just learning amigurumi or already enjoy making crochet characters, projects like this provide plenty of room for creativity. Start with the basic shapes, pay attention to your stitch counts, work patiently with the stuffing, and take extra care when positioning the face. From there, you can experiment with colors, sizes, accessories, and entirely new animal designs.
The best part of making cute animal crochet patterns is that every finished character can have its own little personality. Choose your favorite yarn, pick an animal that makes you smile, and enjoy turning simple stitches into a handmade companion.
Tags
Cute Animal Crochet Animal Crochet Patterns Amigurumi Crochet Animals Easy Crochet Crochet Patterns Crochet Ideas Handmade Gifts