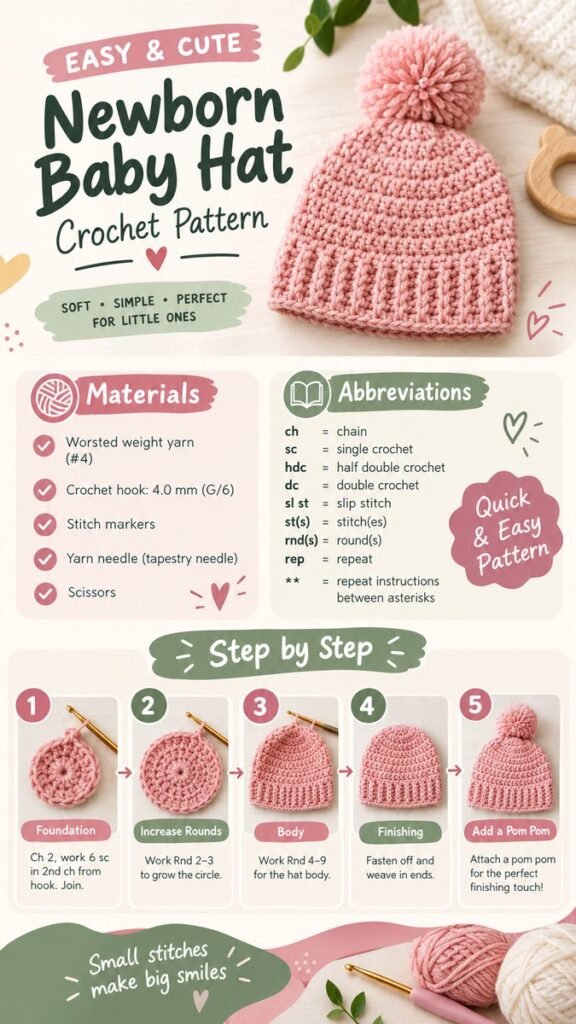
There is something wonderfully special about making a tiny crochet cap for a new baby. A handmade baby cap crochet project can be simple enough for a beginner while still feeling thoughtful, practical, and beautiful. The soft pink cap featured here has a classic rounded shape, a textured crochet body, and a stretchy-looking ribbed brim that gives the design a cozy finish. It is the kind of small project that can become a treasured baby shower gift, newborn accessory, or handmade keepsake.
Whether you are searching for an easy baby cap crochet pattern, planning a handmade gift, or simply looking for a relaxing crochet project, this style offers plenty of inspiration. With soft yarn, a suitable crochet hook, basic stitches, and a few finishing tools, you can create a sweet little hat with a warm handmade character.
Key Takeaways
- A newborn crochet cap is a small, approachable project for beginners.
- Soft worsted weight yarn creates a comfortable and cozy fabric.
- A ribbed brim adds structure and helps the cap sit neatly on the head.
- Simple shaping rounds create the rounded crown and body.
- Pastel colors make the finished cap especially sweet for baby gifts.
- Small details such as a pom pom can give the finished design extra personality.
Why Baby Cap Crochet Projects Are So Popular
Baby crochet projects have a special appeal because they combine practicality with creativity. A baby cap is also much quicker to make than a blanket, making it an excellent choice when you want the satisfaction of completing something handmade without committing to a large project.
The compact size means you can experiment with different yarn colors, stitch textures, and finishing details. A simple crochet baby hat can become a soft neutral accessory, a colorful statement piece, or part of a coordinated handmade baby set.
Another advantage is the approachable construction. The example shown uses a circular crown, gradual increases, a rounded body, and a defined lower edge. These are useful techniques for anyone learning how crochet projects are shaped.
Important: Baby accessories should prioritize softness, comfort, and appropriate fit. Choose yarn intended to feel gentle against sensitive skin, avoid scratchy fibers, and check the finished cap carefully for loose ends or decorations before use.
Materials for an Easy Baby Cap Crochet Pattern
The pictured project uses a straightforward collection of crochet supplies. Keeping the materials simple is one reason this type of baby cap works well as a beginner crochet project.
- Worsted weight yarn: A soft yarn in a baby-friendly fiber is a practical choice. The example uses a gentle pink shade, but cream, sage, beige, dusty blue, lavender, or other soft colors can create a beautiful result.
- 4.0 mm crochet hook: A medium-sized hook is shown with the project and works well with the yarn weight represented in the design.
- Stitch markers: These are helpful when working in rounds and make it easier to identify the beginning of each round.
- Tapestry needle: Use one to weave in yarn tails neatly after finishing.
- Scissors: A sharp pair makes clean trimming quick and easy.
If you are making the cap as a gift, consider selecting a washable yarn. Babies and baby items can require frequent cleaning, so easy-care yarn can make the finished accessory much more practical.
Choosing the Right Yarn
Yarn choice has a major effect on the finished baby cap. A yarn can be beautiful in the skein but still feel uncomfortable if it is too rough or stiff. For a newborn accessory, look for a smooth, soft texture that creates flexible stitches without making the fabric excessively heavy.
Color is another easy way to personalize the project. The dusty pink shade shown in the design creates a classic nursery-inspired look. For a more minimalist cap, try ivory or oatmeal. Sage green gives the project a modern natural feel, while muted lavender or soft blue can add a gentle pop of color.
Understanding the Crochet Construction
The basic shape of this baby cap crochet design can be understood as four main sections: the foundation, increase rounds, hat body, and finishing. Breaking the project into these stages makes the construction much easier to follow.
1. Start With the Foundation
The crown begins in the center and is worked outward in rounds. The example uses a small starting chain followed by single crochet stitches worked into the chain. The first round establishes the center from which the rest of the cap grows.
When working in the round, use a stitch marker to identify the first stitch. This small habit can make a major difference, especially when you are still becoming comfortable with circular crochet.
2. Build the Crown With Increase Rounds
Once the foundation is complete, additional stitches are added to gradually expand the circle. This creates the width needed for the crown of the hat. Increase rounds should be worked consistently so the crown remains smooth and evenly shaped.
If your crochet circle begins to curl upward too early, your stitch count or tension may need attention. If it becomes very wavy, there may be too many increases for your particular yarn and tension. Small adjustments can help maintain a balanced shape.
3. Work the Main Body
After the crown reaches the desired width, the project transitions into the body of the cap. Instead of continuing to expand, the stitches are worked around at a consistent rate. This allows the sides to grow downward and form the recognizable baby hat silhouette.
The stitch texture shown in the design gives the hat a soft, handmade appearance. Even when using relatively basic stitches, consistent tension can create attractive rows and a polished surface.
4. Finish With a Defined Brim
The lower edge is an important visual feature of the cap. The ribbed section creates contrast with the main body and gives the hat a more finished appearance. It also adds a little structure around the opening.
When making a baby cap, the brim should remain comfortable rather than overly tight. Crochet fabric naturally has some flexibility, but your stitch tension and yarn selection will affect how much stretch the finished edge provides.
Expert Insight
The most important part of a simple baby crochet hat is not adding complicated stitches. It is maintaining consistent tension and shaping the crown evenly. A clean foundation and balanced increase rounds can make even a basic pattern look polished and professional.
Helpful Tips for Making a Crochet Baby Hat
Keep Track of Every Round
When crocheting in rounds, it is surprisingly easy to lose track of where one round ends and another begins. A stitch marker placed in the first stitch provides a simple visual reminder. Move the marker as you progress instead of relying on memory.
For beginners, counting stitches periodically is also worthwhile. A small mistake early in the crown can change the shape of the entire hat, so catching errors sooner is much easier than correcting them several rounds later.
Pay Attention to Tension
Two people can use the same yarn and hook and produce different results because their crochet tension is different. If you crochet tightly, the cap may become smaller and firmer. If you crochet loosely, it may become larger and more flexible.
If the finished size matters, making a small gauge swatch before starting can help you understand how your yarn, hook, and tension interact. This is especially useful when adapting a pattern for a different yarn weight.
Keep the Finish Neat
Once the final round is complete, fasten off securely and weave the yarn tail into the fabric using a tapestry needle. Avoid leaving long loose ends inside or around a baby accessory.
Take a moment to inspect the entire cap. Check the seams, brim, crown, and any added decoration. A neat finish makes the hat look better and is also an important part of preparing handmade baby items.
Adding a Cute Pom Pom
The visual example also shows how a pom pom can transform a basic newborn crochet hat into a playful accessory. A pom pom adds height and texture while giving the finished design a cheerful handmade character.
If you add one, make sure it is firmly secured and inspect the attachment carefully. For baby items, simplicity and secure construction are preferable to loose decorative pieces.
You can also leave the pom pom off for a more traditional look. The cap remains attractive with a clean rounded crown and ribbed brim, making it easy to create different styles from the same basic idea.
Ideas for Personalizing Your Baby Cap Crochet Project
One of the best things about handmade crochet is the freedom to personalize every detail. Once you understand the basic construction, small changes can create an entirely different finished cap.
- Change the color: Use a single neutral shade or create subtle stripes for a modern look.
- Add a pom pom: Choose a matching or contrasting yarn for a playful finish.
- Experiment with texture: Try different stitch patterns once you are comfortable with the basic construction.
- Create a matching set: Pair the cap with a simple crochet blanket, booties, or another handmade baby accessory.
- Make it gift-ready: Fold the cap neatly and present it as part of a thoughtful baby shower gift.
Pro Tip: If you are making several baby caps, keep a small note of the yarn, hook size, stitch count, and finished measurements you used. This makes it much easier to recreate a favorite size and color combination later.
Who Can Make This Crochet Baby Cap?
This style of baby cap is particularly appealing to beginners because the construction is easy to break into manageable stages. You do not need a huge collection of supplies, and the project provides useful practice with circular crochet, increases, stitch counting, shaping, and finishing.
More experienced crocheters can also enjoy the design as a quick project. It is a good way to use a small amount of leftover yarn and experiment with color combinations or decorative details.
If you are teaching someone to crochet, a small baby cap can be an encouraging first project. It is compact enough to finish relatively quickly, while still introducing several techniques that can be useful for larger projects.
Making Baby Crochet Projects More Practical
Beautiful design is only one part of a successful handmade baby accessory. Practicality matters too. Select yarn that is comfortable, easy to care for, and appropriate for the intended use. Keep the construction simple and inspect the finished item carefully.
It is also useful to remember that babies grow quickly. A cap made for a newborn may have a relatively short period of use, which makes accurate sizing especially helpful. If you are giving the hat as a gift, consider making the next size as well if you have enough yarn and time.
For photography or gifting, soft neutral backgrounds can complement pastel crochet beautifully. A wooden surface, folded blanket, yarn balls, and a crochet hook can create the same cozy craft atmosphere suggested by this design without making the composition feel crowded.
At a Glance
- Project: Baby cap crochet
- Style: Soft, simple, cozy, and beginner-friendly
- Main features: Rounded crown, textured body, ribbed brim
- Supplies: Yarn, crochet hook, stitch marker, tapestry needle, and scissors
- Finishing option: Add a securely attached pom pom for extra charm
Why a Handmade Baby Cap Makes a Lovely Gift
A handmade baby cap carries a personal quality that is difficult to find in mass-produced accessories. Even a simple design becomes meaningful when someone has chosen the yarn, worked each round, and carefully finished the piece by hand.
For a baby shower, newborn gift, or first-photo outfit, a crochet cap can be both useful and memorable. Choosing a soft color and simple design also makes it easier for the accessory to coordinate with different baby outfits.
Because the project uses relatively little material compared with larger crochet pieces, it can also be a satisfying way to create handmade gifts for several people. You can keep the construction consistent while changing colors to give every cap its own personality.
Final Thoughts on Baby Cap Crochet
A baby cap crochet project proves that a small handmade item can have plenty of charm. The combination of a rounded crown, simple textured stitches, and a defined ribbed brim creates a timeless silhouette that works beautifully in soft pastel yarns. It is approachable for beginners, enjoyable for experienced crocheters, and versatile enough to personalize for different occasions.
Start with comfortable yarn, keep your stitch counts organized, and focus on even tension as you build the crown and body. From there, a simple finishing detail such as a pom pom can add an extra touch of personality. Whether you are making your first crochet baby hat or adding another handmade accessory to your collection, this cozy style is an excellent project to keep in your pattern inspiration folder.
Most importantly, enjoy the process. Crochet is about more than completing stitches. It is a chance to slow down, create something useful, and put a little handmade warmth into an especially memorable moment. Save this baby cap crochet inspiration for your next cozy project and let your choice of yarn, color, and finishing details make it uniquely yours.