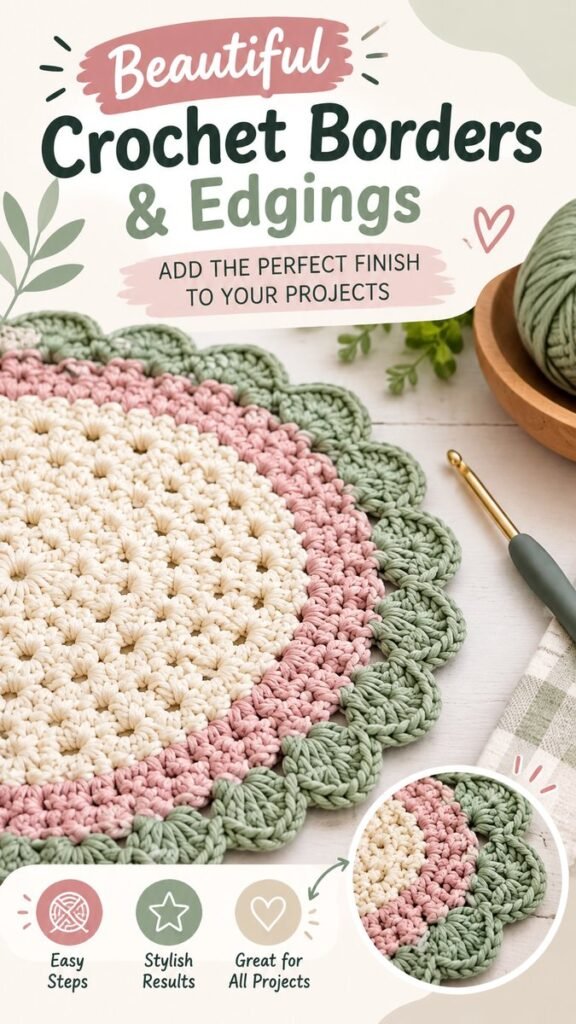
Adding a thoughtful border can completely transform a handmade baby blanket. A simple crochet blanket becomes more polished, decorative, and gift-ready when the edges are finished with a beautiful crochet edging. Whether you are working on a soft nursery blanket, a stroller-sized throw, or a cozy handmade gift, the right border can bring the colors and texture together while giving the project a neat final shape. Crochet baby blanket borders are also a wonderful way to personalize a project without making the main blanket pattern overly complicated.
Key Takeaways
- Choose a border that complements the blanket’s stitch texture and colors.
- Simple crochet edging can give a baby blanket a clean, finished appearance.
- Scalloped and shell-style borders add softness and a decorative touch.
- Use consistent tension to help the blanket edge stay smooth and even.
- Soft, coordinated colors can make the border look intentional and balanced.
- Practice a few border stitches before working around the entire blanket.
Why Crochet Borders Make Baby Blankets Special
The border is more than a finishing detail. It frames the entire blanket and can make even a very simple center pattern feel complete. A carefully chosen crochet edging creates visual definition around the outside of the project, helping the blanket look tidy and thoughtfully designed.
For baby blankets, softer decorative details often work especially well. Rounded scallops, small shells, gentle waves, and understated textured stitches can create a cozy appearance without overwhelming the blanket itself. The example style shown here uses a soft cream center, a blush-toned accent row, and a sage-green decorative edge, demonstrating how a contrasting border can become one of the most eye-catching parts of the finished piece.
Important: A beautiful crochet baby blanket border does not need to be complicated. A few well-placed rounds with consistent tension can provide a polished finish while keeping the design approachable for beginners.
Choosing the Right Border for Your Blanket
Before choosing a crochet edging, look at the overall personality of your blanket. Is the center simple and minimal, or is it already full of texture? Does it use several colors, or is it made from one main shade? The answers can guide you toward a border that enhances the design instead of competing with it.
Match the Border to the Stitch Texture
A highly textured blanket often looks best with a relatively simple edge. This allows the center of the project to remain the main focus. On the other hand, a basic single crochet or half double crochet blanket can support a more decorative border such as shells, scallops, or a gently ruffled edge.
Think of the border as a frame. A frame should complement the artwork rather than distract from it. This simple approach makes it easier to decide whether you need a subtle finish or a statement edging.
Consider the Blanket Colors
Color is one of the easiest ways to personalize crochet baby blanket borders. You can use the same color as the main blanket for a seamless finish, select a contrasting shade for definition, or introduce a third coordinating color for extra character.
Soft neutrals such as cream, beige, oatmeal, and warm white pair naturally with pastel pink, sage, dusty blue, lavender, and other gentle shades. If the blanket already contains several colors, pulling one existing shade into the border can help create a cohesive appearance.
Think About the Overall Style
For a classic handmade look, simple rounded edging is an excellent choice. For something playful, a scalloped border adds a charming decorative finish. If you prefer a modern appearance, consider a clean border made from one or two uncomplicated stitch rounds.
The best crochet border is ultimately the one that makes the finished blanket feel intentional. There is no need to follow a complicated design simply because it looks impressive. A border that suits the blanket will usually look more beautiful than one that is technically elaborate but visually disconnected.
Simple Crochet Border Ideas for Baby Blankets
There are countless crochet edging techniques, but several basic styles are especially useful when finishing baby blankets. They can be adjusted to suit different yarn weights, blanket sizes, and personal preferences.
Single Crochet Border
A single crochet border is one of the simplest ways to create a clean edge. It can help stabilize the outside of the blanket and provide a foundation for additional decorative rounds.
This type of border works especially well when the blanket already has plenty of texture. It can also be used as the first round before adding a more decorative edging. Because the stitch is compact, it provides a neat visual boundary without adding too much bulk.
Half Double Crochet Border
A half double crochet border offers a little more height and softness than a single crochet edge. It creates a smooth transition between the blanket and a decorative finishing round.
This option is particularly useful when you want the border to have some substance without becoming excessively ornate. A second or third round can then introduce a contrasting color or decorative stitch.
Scalloped Crochet Edging
Scalloped edging is a favorite for projects that need a soft and charming finishing touch. The repeated curved shapes create a gentle rhythm around the blanket and can make a simple design look much more decorative.
The scallops can be made smaller or larger depending on the stitch combination and yarn. A smaller scallop gives a delicate appearance, while larger shells create a more noticeable decorative border.
Shell Stitch Border
Shell stitches create a fuller, rounded edge and are ideal when you want the border itself to become a design feature. They can be worked in a matching shade for a subtle finish or a contrasting color for more definition.
For baby blankets, a soft pastel shell border can add visual interest while maintaining a gentle handmade aesthetic. Pairing a cream blanket with a muted accent color is an easy way to create a coordinated look.
Expert Insight
- Use a simple foundation round if the blanket edge is uneven.
- Keep your tension consistent so scallops or shells remain similar in size.
- Try the border in a small swatch before committing to the entire blanket.
How to Create a Neat Crochet Blanket Edge
Even a simple border can look professional when the foundation is prepared carefully. Start by examining the blanket edge and identifying areas where the stitches may be uneven. If the edge has noticeable gaps or waves, a foundation round can help create a more consistent surface for the decorative edging.
Work Around the First Side
Begin at a suitable corner and work evenly along the first side. The exact number of stitches will depend on the existing blanket pattern, so focus on maintaining an even appearance rather than forcing a fixed number into every section.
When working into rows, pay attention to how many stitches you place along the edge. If too many stitches are added, the border can become wavy. If too few are added, the edge may pull inward.
Pay Attention to the Corners
Corners deserve special attention because they need enough space to allow the blanket to turn naturally. A properly formed corner helps the border continue smoothly without puckering or pulling.
If your corner feels tight, consider whether it needs additional stitches. If it looks excessively loose, the corner may have too many stitches. Adjusting the corner before continuing around the blanket can save time and produce a much cleaner final result.
Keep Your Tension Consistent
Consistent tension is one of the most important factors when making crochet baby blanket borders. Try to maintain the same relaxed grip throughout each round. Changing tension frequently can cause sections of the border to appear larger or smaller.
Pro Tip: If your border starts forming waves, pause before continuing. Check whether you are adding too many stitches along the edge. If it begins pulling or curling inward, you may need more stitches to give the border enough room.
Creating a Three-Round Crochet Border
A three-round approach is an easy way to build a border gradually. Instead of trying to create a complicated edge in one round, each layer has a simple purpose. The first round can establish a clean foundation, the second can add height, and the final round can provide the decorative detail.
Round One: Establish the Foundation
A basic single crochet round is a practical starting point. It gives the outer edge a consistent structure and can make it easier to work the decorative stitches in later rounds.
Choose a color that blends with the blanket if you want a subtle transition. Alternatively, use a contrasting shade to create a clearly defined frame.
Round Two: Add Soft Texture
A half double crochet round can add a little height and fullness. This creates a smooth middle layer between the foundation and final decorative edging.
This round does not need to be complicated. The goal is to build enough structure for the final edge while maintaining an even shape around the blanket.
Round Three: Finish with a Decorative Edge
The final round is where you can add personality. A shell stitch, scallop, or another rounded edging can create the soft decorative look often associated with handmade baby blankets.
For a modern finish, choose a muted contrasting shade. A sage green or dusty pastel can stand out beautifully against a cream or blush foundation while keeping the overall appearance gentle.
Tips for Better Crochet Baby Blanket Borders
Small adjustments can make a big difference when finishing your project. Before beginning the border, consider these practical tips:
- Check the edge first: Make sure the blanket is lying flat before adding the border.
- Use matching yarn weights: A border made with dramatically different yarn thickness can look uneven.
- Test your tension: Make a small section first to see whether the edge lies flat.
- Count when necessary: Consistent stitch spacing helps decorative repeats line up.
- Plan the corners: Give corner stitches enough room for the border to turn smoothly.
- Weave in ends carefully: A tidy finish keeps the reverse side looking clean.
Choosing Colors for a Handmade Baby Blanket
The color of the border can dramatically change the personality of a crochet blanket. A matching border creates a calm, seamless appearance, while a contrasting border makes the edge more noticeable.
If your blanket uses multiple colors, consider selecting the least dominant shade for the border. This can help the edge feel connected to the rest of the design without overpowering the main pattern.
For a soft nursery-inspired palette, combinations such as cream and sage, blush and ivory, dusty blue and beige, or lavender and white can create a gentle appearance. You can also use one neutral shade throughout the border for a timeless finish.
Making Your Crochet Border Beginner Friendly
If you are new to crochet edging, start with the simplest possible design. There is no advantage to choosing a complicated stitch pattern that makes the finishing process frustrating. A basic single crochet foundation followed by a straightforward decorative round can produce an attractive result.
Practice is also helpful. Work a few inches of the border on a spare swatch or an inexpensive sample before moving to your finished baby blanket. This gives you a chance to check stitch spacing, color combinations, corner shaping, and overall appearance.
Remember that handmade projects do not need to look machine-perfect. Small variations are part of the charm of crochet. The goal is to create an edge that looks intentional, feels comfortable, and complements the blanket.
Ideas for Personalizing Crochet Baby Blanket Edging
Once you are comfortable with basic borders, there are many ways to personalize your projects. Try changing the number of rounds, alternating colors, or combining a simple foundation with a decorative final row.
You can also experiment with the scale of the edging. Small scallops create a delicate frame, while larger shells make the border more prominent. A narrow border may be ideal for a minimalist blanket, while a wider decorative edge can make a simple center pattern feel more elaborate.
Another easy option is to repeat one of the colors already used in the blanket. This creates a coordinated look without requiring additional colors that may compete with the main design.
At a Glance
- Start with an even foundation edge.
- Use simple rounds to build structure and texture.
- Try scallops or shell stitches for a decorative finish.
- Choose colors that complement the blanket.
- Keep tension steady for smooth, flat edges.
Final Thoughts on Crochet Baby Blanket Borders
A beautiful border is one of the easiest ways to turn a simple crochet blanket into a thoughtfully finished handmade piece. Whether you prefer a clean single crochet edge, a softly textured middle round, or a charming scalloped finish, the right edging can frame the blanket and bring the entire color palette together.
The most successful crochet baby blanket borders are not necessarily the most complicated. Focus on even stitches, balanced corners, coordinated colors, and a design that suits the texture of the blanket. A simple three-round border can provide plenty of visual interest while remaining approachable for beginners.
Most importantly, have fun experimenting. Try a few border styles on small samples, compare colors, and see how different edging shapes change the overall look. With a little practice, you can develop favorite finishing techniques that make every baby blanket feel personal, polished, and beautifully handmade.