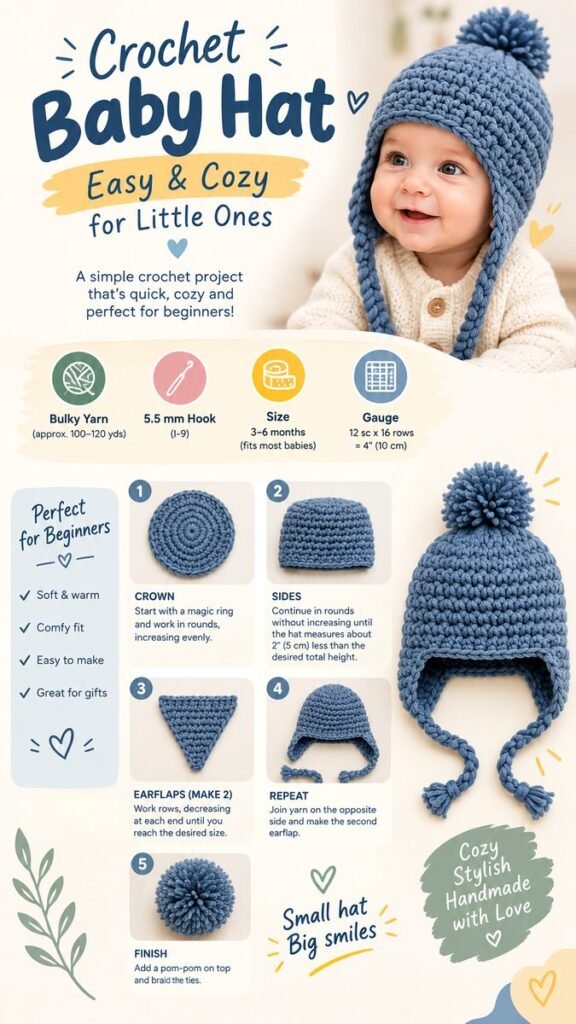
A handmade crochet baby hat is one of those projects that combines practicality, comfort, and plenty of charm. A soft earflap hat with braided ties and a fluffy pom-pom can keep little ears cozy while giving a baby’s outfit an adorable handmade touch. Whether you are new to crochet or looking for a simple project to make as a thoughtful baby gift, this style is a wonderful place to begin.
Key Takeaways
- A crochet baby hat can be both warm and stylish.
- Bulky yarn helps create a soft, cozy texture.
- Earflaps add extra coverage around the sides of the head.
- Braided ties help keep the hat comfortably in place.
- A pom-pom adds a playful finishing detail.
- Simple shapes make this a beginner-friendly crochet idea.
Why Crochet Baby Hats Make Wonderful Handmade Projects
Baby accessories are especially satisfying to crochet because small projects can be completed without requiring a huge amount of yarn or time. A baby hat also gives you plenty of opportunities to experiment with colors, textures, stitches, and finishing details while keeping the overall design manageable.
The classic shape shown here has a rounded crown, simple sides, protective earflaps, braided ties, and a pom-pom at the top. The result is a cozy winter-inspired accessory that feels playful without becoming overly complicated.
Important: When making a crochet baby hat, comfort should always come first. Choose a soft yarn, avoid scratchy fibers, check the fit carefully, and make sure any decorative elements are securely attached.
Choosing Yarn for a Cozy Crochet Baby Hat
The yarn is one of the most important choices in a baby crochet project. A bulky yarn can create the thick, plush appearance seen in this hat while allowing the finished accessory to work up relatively quickly. The reference design uses a chunky blue-gray appearance that gives the hat a soft and cozy character.
For baby accessories, look for yarn that feels comfortable against delicate skin. A smooth texture is generally preferable to anything rough or overly fuzzy. Washability is another useful consideration because baby items often need frequent cleaning.
Useful Materials
- Bulky or chunky-weight yarn
- A crochet hook appropriate for your yarn
- Yarn needle for weaving in ends
- Scissors
- Measuring tape
- Optional yarn for making a pom-pom
Color is another easy way to personalize the project. Soft blue, cream, sage, dusty pink, warm beige, and muted gray can all create a gentle look. You can also use brighter shades if you want a cheerful statement piece.
Understanding the Basic Crochet Baby Hat Shape
The construction of this style is easy to understand once you break it into sections. The crown begins as a small circular shape. Stitches are gradually increased to create a flat or gently curved circle. Once the crown reaches the required diameter, you stop increasing and continue working around the sides.
This simple change from increasing rounds to even rounds is what transforms the circle into a three-dimensional hat. As the sides grow, they begin to wrap around the head.
Step 1: Build the Crown
Begin with a magic ring or another preferred method for starting a crochet circle. Work single crochet stitches into the ring, then increase evenly in subsequent rounds. The exact number of stitches will depend on your yarn, hook, tension, and intended size.
Instead of relying only on a fixed stitch count, measure the crown as you work. This gives you more flexibility and helps account for differences in crochet tension.
Step 2: Work the Sides
Once the crown reaches the appropriate diameter, continue crocheting around without adding more increases. The sides will gradually develop the depth needed to cover the head.
For a comfortable result, measure the hat against the intended wearer or compare it with a reliable size measurement. Babies grow quickly, so a little planning around the finished measurements can make the project much more useful.
Adding Earflaps for Extra Coverage
Earflaps are one of the most charming features of this crochet baby hat. They extend downward on either side of the hat, helping cover the ears while giving the design its distinctive winter accessory appearance.
To create an earflap, work back and forth over a small section of stitches rather than continuing around the entire hat. The shape can be made by decreasing at the ends of rows until a triangular or tapered flap forms.
Make two earflaps and position them as evenly as possible on opposite sides of the hat. Taking a moment to check their placement before fastening off can make a noticeable difference in the finished appearance.
Expert Insight
- Measure the crown instead of depending only on stitch counts.
- Keep both earflaps the same size for a balanced finish.
- Position the flaps slightly forward if you want more cheek and ear coverage.
Creating Secure Crochet Hat Ties
Braided ties are both decorative and practical. They can help the hat stay positioned when a baby is moving around, especially during outdoor walks. Simple yarn braids are an easy finishing technique that suits the handmade style of the hat.
Cut several lengths of yarn, secure them to the bottom of each earflap, and braid them evenly. Finish the ends with small knots or tassel-like details, making sure everything is secure.
Keep safety in mind when adding ties or other decorative elements to baby clothing. Avoid excessively long cords, loose pieces, or small detachable decorations. Always inspect the finished hat before use.
Finishing the Hat With a Crochet Pom-Pom
A fluffy pom-pom transforms a basic crochet hat into something especially playful. The oversized pom-pom shown with this style creates a fun focal point and complements the chunky texture of the stitches.
You can make a pom-pom using yarn and a simple pom-pom maker or a homemade cardboard template. Wrap the yarn repeatedly, secure the center tightly, cut the loops, and trim the finished shape until it looks full and rounded.
Attach the pom-pom securely to the crown. For baby items, inspect the attachment point regularly and avoid decorations that could easily come loose.
How to Get a Better Fit
A good crochet baby hat should feel comfortable rather than overly tight. Because every crocheter has a different tension, the same written stitch count can produce different measurements. That is why checking the actual size as you work is so helpful.
Measure the Crown
The crown diameter is a useful measurement for determining when to stop increasing. Compare your measurement with the approximate head size you are making the hat for, allowing the finished fabric to provide a comfortable fit.
Check the Hat Height
After the crown is complete, measure the hat from the top down toward the edge. The sides should provide enough coverage without extending too far over the face. Remember that earflaps add additional length around the sides.
Pro Tip: Crochet a small gauge swatch before starting if you want more predictable sizing. Your stitch tension can significantly change the finished dimensions, especially when working with thicker yarn.
Simple Ways to Personalize Your Baby Crochet Hat
One of the best things about making a crochet baby hat yourself is the freedom to change small details. The basic construction can remain simple while the finished look becomes completely your own.
Experiment With Color
Try a single neutral shade for a timeless look, or use two coordinating colors for a playful contrast. You could make the hat in cream with a dusty blue pom-pom, choose soft pink with a natural-colored trim, or use earthy greens and browns for a woodland-inspired palette.
Change the Pom-Pom
A small pom-pom gives the hat a subtle finish, while a larger fluffy pom-pom creates a more playful appearance. You can also make the pom-pom match the hat or use a contrasting shade.
Adjust the Earflaps
The earflaps can be made wider or narrower depending on the look and amount of coverage you want. Their shape is also easy to personalize by changing the number of rows and decreases.
Common Crochet Baby Hat Mistakes to Avoid
Even simple crochet projects can become frustrating when a few small details are overlooked. Fortunately, most problems are easy to prevent.
- Skipping measurements: A hat that looks right on the hook may not fit the intended baby. Check the crown diameter and overall height as you work.
- Uneven increases: Irregular increases can make the crown ripple or lose its circular shape. Keep your increases consistent.
- Inconsistent tension: Try to maintain a steady grip and stitch height throughout the project.
- Uneven earflaps: Count rows carefully and compare both flaps before finishing.
- Loose finishing details: Weave in yarn ends securely and inspect decorative elements before use.
Why This Project Is Great for Beginners
A crochet baby hat is a useful beginner project because it introduces several fundamental crochet skills without requiring a large finished piece. You can practice working in the round, increasing stitches, maintaining consistent tension, crocheting flat sections, decreasing, and finishing yarn ends.
The project also provides quick visual progress. Seeing a small circle turn into a recognizable hat can be motivating, particularly for someone who is still building confidence with crochet.
Once you understand the construction, the same approach can be adapted to different sizes, yarn weights, colors, and embellishments. That makes a simple baby hat more than a one-time project. It can become a foundation for developing your own collection of handmade accessories.
A Thoughtful Handmade Baby Gift
Handmade baby accessories can make lovely gifts for baby showers, birthdays, winter arrivals, or simply as a thoughtful surprise. A crochet hat is small enough to package easily and practical enough to become part of a baby’s everyday wardrobe.
If you are creating one as a gift, choose a versatile color and pay close attention to sizing. You can also make a coordinating blanket, booties, scarf, or other crochet accessory to create a charming handmade set.
Adding a small handmade touch makes the gift feel personal. Even a simple hat becomes special when you choose the yarn, color, finishing details, and size with the recipient in mind.
At a Glance
- Use soft, comfortable yarn suitable for baby accessories.
- Measure as you crochet for a more reliable fit.
- Add earflaps for extra coverage and personality.
- Finish with braided ties and a securely attached pom-pom.
- Keep the final design comfortable, practical, and easy to care for.
Final Thoughts on Making a Crochet Baby Hat
A crochet baby hat is a simple project with plenty of room for creativity. The rounded crown creates the foundation, the sides build the cozy shape, and earflaps add both character and coverage. Braided ties make the design practical, while a fluffy pom-pom provides a cheerful finishing touch.
Whether you are making your first baby crochet project or adding another handmade accessory to your collection, this style is a great reminder that useful crafts do not need to be complicated. With soft yarn, careful measurements, consistent stitches, and a few thoughtful finishing details, you can create a warm accessory that looks charming and feels wonderfully handmade.
Take your time with the measurements, enjoy experimenting with colors, and make the design your own. Most importantly, focus on creating a comfortable, well-finished piece that can be enjoyed by a little one. Once you master this basic construction, you will have a versatile foundation for countless crochet baby hat ideas.