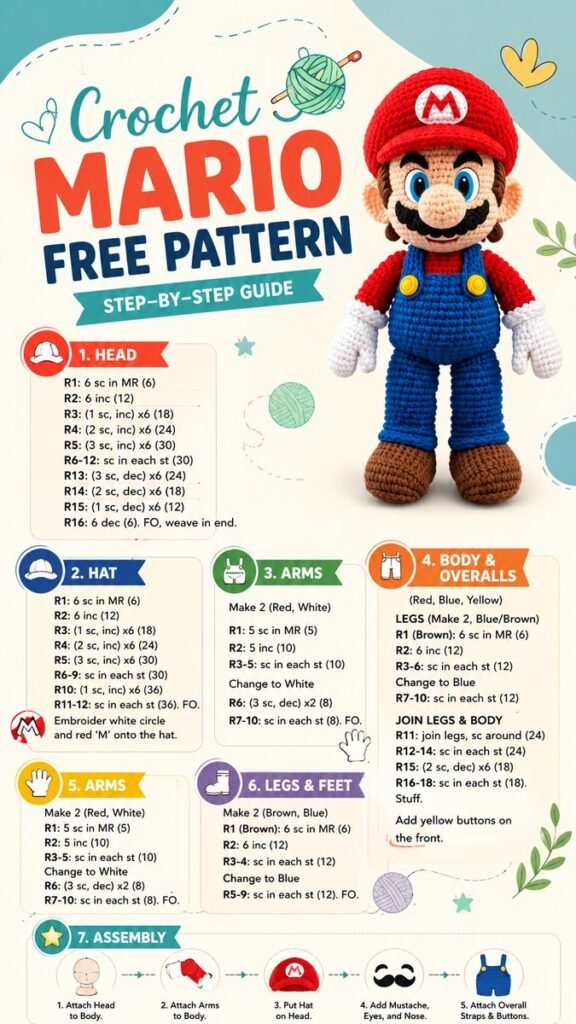
Bring a little playful nostalgia to your crochet projects with a colorful character-inspired amigurumi design that is sure to stand out. This crochet Mario-style doll combines bright red, blue, yellow, white, and brown yarn into a fun handmade figure with a recognizable cap, mustache, overalls, gloves, and boots. The project is especially appealing to crocheters who enjoy character crochet, amigurumi, handmade gifts, and creative projects inspired by classic video game aesthetics.
Key Takeaways
- A colorful character amigurumi is an enjoyable project for crochet enthusiasts.
- The design is built from several recognizable sections, including the head, hat, arms, body, overalls, and legs.
- Red, blue, yellow, white, brown, and peach yarn create the classic character-inspired palette.
- Simple shaping techniques such as single crochet, increases, decreases, stuffing, and sewing bring the figure together.
- Small embroidered and attached details can transform a basic crocheted figure into a memorable character.
Crochet Mario-Inspired Amigurumi Pattern
The finished figure has the charming proportions associated with amigurumi, with a rounded head, compact body, oversized hands, long legs, and chunky shoes. The bright red hat immediately draws attention, while the blue overalls create a strong contrast against the red shirt and brown footwear.
Rather than treating the project as one complicated piece, the design is divided into manageable components. The head and hat are crocheted separately, while the arms, legs, body, and clothing details are assembled afterward. This modular approach makes character crochet much easier to understand, especially if you prefer working through one small section at a time.
Important: The success of an amigurumi project often depends more on consistent tension and careful shaping than on speed. Keep your stitches firm and check the shape regularly as you work.
Materials and Yarn Colors
The image shows a straightforward palette that gives the character its instantly recognizable appearance. You can choose yarn in similar shades while adjusting the exact tones to suit your personal style or available supplies.
- Peach or skin-tone yarn: for the head and visible facial areas.
- Red yarn: for the hat and shirt.
- Blue yarn: for the overalls and legs.
- Yellow yarn: for the overall buttons.
- White yarn: for gloves and selected hat details.
- Brown yarn: for the shoes and hair.
- Black yarn: for the mustache and facial details.
You will also need a crochet hook suitable for your yarn, stuffing, a yarn needle, scissors, and materials for adding facial features. Safety eyes can be used when appropriate, or the eyes can be embroidered for a completely stitched finish.
Choosing Yarn for Amigurumi
A smooth yarn makes small character details easier to see and gives the finished doll a neat appearance. Cotton or cotton-blend yarn is commonly useful for amigurumi because it tends to hold its shape well. Whichever yarn you select, try to keep the yarn weight consistent throughout the project unless a specific section calls for something different.
Understanding the Head and Facial Shape
The head is one of the most important parts of this character crochet project because it establishes the overall personality of the finished figure. The pictured construction begins with a magic ring and expands through repeated increases before continuing in even rounds.
The shaping then reverses through decreases to create the rounded lower portion of the head. Before the final opening is closed, the head is stuffed firmly enough to maintain its shape without becoming overly hard.
Magic Ring, Increases, and Decreases
The pattern uses familiar amigurumi techniques. A magic ring creates the starting center, increases expand the crochet circle, and decreases gradually reduce the number of stitches. Together, these techniques create a three-dimensional shape rather than a flat crochet circle.
When working the head, count your stitches after every increase and decrease round. Consistent stitch counts are particularly important in character amigurumi because even a small shaping error can noticeably change the proportions of the face.
Creating the Signature Crochet Hat
The red hat is one of the most visually important elements in the design. Its rounded crown is created with the same basic increase-and-decrease principles used for the head, followed by several rounds worked evenly to establish the hat’s height.
The brim gives the hat its distinctive silhouette. A small white circle with a red letter detail is shown on the front, creating a focal point that makes the finished piece immediately recognizable as a Mario-inspired crochet character.
Adding the Hat Emblem
For the emblem, you can crochet a small white circle and add the red letter detail with embroidery. This approach gives you more control over the size and placement than trying to crochet every tiny detail directly into the hat.
If embroidery is not your favorite technique, you can simplify the emblem or use a small appliqué. The important thing is to keep the detail securely attached and centered on the front of the hat.
Expert Insight
Character amigurumi looks most polished when the small details are positioned carefully. Before permanently sewing the pieces together, pin or lightly place them first and check the proportions from the front, side, and back.
Crocheting the Body and Overalls
The body combines several strong color blocks to recreate the character’s clothing. The legs begin in brown for the shoes and transition into blue for the pants. Once the legs are complete, they are joined to form the lower body before continuing upward.
The overalls are particularly effective because the blue yarn contrasts beautifully with the red shirt. Yellow buttons provide small but important accents on the front, giving the clothing a finished appearance.
Working the Legs and Shoes
The two legs are made separately before being joined. Each begins with a small magic ring and several increase rounds. The shape then continues evenly before changing color from brown to blue.
Keep the tension similar on both legs. Matching stitch counts and consistent stuffing will help prevent one leg from appearing wider, longer, or more rounded than the other.
Adding the Overall Details
The overalls can be created as part of the body or added as separate clothing elements. The image suggests a separate bib and straps, making this an appealing option if you want the outfit to have extra dimension.
Small yellow buttons complete the front of the overalls. Sew them on securely and position them evenly so the finished character has a balanced appearance.
Making the Arms and Crochet Gloves
The arms use red and white yarn to represent the shirt sleeves and gloves. The construction is compact, which helps create the slightly oversized hands commonly seen in cute amigurumi designs.
Two matching arms should be made with similar tension and stuffing. When attaching them to the body, check their height and angle before sewing them permanently into place.
Pro Tip: Lightly mark the intended attachment points with stitch markers or removable pins before sewing. This makes it much easier to create symmetrical arms and legs.
Assembling the Character
Assembly is where all the individual crochet pieces become one finished character. Take your time during this stage because positioning can have a major effect on the final expression and posture.
- Sew the head securely to the top of the body.
- Attach both arms at matching heights.
- Place and secure the red hat on the head.
- Add the eyes, nose, mustache, and other facial details.
- Attach the overall bib, straps, and yellow buttons.
- Check the entire figure for loose ends and reinforce any attachments that need extra security.
Getting the Face Right
The face deserves special attention because it gives the amigurumi its personality. The large eyes, rounded nose, dark eyebrows, and curved mustache work together to create the familiar character-inspired expression.
Place the eyes only after you are happy with the head’s shape. If you are embroidering the facial features, sketching or marking the approximate positions first can help maintain symmetry.
Tips for a Neater Amigurumi Finish
Small crochet figures can be surprisingly detailed, so a few simple habits can make the process much more enjoyable.
- Use a smaller hook if your stitches are too loose and stuffing is visible.
- Count stitches frequently rather than waiting until the end of a section.
- Stuff gradually as you crochet instead of filling the piece all at once.
- Use stitch markers to identify the beginning of each round.
- Leave sufficient yarn tails for sewing pieces securely.
- Lay completed pieces beside one another to compare their size before assembly.
Ideas for Personalizing Your Crochet Character
One of the best things about amigurumi is how easily you can adapt the design. You can experiment with different yarn shades, facial expressions, clothing details, or proportions while keeping the basic construction intact.
For a softer nursery-inspired look, choose gentle shades instead of bright primary colors. For a bold display piece, use highly saturated yarn and emphasize the contrasting clothing sections.
You can also create a collection of character-inspired crochet dolls using the same basic construction principles. Change the colors, accessories, facial details, and clothing to develop completely different personalities.
Why Character Crochet Makes a Great Handmade Project
Character-inspired crochet combines the satisfaction of making something by hand with the fun of recognizable visual design. Unlike a simple flat project, an amigurumi figure gives you the opportunity to practice shaping, color changes, embroidery, stuffing, sewing, and three-dimensional construction in one project.
It can also make a thoughtful handmade gift for someone who enjoys gaming, nostalgic characters, crochet collectibles, or playful décor. Because the finished figure is compact, it can be displayed on a shelf, craft space, desk, or collection area.
At a Glance
- Colorful character-inspired crochet amigurumi
- Includes head, hat, arms, body, overalls, legs, and shoes
- Uses basic amigurumi shaping techniques
- Best results come from firm, consistent stitches
- Customize colors and details to create your own version
Conclusion
This colorful crochet Mario-inspired amigurumi is a fun way to practice essential crochet skills while creating a character with plenty of personality. From the rounded head and signature red cap to the blue overalls, white gloves, and chunky brown shoes, every section contributes to the recognizable finished look.
The project also demonstrates how a handful of simple crochet techniques can be combined to create an impressive three-dimensional figure. If you enjoy amigurumi, character crochet, or handmade gifts, this type of project is an excellent addition to your creative list.
Ready to crochet? Gather your colorful yarn, take your time with the shaping and assembly, and enjoy turning a collection of small crochet pieces into a playful finished character. Save this idea so you can return to it whenever you’re ready for your next amigurumi project.