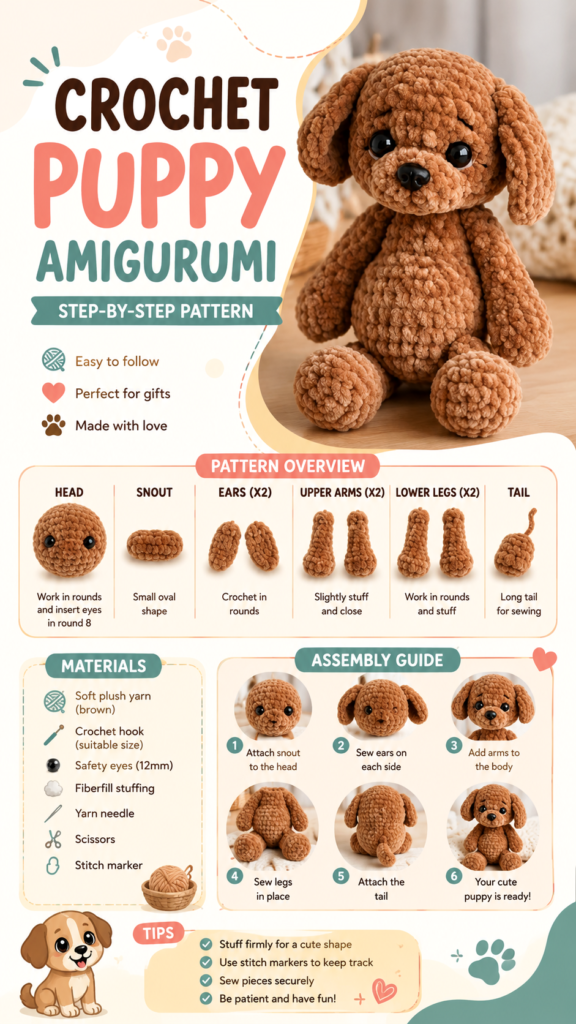
If you love handmade toys with plenty of personality, a crochet puppy amigurumi is a wonderful project to add to your crafting list. This adorable little dog combines simple crocheted shapes, soft yarn, and careful assembly to create a cuddly finished companion. The design shown here uses a warm brown yarn, rounded proportions, floppy ears, a sweet muzzle, and oversized safety eyes for an especially charming expression.
Whether you are learning how to make crochet animals for the first time or looking for another cute amigurumi project, this puppy offers plenty of inspiration. The pattern is built from recognizable components such as the head, body, snout, ears, arms, legs, and tail. Once each piece is crocheted and lightly stuffed, the parts can be sewn together to bring the puppy to life.
Key Takeaways
- A crochet puppy is a fun introduction to animal-shaped amigurumi.
- The project is assembled from several manageable crocheted pieces.
- Consistent tension helps create smooth, rounded shapes.
- Safety eyes and careful stuffing give the puppy its finished character.
- Neat sewing makes the completed animal look polished and secure.
Why Crochet Animals Are So Fun to Make
There is something particularly satisfying about turning a ball of yarn into a recognizable animal. Crochet amigurumi projects allow you to build a character one small piece at a time. Instead of working on one large flat project, you create individual three-dimensional shapes and then combine them.
A puppy is especially appealing because its features are easy to recognize. A rounded head, small snout, floppy ears, chunky paws, and a curled or raised tail can instantly suggest a friendly dog. Small changes in proportions can even give the same basic construction a completely different personality.
Important: When making amigurumi, even tension and careful stuffing are two of the biggest factors in achieving neat, attractive shapes. Work slowly rather than pulling every stitch extremely tight.
Understanding the Crochet Puppy Pattern
The pictured puppy design follows a classic amigurumi construction. The body and head are made primarily by crocheting in continuous rounds, while smaller pieces are worked separately and attached during the finishing stage.
The pattern visually breaks the puppy into several sections, making the project easier to understand. These include the snout, head, body, upper arms, lower legs, tail, and ears. Each component has its own shape and purpose, so keeping the pieces organized as you work can save time later.
The Head
The head is one of the most important parts because it determines much of the puppy’s expression. The pictured instructions begin with a magic ring and build outward through single crochet increases and regular rounds. The result is a rounded shape suitable for adding safety eyes and the muzzle.
The visual pattern indicates that the eyes are inserted during the later rounds of the head. This is an important stage because the placement of the eyes affects the entire personality of the finished puppy. Before permanently securing them, compare their spacing and make sure they sit at the intended height.
The Snout
The small oval snout adds dimension to the face. Rather than embroidering everything directly onto the head, this design uses a separate crocheted muzzle that can be sewn into position. A darker nose and subtle facial details help create the characteristic puppy expression shown in the finished design.
The Body
The body is worked in rounds to create a rounded, slightly elongated shape. It should be stuffed enough to hold its form while remaining soft. Overstuffing can make stitches spread apart, while too little stuffing can leave the body looking flat or uneven.
The Ears
The floppy ears are one of the defining features of this crochet puppy. The pictured instructions describe creating a chain, folding it, and sewing through the layers to form the ear shape. Pins can be useful for marking the desired placement before sewing the ears permanently to the head.
The Arms and Legs
The limbs give the puppy its playful, seated appearance. The upper arms are narrow compared with the body, while the lower legs and paws are fuller and rounded. Light stuffing helps these pieces maintain their shape without making them excessively firm.
The Tail
The tail is a smaller piece that completes the silhouette. It is crocheted in rounds and lightly stuffed before being folded and sewn closed. Because the tail is relatively small, it can be easy to overstuff. A modest amount of filling is usually enough to give it definition.
Materials for a Crochet Puppy
The project shown uses the familiar supplies associated with amigurumi. Having everything nearby before you begin can make the process much more enjoyable, particularly when you reach the assembly stage.
- Soft brown or caramel-colored yarn
- A suitable crochet hook
- Safety eyes
- Fiberfill stuffing
- A yarn or tapestry needle
- Scissors
- A stitch marker
- Pins for positioning pieces
The exact hook and yarn combination can affect the final size and texture of your puppy. For amigurumi, the fabric is generally worked firmly enough that stuffing does not show through the stitches. If your stitches are very loose, changing to a smaller hook can help create a denser fabric.
How to Make Crochet Animals Step by Step
If your goal is to learn how to make crochet animals, this puppy demonstrates a useful approach that can be applied to many other amigurumi designs. Once you understand how individual pieces are shaped and joined, you can experiment with bears, rabbits, cats, foxes, and other small creatures.
- Prepare your materials. Choose your yarn, hook, stuffing, eyes, needle, scissors, and stitch marker before starting.
- Begin with the small components. Making the snout, ears, limbs, and tail first can help you become comfortable with the stitch pattern.
- Work the head and body. Follow the increases and regular rounds carefully to maintain the intended shape.
- Insert the eyes at the correct stage. Check their alignment before securing them.
- Stuff each piece gradually. Add small amounts rather than one large handful at once.
- Arrange the pieces. Use pins to test the ear, arm, leg, and tail positions.
- Sew everything securely. Take your time with attachment points so the finished puppy is sturdy and neat.
- Finish the face. Attach the snout and add the nose and any remaining details.
Expert Insight
Assembly is where a simple collection of crocheted pieces becomes a character. Pin each part first, view the puppy from several angles, and adjust the placement before sewing. A few minutes of positioning can make a major difference to the finished expression.
Tips for Better Amigurumi Results
Keep Your Tension Consistent
Consistent tension helps your stitches look even and makes the finished pieces more predictable. If your tension changes significantly from one round to another, the shape can become uneven. Try to maintain a relaxed but controlled grip on the yarn.
Use a Stitch Marker
When crocheting in continuous rounds, it can be difficult to identify the beginning of each round. A stitch marker provides a simple visual reference and helps prevent accidental shifts in your stitch count.
Stuff in Small Amounts
Amigurumi stuffing is easiest to control when added gradually. Push small pieces toward the edges and rotate the project as you work. This helps prevent noticeable lumps and gives rounded pieces a smoother appearance.
Pro Tip: Do not rush the stuffing stage. The goal is not simply to fill the piece, but to create a smooth shape that supports the crocheted fabric without stretching the stitches too far.
Pin Before You Sew
Pins are particularly helpful for animal projects because symmetry matters. Place the ears, arms, and legs temporarily, then step back and inspect the overall shape. If one side looks higher or farther forward than the other, make the adjustment before using your yarn needle.
Personalizing Your Crochet Puppy
One of the best things about crochet animals is how easy they are to personalize. The pictured puppy uses a warm brown palette, but you can experiment with other shades to create an entirely different look. Cream, beige, gray, black, white, or combinations of several colors can all produce charming results.
You can also experiment with the size and placement of the eyes. A slightly different eye position can make the puppy appear more playful, curious, sleepy, or surprised. Ear placement can have a similar effect.
For a personalized handmade gift, consider matching the puppy’s colors to the recipient’s favorite shades. You can also create a small collection of puppies with different yarn colors and facial expressions. These simple variations make the same basic crochet animal pattern feel fresh each time you make it.
Common Challenges for Beginners
New crocheters may find increases and decreases confusing at first, especially when working in tight amigurumi rounds. Counting your stitches at the end of each round can help catch mistakes before they affect the next section.
Another common challenge is sewing. It can be tempting to attach every piece immediately, but taking time to arrange the parts first usually creates a better result. Keep loose yarn tails available for sewing where the pattern requires them.
If a piece does not look exactly like the example while you are working, do not panic. Small differences in tension, yarn thickness, and stuffing can change the appearance. Focus on maintaining consistent stitches and following the construction steps carefully.
Why This Project Makes a Lovely Handmade Gift
A finished crochet puppy has the advantage of feeling personal and handmade. Unlike a mass-produced toy, it carries the time and attention that went into every stitch. The compact size also makes this type of amigurumi appealing for gift giving, craft fairs, nursery decor, or a handmade collection.
If you are building your crochet skills, animal projects can also become a fun way to practice. After completing one puppy, you may feel more confident working with magic rings, increases, decreases, stuffing, shaping, and sewn assembly.
At a Glance
- Choose soft yarn and a suitable hook for a dense amigurumi fabric.
- Build the puppy from separate crocheted shapes.
- Check eye and ear placement before making attachments permanent.
- Stuff gradually to create smooth, rounded forms.
- Take your time during final assembly for a polished finish.
Conclusion
This crochet puppy amigurumi is a charming example of how a handful of simple crocheted components can become a lovable handmade animal. From the rounded head and expressive eyes to the floppy ears, chunky paws, and little tail, every element contributes to its playful personality.
If you are exploring how to make crochet animals, projects like this are a great way to practice the core techniques behind amigurumi. Work patiently, count your stitches, keep your tension consistent, and take your time with stuffing and assembly. Once you become comfortable with the basic construction, you can start changing colors, proportions, facial features, and shapes to create your own collection of handmade animals.
Grab your favorite yarn, gather your crochet tools, and enjoy the process one stitch at a time. A cute crochet puppy is not only a rewarding project to finish, but also a fun foundation for countless future amigurumi creations.