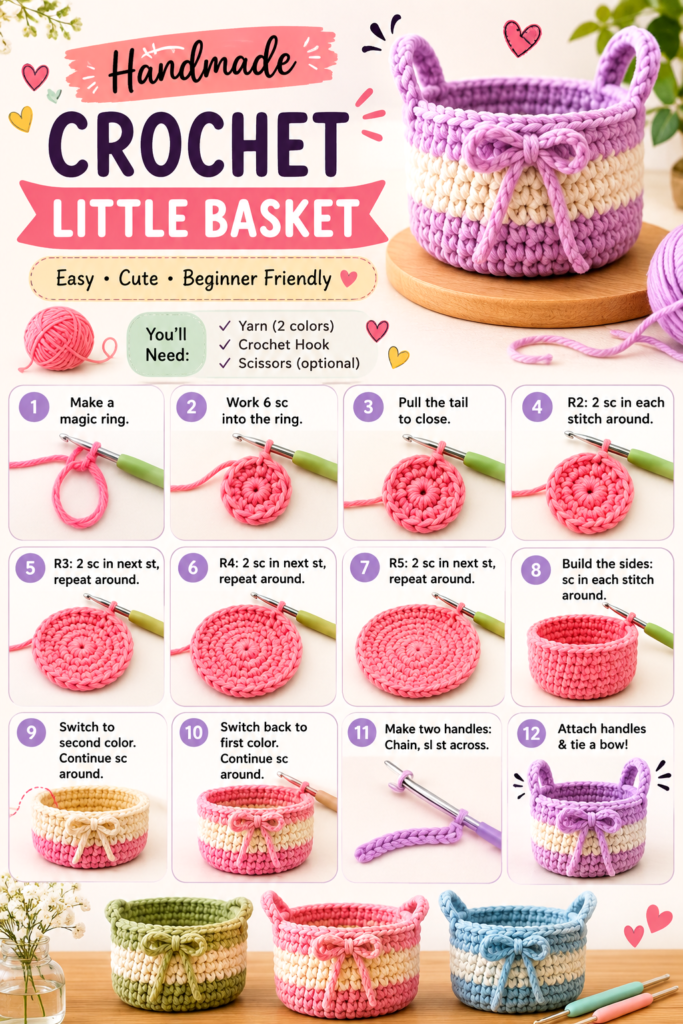
Crochet is one of the most rewarding crafts to learn because it combines creativity with practicality. A small handmade basket is the perfect beginner project since it introduces essential stitches while producing something beautiful and useful. Whether you want to organize your desk, decorate a nursery, hold makeup accessories, or create a thoughtful handmade gift, a crochet basket offers endless possibilities. With soft cotton yarn, simple stitches, and a little patience, you can complete a charming project that looks impressive while strengthening your crochet skills.
This beginner-friendly crochet basket project focuses on building confidence through repetitive stitches and gradual shaping. Instead of jumping into complicated garments or intricate lace patterns, you learn how to create a sturdy circular base, build even sides, change yarn colors, and finish with decorative details like handles and a bow. By the end, you’ll have both a practical storage basket and valuable crochet experience that prepares you for more advanced projects.
Key Takeaways
- Perfect first crochet basket project for beginners.
- Learn foundational crochet stitches while making something useful.
- Practice increasing rounds to create a flat circular base.
- Discover simple color changes for a polished appearance.
- Add handles and decorative details for a professional finish.
Why Crochet Baskets Are Ideal Beginner Projects
Many new crocheters struggle to find projects that are simple enough to complete while still feeling exciting. Small storage baskets solve this challenge beautifully. The repetitive stitching makes it easier to build muscle memory, and the growing shape keeps the project interesting from beginning to end.
Important: Completing an entire project early in your crochet journey builds confidence faster than repeatedly practicing small stitch samples. Finishing something functional keeps motivation high and encourages you to continue learning.
Unlike scarves that may require hundreds of rows before looking complete, a compact basket grows quickly. Every round adds visible progress, making it satisfying to watch the shape develop. This immediate feedback helps beginners stay motivated while learning consistent stitch tension.
Materials You’ll Need
A crochet basket does not require an extensive collection of supplies. Most beginners can start with only a few basic tools.
- Medium or bulky cotton yarn for structure.
- A crochet hook that matches the yarn weight.
- Scissors.
- Yarn needle for weaving in ends.
- Stitch markers if desired.
Cotton yarn is especially popular because it creates firm sides that help the basket maintain its shape. Acrylic yarn works too, but the finished basket may feel softer and less structured.
Understanding the Basic Construction
Every round basket follows a similar building process. Once you understand the structure, you can adapt the design into countless sizes and styles.
Starting With a Magic Ring
The foundation begins with a magic ring, which allows the center hole to close tightly. This technique creates a neat base without leaving an opening in the middle.
Creating a Flat Base
Successive increase rounds expand the circle evenly. Adding stitches at regular intervals prevents curling while maintaining a flat shape. This stage determines the final basket diameter.
Building the Sides
After reaching the desired base size, continuing with even rounds naturally causes the work to turn upward. This simple transition creates sturdy basket walls without complicated shaping.
Expert Insight
Consistent stitch tension matters more than speed. Even if your first basket takes longer than expected, maintaining uniform stitches creates cleaner sides and a more professional finish.
Adding Beautiful Color Changes
Color changes instantly elevate a simple crochet basket. Alternating soft shades creates visual interest while keeping the pattern easy enough for beginners.
Changing colors is often done by completing the final yarn-over of the last stitch using the new yarn color. This creates a smooth transition between rounds and keeps the color line looking clean.
Pro Tip: Weave yarn tails into nearby stitches immediately after changing colors. This prevents loose ends from becoming tangled and makes finishing much easier.
Creating Strong Crochet Handles
Handles make the basket more functional while adding a decorative touch. They are typically formed by chaining several stitches before reconnecting to the basket wall with slip stitches or single crochet.
When positioning handles, ensure they sit directly opposite one another for a balanced appearance. Reinforcing the handle area with extra stitches increases durability if the basket will hold heavier items.
Decorative Finishing Touches
A simple bow transforms an everyday storage basket into a charming handmade decoration. Other embellishments include wooden buttons, crocheted flowers, leather labels, tassels, or contrasting edging.
These small details personalize the basket while allowing you to coordinate it with your home décor, nursery theme, or gift recipient’s favorite colors.
Creative Ways to Use Crochet Baskets
- Organize craft supplies.
- Store makeup brushes.
- Keep baby essentials together.
- Hold keys and wallets near the entryway.
- Display artificial plants.
- Organize office accessories.
- Store hair accessories.
- Create personalized gift baskets.
The versatility of crochet baskets makes them one of the most practical handmade projects. Their compact size also makes them excellent for using leftover yarn from previous projects.
Common Beginner Mistakes to Avoid
Uneven Tension
Keeping stitches consistent produces smoother sides and cleaner shaping.
Incorrect Stitch Count
Counting stitches after each round prevents accidental increases or decreases that may distort the basket.
Using the Wrong Yarn
Very soft yarn may not hold the basket shape effectively. Cotton yarn generally provides better structure.
Important: Taking a few extra moments to count stitches after every round can save significant time later by preventing the need to unravel several completed rows.
Tips for Cleaner Results
- Use stitch markers to identify the beginning of each round.
- Maintain consistent yarn tension.
- Choose high-quality cotton yarn.
- Keep your hook size consistent throughout the project.
- Weave in yarn ends securely.
- Block lightly if needed to improve the basket shape.
How This Project Builds Crochet Skills
Although this basket looks elegant, it teaches many core crochet techniques. Beginners gain experience creating magic rings, working in continuous rounds, increasing evenly, changing colors, building vertical sides, and adding finishing details.
These techniques transfer directly into future crochet projects such as hats, bags, amigurumi, coasters, home décor, and more advanced baskets.
At a Glance
- Beginner-friendly project with simple stitches.
- Practical storage solution for every room.
- Excellent way to practice color changes.
- Quick project with impressive results.
- Easy to personalize with decorative accents.
Conclusion
A handmade crochet basket is more than a simple storage solution. It is an enjoyable project that introduces essential crochet techniques while producing something beautiful enough to display throughout your home. From forming the first magic ring to attaching the final decorative bow, each step develops valuable skills that can be applied to future crochet creations.
Whether you are completely new to crochet or looking for a relaxing weekend project, this charming basket offers the perfect combination of creativity, practicality, and satisfaction. Experiment with different yarn colors, customize the size, and add your own decorative touches to create unique handmade baskets that you’ll enjoy using for years.
Tags
Crochet Basket Beginner Crochet DIY Crochet Easy Crochet Pattern Cotton Yarn Handmade Storage Crochet Tutorial DIY Home Decor