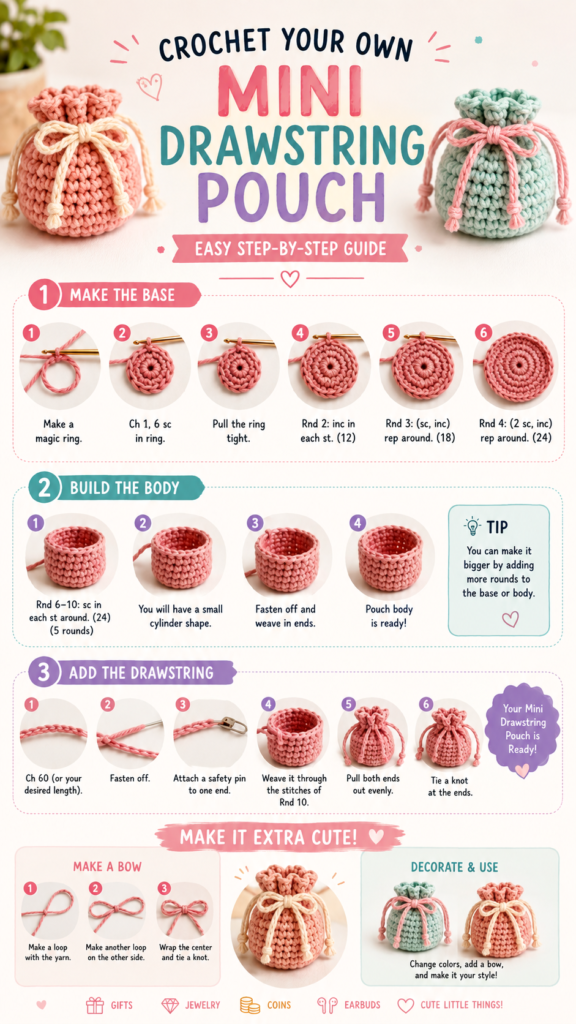
A small handmade pouch can turn an ordinary gift into something much more thoughtful. This crochet gift pouch combines simple stitches, a drawstring closure, and a sweet decorative bow to create a practical little bag for jewelry, coins, earbuds, treats, or other small treasures. The design shown is compact, charming, and approachable, making it a wonderful project for crocheters who want something useful without committing to a large or complicated pattern.
What makes a mini crochet pouch especially appealing is its versatility. You can keep the basic shape simple, experiment with different yarn colors, or add a handmade bow for a more finished look. Once you understand the basic construction, it is easy to adapt the project to different occasions, gift ideas, and personal styles.
Key Takeaways
- A mini crochet drawstring pouch is a simple and practical handmade project.
- The construction can be broken into three main stages: base, body, and drawstring.
- Changing yarn colors or adding a bow creates an entirely different finished look.
- The pouch is useful for small gifts, jewelry, coins, earbuds, and tiny accessories.
- Cotton yarn or another sturdy yarn can help the pouch keep a neat shape.
- The size can be customized by adding rounds to the base or body.
Why Make a Crochet Gift Pouch?
A crochet gift pouch is one of those projects that feels both decorative and useful. Instead of wrapping a small present in disposable paper, you can place it inside a handmade pouch that becomes part of the gift itself. The recipient can then reuse the pouch for another purpose, giving your handmade effort a longer life.
The compact size also makes this type of project appealing for quick crafting sessions. You do not need a large amount of yarn, and the basic cylindrical shape is straightforward to understand. The drawstring adds functionality while also giving the pouch its distinctive gathered appearance.
Another advantage is customization. The example uses soft, playful colors and contrasting ties, but the same concept can be interpreted in countless ways. Choose one neutral shade for a minimalist pouch, combine two colors for a cheerful look, or use a contrasting cord to make the closure stand out.
Important: The most appealing handmade pouches balance practicality with personality. Keep the construction simple, then use color, texture, or a small decorative detail to make the finished piece feel special.
Understanding the Mini Pouch Construction
The illustrated project follows a logical construction method that is easy to visualize. First comes the circular base. The base establishes the width of the pouch and grows through evenly spaced increases. Once the desired diameter is reached, the work continues upward to form the pouch body.
The body is worked in rounds without continuing to widen the circle. This creates the small cylindrical container seen in the finished examples. After the body reaches the desired height, the yarn is fastened off and the ends are woven in.
The final structural step is the drawstring. A separate chain is created and threaded through the stitches near the top of the pouch. Pulling the two ends gathers the opening, transforming the simple cylinder into a functional drawstring bag.
Step 1: Build the Circular Base
The base begins with a magic ring, a common crochet technique for creating a tight center in circular projects. Single crochet stitches are worked into the ring, and the center is pulled closed. From there, additional rounds use increases to gradually expand the circle.
The visual guide demonstrates a progression of increasing rounds. The first round establishes the center, while later rounds distribute increases around the circle. This creates the flat foundation needed for the pouch.
If you are new to crochet, take your time with the first few rounds. Keeping track of stitch counts is more important here than working quickly. A consistent circular base will make the rest of the pouch much easier to shape.
Keep the Base Flat
Watch the shape as you work. A healthy crochet circle should remain relatively flat while the increases are being made. If it begins to curl significantly, the stitch count or tension may need attention. If it becomes wavy, there may be too many increases for the current tension.
Step 2: Work Up the Body
Once the circular base has reached the desired size, the pouch begins to grow vertically. The illustrated pattern shows several rounds of single crochet worked evenly around the circle. Because there are no increases during these body rounds, the sides rise rather than spreading outward.
This stage is ideal for practicing consistent tension. Try to keep your stitches similar in height and tightness throughout the rounds. Even tension gives the pouch a tidy texture and helps the sides stand upright.
The sample has a short, rounded cylinder shape, but that does not mean every pouch needs to be the same size. You can make the body shorter for a tiny coin pouch or add more rounds for a deeper container.
Expert Insight
- Adding rounds to the base increases the pouch’s width.
- Adding rounds to the body increases its height.
- Keeping the stitch pattern simple makes color and decorative details more noticeable.
How to Add the Drawstring
The drawstring is what gives this project its signature gathered finish. The illustrated guide uses a crochet chain that is long enough to travel around the upper portion of the pouch and leave two ends available for tying.
After creating the chain, fasten it off and attach a safety pin to one end. The pin makes it easier to guide the cord through the stitches around the pouch. Carefully weave the drawstring through the appropriate round, moving in and out of the stitches until you return to the starting point.
Once the cord has been threaded all the way around, gently pull both ends. The top of the pouch should gather evenly. Finish by tying knots at the ends of the cord so the drawstring stays secure.
Tips for a Smooth Drawstring
- Make the chain long enough to comfortably gather the opening.
- Use a safety pin or yarn needle to guide the cord through the stitches.
- Avoid pulling the drawstring too tightly while threading it.
- Test the opening before tying the final knots.
- Leave enough cord at both ends for an easy-to-hold closure.
Pro Tip: If you want the drawstring to become a stronger visual feature, use a contrasting color. A cream cord against pink crochet, for example, creates a soft handmade look, while a darker cord can produce a more defined modern finish.
Add a Handmade Crochet Bow
The bow shown with the pouch is a simple decorative detail that can completely change the character of the finished project. It is especially useful when the pouch is being prepared as a gift because it adds a ready-to-give appearance without requiring complicated embellishment.
A basic yarn bow can be made by forming loops on both sides, crossing or arranging them neatly, and wrapping yarn around the center. Tie the center securely, then leave the ends long enough to attach the bow to the front of the pouch.
Ways to Customize the Bow
- Match the bow to the pouch for a coordinated monochrome look.
- Choose a contrasting color for a playful accent.
- Use a lighter thread for a delicate appearance.
- Make a larger bow when decorating a deeper pouch.
- Keep the bow small and subtle for a minimalist design.
Choosing Yarn and Colors
Yarn selection has a major effect on the appearance and feel of a crochet gift pouch. A smooth yarn makes the stitches easy to see and gives the pouch a clean, structured appearance. Cotton yarn is a practical choice for small accessories because it generally produces clear stitch definition and a firm fabric.
Color is where you can make the project truly personal. The reference design demonstrates soft pink and cream combinations, along with a second pastel variation. You can take inspiration from that gentle palette while creating your own color story.
Color Ideas for Handmade Gift Pouches
- Soft pastels: Try blush, cream, mint, lavender, or pale yellow for a sweet handmade look.
- Natural neutrals: Beige, ivory, tan, and soft brown create an understated accessory.
- Bright contrasts: Combine a vivid pouch with a neutral drawstring for a fun accent.
- Two-tone designs: Use one shade for the body and another for the bow and cord.
- Seasonal colors: Adapt the palette to birthdays, holidays, weddings, or other celebrations.
Creative Ways to Use a Crochet Gift Pouch
A handmade pouch can hold far more than a traditional gift. Its small size makes it perfect for organizing little items that are otherwise easy to lose. It can also become part of the presentation when giving someone a small surprise.
Use one as a jewelry pouch for rings, earrings, bracelets, or other small pieces. It can also hold coins, earbuds, tiny craft supplies, hair accessories, or small keepsakes. For gifting, fill it with a favorite little item and let the pouch serve as reusable packaging.
Because the design is compact, several pouches can also be made in different colors for different people. Personalizing each one with a favorite color or contrasting bow makes a simple crochet project feel much more intentional.
Gift Ideas for Different Occasions
- Birthday gifts: Add a tiny accessory or keepsake inside.
- Party favors: Make several small pouches in coordinated colors.
- Craft gifts: Fill the pouch with buttons, stitch markers, or other small supplies.
- Jewelry gifts: Use the pouch as reusable packaging for a small piece of jewelry.
- Everyday organization: Keep coins, earbuds, or other tiny essentials together.
How to Make the Project Your Own
The beauty of a simple crochet pouch is that the basic construction gives you plenty of room to experiment. Once you are comfortable with the circular base, straight body, and drawstring closure, small changes can produce a completely different result.
Try changing the proportions first. A wider base creates a roomier pouch, while additional body rounds create more depth. You can also experiment with the drawstring length and placement to change how dramatically the top gathers.
Texture is another easy way to personalize the project. Even if you keep the same overall pouch shape, a different yarn weight or stitch pattern can create a noticeably different surface. For a beginner-friendly version, however, keeping the stitch pattern simple can make the project faster and easier to manage.
Important: Think of the pictured design as a starting point rather than a limit. The most useful customization comes from adjusting width, height, color, cord style, and decoration to match the purpose of the pouch.
Beginner Tips for a Neater Finish
If you are new to crochet, small accessories like this are excellent practice projects. They provide an opportunity to work on circular crochet, stitch counting, tension, finishing, and simple construction without requiring a large time commitment.
Start by counting your stitches at the end of each increase round. This simple habit can prevent the base from becoming uneven. As you move into the body, check that the sides are growing evenly and that your stitches remain consistent.
Finishing also matters. Weave in yarn tails securely rather than leaving loose ends inside the pouch. When attaching the bow, position it carefully at the front center so the final piece looks balanced.
Keep Your First Version Simple
There is no need to add every decorative feature at once. A single-color pouch with a simple drawstring can be beautiful on its own. Once you are comfortable with the construction, experiment with bows, color changes, contrasting cords, and different proportions.
At a Glance
- Start with a circular crochet base.
- Build the sides with even rounds.
- Add a chain drawstring near the top.
- Decorate with a handmade bow if desired.
- Use different colors and dimensions to personalize the pouch.
Conclusion: A Small Project With Plenty of Possibilities
This crochet gift pouch is a lovely example of how a simple handmade project can be both useful and beautiful. Its compact construction makes it approachable for beginners, while the basic design leaves plenty of space for experienced crocheters to experiment with color, size, texture, and decoration.
Whether you make it to hold a small present, organize everyday essentials, or simply practice your crochet skills, the drawstring pouch is a project worth keeping in your handmade collection. Start with the simple circular base, build the body to your preferred height, add the drawstring, and finish it with a bow or another personal detail.
Most importantly, have fun making it your own. A few small changes can turn the same basic crochet gift pouch into something completely different. Choose your favorite yarn, create a color combination that feels right, and enjoy the satisfaction of making a useful little accessory by hand.
Tags
Crochet Gift Pouch Crochet Pouch Mini Crochet Crochet Gifts Drawstring Pouch Easy Crochet Crochet for Beginners Handmade Gifts