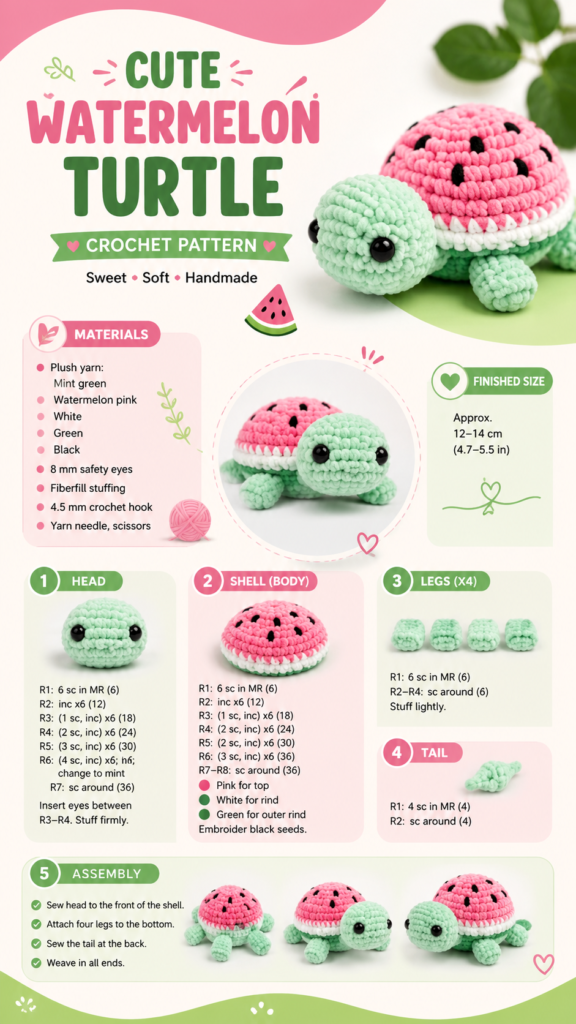
If you love adorable handmade projects, this watermelon turtle crochet pattern is the kind of idea that can make your next crafting session extra fun. The design combines a soft mint-green turtle with a bright pink watermelon shell, creating a playful amigurumi project that feels cheerful, cozy, and wonderfully giftable. With separate sections for the head, shell, legs, and tail, the pattern is also organized in a way that makes the project easier to approach one piece at a time.
This crochet turtle is especially appealing for makers who enjoy plush chenille yarn, colorful amigurumi, and small handmade toys. The finished design has a rounded body, tiny feet, a sweet face, and a watermelon-inspired shell decorated with black seed details. Whether you are building a collection of crochet animals or looking for a charming weekend project, this pattern offers plenty of inspiration.
Key Takeaways
- A playful watermelon turtle combines pastel green, pink, and white crochet details.
- The project is divided into manageable components including the head, shell, legs, and tail.
- Plush chenille yarn helps create the soft, rounded look associated with modern amigurumi.
- Black embroidered seed details give the watermelon shell its recognizable character.
- Simple assembly turns the individual crocheted pieces into one charming finished turtle.
- The design can inspire handmade gifts, nursery decor, craft collections, or seasonal crochet projects.
Why a Watermelon Turtle Makes a Great Crochet Project
Some crochet projects are memorable because of their size or complexity. Others stand out because the concept is simply irresistible. A watermelon turtle belongs firmly in the second category. It takes two familiar, cheerful themes and turns them into one tiny handmade character.
The turtle’s mint-green head and legs create a soft contrast against the pink shell. A white stripe between the shell colors adds another layer of definition, while the small black watermelon seeds instantly communicate the inspiration behind the design. The result is playful without becoming overly complicated visually.
Important: The charm of this amigurumi comes from its clear color story. Keeping the green, watermelon pink, white, and black accents visually distinct helps the shell remain the focal point while allowing the turtle’s face and legs to stand out.
Materials for a Plush Crochet Turtle
The illustrated project uses a plush chenille-style yarn palette centered around mint green, pastel pink, and white, with black used for the watermelon seed details. The reference also shows safety eyes, polyester stuffing, a crochet hook in the medium-size range, a yarn needle, and scissors.
Yarn Colors
Mint green is the primary turtle color, covering the head, legs, and tail. Pink creates the watermelon top, while white provides the narrow rind section. Black yarn or embroidery material can be used to create the little seed marks across the shell.
Plush yarn is particularly effective for this type of crochet animal because its fuzzy texture softens the appearance of individual stitches. It also gives the finished turtle a rounded, cuddly quality that suits the character.
Eyes, Filling, and Tools
The project illustration features glossy black safety eyes that give the turtle a lively expression. Polyester stuffing is used to create the firm but plush shape of the head and shell. A crochet hook, yarn needle, and scissors complete the basic toolkit.
- Plush chenille yarn in mint green, pink, and white
- Black yarn for decorative watermelon seeds
- Safety eyes
- Polyester stuffing
- Medium crochet hook
- Yarn needle and scissors
Understanding the Crochet Construction
The pattern is presented as a collection of small crochet components rather than one large uninterrupted piece. This makes the overall project easier to visualize. The head forms the face, the shell creates the watermelon body, four legs support the turtle, and a small tail completes the back.
The instructions use familiar amigurumi terminology such as single crochet, increases, decreases, and a magic ring. The rounds gradually build the shape by controlling how many stitches are added or reduced. Understanding this basic structure is useful because it helps you see why the pieces become rounded rather than flat.
The Head
The mint-green head is built from a magic ring and several rounds of single crochet with increases. As the rounds progress, the stitch count expands to create a rounded form. Later rounds maintain the circumference before the shape is finished and stuffed.
The eyes are positioned on the front of the head, giving the turtle its expressive personality. Because the face is relatively simple, eye placement can make a noticeable difference in the final appearance. Taking a moment to check their position before permanently securing everything can help create a balanced look.
The Watermelon Shell
The shell is the standout element of this crochet design. It begins with the same basic amigurumi concept of working in rounds, then uses color changes to establish the watermelon effect. Pink forms the main upper section, white represents the inner rind, and mint green completes the outer edge.
Black seed details are added after the main shell shape is complete. Their irregular placement makes the shell feel more like a playful watermelon rather than a rigid geometric pattern. Small decorative details such as these can add a surprising amount of personality to a handmade toy.
Expert Insight
For plush amigurumi, consistent tension matters more than rushing through the rounds. Even stitches help the stuffing remain contained and give the finished pieces a smoother, more polished silhouette.
The Four Legs
Four small mint-green legs give the turtle its recognizable low-to-the-ground stance. Each leg is worked as an individual component, making it possible to keep the shapes consistent before attaching them to the shell.
The legs should look soft and rounded rather than heavily stuffed. Their compact size also means they can be finished relatively quickly compared with the head and shell. Making all four pieces together can be helpful because you can compare their size as you go.
The Tiny Tail
The tail is another small mint-green component. Its simple construction complements the larger shapes without distracting from the watermelon shell. Once finished, it is sewn onto the back of the turtle during assembly.
How to Assemble the Watermelon Turtle
Assembly is where the separate crochet pieces finally become a character. Start by positioning the head at the front of the watermelon shell. Before sewing, check the angle from the front and side so the turtle looks balanced.
- Position and sew the head securely to the front of the shell.
- Arrange the four legs underneath the body, keeping their placement balanced.
- Attach the tiny tail to the back of the shell.
- Check every attachment point and reinforce loose areas.
- Weave in and neatly secure the yarn ends.
The illustrated assembly sequence emphasizes a stable four-legged stance and a forward-facing head. This is an important visual detail because the turtle’s personality depends heavily on its posture. A slightly uneven attachment can change the way the finished plush sits.
Pro Tip: Lay all the finished pieces on a flat surface before sewing them together. This simple step makes it easier to compare the legs, locate the center of the shell, and plan the final proportions before committing to the placement.
Tips for Working With Plush Chenille Yarn
Chenille yarn is wonderfully soft, but its fuzzy texture can make individual stitches harder to see. Good lighting is helpful, especially when counting rounds or identifying the top of a stitch. Keeping your tension steady can also make the process much easier.
- Count stitches regularly instead of relying only on the visual shape.
- Use stitch markers when working in continuous rounds.
- Avoid overstuffing rounded pieces, as excessive filling can stretch the stitches.
- Check color changes carefully so the shell bands remain clean.
- Keep yarn tails long enough to weave in securely during assembly.
Another useful habit is to finish one section before moving to the next whenever possible. The head, shell, legs, and tail each have a distinct purpose. Completing them individually creates a satisfying sense of progress and makes it easier to spot any shape that needs adjustment.
Making the Watermelon Details Stand Out
The watermelon shell works because of contrast. Pink immediately draws attention, white creates a visual break, and green ties the shell back to the turtle’s body. Black seeds then add tiny points of definition across the surface.
When adding the seed embroidery, think about spacing rather than perfect symmetry. A naturally scattered arrangement can feel more playful and organic. The goal is not to make every seed identical, but to create enough visual variation to suggest the texture of a real watermelon.
Creative Ways to Enjoy Your Finished Crochet Turtle
A small crochet turtle can be much more than a pattern practice piece. Its cheerful colors make it a fun addition to a handmade plush collection, craft shelf, or seasonal display. The watermelon theme also makes the design especially suitable for summer-inspired crochet projects.
It can also become a thoughtful handmade gift for someone who enjoys cute animals, fruit-inspired designs, or colorful amigurumi. Because handmade projects carry the personality of the maker, small changes in facial expression, seed placement, or color shades can make each finished turtle feel unique.
For makers who enjoy experimenting, the same basic concept could inspire other fruit-themed creatures. Think of a strawberry shell, citrus-inspired colors, or a soft pastel variation. The watermelon turtle is a great starting point for exploring how simple color changes can transform an amigurumi design.
Why This Pattern Is Worth Saving
Crochet patterns are easiest to return to when they combine a memorable design with clearly separated construction steps. This project does exactly that. Instead of presenting the turtle as one complicated shape, the pattern breaks it into recognizable pieces that can be made and assembled individually.
The finished look is also highly distinctive. The watermelon shell instantly sets it apart from traditional crochet turtle patterns, while the pastel palette gives it a modern plush-toy aesthetic. If your saved crochet collection is filled with animals, amigurumi, and colorful handmade projects, this one brings a particularly playful twist.
At a Glance
- Theme: Cute watermelon-inspired turtle amigurumi
- Look: Soft pastel green, pink, white, and black accents
- Main pieces: Head, shell, four legs, and tail
- Best feature: Colorful watermelon shell with tiny seed details
- Perfect for: Plush crochet lovers, amigurumi makers, handmade gifts, and summer craft inspiration
Conclusion
This watermelon turtle crochet pattern is a delightful example of how a simple amigurumi concept can become something memorable through color, texture, and thoughtful details. The mint-green turtle, bright watermelon shell, white rind stripe, and tiny black seeds work together to create a character that feels cheerful from every angle.
Whether you are practicing crochet animals, looking for a cute chenille yarn project, or simply collecting ideas for your next handmade creation, this turtle offers plenty of inspiration. Work through the pieces one at a time, pay attention to stitch consistency, and take your time with assembly. The little details are what turn a collection of crocheted shapes into a finished character with personality.
Most importantly, have fun with the process. Crochet is a creative craft, and the finished turtle does not need to look exactly like anyone else’s. Experiment with shades, facial expressions, and decorative details to make your own version feel personal. Once you finish this adorable project, you may find yourself dreaming up an entire collection of fruit-inspired amigurumi.
Quick Points
- Use plush yarn for a soft, cuddly finish.
- Keep shell color changes neat and consistent.
- Check stitch counts regularly when crocheting in rounds.
- Position the eyes and limbs carefully before final assembly.
Tags
Crochet Patterns Amigurumi Crochet Turtle Watermelon Crochet Chenille Yarn Crochet Animals Plush Crochet Crochet Toys