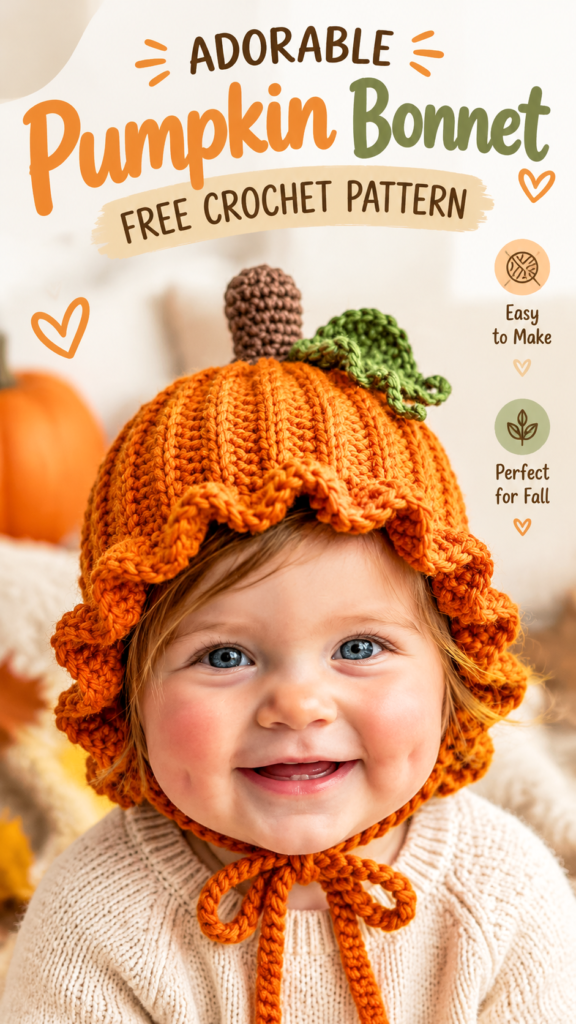
The baby pumpkin hat crochet pattern featured in this project is a cozy seasonal accessory inspired by the warm colors and playful shape of a classic autumn pumpkin. This original crochet design creates a soft bonnet-style baby hat with vertical texture, a gently ruffled brim, a small pumpkin stem, and a leafy accent. It is a charming handmade crochet project for fall outfits, Halloween photos, baby shower gifts, and everyday chilly-weather wear.
This image-inspired interpretation uses a practical crochet construction with simple shaping rather than attempting to reproduce an unseen original design. The hat is worked from the top down in joined rounds, creating a rounded pumpkin shape while maintaining a comfortable fit. The textured body uses front post stitches to create raised vertical ridges similar to pumpkin sections, while the brim adds a decorative scalloped finish.
Key Takeaways
- A pumpkin-inspired crochet baby bonnet with textured ridges and a leafy stem detail.
- Designed as an easy to intermediate crochet project using basic shaping techniques.
- Made with soft worsted weight yarn for warmth, comfort, and easy care.
- Uses joined rounds, front post stitches, increases, and simple decorative edging.
- Customizable for newborns, babies, and toddlers by adjusting circumference and height.
Description of the Crochet Baby Pumpkin Hat Project
This baby pumpkin hat crochet pattern is designed as a festive handmade accessory with a sweet, rounded silhouette. The main color is a rich pumpkin orange, paired with a small brown stem and green leaf detail. The finished look combines practical warmth with seasonal charm, making it ideal for autumn walks, family gatherings, and adorable baby photography.
The hat category is a wearable crochet accessory. It is designed with a soft stretch and a comfortable opening around the face. The suggested construction creates a flexible fabric that gently hugs the head without feeling stiff. The brim curves slightly outward to create the playful pumpkin bonnet appearance visible in the inspiration style.
The recommended yarn is a soft medium weight yarn, approximately category 4 worsted weight. Acrylic, cotton blends, or washable wool blends can all work well, although baby-friendly fibers with a smooth texture are recommended. A hook size around 5 mm is suggested to create a fabric that is warm but still flexible.
The skill level is confident beginner to intermediate. Basic crochet experience is helpful because the pattern includes front post stitches, increases, color changes, and small decorative pieces. Beginners who are comfortable reading stitch counts can also complete this project with patience.
Crochet Construction and Stitch Analysis
The pumpkin hat is designed using a top-down method. The crown begins with a small circle and expands through evenly spaced increases. Once the desired head circumference is reached, the sides are worked without increases to create the rounded pumpkin body.
To create the pumpkin segment texture, front post double crochet stitches are placed vertically around the hat. These raised stitches form subtle ridges that resemble pumpkin sections. The brim uses a combination of single crochet and increases to create a lightly ruffled edge.
The stem and leaf are crocheted separately and attached securely. For baby items, decorative pieces should always be firmly sewn down and checked before use.
Pro Tip: Always check the hat circumference against the intended wearer before finishing the brim. Baby head sizes vary, and small adjustments early in the project create the best fit.
Free Crochet Pattern: Pumpkin Patch Baby Bonnet
Free Crochet Pattern
Project Name: Pumpkin Patch Baby Bonnet
Description: A pumpkin-inspired baby hat featuring textured ridges, a decorative brim, and a small stem and leaf embellishment.
| Skill Level | Confident Beginner to Intermediate |
| Finished Size | Baby size: approximately 16 inches / 41 cm head circumference |
| Yarn | Medium weight category 4 yarn, approximately 180 yards / 165 meters orange, 20 yards / 18 meters brown, 20 yards / 18 meters green |
| Hook | 5 mm crochet hook (US H-8) |
| Gauge | Approximately 14 double crochet stitches x 8 rounds = 4 x 4 inches / 10 x 10 cm |
| Terminology | US crochet terms |
Materials
- Medium weight washable yarn in pumpkin orange, brown, and green.
- 5 mm crochet hook.
- Yarn needle.
- Stitch marker.
- Scissors.
Abbreviations
- ch: chain
- sl st: slip stitch
- sc: single crochet
- hdc: half double crochet
- dc: double crochet
- fpdc: front post double crochet
- st: stitch
- sts: stitches
- inc: increase, work 2 stitches into the same stitch
- rnd: round
Special Stitch
Front Post Double Crochet (fpdc): Yarn over, insert hook from front to back around the post of the indicated stitch, yarn over and pull up a loop, then complete a double crochet normally. This creates a raised vertical ridge.
Construction Notes
The hat is worked in joined rounds. Each round begins with a chain 2, which does not count as a stitch. Join each round with a slip stitch to the first stitch. Use a stitch marker if needed to track the beginning of each round.
Hat Body Instructions
- Round 1: Make a magic ring. Ch 2, work 10 dc into ring. Join. (10 sts)
- Round 2: Ch 2, work 2 dc in each stitch around. Join. (20 sts)
- Round 3: Ch 2, 1 dc in next stitch, 2 dc in next stitch. Repeat around. Join. (30 sts)
- Round 4: Ch 2, 1 dc in next 2 stitches, 2 dc in next stitch. Repeat around. Join. (40 sts)
- Round 5: Ch 2, 1 dc in next 3 stitches, 2 dc in next stitch. Repeat around. Join. (50 sts)
- Rounds 6-12: Ch 2, dc in each stitch around. Join. (50 sts)
- Round 13: Ch 2, *fpdc around next stitch, dc in next 4 stitches*. Repeat from * around. Join. (50 sts)
- Round 14: Ch 2, *dc in next 4 stitches, fpdc around next stitch*. Repeat from * around. Join. (50 sts)
- Rounds 15-17: Repeat Rounds 13 and 14, alternating the fpdc placement to create pumpkin ridges. (50 sts)
Ruffled Brim
- Round 18: Ch 1, sc in each stitch around. Join. (50 sts)
- Round 19: Ch 2, work 2 dc in each stitch around. Join. (100 sts)
- Round 20: Ch 1, sc in each stitch around. Join. Fasten off orange yarn.
Stem Instructions
- Using brown yarn, make a magic ring.
- Round 1: Ch 1, work 6 sc into ring. Join. (6 sts)
- Round 2: Sc in each stitch around. (6 sts)
- Round 3: Repeat Round 2. Fasten off, leaving a long tail for sewing.
Leaf Instructions
- With green yarn, ch 8.
- Sc in second chain from hook, hdc in next chain, dc in next 3 chains, hdc in next chain, sc in last chain.
- Work along the opposite side of the foundation chain with sc stitches back to the beginning.
- Fasten off, leaving a tail for attaching.
Assembly
Sew the stem securely to the top center of the hat. Attach the leaf beside the stem, shaping it slightly with your fingers. Weave in all yarn ends neatly inside the hat.
Important: For baby items, avoid loose buttons, beads, or detachable decorations. Plastic safety eyes and small embellishments are not recommended for babies or children under three. Embroidered details or securely stitched crochet pieces are safer options.
Customization and Size Adjustment Guide
This baby pumpkin hat crochet pattern can be adjusted easily by changing the number of increase rounds before working the straight body section. For a smaller newborn size, stop increasing earlier and create fewer body rounds. For a toddler size, add additional increase rounds until the circumference matches the wearer.
- Increase the hat circumference by adding another increase round using the same increase spacing.
- Adjust height by adding or removing plain body rounds before the brim.
- Create different pumpkin shades using rust, golden orange, cream, or muted autumn colors.
- Add extra pumpkin ridges by spacing fpdc stitches evenly around the body.
Common Mistakes and Troubleshooting
Hat Feels Too Tight
If the hat circumference is too small, the issue may be a tighter crochet tension. Try using a larger hook or adding an extra increase round before continuing the body.
Pumpkin Texture Looks Uneven
Make sure each fpdc stitch is worked around the same type of stitch position. Keeping consistent tension will help the raised ridges appear balanced.
Brim Does Not Ruffle
The ruffled effect comes from doubling the stitch count in the brim round. If the edge is too loose, reduce the number of increases slightly.
Finishing, Blocking, and Care Instructions
Light blocking can help the pumpkin shape settle into a smooth rounded form. Avoid stretching the hat too aggressively because the goal is to maintain the gathered pumpkin silhouette.
For best care, use washable yarn and follow the yarn label instructions. Gentle washing and air drying will help maintain the shape and texture of the crochet stitches.
At a Glance
- Best yarn choice: Soft washable medium weight yarn.
- Skill level: Confident beginner crochet project.
- Key technique: Joined rounds with textured fpdc pumpkin ridges.
- Size adjustment: Modify increase rounds and body height.
- Finishing method: Securely attach stem and leaf, then weave in ends.
Final Thoughts on the Baby Pumpkin Hat Crochet Pattern
This baby pumpkin hat crochet pattern is a fun seasonal project that combines simple crochet techniques with creative autumn styling. The textured stitches, rounded shape, and handmade details make it a memorable accessory for little ones and a thoughtful crochet gift idea.
Choose a soft yarn, check your gauge when possible, and read through the complete pattern before beginning. Personalize the colors, adjust the sizing, and enjoy creating a unique handmade crochet piece that celebrates the cozy feeling of fall.
Tags
Baby Pumpkin Hat Crochet Pattern
Baby Crochet Hat
Fall Crochet Projects
Easy Crochet Pattern
Handmade Baby Gifts
Autumn Crochet