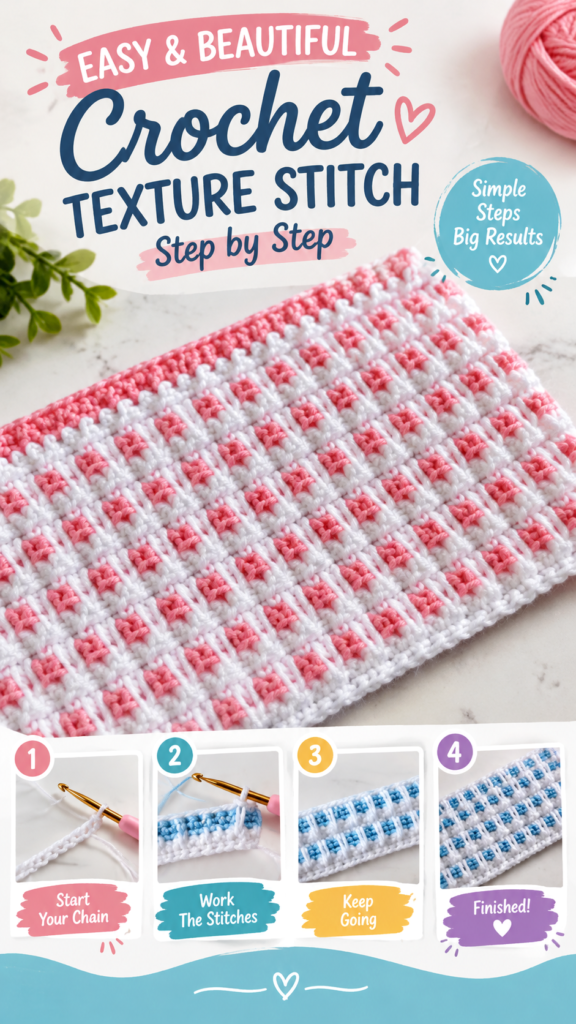
This two color baby blanket crochet pattern is designed to capture the soft, woven appearance of a simple two-tone crochet fabric. The finished blanket features a calm white background with regularly spaced contrast-color windows and raised vertical details that give the surface a subtle plaid or basket-weave effect. It is a practical handmade crochet gift for a nursery, baby shower, stroller, or cozy floor-time blanket.
The original interpretation below uses a straightforward combination of single crochet and elongated single crochet stitches. The construction is worked back and forth in rows, making it accessible to confident beginners who are ready to practice working into a lower row. The suggested yarn is a soft, washable DK-weight yarn, with white as the main color and a gentle blue, pink, or other pastel shade as the contrast color.
Key Takeaways
- A soft rectangular baby blanket worked in two coordinated colors.
- The main texture combines single crochet with elongated single crochet for raised vertical accents.
- Suggested for confident beginners because the basic stitches are simple but the elongated stitches require attention.
- DK-weight washable yarn creates a soft, flexible fabric suitable for everyday baby use.
- The width and length can be customized using the stated stitch and row multiples.
- The clean construction makes this an easy crochet project for a handmade baby gift.
A Soft Two Color Baby Blanket With Woven Texture
The most noticeable feature of this two color baby blanket crochet pattern is the contrast between the pale base and the small blocks of color showing through the textured surface. Rather than using complicated motifs or separate squares, the design creates visual interest directly within the rows. That makes the blanket feel polished while keeping the construction relatively simple.
The suggested version uses warm white for the main color and a pastel contrast color. Soft pink, baby blue, sage, lavender, butter yellow, or a muted neutral can all work beautifully. The contrast does not need to be extremely dark. A gentle difference in value is enough to make the little windows visible.
The finished fabric is intended to be comfortable rather than stiff. Using DK-weight yarn and a moderate hook produces a close stitch structure without making the blanket excessively heavy. The texture is visible from the front, while the reverse remains relatively neat and practical.
Project Description and Visual Details
This original two color baby blanket crochet pattern creates a rectangular fabric with a repeating field of small contrast-colored openings framed by the main color. The surface has a lightly raised appearance because some stitches are pulled upward from a lower row.
The blanket is worked in rows rather than joined motifs. There are no individual granny squares to make or sew together, so the main fabric grows continuously from the foundation chain. The only finishing work involves the simple border, fastening off, weaving in ends, and optional blocking.
The visual effect comes from three related elements. First, the contrast color is worked across a complete row. Second, the next row returns to the main color. Third, another main-color row uses elongated stitches that reach down into the previous contrast row. Those elongated stitches form the narrow vertical accents that visually divide the contrast color into small windows.
The photographed style suggests a fine to medium yarn rather than a bulky yarn. For a practical original interpretation, DK-weight yarn is recommended. A smooth acrylic, cotton-acrylic blend, or washable merino blend can work, although washable fibers are especially convenient for baby blankets.
The recommended difficulty is confident beginner to easy intermediate. Single crochet makes up most of the fabric, but the elongated single crochet technique requires the crocheter to identify a stitch in a lower row and pull the working loop up evenly.
Crochet Construction and Stitch Analysis
The blanket uses a simple row-based construction. The foundation chain establishes the width, and the body is worked back and forth. The stitch pattern is built around a three-row repeat: one contrast-color single crochet row, one main-color single crochet row, and one main-color textured row.
The textured row alternates ordinary single crochet with elongated single crochet. Each elongated single crochet is worked into the corresponding stitch two rows below. Because the lower stitch is from the contrast-colored row, the elongated main-color stitch rises across that color and creates the characteristic window effect.
The pattern is deliberately written with an even stitch count. This allows the final textured row to alternate one single crochet and one elongated single crochet across the entire width without an awkward partial repeat.
The body uses a white or cream main color and one contrast color. The colors can be carried loosely along the side when practical, then hidden beneath the border. If your chosen yarn produces bulky floats, use separate small bobbins instead of carrying the unused yarn.
Crochet Insight
The elongated stitches are the key to the woven appearance. Keep the tension relaxed when pulling them upward, and periodically lay the work flat. If the textured columns begin pulling the fabric inward, the loops are probably being drawn too tightly.
Free Crochet Pattern: Two Color Window Baby Blanket
Pattern Overview
This original pattern is an image-inspired interpretation that uses single crochet and elongated single crochet to create a two-color woven window texture. The measurements, yarn, hook, and gauge below are suggested specifications for a practical baby blanket rather than claims about an unseen original pattern.
| Skill Level | Confident beginner to easy intermediate |
|---|---|
| Finished Size | Approximately 36 x 40 inches (91 x 102 cm) |
| Yarn | DK weight, washable fiber; approximately 1,000 yards (914 m) main color and 300 yards (274 m) contrast color |
| Hook | 4.0 mm US G/6 crochet hook |
| Gauge | 18 single crochet stitches x 18 rows = approximately 4 x 4 inches (10 x 10 cm) |
| Terminology | US crochet terminology |
Materials
- Approximately 1,000 yards (914 m) DK-weight washable yarn in Color A, the main color.
- Approximately 300 yards (274 m) DK-weight washable yarn in Color B, the contrast color.
- 4.0 mm US G/6 crochet hook.
- Yarn needle with a blunt tip.
- Scissors.
- Removable stitch marker, optional but useful for identifying the first stitch during border rounds.
- Measuring tape.
Terminology and Abbreviations
- ch: chain
- sc: single crochet
- sl st: slip stitch
- st: stitch
- sts: stitches
- LSC: elongated single crochet
- RS: right side
- WS: wrong side
- rep: repeat
UK terminology note: US single crochet is called double crochet in UK terminology. The instructions in this pattern use US terminology only.
Special Stitch: Elongated Single Crochet
LSC: Insert the hook into the designated stitch two rows below the current row. Yarn over and pull up a loop to approximately the height of the current row. Yarn over again and pull through both loops on the hook. Do not work into the current-row stitch as well. The LSC replaces that current-row stitch.
For this blanket, every LSC is worked into the stitch directly below its current position in the contrast-color row two rows underneath. Keeping the stitches aligned is important for the vertical window effect.
Construction Notes
- The blanket is worked flat in rows.
- The turning chain does not count as a stitch throughout the pattern.
- Each row contains exactly 162 stitches.
- Do not count the turning chain as one of the 162 stitches.
- Color A is the main color and Color B is the contrast color.
- Rows 2, 5, 8 and every third row after that are Color B rows.
- Rows 3, 4, 6, 7 and the corresponding texture rows are worked in Color A.
- Carry the unused color neatly along the side when possible, or use a small bobbin if the edge becomes bulky.
Starting the Blanket
- With Color A, chain 163.
- Make sure the chain is relaxed rather than tight. If your foundation chain is consistently tight, use a hook 0.5 mm larger for the chain only.
- Row 1 establishes the foundation and is worked entirely in Color A.
Body Pattern
Row 1, Color A
Sc in the second ch from the hook and in each ch across. You will have 162 sc.
Three-Row Texture Repeat
The following three rows form one complete repeat. Work this exact three-row sequence 58 times. After 58 repeats, you will have completed Row 175 of the blanket body.
Repeat Row A, Color B: Ch 1, turn. Sc in each of the 162 sts across. Fasten the working loop only if you are using separate bobbins. Do not count the turning chain. 162 sts.
Repeat Row B, Color A: Ch 1, turn. Sc in each of the 162 sts across. 162 sts.
Repeat Row C, Color A: Ch 1, turn. Work the following sequence across the row: sc in the next st, LSC into the stitch two rows below corresponding to the next stitch, then repeat that two-stitch sequence across the row. Because 162 is evenly divisible by 2, the sequence is worked 81 times. 162 sts total.
For clarity, the first LSC of Repeat Row C reaches into the first stitch of the Color B row two rows below. The next LSC reaches into the third stitch of that Color B row, then the fifth stitch, then the seventh stitch, and so on. The ordinary sc stitches occupy the alternating current-row positions.
After Repeat Row C, begin the next three-row repeat with Color B. The color sequence is therefore:
- Row 1: Color A foundation
- Rows 2 to 4: Color B, Color A, Color A texture
- Rows 5 to 7: Color B, Color A, Color A texture
- Continue the same three-row sequence through Row 175.
After completing Row 175, the main blanket fabric should measure approximately 38 3/4 inches (98.5 cm) long before the border, depending on your personal row gauge.
Final Border
The border is worked around the entire rectangle in Color A. Do not turn between border rounds.
Border Round 1
With the right side facing, join Color A with a slip stitch at the top-right corner. Ch 1, then sc evenly across the top edge, place 3 sc in the corner, sc evenly down the side, place 3 sc in the next corner, sc evenly across the bottom, place 3 sc in the next corner, then sc evenly up the final side. Place 3 sc in the last corner and join with a sl st to the first sc.
There is no fixed stitch count for the side edges because the correct number depends on your row gauge. The goal is an even edge with no rippling and no pulling. On the long top and bottom edges, work approximately one sc into each stitch. On each side edge, distribute sc evenly so the border lies flat.
Border Round 2
Ch 1. Sc in the same stitch as the join and in every stitch around, placing 3 sc in each corner stitch. Join with a sl st to the first sc. Do not count the turning chain as a stitch.
Border Round 3
Ch 1. Sc in each stitch around, placing 3 sc in the center stitch of each corner group of 3 sc. Join with a sl st to the first sc. Fasten off securely.
If you want a slightly more decorative finish, use Color B for Border Round 3. This creates a delicate contrast line around the blanket without overwhelming the textured body.
Fastening Off and Weaving In Ends
After the final border round, cut the yarn leaving a tail of approximately 5 to 6 inches (13 to 15 cm). Pull the tail through the final loop and tighten gently. Thread the tail onto a yarn needle and weave it through several nearby stitches on the wrong side.
Because the design uses two colors, secure every loose end carefully. Weave each end in different directions for extra stability, then trim the excess close to the fabric without cutting into the stitches.
Blocking the Blanket
Blocking is optional, but it can improve the rectangular shape and help the textured columns settle evenly. For washable synthetic yarn, gentle steam blocking or a light damp blocking method may be appropriate. Always follow the care instructions for your particular yarn.
For wet blocking, dampen the finished blanket without aggressively soaking or twisting it. Lay it flat on a clean surface, gently smooth the edges into a rectangle, and allow it to dry completely. Do not stretch the fabric excessively because this can distort the small contrast windows.
How to Customize the Blanket Size
The easiest way to customize this two color baby blanket crochet pattern is to change the foundation chain while keeping the stitch count even. The textured row works in a two-stitch repeat, so the total number of body stitches should remain divisible by 2.
Changing the Width
For a narrower or wider blanket, choose an even number of foundation stitches and add one chain for the turning chain. For example, a 144-stitch body begins with chain 145, while a 180-stitch body begins with chain 181.
Always make a small gauge swatch before committing to a large blanket. If your gauge is 18 stitches per 4 inches, 144 stitches will produce approximately 32 inches (81 cm) of body width and 180 stitches will produce approximately 40 inches (102 cm), before any minor border variation.
Important: Change the width using an even stitch count. The texture row alternates sc and LSC, so an odd number of stitches would leave the final repeat incomplete.
Changing the Length
The body grows in three-row groups after the first foundation row. To make the blanket shorter or longer, add or remove complete three-row repeats. Each additional repeat adds approximately 2/3 inch (1.7 cm) at the suggested gauge.
For a smaller receiving blanket, you can work fewer repeats. For a larger toddler blanket, continue adding complete three-row groups until the desired length is reached. Keep the final row as a texture row so the border begins after a completed visual unit.
Color Customization
The contrast color can completely change the character of the finished blanket. Pale pink and ivory create a traditional nursery look, while blue and white emphasize the woven texture. Sage and cream feel calm and modern, and lavender with white gives the windows a softer appearance.
For a more graphic design, choose a stronger contrast. For a subtle heirloom-style blanket, select two shades with similar brightness. You can also reverse the visual emphasis by making the darker color the main color and using cream for the elongated texture stitches.
Common Mistakes and Troubleshooting
The Elongated Stitches Are Too Tight
If the vertical texture pulls the fabric upward or causes puckering, loosen the loop when you draw it from the lower row. The loop should rise naturally to the height of the current row. Do not yank the yarn tightly against the lower row.
The Contrast Windows Do Not Line Up
This usually happens when an LSC is inserted into the wrong stitch below. On every texture row, the LSC should reach into the corresponding position of the contrast row two rows below. Count from the beginning of the row if you lose your place.
The Blanket Is Getting Wider
Count the stitches at the end of every row. You should always have 162 stitches in the base pattern. Accidental increases often happen when a crocheter works an extra sc into the turning-chain area. Remember that the turning chain does not count as a stitch.
The Blanket Is Curling
A small amount of movement during the first several rows is normal. If the fabric continues to curl strongly, check your tension and make sure the LSC loops are not being pulled too tightly. Blocking after completion can also help the edges settle.
The Side Edges Look Uneven
Keep the first and final stitch of every row easy to identify. Because the turning chain does not count, work the first sc into the first actual stitch. At the end of the row, count 162 stitches before turning. Consistent edge tension will make the final border much easier.
Finishing, Care, and Baby-Safe Use
A baby blanket benefits from yarn that is soft against delicate skin and easy to wash. A washable DK-weight acrylic or cotton blend is a practical choice because it can usually tolerate regular laundering better than specialty fibers. Check the yarn label for its specific washing and drying instructions.
For baby projects, avoid adding detachable buttons, beads, charms, or other small decorations. The clean two-color surface of this design does not require extra embellishments, which keeps the finished blanket simple and practical.
Safety Note: Use secure, washable construction and avoid loose decorative elements on baby blankets. A handmade blanket should not be represented as medically safe or as a substitute for appropriate infant sleep guidance. Follow current infant-care recommendations for how and when blankets are used.
For everyday care, wash the blanket according to the yarn manufacturer’s instructions. Avoid aggressive agitation if the yarn is delicate, and reshape the blanket gently while damp if needed. Store it completely dry to help maintain the yarn and prevent unwanted odors.
Why This Easy Crochet Project Works Well for Beginners
This two color baby blanket crochet pattern uses familiar stitches for most of the project. Single crochet creates a stable foundation, while the elongated stitch introduces just one new technique. Because the texture repeats consistently, crocheters can practice the motion without having to memorize a complicated multi-stitch motif.
The rectangular construction is another advantage. There are no increases or decreases in the body, no shaping around corners until the border, and no separate motifs to assemble. Once the first texture repeat is established, the rest of the blanket follows the same predictable rhythm.
The pattern also provides a useful introduction to colorwork without requiring intricate stranded crochet. The two colors are organized into clear rows, and the raised main-color stitches create the impression of small contrast windows without complicated color charts.
At a Glance
- Best yarn: Soft, washable DK-weight yarn in one main shade and one pastel contrast.
- Skill level: Confident beginner to easy intermediate.
- Key technique: Alternating single crochet with elongated single crochet worked two rows below.
- Size adjustment: Use an even stitch count for the width and add or remove complete three-row repeats for length.
- Finishing: Three rounds of simple single crochet create a clean, gently framed edge.
Final Thoughts on This Two Color Baby Blanket Crochet Pattern
This two color baby blanket crochet pattern combines a simple rectangular construction with enough texture and color contrast to make the finished piece feel special. The raised white columns break up the contrast rows and create a woven-looking surface that works especially well with soft nursery shades.
Before beginning, choose your yarn and make a small gauge swatch so you know how your tension compares with the suggested measurements. Read through the complete pattern, especially the elongated single crochet instructions, before starting the blanket. Once the first three-row repeat is established, the stitch sequence becomes easy to recognize.
Feel free to personalize the project with your favorite two-color combination, adjust the dimensions for your preferred blanket size, or add a subtle contrast-color border. With soft washable yarn, balanced tension, and careful finishing, this original two color baby blanket crochet pattern makes a thoughtful handmade crochet gift and a satisfying long-form crochet project.
Tags
Two Color Baby Blanket
Baby Blanket Crochet Pattern
Easy Crochet Blanket
Two Color Crochet
Textured Crochet Stitch
Beginner Crochet Pattern
Handmade Baby Gift
Crochet Baby Gift