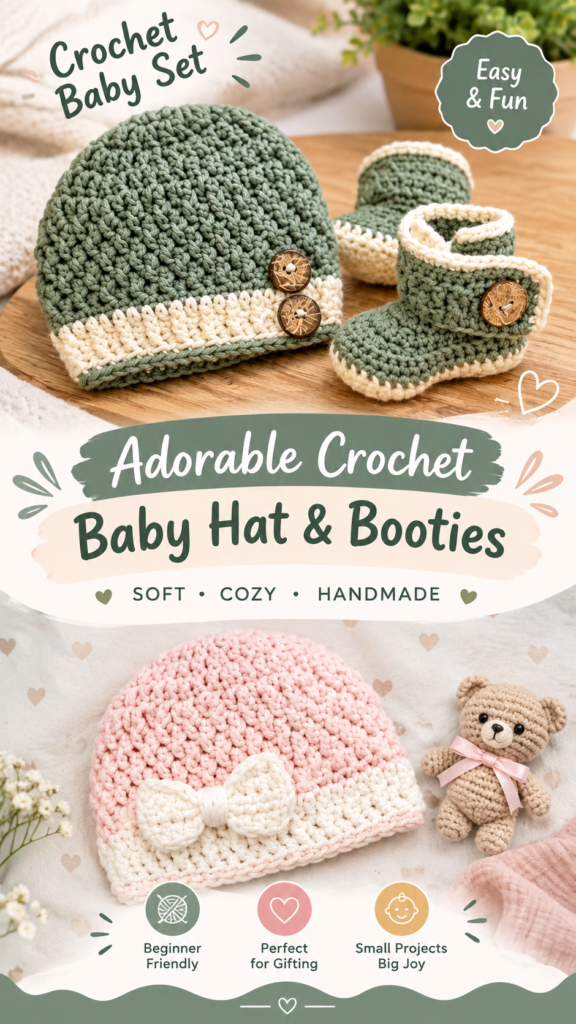
Soft, cozy, and wonderfully giftable, this crochet baby hat and booties set is designed around the sweet simplicity of the pictured style. The coordinated pieces use a soft sage-and-cream palette, dense crochet texture, a gently rounded hat crown, and tiny booties with a folded cuff. The result is a practical handmade set that works beautifully for newborn photos, baby showers, keepsake outfits, or everyday chilly-weather layering.
This original interpretation uses simple shaping and textured single crochet rather than attempting to reproduce an unseen pattern. The measurements, yarn amounts, hook size, and gauge below are suggested for an approximately 0 to 3 month size and may vary slightly with yarn choice and individual tension.
Key Takeaways
- A coordinated crochet baby hat and booties set for approximately 0 to 3 months.
- The hat is worked from the crown downward in joined rounds with textured single crochet.
- The booties begin with an oval crochet sole and continue upward with simple toe shaping.
- Lightweight DK yarn is a comfortable choice for a soft baby-friendly finish.
- The sage and cream color combination can easily be changed for a boy, girl, neutral nursery, or seasonal palette.
- The pattern uses straightforward shaping suitable for a confident beginner.
A Sweet Crochet Baby Hat and Booties Set
The charm of this crochet baby hat and booties set comes from its clean silhouette and restrained colorwork. The hat has a rounded crown that transitions into a comfortable straight-sided body, while the booties feature a low oval sole, softly shaped toe, and contrasting cuff. Together, the pieces look coordinated without requiring complicated stitchwork.
The pictured color arrangement is especially appealing for handmade baby gifts. A muted green body paired with a warm ivory trim creates a vintage-inspired appearance, while a blush-and-cream version gives the same design a softer look. You can also make the entire set in one color for a minimalist finish.
The texture is dense enough to give the fabric structure while still allowing the finished pieces to remain soft and flexible. For a baby accessory, that balance is useful because overly loose fabric can catch on small objects, while very stiff crochet can feel uncomfortable.
Project Description and Visual Details
This crochet baby hat and booties design is a small matching accessory set consisting of one rounded baby hat and a pair of ankle-height booties. The hat has a smooth dome, a contrasting horizontal band near the lower edge, and a narrow coordinating finish around the bottom. The booties have rounded toes, compact soles, taller ankle sections, and contrasting cuffs.
The most practical interpretation is a bottom-up construction for the hat and a sole-up construction for the booties. Both pieces can be made without complicated panels or sewn components, which keeps the project approachable and reduces bulky seams.
- Project type: Baby accessory set
- Suggested size: Approximately newborn to 3 months
- Construction: Joined crochet rounds
- Main texture: Single crochet, including back-loop-only stitches
- Suggested yarn: Soft DK or light worsted washable yarn
- Suggested skill level: Confident beginner
- Best use: Baby shower gift, newborn photo outfit, everyday accessory, or handmade keepsake
Important sizing note: Baby head and foot measurements vary considerably. The finished measurements in this pattern are approximate. Measure the intended recipient whenever possible and choose a size that allows comfortable movement rather than relying only on age.
Crochet Construction and Stitch Analysis
Hat Construction
The hat is most conveniently worked from the center crown outward. The first rounds establish the circular crown with evenly spaced increases. Once the circumference reaches the target size, the increases stop and the sides are worked evenly. A band of contrasting cream yarn then creates the visual stripe seen in the inspiration, followed by a few rows of the main color for the lower edge.
Single crochet worked through the back loop only creates small horizontal ridges and a flexible, lightly ribbed surface. It is a useful alternative to more complicated textured stitches because the texture comes directly from the placement of the hook.
Bootie Construction
Each bootie begins with an oval sole worked around both sides of a starting chain. The first three rounds gradually increase the length and width of the sole. The upper then rises directly from the sole, eliminating the need to sew a separate foot section.
After two shaping rounds, the toe becomes narrower while the back of the bootie remains comparatively open. Additional rounds form the ankle area, followed by a contrasting cuff. The cuff can be folded outward for the cozy look associated with the inspiration.
Recommended Yarn and Texture
A smooth, washable DK-weight yarn is suggested because it provides enough stitch definition to show the textured surface without making the accessories unnecessarily bulky. A soft acrylic, cotton-acrylic blend, or washable wool blend can work depending on the season and the recipient’s preferences. Avoid scratchy fibers for baby garments and accessories.
Free Crochet Pattern: Sage & Cream Baby Hat and Booties
Pattern description: This original crochet baby hat and booties pattern creates a coordinated newborn accessory set with a textured hat, rounded booties, and contrasting trim. The design is intentionally simple so the color changes and shaping remain the visual focus.
| Skill Level | Confident beginner |
| Finished Hat Size | Approx. 13.3 in / 33.8 cm circumference; 5.6 in / 14.2 cm tall |
| Bootie Size | Approx. 3.5 in / 8.9 cm sole length and 2.1 in / 5.3 cm sole width |
| Yarn | DK weight, approximately 160 to 190 yd / 146 to 174 m total |
| Hook | 4.0 mm US G/6 crochet hook |
| Gauge | Approx. 18 sc x 20 rounds = 4 x 4 in / 10 x 10 cm |
| Terminology | US crochet terminology |
Materials
- DK-weight washable yarn in approximately 110 to 125 yd / 100 to 114 m main color, such as sage green
- DK-weight washable yarn in approximately 50 to 65 yd / 46 to 59 m contrast color, such as cream
- 4.0 mm US G/6 crochet hook
- Yarn needle
- Scissors
- Stitch marker
- Measuring tape
The yarn estimate covers one hat and one pair of booties with modest allowance for finishing. Exact usage will vary according to yarn thickness, tension, color changes, and adjustments.
Terminology and Abbreviations
- ch: chain
- sc: single crochet
- sc2tog: single crochet two together
- sl st: slip stitch
- BLO: back loop only
- st/sts: stitch/stitches
- rnd: round
- rep: repeat
In UK terminology, sc is generally called double crochet. The instructions themselves use US terminology throughout.
Special Stitch: SC2TOG
Insert the hook into the next stitch and pull up a loop. Insert the hook into the following stitch and pull up a loop. Yarn over and pull through all three loops on the hook. This decreases the stitch count by one.
Construction Notes
- Turning chains do not count as stitches unless specifically stated.
- Slip stitches used to join rounds do not count as stitches.
- The hat is worked in joined rounds.
- The bootie sole and upper are also worked in joined rounds.
- Use a stitch marker to identify the first stitch if you find joined rounds difficult to track.
- Change colors in the final yarn-over of the last stitch of the previous color round for a cleaner transition.
Part 1: Crochet Baby Hat
Finished measurement: approximately 13.3 in / 33.8 cm around and 5.6 in / 14.2 cm tall. The circumference is intended to provide a gentle fit for a small baby. The finished hat should not be tight or restrictive.
Crown
- Rnd 1: With main color, make a magic ring. Ch 1, work 6 sc into the ring. Sl st to the first sc. 6 sts.
- Rnd 2: Ch 1. Work 2 sc in each stitch around. Sl st to the first sc. 12 sts.
- Rnd 3: Ch 1. [Sc in next st, 2 sc in next st] around. Sl st to the first sc. 18 sts.
- Rnd 4: Ch 1. [Sc in next 2 sts, 2 sc in next st] around. Sl st to the first sc. 24 sts.
- Rnd 5: Ch 1. [Sc in next 3 sts, 2 sc in next st] around. Sl st to the first sc. 30 sts.
- Rnd 6: Ch 1. [Sc in next 4 sts, 2 sc in next st] around. Sl st to the first sc. 36 sts.
- Rnd 7: Ch 1. [Sc in next 5 sts, 2 sc in next st] around. Sl st to the first sc. 42 sts.
- Rnd 8: Ch 1. [Sc in next 6 sts, 2 sc in next st] around. Sl st to the first sc. 48 sts.
- Rnd 9: Ch 1. [Sc in next 7 sts, 2 sc in next st] around. Sl st to the first sc. 54 sts.
- Rnd 10: Ch 1. [Sc in next 8 sts, 2 sc in next st] around. Sl st to the first sc. 60 sts.
Textured Hat Body
- Rnd 11: Ch 1. Sc BLO in each stitch around. Sl st to the first sc. 60 sts.
- Rnd 12: Ch 1. Sc BLO in each stitch around. Sl st to the first sc. 60 sts.
- Rnd 13: Repeat Rnd 12. 60 sts.
- Rnd 14: Repeat Rnd 12. 60 sts.
- Rnd 15: Repeat Rnd 12. 60 sts.
- Rnd 16: Repeat Rnd 12. 60 sts.
- Rnd 17: Repeat Rnd 12. 60 sts.
- Rnd 18: Repeat Rnd 12. 60 sts.
Cream Contrast Band
Switch to contrast color at the final yarn-over of Rnd 18.
- Rnd 19: Ch 1. Sc BLO in each stitch around. Sl st to the first sc. 60 sts.
- Rnd 20: Repeat Rnd 19. 60 sts.
- Rnd 21: Repeat Rnd 19. 60 sts.
- Rnd 22: Repeat Rnd 19. 60 sts.
- Rnd 23: Repeat Rnd 19. 60 sts.
- Rnd 24: Repeat Rnd 19. 60 sts.
Lower Green Edge
Change back to the main color at the final yarn-over of Rnd 24.
- Rnd 25: Ch 1. Sc BLO in each stitch around. Sl st to the first sc. 60 sts.
- Rnd 26: Repeat Rnd 25. 60 sts.
- Rnd 27: Repeat Rnd 25. 60 sts.
- Rnd 28: Repeat Rnd 25. Sl st to the first sc, fasten off, and leave a 5 in / 13 cm tail for weaving in. 60 sts.
Weave the yarn tail securely through the wrong side of several stitches. The hat should measure approximately 5.6 in / 14.2 cm from crown to lower edge. If your fabric is noticeably shorter or taller, adjust by adding or removing one or two even rounds before finishing.
Part 2: Crochet Baby Booties
Make two identical booties. Each bootie begins with an oval sole. Keep the join at the center back so the later shaping is easy to position.
Sole
- Ch 11.
- Rnd 1: Sc in the 2nd ch from hook and in the next 8 chains, 3 sc in the last chain. Working along the underside of the starting chain, sc in the next 8 chains, then 2 sc in the final chain. Sl st to the first sc. 22 sts.
- Rnd 2: Ch 1. 2 sc in each of the next 2 sts, sc in the next 8 sts, 2 sc in each of the next 3 sts, sc in the next 8 sts, 2 sc in each of the last 2 sts. Sl st to the first sc. 30 sts.
- Rnd 3: Ch 1. 2 sc in each of the next 2 sts, sc in the next 9 sts, [2 sc in next st, sc in next st] 4 times, sc in the next 9 sts, 2 sc in each of the last 2 sts. Sl st to the first sc. 38 sts.
The third sole round is the final increase round. The resulting oval should measure approximately 3.5 in / 8.9 cm long and 2.1 in / 5.3 cm wide. If your sole is substantially smaller, check your gauge before continuing.
Bootie Upper
- Rnd 4: Ch 1. Sc BLO in each stitch around. Sl st to the first sc. 38 sts.
For the next two rounds, the first 9 stitches and last 9 stitches form the back portion of the bootie. The middle 20 stitches form the toe section. This positioning keeps the decreases toward the front instead of shrinking the entire ankle opening.
- Rnd 5: Ch 1. Sc in the next 9 sts, then work [sc in next st, sc2tog] 6 times across the next 18 sts, sc in the next 2 sts, sc in the next 9 sts. Sl st to the first sc. 32 sts.
- Rnd 6: Ch 1. Sc in the next 9 sts, then work [sc in next st, sc2tog] 4 times across the next 12 sts, sc in the next 2 sts, sc in the next 9 sts. Sl st to the first sc. 28 sts.
- Rnd 7: Ch 1. Sc in each stitch around. Sl st to the first sc. 28 sts.
- Rnd 8: Ch 1. Sc in each stitch around. Sl st to the first sc. 28 sts.
Contrasting Fold-Over Cuff
Change to the contrast color at the end of Rnd 8. Work the cuff loosely enough that it can be folded outward without squeezing the ankle.
- Rnd 9: Ch 1. Sc BLO in each stitch around. Sl st to the first sc. 28 sts.
- Rnd 10: Ch 1. Sc BLO in each stitch around. Sl st to the first sc. 28 sts.
- Rnd 11: Ch 1. Sc BLO in each stitch around. Sl st to the first sc. 28 sts.
- Rnd 12: Ch 1. Sc BLO in each stitch around. Sl st to the first sc. 28 sts.
Change back to the main color for a narrow accent stripe.
- Rnd 13: Ch 1. Sc BLO in each stitch around. Sl st to the first sc. 28 sts.
Change once more to the contrast color for the final edge.
- Rnd 14: Ch 1. Sc BLO in each stitch around. Sl st to the first sc. Fasten off and weave in the end. 28 sts.
Second Bootie
Repeat the complete sole, upper, shaping, and cuff instructions to make the second bootie. Because the construction is symmetrical, no separate left and right versions are necessary.
Finishing the Set
- Trim all yarn ends to approximately 4 to 5 in / 10 to 13 cm.
- Use a yarn needle to weave each end through several stitches on the wrong side.
- Change direction once or twice while weaving to help secure the tail.
- Trim only after the tail is securely woven.
- Gently shape the hat by hand so the crown is rounded.
- Shape each bootie over your fingers, especially around the toe and sole.
- Fold the contrasting bootie cuff outward evenly.
- Check every finished piece for loose yarn ends before giving the set to a baby.
Baby safety: Keep this set free of loose buttons, beads, charms, detachable appliques, and long cords. The pictured decorative-button look can be recreated with simple embroidered circles or small embroidered motifs instead. Handmade baby accessories should always be inspected for loose fibers and decorations before use.
Customization and Size Adjustments
The easiest way to personalize this crochet baby hat and booties set is through color, circumference, and length. Since babies grow quickly, making a slightly larger version can be useful when the set is intended as a gift.
Adjusting the Hat Circumference
The hat reaches 60 stitches at the end of the crown increases. At the suggested gauge, this produces approximately 13.3 in / 33.8 cm around. For a larger size, add another increase round following the same mathematical progression, creating 66 stitches, then work the sides evenly.
For a smaller circumference, stop the increase sequence earlier. For example, ending after 54 stitches creates a smaller crown, but the finished circumference will depend on your exact tension. Always measure the crown and compare it with the intended head measurement before continuing.
When adjusting the circumference, it is usually better to alter the number of crown stitches than to dramatically change the hook size. A very large hook can make a baby hat too loose and floppy, while a very small hook can create an unnecessarily firm fabric.
Adjusting Hat Height
To make the hat taller, add even BLO rounds after the final crown increase. Add one round at a time and measure from the center crown to the lower edge. To make a shorter beanie, remove one or two body rounds before starting the contrast band.
Adjusting Bootie Length
The bootie sole is based on a starting chain of 11. To create a longer bootie, increase the starting chain while keeping the end shaping proportionate. Add two chains for a modest length increase and adjust the straight sections of the oval accordingly. Keep the toe and heel increases balanced so the sole remains symmetrical.
For a smaller foot, reduce the starting chain by one or two chains and make sure the sole remains comfortably wider than the baby’s foot. The bootie should never feel tight across the toes or ankle.
Color Ideas
- Sage green and cream for a muted vintage-inspired set
- Blush pink and ivory for a soft nursery palette
- Dusty blue and cream for a classic cool-toned combination
- Oatmeal and natural white for a neutral handmade look
- Mustard and cream for an autumn-inspired accessory set
- Two shades of the same color for a subtle monochromatic design
Crochet Insight
- Back-loop-only single crochet creates texture without complicated stitch combinations.
- For the cleanest stripes, change yarn during the final yarn-over of the last stitch in the previous round.
- Use the same hook and yarn combination for the complete set whenever possible so the pieces have a coordinated fabric density.
Common Mistakes and Troubleshooting
The Hat Crown Looks Flat
If the crown looks very flat instead of gently domed, your tension may be loose or your increases may be too frequent for your yarn. Check the stitch count at the end of every increase round. If the stitch count is correct but the fabric is still too flat, use a slightly smaller hook for the crown.
The Hat Is Too Small
Measure the circumference rather than judging only by appearance. If the hat is significantly smaller, your stitch gauge is tighter than the suggested gauge. Try a larger hook for the next version or add an increase round to create additional circumference.
The Bootie Sole Curls
A curled sole usually indicates tight tension, inconsistent increases, or a mismatch between the yarn and hook. Lay the sole flat after each round. If the edges curl upward strongly, loosen your tension or move up slightly in hook size.
The Bootie Toe Looks Uneven
Make sure the shaping decreases are centered across the front section. The two groups of 9 stitches at the back remain unchanged while the decreases are concentrated toward the toe. Counting the stitches before each shaping round prevents the toe from drifting to one side.
The Cuff Feels Tight
Because the cuff is folded, it needs enough flexibility to sit comfortably around the ankle. Do not pull the yarn tightly while working BLO stitches. If needed, use a slightly larger hook for the cuff only while maintaining the same stitch count.
Finishing, Shaping, and Care
For this small project, traditional wet blocking is not essential. Gentle hand shaping is usually enough. Place the hat on a clean towel and smooth the crown into a rounded dome. Shape the bootie soles flat and gently round the toes with your fingers.
If you choose to wet block, use only a small amount of water and shape the pieces without stretching them beyond their intended measurements. Allow them to dry completely before use. Always follow the washing instructions appropriate for your chosen yarn.
For washable baby accessories, gentle washing and thorough drying are practical choices. Avoid harsh detergents and excessive heat unless the yarn label specifically allows it. Store the finished set clean and dry.
Before every use, especially after washing, inspect the hat and booties for loose ends, stretched stitches, or detached embellishments. Remove the item from use if any part becomes damaged.
At a Glance
- Best yarn: Soft, washable DK-weight yarn with clear stitch definition
- Skill level: Confident beginner
- Key technique: Joined rounds with textured single crochet and simple shaping
- Size adjustment: Modify crown increases for the hat and starting chain for bootie length
- Finishing: Weave ends securely, hand-shape the pieces, and fold the bootie cuffs outward
A Lovely Handmade Baby Gift
This crochet baby hat and booties set combines a practical shape with enough texture and color detail to make the finished pieces feel special. The simple construction keeps the project approachable, while the contrasting band and cuff give the set a polished coordinated appearance.
Before beginning, choose a soft washable yarn, check your gauge if fit matters, and read through the complete pattern so the color changes and shaping are easy to follow. For a more personalized gift, change the palette, adjust the hat circumference, or add a small embroidered motif that is securely stitched into the fabric.
The finished crochet baby hat and booties make a charming handmade accessory set for a new arrival. With thoughtful yarn selection, careful finishing, and baby-safe construction, this easy crochet project can become a practical little keepsake that is both cozy and beautifully handmade.
Tags
Crochet Baby Hat
Crochet Baby Booties
Baby Crochet Pattern
Newborn Crochet
Easy Crochet Project
Baby Shower Crochet Gift
Handmade Baby Accessories
Beginner Crochet Pattern