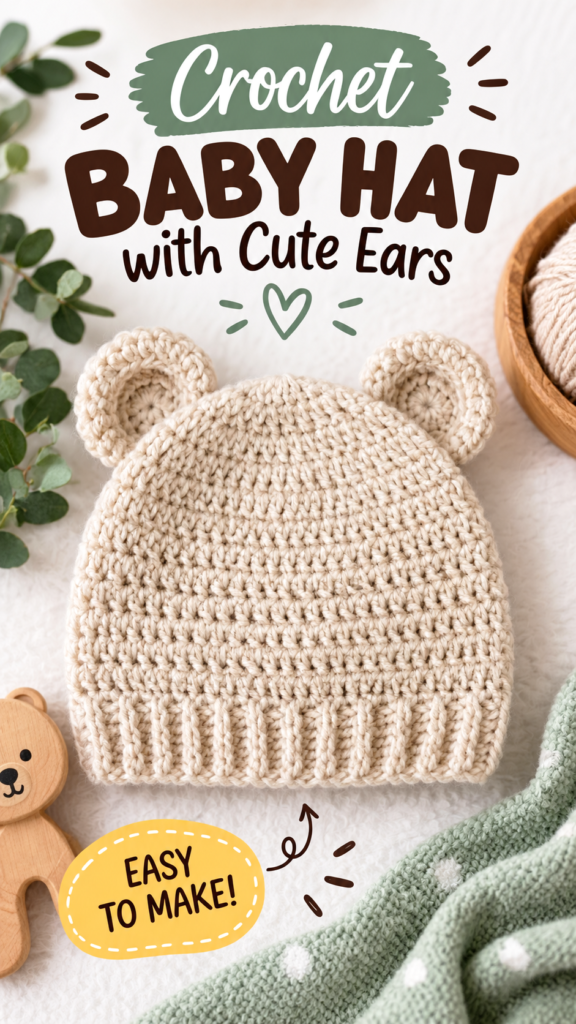
This crochet newborn baby hat combines a soft neutral color, a snug ribbed brim, a dense textured body, and two sweet rounded bear ears. The simple silhouette makes it a lovely handmade baby gift, while the understated cream palette keeps the finished hat timeless and easy to pair with newborn outfits or photo-session layers. This original interpretation uses a bottom-up construction with a crocheted ribbed brim, joined rounds for the hat body, and separately worked ears sewn securely into place.
Key Takeaways
- A cozy crochet newborn baby hat with rounded bear ears and a structured ribbed brim.
- Designed as an approachable project for confident beginners and intermediate crocheters.
- The suggested construction combines single crochet ribbing with half double crochet worked through the back loop.
- Medium-weight, soft, washable yarn is a practical choice for a baby-friendly handmade hat.
- The basic circumference can be adjusted by changing the number of brim rows before joining.
- The neutral design can easily be customized with pastel, earthy, or contrasting yarn colors.
A Cozy Crochet Newborn Baby Hat for Little Ones
A handmade hat is one of those crochet projects that feels both practical and special. This crochet newborn baby hat has a soft, rounded shape that sits comfortably over the head, while the little bear ears add just enough personality without making the design complicated.
The cream-colored look is especially versatile. It works beautifully for winter wardrobes, newborn photography, baby shower gifts, and cozy everyday outfits. You can also use the same construction in dusty pink, sage, oatmeal, light gray, warm brown, or pale blue for a completely different personality.
The pattern below is an original, image-inspired interpretation rather than a reconstruction of an unseen pattern. The exact yarn, hook, gauge, measurements, and construction of a photographed handmade item cannot be determined with certainty from appearance alone, so the recommendations below are selected to create a practical finished hat with a similar overall character.
What Makes This Crochet Baby Hat Special?
The finished design has four main visual features: a compact ribbed brim, a dense textured crown, a softly rounded top, and two circular bear ears. Together, these elements create a simple silhouette that looks polished without requiring complicated colorwork or advanced stitch techniques.
Soft Neutral Texture
A warm cream or oatmeal shade allows the stitch texture to become the focus. A smooth medium-weight yarn also makes the vertical stitch definition easier to see. For a baby project, choose yarn that feels soft against the skin and is easy to wash and care for.
A Practical Ribbed Brim
The brim is worked separately in rows of single crochet through the back loop. This creates flexible ridges that run around the finished hat. Once the brim reaches the desired circumference, its short ends are joined and the body is crocheted upward from the edge.
Rounded Bear Ears
The ears are simple flat crochet circles. Each circle is folded slightly at the base before being sewn to the hat. This creates the rounded ear shape without requiring complicated shaping or stuffing.
Crochet Construction and Stitch Analysis
The practical construction chosen for this crochet newborn baby hat starts at the lower edge and works upward. The brim is made first as a narrow strip. Because each row becomes one stitch around the circumference, adding or removing brim rows is a straightforward way to change the hat width.
After the brim is joined into a ring, the main body is worked in joined rounds of half double crochet through the back loop. The rounds remain at a consistent stitch count through most of the hat, then decrease gradually toward the crown. This gives the hat a rounded profile instead of an abrupt gathered top.
The ears use basic single crochet increases. They are intentionally uncomplicated so the project remains accessible to crocheters who are comfortable with basic stitches but want a cute handmade result.
Free Crochet Newborn Baby Hat Pattern
Free Crochet Pattern: Cozy Bear Ear Baby Hat
Project description: This original crochet newborn baby hat pattern creates a soft, close-fitting beanie with a flexible ribbed brim, dense textured body, rounded crown, and two cute bear ears. The base size is intended for a newborn to approximately 3 months, depending on the baby’s actual head measurement and the stretch of the yarn.
| Skill Level | Confident beginner |
| Finished Size | Approximately 13.5 in / 34 cm circumference and 5.75 in / 14.5 cm height |
| Yarn | Category 4 medium, soft washable yarn |
| Yarn Quantity | Approximately 90 to 120 yd / 82 to 110 m |
| Hook | 5.0 mm US H-8 crochet hook |
| Gauge | Approximately 14 hdc x 10 rows = 4 x 4 in / 10 x 10 cm in hdc BLO |
| Terminology | US crochet terminology |
Materials
- 90 to 120 yards / 82 to 110 meters of category 4 medium yarn in cream, oatmeal, beige, or another soft neutral
- 5.0 mm US H-8 crochet hook
- Yarn needle
- Removable stitch marker
- Scissors
- Measuring tape
For a baby item, select a soft yarn labeled washable and suitable for clothing or accessories. Avoid scratchy fibers and loose novelty yarns that could shed fibers.
Crochet Terminology and Abbreviations
- ch: chain
- sc: single crochet
- hdc: half double crochet
- hdc2tog: half double crochet two together
- sl st: slip stitch
- st/sts: stitch/stitches
- BLO: back loop only
- inc: increase, two stitches worked into the same stitch
- FO: fasten off
UK equivalent note: US single crochet is called double crochet in UK terminology, and US half double crochet is called half treble crochet. The pattern instructions themselves use US terminology only.
Special Stitch
Half double crochet through the back loop: Yarn over, insert the hook through the back loop of the indicated stitch, yarn over and pull up a loop, yarn over and pull through all three loops on the hook. The unused front loop creates the raised texture on the opposite side of the fabric.
Half double crochet two together: Yarn over, insert the hook through the back loop of the next stitch, yarn over and pull up a loop. Yarn over, insert the hook through the back loop of the following stitch, yarn over and pull up a loop. Yarn over and pull through all five loops on the hook. This decreases one stitch.
Before You Begin
This original interpretation uses a 48-stitch body and a 13.5-inch / 34-centimeter approximate finished circumference. Because babies vary considerably in head size, measure the intended recipient when possible. The hat should have gentle negative ease so it sits securely without being excessively tight.
Turning chains in the brim do not count as stitches. In the joined body rounds, the beginning ch 2 does not count as a stitch. Slip stitches used to join rounds do not count as stitches. The hat body is worked in joined rounds, not continuous rounds.
Part 1: Ribbed Brim
- Row 1: Ch 9. Sc in the 2nd ch from the hook and in each chain across. 8 sc.
- Row 2: Ch 1, turn. Sc BLO across. 8 sc.
- Rows 3 to 48: Repeat Row 2 for a total of 48 rows. 8 sc at the end of every row.
The finished strip should measure approximately 13.5 inches / 34 centimeters when gently stretched. Do not stretch it aggressively while measuring. The actual length may vary slightly depending on yarn and personal tension.
Fold the strip so the first and last rows meet. With the wrong sides facing each other, slip stitch through both layers across all 8 stitches to form a ring. Fasten off only if you prefer to rejoin the yarn at the seam. Otherwise, continue directly from the brim seam.
Part 2: Crochet Hat Body
Turn the brim so the ribbed texture is facing outward. Rotate the work and crochet around the long edge of the brim. You will work one hdc into the end of each brim row, giving you 48 stitches around the hat.
- Round 1: Ch 2. Work 1 hdc into the end of each of the 48 brim rows. Sl st to the first hdc. 48 hdc.
- Round 2: Ch 2. Hdc BLO in each stitch around. Sl st to the first hdc. 48 hdc.
- Rounds 3 to 8: Repeat Round 2 six more times. 48 hdc at the end of each round.
At this point, the hat should measure approximately 3.75 to 4 inches / 9.5 to 10 centimeters above the lower edge of the brim. If your tension is looser or tighter, the measurement may differ. Focus on the finished measurement rather than forcing the stitch count to match a specific height.
Part 3: Shape the Crown
- Round 9: Ch 2. Repeat [4 hdc BLO, hdc2tog BLO] 8 times around. Sl st to the first hdc. 40 sts.
- Round 10: Ch 2. Repeat [3 hdc BLO, hdc2tog BLO] 8 times around. Sl st to the first hdc. 32 sts.
- Round 11: Ch 2. Repeat [2 hdc BLO, hdc2tog BLO] 8 times around. Sl st to the first hdc. 24 sts.
- Round 12: Ch 2. Repeat [1 hdc BLO, hdc2tog BLO] 8 times around. Sl st to the first hdc. 16 sts.
- Round 13: Ch 2. Repeat [hdc2tog BLO] 8 times around. Sl st to the first hdc. 8 sts.
- Round 14: Ch 2. Repeat [hdc2tog BLO] 4 times around. 4 sts.
Fasten off with an approximately 8-inch / 20-centimeter yarn tail. Thread the tail onto a yarn needle and weave it through the remaining 4 stitches. Pull gently to close the crown. Secure the tail on the inside and weave in the remaining end.
The crown should form a smooth rounded top rather than a sharp point. If your yarn is particularly bulky, avoid pulling the final closure extremely tightly because that can create a small puckered knob.
Part 4: Make the Bear Ears
Make 2 ears. Each ear is worked in joined rounds as a flat circle. The circles can remain single-layered for a soft floppy look, or you can fold a small section at the bottom before sewing them to the hat for a more dimensional appearance.
- Ear Round 1: Make a magic ring. Ch 1. Work 6 sc into the ring. Sl st to the first sc. 6 sc.
- Ear Round 2: Ch 1. Work 2 sc in each stitch around. Sl st to the first sc. 12 sc.
- Ear Round 3: Ch 1. Repeat [1 sc, 2 sc in the next stitch] 6 times. Sl st to the first sc. 18 sc.
- Ear Round 4: Ch 1. Repeat [2 sc, 2 sc in the next stitch] 6 times. Sl st to the first sc. 24 sc.
- Ear Round 5: Ch 1. Sc in each stitch around. Sl st to the first sc. 24 sc.
Fasten off, leaving an approximately 10-inch / 25-centimeter sewing tail. Make the second ear using the same instructions.
Part 5: Shape and Attach the Ears
Place the hat flat with the crown at the top. Position the first ear approximately 1.5 inches / 4 centimeters from the center line. Position the second ear the same distance from the center on the opposite side. The exact placement can be adjusted to create a wider or narrower bear-ear appearance.
- Fold the bottom edge of each circular ear slightly inward so the lower section creates a gentle curve.
- Pin or hold the first ear in place with the lower edge following the upper contour of the hat.
- Using the attached yarn tail and a yarn needle, sew through the base of the ear and the hat fabric with small, secure stitches.
- Work back and forth across the lower portion of the ear until it feels firmly attached.
- Repeat for the second ear, checking that both ears are at a similar height and distance from the center.
- Weave the remaining yarn securely through the inside of the hat and trim the excess.
For a softer, more rounded ear, sew only the lower third of each circle firmly to the hat and allow the upper portion to remain slightly raised. For flatter ears, sew a larger section of the circle to the hat.
Final Finishing
- Inspect the entire hat for loose yarn tails and weave each tail securely into the wrong side.
- Check the brim for consistent stretch and make sure the seam is comfortable rather than bulky.
- Gently shape the crown with your hands.
- Lay the hat flat and allow it to dry naturally if it has been lightly dampened during shaping.
- Measure the circumference and height again after finishing.
Baby Safety: Keep this hat free from buttons, beads, plastic decorations, detachable appliques, and long loose ties. For babies and young children, embroidered details are preferable to small attached pieces. Handmade hats should also be used only as appropriate for the situation and should not be treated as sleep-safe products.
How to Adjust the Crochet Newborn Baby Hat Size
The easiest way to change the circumference is to adjust the number of rows in the ribbed brim. Each brim row becomes one stitch in the first body round, so changing the row count changes the number of body stitches.
For a Smaller Hat
Remove 4 brim rows at a time and work the body with the resulting even stitch count. For example, 44 brim rows create approximately 44 body stitches. The exact finished circumference will depend on your gauge and the natural stretch of your yarn.
For a Larger Hat
Add 4 brim rows at a time. A 52-row brim creates 52 body stitches and can provide a larger circumference. Before making the crown, measure the hat around its widest point and compare it with the intended head measurement.
When changing the body stitch count, the crown decrease rounds need to be recalculated. The simplest method is to divide the starting stitch count into equal decrease sections and gradually reduce the number of stitches until a small opening remains for closing. Avoid applying the 48-stitch decrease sequence unchanged to a different stitch count.
Adjusting Hat Height
To make the hat taller, add one or two plain hdc BLO rounds before beginning Round 9. Each additional round adds approximately 0.4 inches / 1 centimeter depending on tension. To make the hat shorter, begin the crown decreases after fewer plain rounds.
Measure from the lower edge of the brim to the crown rather than relying only on row counts. Babies have different head proportions, so measurement is more reliable than assuming one size fits every newborn.
Crochet Insight
- Measure the head at the widest point, usually around the forehead and back of the head.
- For a stretchy beanie, the finished hat can be slightly smaller than the head measurement.
- Make the brim first and check its stretch before investing time in the crown.
Common Crochet Mistakes and Troubleshooting
The Brim Is Too Tight
If the brim does not stretch comfortably, check your tension first. Single crochet worked through the back loop can become very firm when crocheted tightly. Try relaxing your hands or moving up to a 5.5 mm US I-9 hook for the brim only.
The Hat Looks Too Wide
Check your gauge and actual circumference before continuing. A loose gauge creates a larger hat even when the stitch count is correct. If your fabric is much looser than 14 hdc per 4 inches / 10 centimeters, use a smaller hook and remake the brim if necessary.
The Crown Has a Point
A pointed crown usually happens when the final stitches are pulled too tightly. Reopen the final closure and close it more gradually. The four-stitch ending should be gathered gently rather than cinched aggressively.
The Ears Do Not Match
Count the rounds carefully and compare the diameter of both circles before sewing them on. When attaching them, measure from the center of the crown to each ear so the placement is symmetrical.
The Joining Seam Is Noticeable
Make sure the joining slip stitch is not tighter than the surrounding hdc stitches. You can also place the seam toward the back of the hat and use the ears to help visually balance the upper portion.
Finishing, Blocking, and Care
This hat does not require aggressive blocking. In fact, excessive stretching can reduce the natural elasticity of the ribbed brim. A gentle shaping process is enough to smooth the crown and settle the stitches.
If the yarn care label allows wet washing, wash the finished hat according to the yarn manufacturer’s care instructions. Reshape it while damp and allow it to air dry completely on a clean, flat surface. Avoid using high heat unless the yarn label specifically permits it.
Before gifting, inspect every seam and yarn tail. Pay particular attention to the attachment points of the ears. The ears should remain securely sewn to the hat without long loose strands on the inside.
For everyday baby use, a washable yarn is especially convenient. Neutral cream is a classic choice, but the same pattern works beautifully in soft sage, dusty rose, muted mustard, light gray, cocoa, or pale blue.
Styling and Customization Ideas
The basic design is intentionally simple, which makes it easy to personalize without changing the underlying construction.
- Classic bear: Use cream, oatmeal, tan, or warm brown yarn and keep the ears in the same color.
- Soft pastel: Choose pale pink, sage, lavender, or powder blue for a gentle nursery-inspired palette.
- Two-tone version: Make the brim and ears in a slightly darker shade while keeping the body neutral.
- Textured finish: Use a yarn with subtle tonal variation to emphasize the hdc BLO texture.
- Simple newborn gift set: Pair the hat with another handmade accessory made from the same washable yarn.
For babies, keep decorative additions minimal. The bear-ear silhouette is already distinctive, so there is no need for buttons, beads, embroidered eyes, bows, or other detachable details.
At a Glance
- Best yarn: Soft, washable category 4 medium yarn with good stitch definition.
- Skill level: Confident beginner, with basic increases, decreases, joined rounds, and sewing.
- Key technique: Single crochet BLO ribbing followed by hdc BLO body rounds.
- Size adjustment: Change the brim row count to alter circumference, then recalculate the crown decreases.
- Finishing: Gently shape the crown, weave in ends securely, and sew the ears firmly into place.
Make This Crochet Newborn Baby Hat Your Own
This crochet newborn baby hat is a sweet example of how basic stitches can create a polished handmade accessory. The ribbed brim provides gentle stretch, the hdc BLO body creates a dense textured fabric, and the simple rounded ears turn an everyday beanie into an adorable bear-inspired design.
Choose a soft washable yarn, check your gauge when size matters, and read through the complete pattern before beginning. If the intended recipient is available for measuring, use their actual head circumference to decide whether the base size needs adjustment. From there, experiment with calm neutrals or soft colors to create a personalized handmade gift.
The pattern is designed to be approachable while still offering plenty of room for customization. Once you understand the brim-to-body construction, you can adjust the height, circumference, ear placement, and color palette to create your own version while keeping the cozy character of the original design.
Final Tip: Always check the fit and construction before gifting a handmade baby hat. A secure finish, soft washable yarn, comfortable stretch, and carefully woven ends are more important than matching an exact measurement.
Tags
Crochet Newborn Baby Hat
Baby Hat Crochet
Crochet Bear Ear Hat
Newborn Crochet Pattern
Easy Crochet Project
Baby Crochet Gift
Handmade Baby Hat
Beginner Crochet Pattern