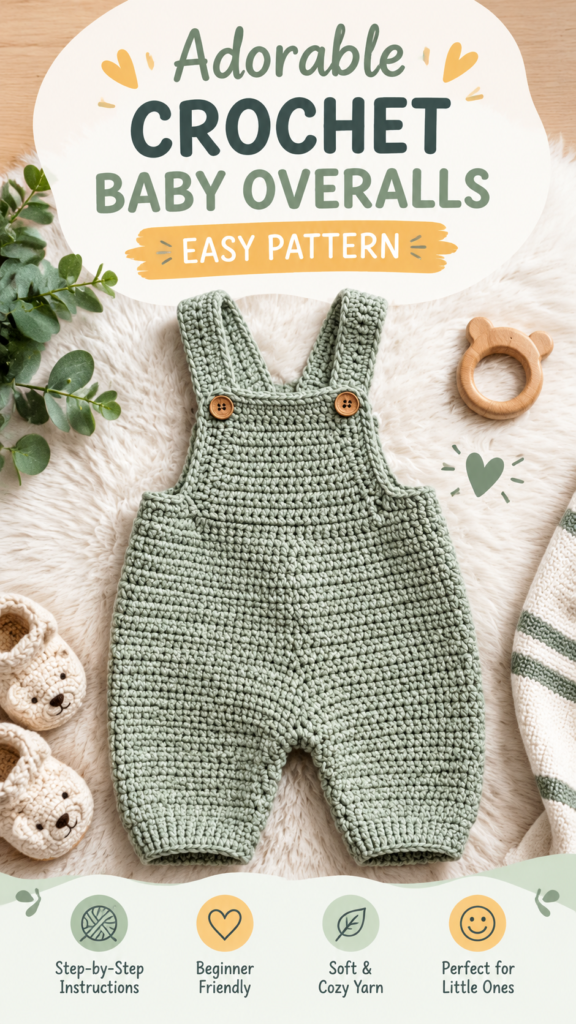
These baby crochet overalls are designed as a cozy, practical handmade layer for little ones. The classic overall shape features a softly rounded bib, wide shoulder straps, a roomy waist and gently tapered legs with simple cuffs. The neutral, textured appearance works beautifully for everyday outfits, winter layering, baby photography, or a thoughtful handmade gift.
This original interpretation uses a dense, even crochet texture created with half double crochet worked through the back loop. The construction begins with two separate leg tubes, which are joined at the crotch before the upper body is worked in rounds. The front bib is then worked in rows, followed by two straps and a simple finished edging. The result is a comfortable romper-style garment with plenty of room for movement.
Important: Baby clothing needs a comfortable fit without restrictive openings. Check the finished measurements against the baby’s current measurements before adding buttons or making final adjustments. This garment is intended as clothing, not as sleepwear.
Key Takeaways
- Classic baby crochet overalls with a bib front, straps, roomy body and cuffed legs.
- Suggested for approximately 6 to 12 months, with adjustment guidance included.
- Worked primarily with half double crochet through the back loop for a soft horizontal texture.
- Worsted-weight washable yarn provides structure while remaining comfortable for everyday wear.
- The construction uses two leg tubes joined at the crotch, followed by the body and bib.
- Easy customization options include lengthening the legs, changing colors, or adjusting the bib width.
A Cozy Baby Crochet Overalls Design
The pictured style has the relaxed silhouette that makes crochet overalls especially useful for babies. Instead of fitting tightly around the body, the garment has enough ease to sit comfortably over a diaper and a lightweight shirt. The front bib gives the piece its recognizable overall character, while the straps add both function and visual interest.
The color arrangement is simple and neutral, allowing the stitch texture to remain the main decorative feature. A single solid shade is particularly suitable for this design because it highlights the horizontal rows and clean shaping. However, the pattern can easily be adapted into two or more colors if you prefer a striped baby romper.
The visible fabric has a compact appearance rather than an open lace texture. A smooth worsted-weight yarn is therefore a practical choice. Cotton, cotton-acrylic blends, washable merino blends, or other soft machine-washable yarns can work well, provided the finished fabric is comfortable against delicate skin.
Who Is This Crochet Project For?
This pattern is aimed at confident beginners who are comfortable working basic stitches, counting stitches, crocheting in rounds, and making simple decreases. The overall construction is straightforward, but the garment requires careful measurement and consistent tension. A beginner who has already made a hat, simple baby sweater, or small crochet garment should find the techniques manageable.
The finished base size is approximately 6 to 12 months. Because babies grow at different rates, measurements are more useful than age labels alone. The customization section explains how to modify the width, leg length, bib height, and strap length.
Crochet Construction and Stitch Analysis
The most practical construction for this design is a bottom-up method. Each leg begins as a small circular tube. After the two legs are completed, they are joined across the crotch with short chain sections. The upper body is then worked continuously in rounds, allowing the garment to maintain a simple cylindrical shape.
The front half of the upper body becomes the bib. Instead of continuing in rounds, the front stitches are separated and worked back and forth in rows. Small decreases near the top create a gentle narrowing that visually resembles the shaped bib in the design. Two narrow straps are made separately and attached at the back, with buttonholes at the front ends.
The main texture is half double crochet through the back loop. Working into the back loop leaves a raised horizontal ridge on the front of each row. This creates visual texture without introducing large gaps, making it especially appropriate for a cozy baby garment.
- Keep your tension relaxed so the garment remains soft rather than stiff.
- Check the width after the leg and body sections instead of relying only on row counts.
- Use a stitch marker at the beginning of every circular round to make counting easier.
Free Crochet Pattern: Cozy Baby Crochet Overalls
Free Crochet Pattern
Pattern interpretation: This is an original crochet pattern inspired by the visible overall silhouette and stitch texture. The precise yarn, hook, gauge, and original construction cannot be established from appearance alone, so the specifications below are practical recommendations for recreating a similar handmade style.
Pattern Overview
| Skill Level | Confident beginner |
|---|---|
| Approximate Finished Size | 6 to 12 months; about 21 in / 53.5 cm body circumference |
| Finished Length | About 18.5 to 19 in / 47 to 48 cm from top of bib to leg cuff |
| Yarn | Worsted-weight, soft washable yarn; approximately 450 to 550 yd / 411 to 503 m |
| Hook | 4.0 mm, US G-6 crochet hook |
| Gauge | 16 hdc x 12 rows = 4 x 4 in / 10 x 10 cm |
| Terminology | US crochet terminology |
Finished Measurements
- Body circumference: approximately 21 in / 53.5 cm.
- Leg opening circumference: approximately 8 in / 20.5 cm.
- Leg length from cuff to crotch: approximately 8.5 to 9 in / 21.5 to 23 cm.
- Body length from crotch to top of waistband: approximately 3.5 to 3.75 in / 9 to 9.5 cm.
- Bib height from waistband to top edge: approximately 6 in / 15 cm.
- Strap length: approximately 7.25 in / 18.5 cm.
Materials and Notions
- 450 to 550 yd / 411 to 503 m worsted-weight soft washable yarn.
- 4.0 mm US G-6 crochet hook.
- Yarn needle with a blunt tip.
- Removable stitch marker.
- Scissors.
- Two small flat buttons, approximately 1/2 in / 12 mm, only if securely sewn and appropriate for the child. Embroidered button details are the safer alternative for very young babies.
- Tape measure.
Terminology and Abbreviations
- ch: chain
- hdc: half double crochet
- sc: single crochet
- sl st: slip stitch
- st: stitch
- sts: stitches
- BLO: back loop only
- hdc2tog: half double crochet two together
- RS: right side
- WS: wrong side
In UK terminology, hdc corresponds to half treble crochet and sc corresponds to double crochet. The instructions themselves use US terminology throughout.
Special Stitch
Hdc2tog: Yarn over, insert the hook into the next stitch and pull up a loop, yarn over and insert the hook into the following stitch and pull up a loop, yarn over and pull through all five loops on the hook. This decreases two stitches into one.
Hdc BLO: Work a half double crochet through the back loop only. The back loop is the loop farther away from you when looking at the top of the stitch.
Construction Notes
The garment is worked from the legs upward. Do not turn during the circular leg or body sections. The beginning chain does not count as a stitch throughout the pattern. The slip stitch used to close a joined round does not count as a stitch. Place a stitch marker in the first stitch of every round before beginning the next round.
For the best fit, measure the baby’s chest or waist and compare it with the finished 21 in / 53.5 cm body circumference. A small amount of positive ease is intentional so the garment can be worn comfortably over a diaper and light clothing.
Leg 1
- Foundation: Ch 32. Sl st to the first chain, being careful not to twist the chain. Place a marker in the first stitch.
- Round 1: Ch 1, hdc BLO in each of the 32 sts. Sl st to the first hdc. 32 sts.
- Round 2: Ch 1, hdc BLO in each of the 32 sts. Sl st to the first hdc. 32 sts.
- Round 3: Ch 1, hdc BLO in each of the 32 sts. Sl st to the first hdc. 32 sts.
- Round 4: Ch 1, hdc BLO in each of the 32 sts. Sl st to the first hdc. 32 sts.
- Round 5: Ch 1, hdc BLO in each of the 32 sts. Sl st to the first hdc. 32 sts.
- Round 6: Repeat Round 5. 32 sts.
- Round 7: Repeat Round 5. 32 sts.
- Round 8: Repeat Round 5. 32 sts.
- Round 9: Repeat Round 5. 32 sts.
- Round 10: Repeat Round 5. 32 sts.
- Round 11: Repeat Round 5. 32 sts.
- Round 12: Repeat Round 5. 32 sts.
- Round 13: Repeat Round 5. 32 sts.
- Round 14: Repeat Round 5. 32 sts.
- Round 15: Repeat Round 5. 32 sts.
- Round 16: Repeat Round 5. 32 sts.
- Round 17: Repeat Round 5. 32 sts.
- Round 18: Repeat Round 5. 32 sts.
- Round 19: Repeat Round 5. 32 sts.
- Round 20: Repeat Round 5. 32 sts.
- Round 21: Repeat Round 5. 32 sts.
- Round 22: Repeat Round 5. 32 sts.
- Round 23: Repeat Round 5. 32 sts.
- Round 24: Repeat Round 5. 32 sts.
- Round 25: Repeat Round 5. 32 sts.
- Round 26: Repeat Round 5. 32 sts.
- Round 27: Repeat Round 5. 32 sts.
- Round 28: Ch 1, sc in each of the 32 sts. Sl st to the first sc. Fasten off and weave in the end. 32 sts.
Leg 2
- Make Leg 2 exactly as instructed for Leg 1, from the foundation chain through Round 28.
- Fasten off only after completing Round 28. Weave in the starting tail, but leave the working leg available for joining.
Joining the Legs
Lay both legs flat with their round joins positioned toward the back. Identify the two stitches at the inner crotch area of each leg. The short chain bridges become the center front and center back of the crotch.
- Join yarn to the first stitch of Leg 1 at the inner crotch.
- Ch 1. Hdc BLO around all 32 stitches of Leg 1.
- Ch 4 to create the front crotch bridge.
- Hdc BLO around all 32 stitches of Leg 2.
- Ch 4 to create the back crotch bridge.
- Sl st to the first hdc of Leg 1. Do not count either chain bridge as a stitch yet. The working round contains 72 working stitches when the two four-chain bridges are treated as four-stitch sections.
For the next round, work one hdc into each chain of both four-chain bridges. This produces a continuous 72-stitch body round and closes the crotch opening.
Upper Body
- Round 1: Ch 1, hdc BLO in each of the 72 sts around. Sl st to the first hdc. 72 sts.
- Round 2: Ch 1, work [hdc BLO in the next 11 sts, 2 hdc BLO in the next st] 6 times. Sl st to the first hdc. 78 sts.
- Round 3: Ch 1, work [hdc BLO in the next 12 sts, 2 hdc BLO in the next st] 6 times. Sl st to the first hdc. 84 sts.
- Round 4: Ch 1, hdc BLO in each of the 84 sts. Sl st to the first hdc. 84 sts.
- Round 5: Repeat Round 4. 84 sts.
- Round 6: Repeat Round 4. 84 sts.
- Round 7: Repeat Round 4. 84 sts.
- Round 8: Repeat Round 4. 84 sts.
- Round 9: Repeat Round 4. 84 sts.
- Round 10: Repeat Round 4. 84 sts.
- Round 11: Repeat Round 4. 84 sts.
At the end of Round 11, the body should measure approximately 3.5 to 3.75 in / 9 to 9.5 cm from the crotch. Fasten off only if you need to reposition the yarn for the bib. Otherwise, continue directly into the bib after identifying the front 42 stitches.
Front Bib
Place a marker at the center of each side of the garment so that 42 stitches form the front half. The remaining 42 stitches form the back half. Work the bib back and forth across the front stitches only.
- Row 1, RS: Join yarn at the right side of the front section. Ch 1, hdc BLO in the next 42 sts. Turn. 42 sts.
- Row 2, WS: Ch 1, hdc BLO across all 42 sts. Turn. 42 sts.
- Row 3: Ch 1, hdc BLO across. Turn. 42 sts.
- Row 4: Ch 1, hdc BLO across. Turn. 42 sts.
- Row 5: Ch 1, hdc BLO across. Turn. 42 sts.
- Row 6: Ch 1, hdc BLO across. Turn. 42 sts.
- Row 7: Ch 1, hdc BLO across. Turn. 42 sts.
- Row 8: Ch 1, hdc BLO across. Turn. 42 sts.
- Row 9: Ch 1, hdc BLO across. Turn. 42 sts.
- Row 10: Ch 1, hdc BLO across. Turn. 42 sts.
- Row 11: Ch 1, hdc BLO across. Turn. 42 sts.
- Row 12: Ch 1, hdc BLO across. Turn. 42 sts.
- Row 13: Ch 1, hdc2tog, hdc BLO in the next 38 sts, hdc2tog. Turn. 40 sts.
- Row 14: Ch 1, hdc BLO across. Turn. 40 sts.
- Row 15: Ch 1, hdc2tog, hdc BLO in the next 36 sts, hdc2tog. Turn. 38 sts.
- Row 16: Ch 1, hdc BLO across. Turn. 38 sts.
- Row 17: Ch 1, hdc2tog, hdc BLO in the next 34 sts, hdc2tog. Turn. 36 sts.
- Row 18: Ch 1, hdc BLO across. Turn. 36 sts.
Fasten off and weave in the end. The top edge of the bib should measure approximately 9 in / 23 cm. The slight narrowing makes the bib sit neatly between the straps without becoming restrictive.
Shoulder Straps
Make two identical straps. The straps are worked flat in rows and are intentionally narrow enough to look proportional to the baby-sized bib.
- Row 1: Ch 7. Hdc in the second chain from the hook and in each remaining chain. Turn. 6 sts.
- Rows 2 through 18: Ch 1, hdc across. Turn after every row. 6 sts.
- Row 19: Ch 1, hdc in the first 2 sts, ch 2, skip the next 2 sts, hdc in the last 2 sts. Turn. 6 sts.
- Rows 20 through 22: Ch 1, hdc across. Turn after every row. 6 sts.
Fasten off after Row 22 and leave a sewing tail of approximately 8 in / 20 cm on each strap. The finished strap is approximately 7.25 in / 18.5 cm long.
Bib and Strap Edging
- Join yarn at the lower side edge of the bib.
- Work 1 sc evenly along the first side edge, placing approximately 1 sc into each row-end.
- Work 1 sc into each of the 36 top stitches.
- Work 1 sc evenly down the opposite side edge.
- Sl st to the starting sc. Fasten off and weave in the end.
Do not add a border along the bottom edge of the bib because that edge is already secured to the body. The narrow edging helps reinforce the top and sides without adding excessive bulk.
Assembly and Strap Placement
- Lay the finished garment flat with the bib facing upward.
- Locate the back half of the waistband, which consists of 42 stitches.
- Measure approximately 2.5 in / 6.5 cm inward from each side seam. These areas are the suggested strap attachment points.
- Place the flat end of one strap against the inside of the back waistband, keeping the strap straight.
- Sew across the six-stitch strap end using the yarn needle and matching yarn. Sew through every stitch at least twice for a secure attachment.
- Attach the second strap at the corresponding position on the opposite side.
- Bring each strap forward over the shoulders and check the fit before sewing or positioning the buttons.
- Place one button on the front bib beneath each strap buttonhole. The button should sit securely inside the buttonhole without stretching the crochet fabric.
- Sew each button very securely with several passes of matching yarn. For infants and very young babies, embroidered button details can be used instead of detachable buttons.
Baby Safety: Check every fastening before each use. Avoid loose buttons, beads, charms, decorative cords, or other detachable pieces. Do not leave a baby unattended while wearing a handmade garment with detachable closures. This pattern is for clothing and should not be treated as sleepwear or a safety product.
Fastening Off and Weaving In
After all pieces are assembled, inspect the inside of the garment for loose ends. Thread each yarn tail onto a yarn needle and weave it securely through several nearby stitches, changing direction once or twice before trimming. Avoid leaving long tails inside areas that could rub against the baby’s skin.
Customization and Size Adjustment
The simplest way to customize these baby crochet overalls is to change the leg circumference, leg length, body circumference, bib height, or strap length independently. Always make a small gauge swatch before making major size changes.
Adjusting the Leg Width
The base leg begins with 32 stitches. At the stated gauge, every 4 stitches represent approximately 1 in / 2.5 cm. To make the leg wider, add stitches to the starting chain in multiples of 4. For example, 36 stitches will produce a wider opening, while 28 stitches will make a narrower leg.
Keep both legs identical. If you change the number of starting stitches, use the same number for both legs and make sure the crotch joining section is adjusted symmetrically.
Adjusting Leg Length
Each additional hdc BLO round adds approximately one-third of an inch at the recommended gauge. Add or remove rounds before the final sc cuff round. For a longer winter version, add several hdc rounds to create more coverage. For a shorter summer version, remove several rounds while keeping the cuff proportionate.
Adjusting Body Width
The upper body reaches 84 stitches, producing approximately 21 in / 53.5 cm circumference at the recommended gauge. To make the garment wider, add increases in evenly spaced locations rather than adding them beside each other. To make it narrower, stop the increase sequence earlier.
Because the bib is worked over half of the body, changes to the body circumference should also be reflected in the bib width. Keep the bib approximately half the finished body circumference for a balanced overall silhouette.
Adjusting the Bib
For a shorter bib, remove rows from the straight section before beginning the decreases. For a taller bib, add rows to the straight section. The top should remain wide enough to provide comfortable coverage without reaching too close to the baby’s neck.
Adjusting Strap Length
Try the garment on over the intended clothing layer before securing the strap position. Add or remove hdc rows from the straight strap section to change its length. Keep the buttonhole close enough to the strap end that the fastening remains comfortable and does not create excessive slack.
Pro Tip: Measure the baby from the waist or crotch to the desired shoulder position before making the straps. Crochet stretch can change the apparent length after the garment is worn, so allow only modest extra length.
Common Mistakes and Troubleshooting
The Leg Is Twisting
This usually happens when the foundation chain is twisted before joining. Lay the chain flat before making the first slip stitch. If the first round has already been completed and the twist is obvious, it is usually better to unravel the joining section and correct it rather than trying to compensate later.
The Body Is Too Tight
First compare your gauge with the recommended 16 hdc per 4 in / 10 cm. If you have more stitches than the gauge, your fabric is smaller than intended. Move to a larger hook and make another swatch. If the gauge is correct but the baby’s measurements require more room, use the size adjustment method rather than simply stretching the finished garment.
The Bib Looks Uneven
Count each decrease row carefully. The decrease sequence should always reduce the bib by exactly two stitches. If the edges lean at different angles, check that the first and last decreases are worked in corresponding positions.
The Fabric Feels Stiff
A very tight crochet tension can make worsted-weight yarn feel rigid. Try relaxing your grip, changing to a slightly larger hook, or selecting a softer washable yarn. Always make sure the final fabric is comfortable and flexible before completing the garment.
Finishing, Blocking, and Care
For a baby garment, aggressive blocking is unnecessary. Instead, gently wash the completed overalls according to the yarn manufacturer’s care instructions and reshape them while damp. Lay the garment flat and smooth the bib, straps, leg cuffs, and side edges into their intended shapes.
Allow the garment to dry completely before attaching or checking any final closures. If you use buttons, inspect them carefully after washing. A button should remain firmly attached with no visible looseness.
Wash the garment gently and avoid harsh treatments that could damage the crochet fabric or irritate sensitive skin. Store it clean and dry. Before every wear, inspect the seams, straps, cuffs, and closures for signs of loosening or wear.
The neutral solid-color version is especially versatile. For a more playful look, use one shade for the legs and body and a contrasting shade for the bib and straps. You can also create narrow horizontal stripes by changing yarn colors every two or four body rounds. Keep yarn tails securely woven into the inside of the garment.
At a Glance
- Best yarn: Soft, washable worsted-weight yarn with a smooth, comfortable fiber blend.
- Skill level: Confident beginner, with basic decreases and circular construction.
- Key technique: Half double crochet through the back loop creates the dense horizontal texture.
- Size adjustment: Modify starting leg stitches, leg rounds, body increases, bib rows, and strap length.
- Finishing: Securely weave ends, gently reshape after washing, and inspect all closures before use.
Final Thoughts on These Baby Crochet Overalls
These baby crochet overalls combine a classic silhouette with simple crochet texture, making them a lovely handmade project for a growing baby wardrobe. The two-leg construction keeps the pattern organized, while the front bib and straps give the finished piece the familiar overall shape seen in timeless baby clothing.
Before beginning, choose a soft washable yarn, make a gauge swatch, and compare the finished measurements with the baby’s current measurements. Read the complete pattern once before picking up the hook so you understand how the legs, crotch, body, bib, and straps fit together.
Once the basic version is comfortable, personalize it with gentle color changes, a slightly longer leg, a taller bib, or decorative crochet edging. Keep embellishments minimal and securely attached, especially for babies. With thoughtful yarn selection and careful finishing, this free crochet pattern makes a practical handmade garment that can be enjoyed throughout the cooler months.
Tags
Baby Crochet Overalls
Baby Crochet Pattern
Crochet Baby Romper
Crochet Baby Clothes
Easy Crochet Project
Handmade Baby Gift
Crochet Baby Romper Pattern
Baby Winter Crochet