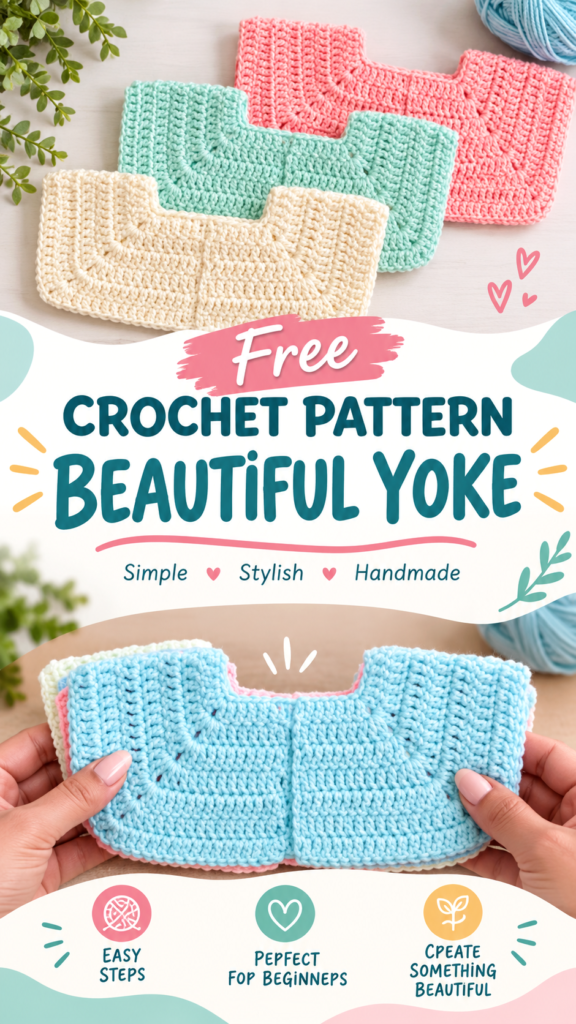
This crochet yoke pattern for baby is designed around the sweet, softly structured shape of a classic baby garment yoke. The pictured style features rounded corners, a gentle neckline opening, simple horizontal rows, and a smooth fabric that works beautifully in soft pastel shades. The construction is practical enough for a confident beginner while still giving experienced crocheters plenty of room to customize.
This original interpretation uses a simple half double crochet fabric worked in rows. The front and back yokes are made separately, joined at the shoulders, and then used as the upper section of a lightweight baby pullover or dress. The pattern below is intentionally written as a complete yoke project, with clear measurements and stitch counts so you can use it as a foundation for your own handmade baby garment.
Key Takeaways
- This is an original crochet yoke pattern for baby inspired by a softly rounded, pastel crochet yoke.
- The yoke is worked flat in rows using half double crochet for a neat, flexible fabric.
- The base pattern is designed for approximately 6 to 12 months, with straightforward size-adjustment instructions.
- Soft worsted or light worsted yarn with good washability is recommended for baby garments.
- The yoke can become the upper section of a pullover, dress, tunic, cardigan, or sleeveless top.
- Pastel color changes can be added between rows for a look similar to the gentle multicolor arrangement shown here.
A Sweet Crochet Yoke Pattern for Baby Garments
A crochet yoke is one of those small garment details that can completely change the look of a handmade piece. Instead of beginning with a complicated fitted bodice, a yoke gives the upper part of a sweater or dress a defined shape around the neckline and shoulders. It also creates a natural place for color changes, textured stitches, decorative edging, or contrasting yarn.
The design here has a deliberately clean appearance. The main fabric is made with half double crochet, creating compact horizontal rows while retaining enough stretch for comfortable baby clothing. A shallow neckline is shaped into the back, while the front receives a slightly deeper opening. The shoulder sections are then joined before the lower body is attached.
Because the exact yarn, hook, gauge, and original construction cannot be established from appearance alone, the measurements below are suggested working specifications for an original interpretation. They are intended to produce a practical baby yoke rather than reproduce any unseen pattern.
What the Crochet Project Looks Like
The project is a soft crochet baby garment yoke with a broad lower edge and a shaped upper neckline. Several pastel versions can be layered together visually, making the design especially attractive in combinations such as aqua, blush pink, pale blue, cream, mint, or lavender.
The yoke has a relatively simple silhouette. The lower edge is wider than the upper shoulder area, while the center neckline creates the characteristic opening. This shape makes it suitable for attaching to a wider crocheted body underneath.
The stitch texture appears compact and even, so a smooth half double crochet fabric is a practical substitute for reproducing the overall visual character. Half double crochet is particularly useful for baby garments because it works more quickly than single crochet while remaining denser and less open than many taller stitches.
For the softest result, choose a washable yarn with good stitch definition. A smooth acrylic, cotton-acrylic blend, or washable merino blend can work well. Avoid very fuzzy yarn because it can obscure the clean rows and make stitch counting harder.
Crochet Construction and Stitch Analysis
Working Direction
The original pattern is worked flat rather than in a continuous round. The front yoke is made first, followed by the back yoke. Each piece is worked upward from its lower edge. The shoulder portions are shaped near the neckline and joined after both pieces are complete.
Main Stitch
The primary stitch is half double crochet. It gives the yoke a tidy, slightly ribbed-looking row structure without creating large holes. Working through the back loop on selected rows adds subtle vertical texture, but the base pattern uses regular half double crochet so the construction remains accessible.
Suggested Yarn and Hook
A light worsted or worsted-weight washable yarn is a sensible choice. For baby clothing, select a soft yarn that can tolerate frequent washing. A 5.0 mm US H-8 crochet hook is suggested for the base pattern, although your individual yarn and tension may require a different hook.
Important: Always make a small gauge swatch before beginning the garment. A yoke that is only slightly too tight or too loose can noticeably affect the neckline and shoulder fit.
Free Crochet Pattern: Pastel Baby Yoke
Free Crochet Pattern
Project name: Pastel Baby Yoke
This original crochet yoke pattern for baby creates a softly shaped front and back yoke suitable for attaching to a simple crocheted body. The base size is approximately 6 to 12 months. The finished yoke is designed with approximately 1 inch / 2.5 cm of wearing ease when incorporated into a garment with a finished chest circumference of approximately 20.5 inches / 52 cm.
| Specification | Recommendation |
|---|---|
| Skill Level | Confident beginner |
| Base Size | Approximately 6 to 12 months |
| Finished Yoke Width | Approximately 10.25 in / 26 cm |
| Yoke Height | Approximately 3.5 in / 9 cm |
| Suggested Yarn | Light worsted or worsted, washable and soft |
| Yarn Quantity | Approximately 120 yd / 110 m for both yoke pieces |
| Hook | 5.0 mm / US H-8 |
| Gauge | 14 hdc x 11 rows = 4 x 4 in / 10 x 10 cm |
| Terminology | US crochet terminology |
Materials
- Approximately 120 yd / 110 m of soft washable light worsted or worsted-weight yarn for both yoke pieces.
- 5.0 mm / US H-8 crochet hook.
- Yarn needle for sewing and weaving in ends.
- Removable stitch markers.
- Scissors.
- Measuring tape.
Terminology and Abbreviations
- ch: chain
- hdc: half double crochet
- sl st: slip stitch
- st: stitch
- sts: stitches
- BLO: back loop only
- yo: yarn over
- RS: right side
- WS: wrong side
The equivalent UK term for hdc is half treble crochet. The instructions themselves use US terminology throughout.
Special Stitch
Half double crochet: Yarn over, insert the hook into the indicated stitch, yarn over and pull up a loop, yarn over and pull through all three loops on the hook.
Half double crochet through the back loop: Work a regular half double crochet while inserting the hook under only the back loop of the next stitch. This creates a subtle raised ridge.
Construction Notes
The turning chain of 2 does not count as a stitch. The first hdc is worked into the first stitch of the row. Rows are turned after completing the stated stitch count.
Make one front yoke and one back yoke. The front has a deeper neckline, while the back has a shallower neckline. Each piece finishes with two shoulder sections that are joined together. The lower edges remain open for attachment to the body of a sweater, dress, or tunic.
Front Yoke
Foundation: Ch 37.
Rows 1 to 4: Lower Yoke
- Row 1, RS: Hdc in 2nd ch from hook and in each ch across. 36 hdc. Ch 2, turn.
- Row 2, WS: Hdc in each st across. 36 hdc. Ch 2, turn.
- Row 3, RS: Hdc in each st across. 36 hdc. Ch 2, turn.
- Row 4, WS: Hdc in each st across. 36 hdc. Ch 2, turn.
Rows 5 to 7: Begin Front Neckline
The next rows divide the front into a left shoulder, center neckline, and right shoulder. The center opening will be 16 stitches wide.
- Row 5, RS: Hdc in first 10 sts, hdc in next 16 sts, hdc in last 10 sts. 36 hdc. Ch 2, turn.
- Row 6, WS: Hdc in first 10 sts. Skip the next 16 sts. Hdc in the last 10 sts. 20 hdc total. Do not work across the skipped center section. Ch 2, turn.
At Row 6, the two shoulder sections are now separated. Work each shoulder independently.
Left shoulder, Rows 7 to 10: Beginning at the outer edge of the left shoulder, hdc across 10 sts. Ch 2, turn after every row. Repeat for 4 rows total. 10 hdc at the end of Row 10. Fasten off.
Right shoulder, Rows 7 to 10: Join yarn with a sl st to the first stitch of the right shoulder. Hdc across 10 sts. Ch 2, turn. Work 4 rows total. 10 hdc at the end of Row 10. Fasten off.
The front yoke now measures approximately 3.5 inches / 9 cm from the lower edge to the top shoulder edge, depending on individual tension.
Back Yoke
The back uses the same lower width but has a smaller neckline opening. This gives additional coverage around the back of the neck.
Foundation: Ch 37.
Rows 1 to 5: Lower Back Yoke
- Row 1, RS: Hdc in 2nd ch from hook and in each ch across. 36 hdc. Ch 2, turn.
- Row 2, WS: Hdc in each st across. 36 hdc. Ch 2, turn.
- Row 3, RS: Hdc in each st across. 36 hdc. Ch 2, turn.
- Row 4, WS: Hdc in each st across. 36 hdc. Ch 2, turn.
- Row 5, RS: Hdc in each st across. 36 hdc. Ch 2, turn.
Rows 6 to 9: Back Neckline
The back neckline opening is 12 stitches wide, leaving 12 stitches for each shoulder.
- Row 6, WS: Hdc in first 12 sts, skip next 12 sts, hdc in last 12 sts. 24 hdc total. Ch 2, turn.
Work the two shoulder sections separately.
Left back shoulder, Rows 7 to 10: Hdc across 12 sts. Ch 2, turn. Repeat for 4 rows total. 12 hdc at the end of Row 10. Fasten off.
Right back shoulder, Rows 7 to 10: Join yarn at the first stitch of the right shoulder. Hdc across 12 sts. Ch 2, turn. Repeat for 4 rows total. 12 hdc at the end of Row 10. Fasten off.
Optional Pastel Color Changes
For a soft multicolor appearance, change colors after any completed row. A simple sequence is cream for Rows 1 to 3, pale blue for Rows 4 to 6, mint for Rows 7 to 8, and blush pink for Rows 9 to 10. This is only a suggested palette and does not need to match the photographed color arrangement.
To change colors neatly, complete the final yarn over of the last stitch with the new color. Cut the old yarn, leaving a tail of approximately 4 inches / 10 cm, and continue with the new shade.
Pro Tip: If you want the yoke to look especially polished, change colors at the end of a row rather than in the middle. Keep all tails on the wrong side so they can be woven in securely later.
Shoulder Assembly
- Lay the front and back yokes flat with right sides facing each other.
- Align one front shoulder with the corresponding back shoulder.
- Using a yarn needle and matching yarn, whipstitch or mattress stitch the shoulder edges together.
- Work through each corresponding stitch along the 10-stitch front shoulder and 12-stitch back shoulder. Because the back shoulder is wider in this base interpretation, ease the final 2 stitches gently across the shoulder seam rather than leaving a gap.
- Repeat for the opposite shoulder.
- Turn the joined yoke right side out and check the neckline before attaching the body.
Neckline Edging
For a neat neckline, attach yarn at the back of the neck and work a round of single crochet evenly around the neckline opening. Because the front and back openings are formed by skipped stitches, place approximately 2 single crochet stitches along every vertical edge and 1 single crochet into each horizontal stitch.
- Join yarn with a sl st at the back center of the neckline.
- Ch 1. This chain does not count as a stitch.
- Sc evenly around the complete neckline.
- When you reach the starting point, sl st to the first sc.
- Fasten off and weave in the end.
Do not pull the edging tightly. A slightly relaxed neckline is more comfortable and will prevent the yoke from puckering.
Attaching the Yoke to a Baby Garment
The finished yoke can be attached to a simple crocheted body. For a pullover, begin the body at the lower edge of the joined yoke and work downward. For a dress, continue the body for additional length before adding a decorative hem.
When attaching the body, divide the lower yoke into front and back sections and mark the side seams. Work evenly around the entire lower opening, making sure the stitch density does not pull the yoke inward.
For a simple body, you can work half double crochet in rounds. Begin with enough stitches to produce approximately 20.5 inches / 52 cm of finished chest circumference. Join each round with a slip stitch, or work continuously with a stitch marker if you prefer to avoid a visible joining line.
Crochet Insight
The neckline is the most important area to check before attaching the body. Lay the finished yoke flat and measure from shoulder to shoulder and around the neckline. If the fabric looks stretched or the neckline curls inward, correct the tension before continuing. Small adjustments are much easier at the yoke stage than after the entire garment is finished.
How to Customize the Crochet Yoke Pattern for Baby
The base pattern is intentionally simple to resize. The most important measurements are the child’s chest circumference, shoulder width, and desired neckline opening. Measure the child over a light layer of clothing and compare those measurements with your gauge before changing the starting chain.
Adjusting the Width
At the recommended gauge, 14 hdc measure approximately 4 inches / 10 cm. To make the yoke wider, add stitches to the foundation chain in even groups. Each additional 7 stitches adds approximately 2 inches / 5 cm to the total width.
For example, if you want a yoke approximately 2 inches / 5 cm wider, add 7 chains to the starting chain and distribute the additional stitches between the two shoulder areas and neckline area. Keep the neckline centered so both sides remain symmetrical.
Adjusting the Length
To make a deeper yoke, add complete rows before beginning the neckline shaping. At the stated gauge, approximately 3 additional rows add about 1 inch / 2.5 cm. This is useful when adapting the yoke for a larger child or when you want a more pronounced upper bodice.
Adjusting the Neckline
A smaller neckline can be created by skipping fewer center stitches. A larger neckline can be created by skipping more center stitches. Always keep the opening centered and leave enough shoulder stitches on both sides to create a stable seam.
Sizing reminder: Do not resize a baby garment solely by adding rows. Compare chest width, neckline width, shoulder width, and yoke depth separately. A garment can have the correct overall width but still feel uncomfortable if the neckline or shoulders are too small.
Ideas for Different Baby Garments
- Baby pullover: Attach a straight half double crochet body below the yoke.
- Baby dress: Continue the body several inches longer and add a simple scalloped or single crochet hem.
- Sleeveless top: Use the yoke with a short body and finish the armholes with single crochet.
- Light cardigan: Keep the front neckline open and add a narrow front edging rather than joining the front completely.
- Color-blocked sweater: Use a different pastel shade for the yoke and body.
Common Crochet Yoke Mistakes and Troubleshooting
The Yoke Is Too Wide
This usually means your stitches are larger than the suggested gauge or your hook is too large. Measure across the yoke after several rows. If the width is consistently larger than expected, try a smaller hook and remake the swatch.
The Neckline Feels Too Tight
Check whether your neckline edging has been worked too tightly. Single crochet can draw an opening inward when worked with firm tension. Try using a slightly larger hook for the edging or placing stitches more generously around the curved sections.
The Shoulder Seams Do Not Match
Before sewing, place the front and back yokes on a flat surface and align the lower edges. If the shoulder widths appear different, recount the stitches. The front shoulders contain 10 stitches each, while the back shoulders contain 12 stitches each in this original base-size interpretation. Ease the extra back stitches gradually along the seam rather than bunching them at one end.
The Fabric Looks Stiff
Baby clothing benefits from a flexible fabric. If your half double crochet fabric feels rigid, loosen your tension or move up one hook size after making a new gauge swatch. Yarn fiber also affects drape, so a soft washable blend may behave differently from a firm cotton yarn.
The Edges Look Uneven
Uneven edges often happen when the first or last stitch of a row is missed. Since the turning chain does not count as a stitch in this pattern, remember to work the first hdc directly into the first stitch and the final hdc into the last stitch.
Finishing, Blocking, and Baby-Safe Care
Once both yoke pieces have been joined, weave in all yarn tails securely on the wrong side. Trim the ends only after they have been worked back and forth through several stitches.
For light shaping, gently dampen the finished yoke and lay it flat on a clean towel. Smooth the shoulders, neckline, and lower edge into the desired shape. Allow the piece to dry completely before attaching the body.
Aggressive blocking is unnecessary for this small garment component. The goal is simply to even out the rows and help the neckline lie flat.
For baby clothing, choose machine-washable or easily washable yarn whenever possible. Follow the care instructions appropriate for the yarn you selected. Avoid attaching loose beads, buttons, charms, or other small detachable decorations to garments intended for babies or young children.
For closures, a carefully secured crocheted loop or a closure appropriate to the finished garment can be used, but check all attachments regularly for looseness. Handmade baby clothing should always be supervised during use and should never be treated as sleepwear or as a safety product unless it meets applicable safety requirements.
At a Glance
- Best yarn: Soft, washable light worsted or worsted-weight yarn.
- Skill level: Confident beginner, with basic row shaping and seaming.
- Key technique: Half double crochet worked in rows with a shaped neckline.
- Base size: Approximately 6 to 12 months, with resizing guidance included.
- Finishing: Shoulder seams, neckline edging, secure weaving of ends, and gentle blocking.
Final Thoughts on This Crochet Yoke Pattern for Baby
This crochet yoke pattern for baby is a versatile starting point for creating soft handmade clothing with a simple, polished shape. The half double crochet texture keeps the construction approachable, while the separate front and back pieces make it easy to control the neckline and shoulder fit.
Before beginning, choose your yarn carefully, check your gauge, and compare the finished measurements with the child or garment size you are making. Read through the complete pattern before picking up the hook, especially the neckline and shoulder instructions.
Once the basic yoke is comfortable to make, experiment with pastel stripes, contrasting necklines, textured rows, longer body sections, or simple crocheted edgings. A small change in color or border can turn the same basic construction into a sweater, tunic, dress, or sleeveless baby top.
Most importantly, use the measurements as a starting point rather than assuming every baby will fit the same standard size. A few minutes spent measuring and checking gauge can make the finished handmade garment much more comfortable and wearable.
Tags
Crochet Yoke Pattern
Baby Crochet
Free Crochet Pattern
Crochet Baby Clothes
Baby Sweater Crochet
Easy Crochet Project
Crochet Baby Garment
Handmade Baby Clothes