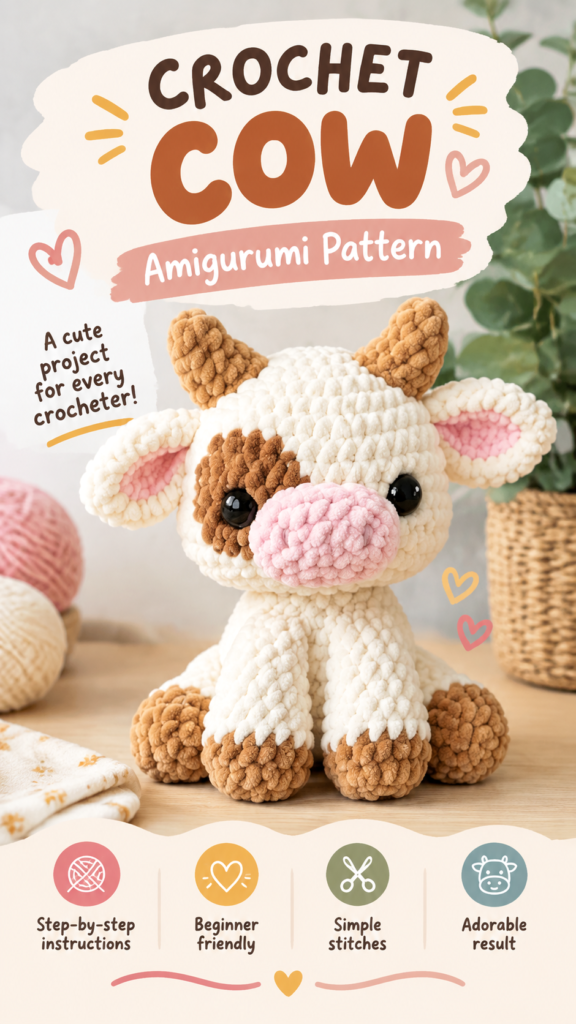
The baby cow crochet project is a charming amigurumi-style plush that brings a soft handmade touch to nurseries, gift baskets, and animal-themed collections. This sweet crochet cow features a rounded head, tiny legs, floppy ears, a textured muzzle, embroidered-style facial details, and a classic farm animal color palette of creamy white, warm brown, soft pink, and golden accents. This original interpretation uses simple amigurumi construction techniques with suggested materials to help you create a similar cuddly character.
Key Takeaways
- A beginner-friendly baby cow crochet amigurumi with separate stuffed pieces.
- Created mainly with single crochet stitches worked in continuous rounds.
- Suggested yarn: soft chenille or plush bulky yarn for a cuddly texture.
- Features simple shaping, color changes, and basic assembly techniques.
- Perfect as a handmade crochet gift idea or farm animal decoration.
Description of the Baby Cow Crochet Project
This baby cow crochet plush is designed as a soft amigurumi toy with a rounded silhouette and friendly expression. The visible design inspiration includes a large oval head, compact body, short legs, small horns, wide ears, and a pink snout that creates the recognizable cow character.
The project belongs to the crochet amigurumi category, where small three-dimensional figures are created by crocheting tightly packed stitches and adding stuffing for shape. The recommended construction method is working each component separately in continuous rounds before sewing the pieces together.
The finished cow has a cozy handmade appearance created through plush yarn texture and simple shaping. The body and head use cream-colored yarn as the main shade, while brown patches, pink facial details, and golden accents add personality. The closest practical stitch match is a tight single crochet fabric, which creates a firm surface that holds stuffing securely.
Crochet Construction and Stitch Analysis
The baby cow crochet design is best recreated using continuous spiral rounds. This technique avoids visible seams and creates the smooth rounded shapes commonly seen in amigurumi animals. A stitch marker is recommended because rounds are not joined with slip stitches.
The project uses single crochet stitches with strategic increases and decreases. Increases expand the round shape of the head and body, while decreases create curves around the neck, legs, and facial areas.
The recommended difficulty level is confident beginner. Basic crochet skills such as single crochet, increasing, decreasing, stuffing, and sewing pieces together are helpful before starting.
Free Crochet Pattern: Baby Meadow Cow Amigurumi
Free Crochet Pattern
Project Name: Baby Meadow Cow Amigurumi
Pattern Description: A soft crochet cow plush featuring a rounded head, small body, four legs, ears, horns, tail, muzzle, and embroidered facial details. This original pattern creates a similar style using recommended yarn and shaping techniques.
| Skill Level | Confident Beginner |
| Finished Size | Approximately 8 inches (20 cm) tall |
| Yarn | Super bulky chenille yarn, approximately 120 yards (110 meters) cream, 25 yards (23 meters) brown, 15 yards (14 meters) pink, 15 yards (14 meters) tan |
| Hook | 4.0 mm crochet hook (US G-6) |
| Gauge | Approximate gauge: 14 single crochet stitches x 16 rounds = 4 inches (10 cm) |
| Terminology | US crochet terms |
Materials and Notions
- Super bulky chenille yarn in cream, brown, pink, and tan
- 4.0 mm crochet hook (US G-6)
- Polyester fiber stuffing
- Yarn needle
- Scissors
- Stitch marker
- Black embroidery thread or safety eyes
Safety Note: Plastic safety eyes may not be appropriate for babies or children under three. For a baby-safe version, use securely embroidered eyes instead and avoid any loose decorations.
Abbreviations
- MR: Magic ring
- sc: Single crochet
- inc: Increase, make 2 sc in one stitch
- dec: Decrease, single crochet two stitches together
- sl st: Slip stitch
- ch: Chain
- st: Stitch
- FO: Fasten off
Special Stitch Explanation
Invisible decrease: Insert the hook through the front loops only of the next two stitches, yarn over, pull through both loops, yarn over again, and complete one single crochet. This creates a smoother amigurumi surface.
Construction Notes
All main pieces are worked in continuous rounds. Do not join rounds unless specifically instructed. Place a stitch marker in the first stitch of each round and move it upward as you crochet.
Head
- With cream yarn, make a MR.
- Round 1: 6 sc into MR. (6)
- Round 2: Inc in each stitch around. (12)
- Round 3: (Sc in next stitch, inc) repeat 6 times. (18)
- Round 4: (Sc in next 2 stitches, inc) repeat 6 times. (24)
- Round 5: (Sc in next 3 stitches, inc) repeat 6 times. (30)
- Rounds 6-11: Sc around. (30)
- Round 12: (Sc in next 3 stitches, dec) repeat 6 times. (24)
- Round 13: (Sc in next 2 stitches, dec) repeat 6 times. (18)
- Begin stuffing firmly.
- Round 14: (Sc in next stitch, dec) repeat 6 times. (12)
- Round 15: Dec around. (6)
- FO and close opening.
Body
- With cream yarn, make a MR.
- Round 1: 6 sc into MR. (6)
- Round 2: Inc around. (12)
- Round 3: (Sc, inc) repeat 6 times. (18)
- Round 4: (Sc 2, inc) repeat 6 times. (24)
- Rounds 5-10: Sc around. (24)
- Round 11: (Sc 2, dec) repeat 6 times. (18)
- Stuff firmly.
- Round 12: (Sc, dec) repeat 6 times. (12)
- Round 13: Dec around. (6)
- FO and close.
Legs (Make 4)
- With tan yarn, make a MR.
- Round 1: 6 sc into MR. (6)
- Round 2: Inc around. (12)
- Rounds 3-4: Sc around. (12)
- Change to cream yarn.
- Rounds 5-8: Sc around. (12)
- Stuff lightly.
- FO, leaving a long sewing tail.
Ears (Make 2)
- With cream yarn, make a MR.
- Round 1: 6 sc into MR. (6)
- Round 2: (Sc, inc) repeat 3 times. (9)
- Round 3: Sc around. (9)
- Flatten piece and FO with sewing tail.
Horns (Make 2)
- With tan yarn, make a MR.
- Round 1: 5 sc into MR. (5)
- Round 2: Sc around. (5)
- Round 3: Inc around. (10)
- Round 4: Sc around. (10)
- FO and leave a sewing tail.
Muzzle
- With pink yarn, make a MR.
- Round 1: 6 sc into MR. (6)
- Round 2: Inc around. (12)
- Round 3: (Sc, inc) repeat 6 times. (18)
- Round 4: Sc around. (18)
- FO and leave a sewing tail.
Assembly
- Sew the head securely to the body, centering the neck area.
- Attach the four legs evenly around the lower body.
- Sew ears to the upper sides of the head.
- Attach horns between the ears.
- Place the muzzle near the lower center of the face.
- Embroider eyes and small facial details.
- Add small brown patches using surface embroidery or sewn yarn details.
Customization and Size Adjustment Guidance
The baby cow crochet pattern can be customized easily by changing yarn thickness, colors, and proportions. To create a larger plush, use a thicker yarn with a larger hook while keeping stitches tight enough to prevent stuffing from showing.
- For a mini cow, reduce the number of plain rounds in the head and body.
- For a larger stuffed animal, increase the widest rounds before beginning decreases.
- Create different cow personalities by changing ear positions and facial expressions.
- Add embroidered spots instead of loose attachments for safer baby-friendly designs.
Common Mistakes and Troubleshooting
- Uneven shaping: Check stitch counts at the end of every round.
- Loose fabric: Use a smaller hook if stuffing is visible.
- Lumpy stuffing: Add small amounts gradually and shape as you fill.
- Loose facial pieces: Secure all sewn details with multiple passes of yarn.
Finishing, Shaping, and Care
After assembly, gently shape the cow by adjusting the stuffing inside the head and body. No traditional blocking is required for plush amigurumi, but lightly steaming the finished piece from a distance can help smooth yarn fibers if needed.
For care, hand washing with mild soap is recommended for most plush yarn projects. Allow the cow to air dry completely before storing or displaying.
At a Glance
- Best yarn choice: Soft chenille or plush super bulky yarn.
- Skill level: Confident beginner amigurumi project.
- Key technique: Continuous rounds with single crochet shaping.
- Adjustment option: Change yarn weight and round counts for different sizes.
- Finishing method: Stuff firmly, sew pieces securely, and embroider details.
Create Your Own Baby Cow Crochet Friend
This baby cow crochet pattern is a sweet way to practice amigurumi techniques while creating a lovable handmade keepsake. Choose soft yarn, prepare your materials, and read through the complete instructions before beginning. Checking your stitch counts and personalizing colors will help create a unique crochet cow that matches your style.
Whether you are making a nursery decoration, a handmade crochet gift idea, or adding to an animal collection, this project offers a fun combination of simple stitches and creative details.
Tags
Baby Cow Crochet
Crochet Amigurumi
Free Crochet Pattern
Crochet Cow Plush
Easy Crochet Project
Handmade Crochet