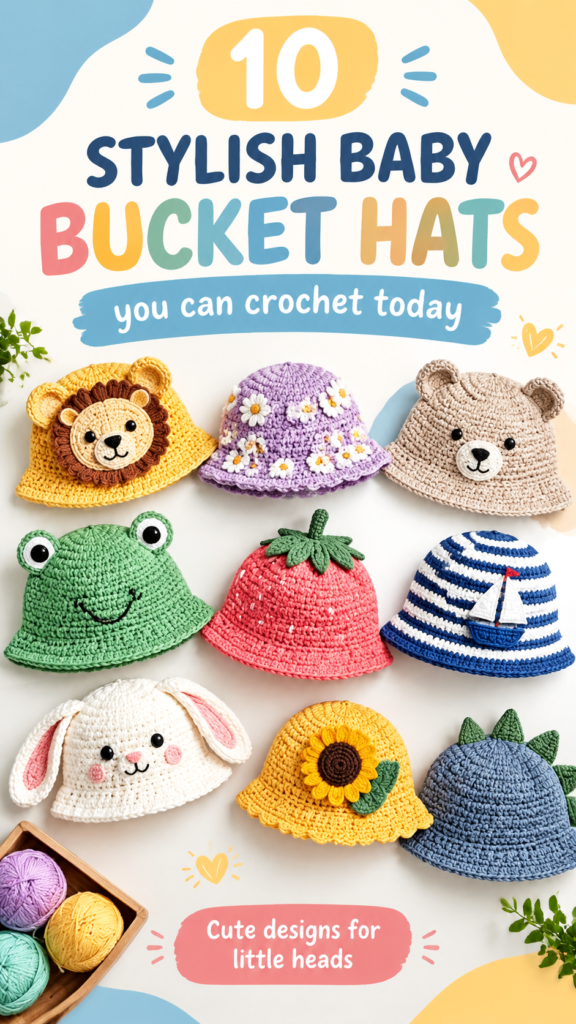
The sweet charm of a handmade crochet baby bucket hat comes from its playful shape, soft texture, and endless customization possibilities. This style of baby accessory has become a favorite crochet project because it combines practical sun protection with adorable handmade details. From animal-inspired designs to simple textured brims, a crochet bucket hat can be personalized with colors, stitches, and appliques to create a unique piece for little ones.
This original crochet pattern is inspired by the classic rounded bucket hat silhouette shown in the collection of colorful baby hats. The design uses simple crochet techniques, a sturdy yet flexible fabric, and gentle shaping to create a comfortable accessory suitable for everyday outings, photo sessions, or thoughtful handmade gifts.
Key Takeaways
- This crochet baby bucket hat is a beginner-friendly accessory project.
- The pattern uses simple joined rounds with single crochet stitches for structure.
- Soft cotton or cotton-blend yarn is recommended for comfort and easy washing.
- The rounded crown and firm brim create the classic bucket hat shape.
- The design can be customized with colors, stripes, flowers, or animal details.
Crochet Baby Bucket Hat Project Description
The pictured style represents a collection of playful crochet baby bucket hats featuring smooth rounded crowns, gently flared brims, and decorative details. Some designs include animal faces, textured stitches, colorful stripes, or small appliques, making them ideal inspiration for personalized baby crochet projects.
This original interpretation creates a simple everyday baby bucket hat with a clean silhouette. The hat is worked from the top down in joined rounds, beginning with a flat circular crown. Even increases shape the crown, while straight rounds create the sides. A final section of increases forms the soft bucket-style brim.
The recommended construction uses dense single crochet stitches because they create a fabric that holds its shape while remaining comfortable. A cotton or cotton-blend yarn works especially well because it is breathable, washable, and gentle against sensitive skin.
Important: Baby accessories should always be made with secure construction. Avoid buttons, beads, loose decorations, or small detachable pieces that could create hazards for infants and young children. For decorative details, embroidered features or firmly attached crochet elements are safer choices.
Crochet Construction and Stitch Analysis
The crochet baby bucket hat uses a simple circular construction similar to many classic crochet hat designs. The project is built in three main sections:
- Crown: A flat circle worked with evenly spaced increases creates the top of the hat.
- Hat body: Several rounds without increases build the height and rounded shape.
- Brim: Controlled increases create the outward bucket hat edge.
The visible texture of this style is closest to a tight single crochet fabric. This stitch creates small, neat rows that allow color changes and decorative additions to stand out. A slightly smaller hook than usually recommended for the yarn helps create a firm fabric that keeps the brim from becoming floppy.
Free Crochet Pattern: Little Explorer Baby Bucket Hat
Pattern Overview
| Skill Level | Confident beginner |
| Finished Size | Approx. 17 inch circumference (43 cm) for 6 to 12 months |
| Yarn | Suggested worsted weight cotton yarn, approximately 120 yards (110 meters) |
| Hook | Recommended 4.0 mm crochet hook (US G/6) |
| Gauge | Approximately 18 single crochet stitches and 20 rounds in a 4 inch (10 cm) square |
| Terminology | US crochet terms |
Materials
- Worsted weight cotton yarn in main color, approximately 120 yards (110 meters)
- Small amount of contrasting yarn for optional decorations
- 4.0 mm crochet hook (US G/6)
- Yarn needle
- Stitch marker
- Scissors
Abbreviations
- ch = chain
- sl st = slip stitch
- sc = single crochet
- inc = increase, 2 single crochet stitches in the same stitch
- st = stitch
- rep = repeat
UK equivalent note: single crochet is called double crochet in UK terminology.
Construction Notes
This hat is worked in joined rounds. Each round begins with chain 1, which does not count as a stitch. Join each round with a slip stitch into the first single crochet. Use a stitch marker if you prefer to track the beginning of each round.
Hat Pattern Instructions
Crown
- Round 1: Make a magic ring. Ch 1, work 8 sc into ring. Join with sl st. (8 sts)
- Round 2: Ch 1. Inc in each stitch around. Join. (16 sts)
- Round 3: Ch 1. Sc in next stitch, inc in next stitch. Repeat around. Join. (24 sts)
- Round 4: Ch 1. Sc in next 2 stitches, inc in next stitch. Repeat around. Join. (32 sts)
- Round 5: Ch 1. Sc in next 3 stitches, inc in next stitch. Repeat around. Join. (40 sts)
- Round 6: Ch 1. Sc in next 4 stitches, inc in next stitch. Repeat around. Join. (48 sts)
- Round 7: Ch 1. Sc in next 5 stitches, inc in next stitch. Repeat around. Join. (56 sts)
Hat Body
- Rounds 8 to 18: Ch 1. Sc in each stitch around. Join after every round. (56 sts)
The body should measure approximately 3.5 inches (9 cm) from the crown edge before beginning the brim.
Brim Shaping
- Round 19: Ch 1. Sc in next 6 stitches, inc in next stitch. Repeat around. Join. (64 sts)
- Round 20: Ch 1. Sc in each stitch around. Join. (64 sts)
- Round 21: Ch 1. Sc in next 7 stitches, inc in next stitch. Repeat around. Join. (72 sts)
- Round 22: Ch 1. Sc in each stitch around. Join. (72 sts)
- Round 23: Ch 1. Sc in each stitch around. Join. (72 sts)
Fasten off and weave in all ends securely.
Optional Decorative Details
For an animal-inspired baby bucket hat, add embroidered eyes, noses, or simple crocheted shapes. For floral designs, create small flat crochet flowers and stitch them firmly onto the hat. Keep decorations minimal and securely attached.
Finishing Instructions
Gently shape the brim with your hands and allow the hat to rest flat before wearing. Light blocking with water can help even out stitches, but avoid stretching the hat beyond the intended size.
Customization and Size Adjustment Guidance
This crochet baby bucket hat can easily be adapted for different ages. To increase the circumference, continue adding increase rounds to the crown before working the body. The crown should measure approximately 1 to 1.5 inches (2.5 to 4 cm) smaller than the desired finished circumference before the sides are added because crochet fabric has natural stretch.
- For a smaller baby size, stop crown increases earlier and reduce body rounds.
- For toddler sizes, add one or two extra increase rounds before the body section.
- For a deeper hat, add additional straight rounds before starting the brim.
- For a wider brim, add one extra increase round before finishing.
Common Crochet Mistakes and Troubleshooting
Hat Looks Too Flat
If the crown does not curve naturally, check your stitch count. Too many increases can create a ruffled edge, while too few can create a bowl shape.
Brim Curls Up
A curling brim often means the fabric is too tight or needs a little more structure. Try blocking the hat gently or adding another relaxed edging round.
Size Is Incorrect
Always compare the hat circumference with the intended wearer’s head measurement. Crochet tension differences can change the finished size significantly.
Finishing, Blocking, and Care
Wash the finished crochet baby bucket hat according to the yarn recommendations. Cotton yarn usually benefits from gentle washing and air drying to maintain shape.
Lay the hat flat after washing, reshape the crown, and gently smooth the brim. Avoid hanging the hat while wet because the weight of the water can stretch the stitches.
At a Glance
- Best yarn choice: Soft cotton or cotton-blend worsted weight yarn.
- Skill level: Confident beginner crochet project.
- Main technique: Joined rounds with single crochet increases.
- Customization: Add colors, embroidery, or simple crochet details.
- Finishing: Shape gently and weave in ends securely.
Create Your Own Crochet Baby Bucket Hat
A crochet baby bucket hat is a charming handmade accessory that allows endless creativity through color choices, textures, and decorative details. This original free crochet pattern provides a simple foundation that can be personalized for different seasons, outfits, and gifting occasions.
Before beginning, choose a comfortable yarn, check your gauge when accurate sizing matters, and read through the complete pattern instructions. Small changes in yarn weight and tension can create a different fit, so taking time with measurements will help you create a beautiful handmade crochet accessory.
Tags
Crochet Baby Bucket Hat
Free Crochet Pattern
Baby Crochet Ideas
Beginner Crochet Pattern
Handmade Baby Accessories
Crochet Tutorial