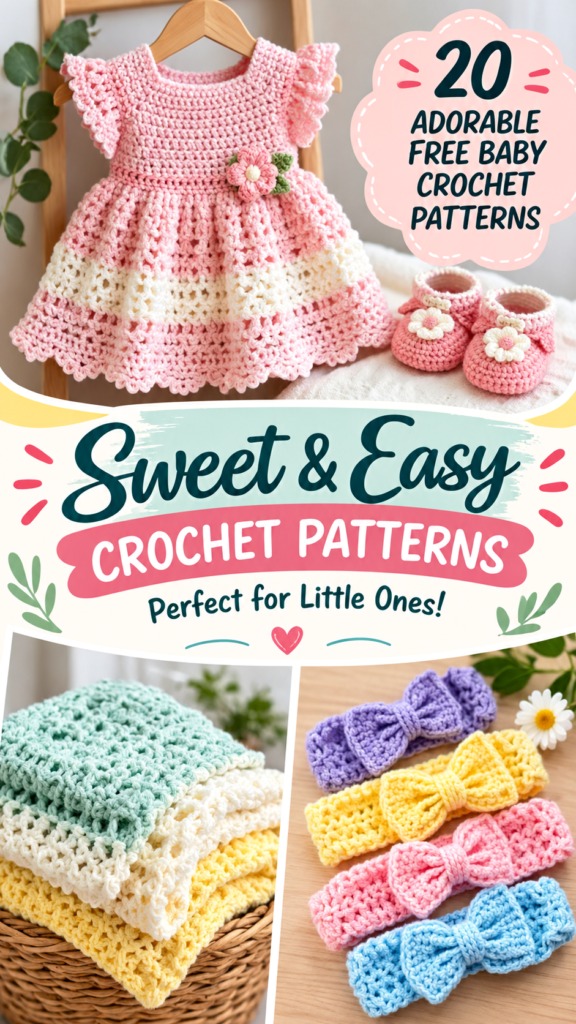
This sweet crochet baby set brings together the soft, handmade look of a little dress, matching booties, and a simple headband. The coordinated pieces use gentle texture, a softly flared silhouette, and pastel-friendly styling that makes the set especially appealing for baby gifts, milestone photos, birthdays, and everyday wear.
The original interpretation below is designed as a practical 0 to 3 month set using lightweight washable yarn. The photographed style suggests a textured crochet fabric with delicate edging, so this pattern uses half double crochet for a soft, structured fabric and a simple shell border for a decorative finish. Exact yarn, gauge, measurements, and construction cannot be determined visually, so the specifications below are suggested starting points for creating a similar handmade look.
Key Takeaways
- A coordinated crochet baby set featuring a dress, booties, and headband.
- Designed around a soft DK or light worsted yarn with a 4.0 mm crochet hook.
- Uses half double crochet, simple shaping, joined rounds, and a scalloped shell edging.
- The 0 to 3 month base size can be adjusted by changing the yoke or skirt measurements.
- Soft washable yarn makes the finished pieces practical for gifting and regular baby wear.
- The decorative details can be changed with contrasting colors without altering the basic construction.
A Sweet Crochet Baby Set for Handmade Gifts
A handmade baby outfit does not need complicated stitches to look special. The charm of this crochet baby set comes from combining straightforward construction with thoughtful details. A softly textured dress forms the centerpiece, while tiny booties and a matching headband complete the coordinated look.
The dress is designed with a gently expanding yoke and a comfortable A-line skirt. The bodice is worked from the neckline downward in joined rounds, which keeps the construction relatively simple while creating a neat foundation for the skirt. Once the yoke reaches the desired chest width, the armholes are formed with short chains and the body continues in rounds.
The booties use an oval crocheted sole followed by a low upper and a shaped toe. The headband is intentionally simple, making it an excellent place to use leftover yarn. A small crocheted bow gives the accessory the same sweet character as the dress without requiring complicated motifs.
For a coordinated set, you can work all three pieces in one soft shade or use a main color with a contrasting trim. Cream, pale pink, mint, butter yellow, lavender, and light blue all work beautifully with this style.
What Makes This Crochet Baby Set Special?
The project combines three useful baby accessories into one cohesive crochet gift idea. The dress has enough texture to look detailed without relying on difficult stitch combinations, while the booties and headband can be completed with basic techniques.
The overall construction is also flexible. The skirt can be made shorter for a tunic-style dress, or additional rounds can be added for a longer silhouette. The edging can remain in the main color for a subtle finish or be worked in a contrasting shade for more definition.
Likely Crochet Construction
- Dress: top-down joined rounds for the yoke and skirt.
- Yoke: half double crochet with four evenly spaced increase points.
- Skirt: joined rounds with gradual increases for an A-line shape.
- Edging: simple five-double-crochet shells separated by single crochet stitches.
- Booties: oval sole followed by a crocheted upper and shaped toe.
- Headband: joined rounds of single crochet with a separate crocheted bow.
Yarn and Texture
A smooth DK weight yarn is a practical choice for this project because it creates enough stitch definition for the textured dress while remaining relatively light. A cotton or cotton-blend yarn can give the fabric a crisp handmade appearance, while a soft washable acrylic or acrylic blend can provide easier care and a slightly warmer drape.
The recommended fabric is neither extremely loose nor stiff. The goal is a comfortable garment with enough structure to hold the skirt shape while remaining soft against delicate skin.
Important: Baby garments should be comfortable rather than restrictive. Measure the finished bodice and compare it with the baby’s current measurements before adding extra rows or increasing the circumference.
Free Crochet Pattern: Sweet Little Baby Set
Project description: This original crochet baby set includes a sleeveless textured dress, matching booties, and a simple bow headband. It is designed as a coordinated 0 to 3 month outfit and can be adjusted using the sizing instructions below.
| Skill Level | Confident beginner |
| Finished Dress Size | Approx. 17 in / 43 cm chest circumference, 9 in / 23 cm total length |
| Bootie Size | Approx. 3.75 in / 9.5 cm foot length |
| Headband | Approx. 13.5 in / 34 cm relaxed circumference |
| Yarn | DK weight, category 3, soft washable fiber |
| Yarn Quantity | Approx. 320 yd / 293 m for the complete set |
| Hook | 4.0 mm / US G-6 crochet hook |
| Gauge | 18 hdc x 12 rows = 4 in / 10 cm |
| Terminology | US crochet terminology |
Materials
- Approx. 260 yd / 238 m DK weight yarn for the dress.
- Approx. 35 yd / 32 m DK weight yarn for both booties.
- Approx. 25 yd / 23 m DK weight yarn for the headband and bow.
- 4.0 mm / US G-6 crochet hook.
- Yarn needle.
- Stitch marker.
- Small scissors.
- Measuring tape.
Terminology and Abbreviations
- ch: chain
- sl st: slip stitch
- sc: single crochet
- hdc: half double crochet
- dc: double crochet
- hdc2tog: half double crochet two together
- BLO: back loop only
- st: stitch
- sts: stitches
- rnd: round
- rep: repeat
UK equivalent note: US sc is UK double crochet, US hdc is UK half treble crochet, and US dc is UK treble crochet. The actual instructions below use US terminology only.
Special Stitch
Shell: Work 5 dc into the same stitch. This creates the scalloped edging used around the dress hem.
Raglan increase: Work 2 hdc into the marked stitch. Each increase adds one stitch to the total because the original marked stitch is replaced by two stitches.
Construction Notes
The dress begins at the neckline and is worked downward in joined rounds. The four increase points create a gently expanding yoke. After the sixth yoke round, the four sections are divided into front and back areas, with four-chain underarm spaces connecting the sections.
The skirt then continues in joined rounds. The increases are intentionally spaced rather than made in every round, producing a gradual A-line shape instead of a sharply flared skirt.
Part 1: Crochet Baby Dress
Neckline and Yoke
Foundation: Ch 44. Join with a sl st to the first chain, being careful not to twist the chain.
Rnd 1: Ch 2. Hdc in each ch around. Join with a sl st to the first hdc. Do not count the ch-2 as a stitch. 44 sts.
Place a stitch marker in every 11th stitch. These four marked stitches form the increase points for the yoke.
Rnd 2: Ch 2. Hdc in each stitch to the first marked stitch, 2 hdc in marked stitch, then continue hdc to the next marked stitch. Work 2 hdc in each remaining marked stitch. Join with a sl st to the first hdc. 48 sts.
Rnd 3: Ch 2. Hdc in each stitch around, working 2 hdc in each of the 4 marked stitches. Join. 52 sts.
Rnd 4: Repeat Rnd 3. 56 sts.
Rnd 5: Repeat Rnd 3. 60 sts.
Rnd 6: Repeat Rnd 3. 64 sts.
After Rnd 6, there are 16 stitches in each section between the four increase points. This division gives the dress two 32-stitch body sections.
Separate the Armholes
Body setup round: Ch 2. Hdc across the first 16 stitches. Ch 4 for the first underarm. Skip the next 16 stitches. Hdc across the next 16 stitches. Ch 4 for the second underarm. Skip the final 16 stitches. Join with a sl st to the first hdc. 40 hdc plus two ch-4 spaces.
For the next round, treat each four-chain space as four stitches. The dress body therefore contains 72 stitches around the complete chest circumference once both skipped sections are replaced by their underarm chains.
Skirt
Skirt Rnd 1: Ch 2. Hdc in each stitch and across each underarm chain around. Join. 72 sts.
Skirt Rnd 2: Ch 2. Work 11 hdc, 2 hdc in next stitch. Repeat this sequence 6 times around. Join. 78 sts.
Skirt Rnd 3: Ch 2. Hdc in each stitch around. Join. 78 sts.
Skirt Rnd 4: Ch 2. Work 12 hdc, 2 hdc in next stitch. Repeat 6 times. Join. 84 sts.
Skirt Rnd 5: Hdc in each stitch around. Join. 84 sts.
Skirt Rnd 6: Ch 2. Work 13 hdc, 2 hdc in next stitch. Repeat 6 times. Join. 90 sts.
Skirt Rnd 7: Hdc in each stitch around. Join. 90 sts.
Skirt Rnd 8: Ch 2. Work 14 hdc, 2 hdc in next stitch. Repeat 6 times. Join. 96 sts.
Skirt Rnd 9: Hdc in each stitch around. Join. 96 sts.
Skirt Rnd 10: Hdc in each stitch around. Join. 96 sts.
Skirt Rnd 11: Ch 2. Work 15 hdc, 2 hdc in next stitch. Repeat 6 times. Join. 102 sts.
Skirt Rnds 12 to 25: Ch 2. Hdc in each stitch around. Join at the end of every round. 102 sts per round.
Pro Tip: Try the dress against the intended measurements after Rnd 18. If a shorter dress is preferred, move directly to the edging. For a longer dress, add additional plain hdc rounds before the final border.
Scalloped Dress Edging
Rnd 26: Ch 1. Sc in first stitch. Skip 2 stitches, work 5 dc in next stitch, skip 2 stitches, sc in next stitch. Repeat this sequence around the entire hem. Join with a sl st to the first sc. Because 102 is evenly divisible by 6, the round finishes cleanly with 17 shells.
Fasten off and weave in the yarn tail securely. The completed skirt should have 17 evenly spaced shells around the hem.
Neckline and Armhole Finish
Join yarn at the back neckline. Work one round of sc evenly around the neckline, placing approximately 44 sc around the opening. Do not pull the stitches tightly. Join with a sl st and fasten off.
For each armhole, join yarn beneath one arm and work one round of sc around the armhole opening. Aim for approximately 28 sc around each armhole, distributing the stitches evenly. Join and fasten off.
If the neckline or armholes feel too firm, remove the edging and work the stitches more loosely. Baby garments should have comfortable openings that do not pinch or restrict movement.
Part 2: Matching Crochet Baby Booties
The booties are worked from the sole upward. Make two identical booties.
Oval Sole
Foundation: Ch 13.
Rnd 1: Hdc in the 3rd chain from hook and in the next 9 chains. Work 5 hdc in the final chain. Turn your work so you can crochet along the underside of the foundation chain. Hdc in the next 10 chains. Work 4 hdc in the remaining loop of the starting chain. Join with a sl st to the first hdc. 31 sts.
Rnd 2: Ch 2. Hdc in each of the first 10 stitches. Work 2 hdc in each of the next 5 stitches. Hdc in each of the next 10 stitches. Work 2 hdc in each of the final 4 stitches. Join. 40 sts.
The sole is now approximately 3.75 inches / 9.5 cm long when worked at the suggested gauge.
Bootie Upper
Rnd 3: Ch 1. Sc in each stitch around. Join with a sl st. 40 sts.
Rnd 4: Ch 1. Sc in each stitch around. Join. 40 sts.
Rnd 5: Ch 1. Sc in the first 10 stitches. Hdc2tog across the next 10 stitches, creating 5 decreases. Sc in the remaining 20 stitches. Join. 35 sts.
Rnd 6: Ch 1. Sc in the first 10 stitches. Hdc2tog across the next 8 stitches, creating 4 decreases. Sc in the remaining 17 stitches. Join. 31 sts.
Rnd 7: Ch 1. Sc in each stitch around. Join. 31 sts.
Bootie Cuff
Rnd 8: Ch 1. Sc in the back loop only of each stitch around. Join. 31 sts.
Rnd 9: Ch 1. Sc in BLO around. Join. 31 sts.
Rnd 10: Ch 1. Sc in BLO around. Join. 31 sts.
Fasten off and weave in the end. Repeat all instructions for the second bootie.
For a decorative look, use the same contrast color as the dress edging for the final cuff round. Keep any color changes securely woven into the fabric.
Part 3: Simple Crochet Baby Headband
The headband is designed with gentle stretch and should fit comfortably rather than tightly.
Headband Base
Foundation: Ch 61. Join with a sl st to the first chain without twisting.
Rnd 1: Ch 1. Sc in each chain around. Join. 60 sts.
Rnd 2: Ch 1. Sc in each stitch around. Join. 60 sts.
Rnd 3: Ch 1. Sc in BLO around. Join. 60 sts.
Rnd 4: Ch 1. Sc in BLO around. Join. 60 sts.
Fasten off and weave in the ends.
Crochet Bow
Row 1: Ch 16. Hdc in the 3rd chain from hook and across. 14 hdc.
Rows 2 to 5: Ch 2, turn. Hdc in each stitch across. 14 hdc.
Fasten off, leaving a yarn tail approximately 18 inches / 46 cm long.
Fold the rectangle into a compact bow shape by bringing the short ends toward the center. Wrap the center several times with the reserved yarn tail, then secure the back firmly. Sew the bow to the headband with multiple passes of yarn.
For a baby item, avoid loose beads, buttons, charms, metal decorations, or detachable embellishments. The bow should be firmly attached and checked regularly for loose stitching.
Assembly and Finishing
There is very little sewing required because the dress and headband are primarily worked as joined pieces. After completing each item, use a yarn needle to weave every tail back and forth through several stitches on the wrong side. Trim only after the yarn is secure.
Inspect the underarm joins, neckline, bootie sole, cuff, and headband bow especially carefully. These areas receive more handling and should have firmly secured ends.
If you want a more polished appearance, lightly block the dress before wearing. Shape the skirt flat, gently smooth the shell border, and allow it to dry completely. Avoid aggressive stretching because the goal is to preserve the baby’s garment dimensions.
Baby Safety: Use soft washable yarn and avoid small detachable decorations. Check every seam and embellishment before each use. Handmade baby clothing should not include loose buttons, beads, long cords, or other pieces that could become choking or entanglement hazards. This pattern is for clothing and accessories and should not be used as sleepwear guidance.
Customization and Size Adjustment
The easiest way to customize this crochet baby set is to change the dress length, skirt fullness, color arrangement, and accessory details. Because the dress uses a clearly defined increase system, adjustments can be made without redesigning the entire project.
Adjusting the Dress Width
For a larger chest measurement, add stitches to the neckline foundation in multiples of 4. The original foundation is 44 chains. A foundation of 48, 52, or 56 chains can be used for additional circumference, provided the four raglan sections remain evenly divided.
For a smaller size, reduce the foundation in multiples of 4. Always make a gauge swatch first and compare the finished circumference with the baby’s actual chest measurement.
The yoke increases should remain evenly distributed at four points. If the foundation changes, divide the starting stitches into four equal sections and place one increase point at each section boundary.
Adjusting Dress Length
For a shorter dress, stop the skirt after any plain round and work the scalloped border. For a longer dress, continue with additional plain hdc rounds after Rnd 25.
If you add length without changing the width, the dress will have a slimmer silhouette. For a fuller skirt, repeat an additional increase round before working the final plain rounds. Keep the increases evenly spaced to prevent visible waves or puckering.
Color Ideas
- Use cream for the dress with a pale pink scalloped hem.
- Try mint green for the yoke and cream for the skirt.
- Make the dress entirely pastel pink and use white for the bootie flowers or edging.
- Alternate two colors every three skirt rounds for subtle horizontal stripes.
- Use one main color throughout the set for a classic heirloom-inspired appearance.
Making the Set for an Older Baby
For approximately 3 to 6 months, measure the baby’s chest and desired dress length rather than relying only on age. Increase the neckline foundation in a multiple of 4, then divide it evenly into four yoke sections. Work additional yoke rounds until the armhole depth and chest width are comfortable.
The bootie sole should be adjusted according to actual foot length. Add foundation chains to lengthen the sole, then maintain the same oval construction. The headband should be based on head circumference with a small amount of negative ease so it stays in place without feeling tight.
Gauge Matters for Baby Garments
A small gauge difference can noticeably change a baby garment. If your swatch has more stitches per 4 inches than the pattern gauge, your fabric is tighter and the garment will come out smaller. If it has fewer stitches, your fabric is looser and the garment will come out larger. Adjust the hook size before changing the stitch counts whenever possible.
Common Mistakes and Troubleshooting
The Yoke Looks Uneven
Check that the four increase points are evenly distributed. An extra increase or missed increase can make one side of the dress expand more quickly than the other. Stitch markers are particularly helpful during the yoke rounds.
The Skirt Waves Too Much
Too many increases create excess fabric. Count the stitches after every increase round and make sure each increase round contains exactly six increases. If the skirt is already large enough, omit a planned increase round and continue with plain hdc rounds.
The Skirt Curls at the Hem
A small amount of curling can relax after blocking. If the fabric curls significantly, check your tension and make sure the hook size matches the recommended gauge. The scalloped border also helps settle the lower edge.
The Bootie Sole Is Too Small
Compare your sole with the desired foot length before beginning the upper. If your gauge is tighter than recommended, the sole will be smaller. Try a larger hook or add foundation chains while preserving the oval shape.
The Headband Feels Too Tight
Baby headbands should not leave deep marks. Add chains to the foundation for a larger circumference, keeping the number of stitches divisible by 1 because the band is worked in single crochet. Measure the finished band relaxed before attaching the bow.
Finishing, Blocking, and Care
Once all three pieces are finished, gently wash them according to the yarn manufacturer’s care recommendations. A mild wash is generally preferable for delicate handmade baby garments. Do not use harsh heat unless the yarn specifically permits it.
Shape the dress while damp by laying it flat on a clean towel. Smooth the neckline, armholes, skirt, and shell edging into place. Allow the garment to dry completely before storing or wearing.
The booties can be shaped by gently filling them with a clean soft cloth while drying. Do not stretch the soles aggressively. For the headband, lay the band flat and reshape it by hand.
Store the completed set clean and dry. Before each use, inspect the dress edging, bootie seams, headband, and bow attachment. Repair loose stitches before giving the item to a baby.
At a Glance
- Best yarn: Soft washable DK weight category 3 yarn.
- Skill level: Confident beginner with basic shaping experience.
- Key technique: Joined half double crochet rounds with evenly spaced increases.
- Size adjustment: Modify the neckline foundation, yoke depth, skirt length, and accessory circumference.
- Finishing: Add a neat single crochet edging and scalloped shell border, then gently block.
A Handmade Crochet Baby Set to Personalize
This crochet baby set is designed to capture the charm of coordinated handmade baby clothing while keeping the actual construction approachable. The dress provides the main focal point with its gently flared skirt and scalloped edge, while the matching booties and bow headband complete the outfit.
Choose a soft yarn, check your gauge before beginning the dress, and read through the complete pattern so you understand the yoke division and skirt increases. Small changes in yarn, hook size, or tension can affect the final measurements, so use the stated dimensions as a practical guide rather than a substitute for measuring the intended wearer.
Most importantly, personalize the colors and proportions to suit your project. A simple two-color palette, a contrasting hem, or a longer skirt can give the same basic construction a completely different character. With careful finishing and secure stitching, this free crochet pattern can become a charming handmade gift for a little one.
Tags
Crochet Baby Set
Free Crochet Pattern
Crochet Baby Dress
Baby Crochet Patterns
Crochet Baby Booties
Crochet Headband
Handmade Baby Gift
Easy Crochet Project