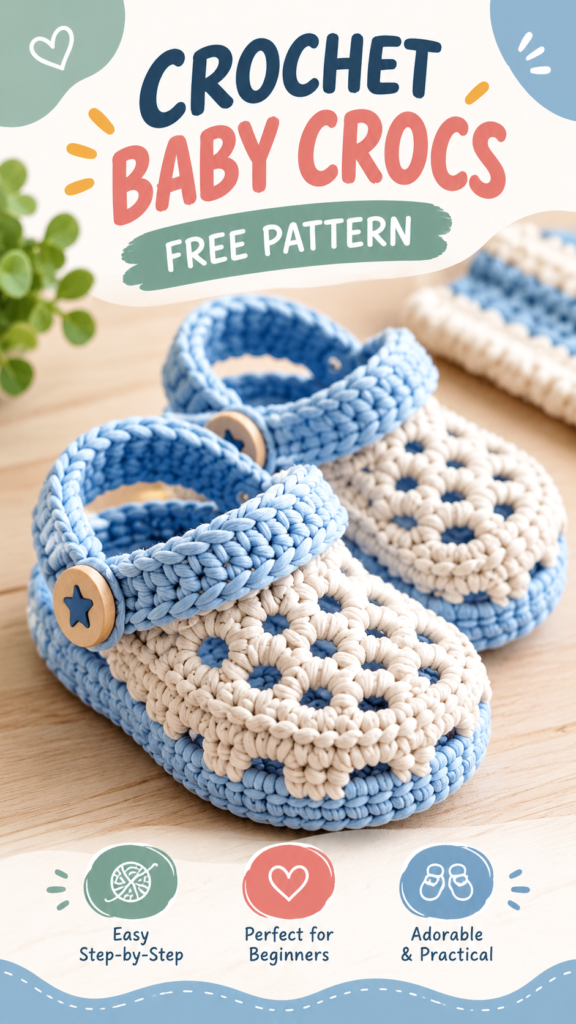
These free crochet baby shoes are inspired by the soft, cozy look of classic handmade baby booties, with a pastel blue sole and upper accented by delicate cream floral motifs. The original interpretation below uses a shaped crochet sole, a gently tapered upper, and separate flower squares that are stitched securely across the toe. The result is a sweet pair of lightweight baby shoes that works especially well as a handmade gift, nursery accessory, or special outfit accent.
The construction is intentionally practical for confident beginners. The sole is crocheted first, the upper is built directly around its edge, and the decorative motifs are made separately before being sewn into position. This approach makes the project easier to customize than trying to reproduce every visual detail of a photographed shoe.
Key Takeaways
- Project type: Soft crochet baby shoes with a decorative floral toe.
- Skill level: Confident beginner to intermediate.
- Main construction: An oval sole with the upper crocheted around the perimeter.
- Texture: Compact single crochet creates a firm, cushioned fabric suitable for little shoes.
- Yarn choice: Soft washable DK-weight yarn is suggested for comfortable baby footwear.
- Customization: The sole and upper can be adjusted for several baby foot lengths.
About These Crochet Baby Shoes
The pictured style has a charming handmade character created by combining a cool pastel blue base with a warm cream overlay. The toe area appears to use small floral motifs with rounded petals surrounding contrasting centers. The textured stitches give the shoes a plush appearance rather than a flat, tightly woven finish.
For this original free crochet baby shoes pattern, the decorative look is translated into a practical construction using compact single crochet for the shoe and small four-petal flower squares for the toe. This keeps the pattern achievable while still capturing the soft floral character of the inspiration.
The finished shoe is designed as a flexible indoor bootie rather than a structured outdoor shoe. Because crochet fabric does not provide the same support, traction, or protection as a manufactured sole, these are best treated as soft baby footwear for supervised use. They should not be presented as medically supportive footwear or as a substitute for properly fitted shoes.
The suggested base size is approximately 4.25 inches (10.8 cm) long, suitable as a starting point for a small baby size around 3 to 6 months. Baby feet vary considerably, so measuring the intended recipient’s foot is more reliable than choosing a size solely by age.
Important: Baby footwear should fit comfortably without squeezing the toes or creating loose loops. Check the finished shoe carefully for loose yarn ends, detachable decorations, or openings that could catch tiny fingers or toes.
Crochet Construction and Stitch Analysis
The Sole
The sole uses an oval construction worked around both sides of a foundation chain. This is one of the most useful shapes for baby shoes because it creates a rounded toe and heel without requiring complicated shaping. The first round establishes the length, while increases at both ends gradually widen the sole.
Single crochet is used throughout the sole because it produces a relatively dense fabric. With DK-weight yarn and a moderately small hook, the fabric has enough body to hold the shape of a little shoe while remaining flexible.
The Upper
The upper begins with a round of single crochet worked through the back loop around the sole. This creates a subtle ridge that visually separates the bottom from the sides. Additional rounds are worked in regular single crochet, followed by controlled decreases across the toe to create a gently tapered front.
The heel remains comparatively open, while the toe becomes narrower. This construction creates a slip-on baby bootie shape without relying on buttons, beads, or other detachable fasteners.
The Floral Decoration
The floral accents are separate crochet motifs. Each small square is built around a four-petal flower, then framed with a simple border. Making the decorations separately allows you to use a contrasting color without carrying yarn through the entire shoe.
The motifs are intentionally flatter than heavily raised appliques. This keeps the toe comfortable and reduces the number of loose components attached to the finished baby shoe.
Construction Note
The decorative squares are intentionally sewn on after the shoe is finished. This gives you more control over placement and makes color changes easier. Keep the sewing stitches small and secure, especially around the toe where the motifs may receive repeated handling.
Free Crochet Pattern: Pastel Floral Baby Shoes
Pattern clarification: This is an original image-inspired interpretation. The exact yarn, hook, gauge, dimensions, and construction of the pictured footwear cannot be established from appearance alone, so the specifications below are practical recommendations designed to create a similar soft floral baby-shoe style.
Project Details
| Skill Level | Confident beginner |
| Finished Sole Length | Approx. 4.25 in / 10.8 cm |
| Suggested Size | Approx. 3 to 6 months |
| Yarn | DK weight, soft washable baby yarn |
| Yarn Quantity | Approx. 60 yd / 55 m total |
| Main Color | Approx. 40 yd / 37 m |
| Contrast Colors | Approx. 20 yd / 18 m total |
| Hook | 3.5 mm, US E/4 |
| Gauge | Approx. 20 sc x 22 rows = 4 in / 10 cm |
| Terminology | US crochet terms |
Materials
- DK-weight washable yarn in a soft blue or similar main color.
- Small amounts of cream or pale beige yarn for the floral motifs.
- Small amount of a contrasting blue shade for flower centers.
- 3.5 mm US E/4 crochet hook.
- Yarn needle with a blunt tip.
- Stitch marker.
- Small scissors.
- Optional removable measuring tape for checking foot length.
Abbreviations
- ch: chain
- sc: single crochet
- sl st: slip stitch
- sc2tog: single crochet two stitches together
- inc: two single crochets in the same stitch
- st: stitch
- sts: stitches
- BLO: back loop only
- FO: fasten off
UK terminology note: US single crochet is called double crochet in UK terminology. The instructions below use US terminology exclusively.
Special Stitch
sc2tog: Insert the hook into the next stitch and pull up a loop. Insert the hook into the following stitch and pull up a loop. Yarn over and pull through all three loops on the hook. This decreases the stitch count by one.
Construction Notes
The sole is worked in joined rounds. The upper is also worked in joined rounds, beginning at the heel. The chain at the beginning of each joined round does not count as a stitch. Join each round with a slip stitch to the first sc unless otherwise stated.
For the best fit, measure the baby’s foot from the back of the heel to the tip of the longest toe. Compare that measurement with the finished sole before making both shoes.
Part 1: Crochet the Sole
Round 1
With the main color, ch 10.
- Sc in the 2nd ch from hook and in the next 7 ch. 8 sc.
- Work 3 sc in the last chain. 3 sc.
- Turn the chain so you can work into the unused loops on the underside. Sc in the next 7 unused loops. 7 sc.
- Work 2 sc in the remaining loop of the first chain. 2 sc.
- Join with a sl st to the first sc.
Total: 20 sc.
Round 2
Ch 1. This chain does not count as a stitch.
- Work 2 sc in each of the next 2 sts. 4 sc.
- Sc in the next 7 sts. 7 sc.
- Work 2 sc in each of the next 3 sts. 6 sc.
- Sc in the next 7 sts. 7 sc.
- Work 2 sc in each of the final 2 sts. 4 sc.
- Join with a sl st to the first sc.
Total: 28 sc.
Round 3
Ch 1.
- Sc in the first 2 sts.
- Work 2 sc in each of the next 2 sts.
- Sc in the next 7 sts.
- Work 2 sc in each of the next 3 sts.
- Sc in the next 7 sts.
- Work 2 sc in each of the next 2 sts.
- Sc in the final 2 sts.
- Join with a sl st to the first sc.
Total: 35 sc.
Round 4
Ch 1. Sc in every stitch around. Join with a sl st to the first sc.
Total: 35 sc.
Fasten off only if you want the upper to begin with a new yarn end. Otherwise, keep the yarn attached and continue directly into the upper.
Part 2: Crochet the Shoe Upper
Round 1: Raised Sole Edge
With the sole facing right side up, join the main color at the center of the heel. Ch 1. Working in the BLO of each sole stitch, sc in every stitch around. Join with a sl st to the first sc.
Total: 35 sc.
Round 2: Side Wall
Ch 1. Sc in every stitch around. Join with a sl st to the first sc.
Total: 35 sc.
Round 3: Begin Toe Shaping
Ch 1.
- Sc in the next 10 sts.
- Sc2tog over the next 2 sts.
- Sc in the next 11 sts.
- Sc2tog over the next 2 sts.
- Sc in the final 10 sts.
- Join with a sl st.
Total: 33 sc.
Round 4
Ch 1.
- Sc in the next 9 sts.
- Sc2tog over the next 2 sts.
- Sc in the next 11 sts.
- Sc2tog over the next 2 sts.
- Sc in the final 9 sts.
- Join with a sl st.
Total: 31 sc.
Round 5
Ch 1. Sc in the next 8 sts, sc2tog over the next 2 sts, sc in the next 11 sts, sc2tog over the next 2 sts, then sc in the final 8 sts. Join with a sl st.
Total: 29 sc.
Round 6
Ch 1. Sc in the next 7 sts, sc2tog over the next 2 sts, sc in the next 11 sts, sc2tog over the next 2 sts, then sc in the final 7 sts. Join with a sl st.
Total: 27 sc.
Round 7: Final Toe Round
Ch 1. Sc in the next 6 sts, sc2tog over the next 2 sts, sc in the next 11 sts, sc2tog over the next 2 sts, then sc in the final 6 sts. Join with a sl st.
Total: 25 sc.
Do not fasten off until you have checked the opening against the baby’s foot. If the opening feels too snug, omit Round 7 and finish after Round 6.
Round 8: Soft Cuff
For the finished edge, ch 1 and sc in every stitch around. Join with a sl st. Total: 25 sc.
Fasten off, leaving a yarn tail approximately 6 inches (15 cm) long. Pull the tail through the final loop and weave it securely through several stitches on the inside of the shoe.
Part 3: Make the Four-Petal Flower Motifs
Make four flower squares per shoe, for a total of eight motifs. The finished motifs should measure approximately 1.1 to 1.25 inches (2.8 to 3.2 cm) across. If your motifs are substantially larger, make only three per shoe or reduce the flower size so the toe remains flexible.
Flower Center
With the center color, make a magic ring.
- Ch 1.
- Work 8 sc into the ring.
- Pull the ring closed.
- Join with a sl st to the first sc.
Total: 8 sc.
Petal Round
Join the cream yarn to any center stitch.
- Ch 2.
- Work 3 dc into the same stitch.
- Ch 2 and sl st into the next stitch.
- Repeat steps 1 through 3 three more times.
- Join with a sl st to the first center stitch.
Total: 4 petals.
Each petal consists of 3 dc framed by chain stitches. The petals should puff outward naturally without being pulled excessively tight.
Square Border
Join the main blue yarn in the chain-2 space between any two petals.
- Ch 3. This counts as the first dc.
- In the same space, work 2 dc, ch 2, 3 dc.
- Ch 1.
- In the next petal space, work 3 dc, ch 1.
- In the next petal space, work 3 dc, ch 1.
- In the next petal space, work 3 dc, ch 1.
- Return to the first corner space and work 3 dc, ch 2, then sl st to the top of the beginning ch-3.
Fasten off and weave in the ends. The resulting motif has a flower-like center framed into a small square. Make four identical motifs for each shoe.
Part 4: Attach the Floral Motifs
Place four motifs across the toe of each shoe before sewing. Arrange them in a gentle two-by-two layout, with the lower pair slightly closer to the toe edge and the upper pair closer to the opening. The motifs may overlap slightly if your finished shoes are narrower than the suggested dimensions.
- Position the first motif near one side of the toe.
- Place the second motif beside it, keeping the edges aligned.
- Place the third and fourth motifs behind the first pair, closer to the shoe opening.
- Check that the motifs do not extend over the sole edge.
- Thread a yarn needle with matching cream or blue yarn.
- Use small whip stitches to attach each motif around its outer border.
- Secure each corner separately.
- Turn the shoe inside out and weave the yarn ends through several stitches.
- Trim only after confirming that every attachment point is secure.
Do not leave long loops of yarn on the inside of the shoe. The decorative pieces should sit flat and should not interfere with the baby’s foot.
Part 5: Make the Second Shoe
Repeat the sole, upper, cuff, and motif instructions for the second shoe. Keep the tension consistent between both shoes so the finished pair matches in length and width.
Because the flower motifs are attached after the shoe is constructed, you can arrange them slightly differently on the second shoe while maintaining the same overall visual balance.
Pro Tip: Before sewing the motifs permanently, place all eight motifs on the finished shoes and photograph the arrangement from above. This makes it much easier to compare spacing and create a balanced pair.
How to Adjust the Baby Shoe Size
The most reliable way to resize crochet baby shoes is to adjust the sole length first, then modify the upper to match. Baby foot proportions vary, so use the actual foot measurement whenever possible.
For a Smaller Shoe
Use a shorter foundation chain. For example, starting with ch 9 instead of ch 10 will reduce the length slightly. Work the same style of increases at both rounded ends, then stop adding sole rounds once the sole reaches the desired length.
When the sole is smaller, do not automatically use every upper round in the base pattern. Try the upper on a measurement guide and stop before the toe becomes too long.
For a Larger Shoe
Begin with ch 11 or ch 12 and add an additional sole round using evenly distributed increases. Keep the increase placement balanced between the heel and toe ends so the sole remains oval rather than becoming pointed.
For a wider foot, add a little extra width by working one additional increase on each rounded end. The upper can then be built over the larger stitch count.
Adjusting the Floral Motifs
For a smaller shoe, use three motifs across the toe instead of four. For a larger shoe, use four to six motifs depending on the finished width. Another option is to make the same flower motifs with a slightly larger hook and use fewer motifs.
Keep decorative pieces away from the sole edge. This preserves the flexibility of the bottom and prevents the motif edges from becoming part of the walking surface.
Common Crochet Mistakes and Troubleshooting
The Sole Is Curling
A slightly curved sole can happen when your stitches are tight or your increases are uneven. Check the stitch count at the end of every round. If you have fewer stitches than expected, an increase may have been missed. If the sole becomes ruffled, too many increases may have been added.
The Shoe Is Too Tight
Check both sole length and circumference. If the sole length is correct but the upper is tight, use a slightly larger hook for the upper or add one plain round before beginning the toe decreases. Avoid simply stretching the finished shoe because excessive tension can distort the shape.
The Toe Looks Too Pointed
This usually indicates that the decreases are too concentrated. Make sure the two sc2tog decreases are positioned symmetrically around the toe. For a rounder toe, stop one decrease round earlier and finish with an additional plain sc round.
The Floral Motifs Look Uneven
Uneven motifs are often caused by inconsistent tension in the petal round. Try keeping the chain stitches relaxed while maintaining the same height for every dc. Blocking the motifs lightly before attachment can also help create consistent squares.
Important sizing tip: Gauge is especially useful when your crochet tension differs from the suggested tension. If your stitches are much larger, the shoe may become too loose even when the stitch counts are correct. Measure the sole before completing both shoes.
Finishing, Shaping, and Care
Weaving in Ends
Use a blunt yarn needle to weave each end through several nearby stitches on the inside of the shoe. Change direction at least once before trimming the yarn. Avoid leaving bulky knots where they could press against the baby’s foot.
Light Blocking
These shoes generally do not require aggressive blocking. If the flower motifs are slightly uneven, dampen them lightly, shape them with your fingers, and allow them to dry completely. Do not stretch the sole excessively because the intended shape depends on its compact crochet structure.
Washing and Storage
Choose washable yarn so the shoes can be cleaned easily. Follow the care instructions appropriate for the yarn you select. In general, gentle washing and air drying are preferable to high heat, which can shrink or distort crochet fabric.
Reshape the shoes while damp and allow them to dry naturally. Store them flat or gently nested together rather than compressing the floral motifs under heavy objects.
Baby safety reminder: Inspect handmade footwear regularly. Do not use loose beads, buttons, charms, safety eyes, or other detachable decorations on baby items. Check all sewn-on motifs and yarn ends before each use. These soft crochet shoes are not intended to be used as sleepwear or as medically supportive footwear.
Styling and Customization Ideas
The pastel color combination works beautifully for spring and summer baby outfits, but the pattern is easy to reinterpret with other shades. Try ivory with dusty pink for a delicate floral look, sage with cream for a natural palette, or lavender with pale blue for a softer contrast.
You can also make the shoe completely monochromatic and use a slightly darker shade for the flower centers. This keeps the floral texture visible without making the footwear overly colorful.
For a more textured finish, use a smooth DK-weight yarn for the sole and a slightly plush but washable yarn for the flowers. Keep the floral yarn lightweight enough that the motifs do not become bulky or stiff.
The flower squares can also be used independently as small crochet appliques for blankets, baby clothing, gift bags, or nursery accessories. Make them in several colors and arrange them in different layouts for a coordinated handmade set.
At a Glance
- Best yarn: Soft, washable DK-weight baby yarn with good stitch definition.
- Skill level: Confident beginner to intermediate, with simple shaping and small motifs.
- Key technique: Oval sole construction followed by joined-round single crochet shaping.
- Size adjustment: Modify the foundation chain and sole rounds according to the measured foot.
- Finishing: Securely sew the floral motifs, weave in all ends, and lightly shape the finished shoes.
Conclusion
This free crochet baby shoes pattern combines a practical oval sole with a gently shaped upper and sweet floral motifs for a cozy handmade finish. The construction is straightforward enough to practice basic shaping while still giving you plenty of opportunities to experiment with color and texture.
Before beginning, choose a soft washable yarn, measure the intended foot whenever possible, and check your gauge if your tension differs from the recommendation. Read the complete pattern once before crocheting so you understand how the sole, upper, and decorative motifs fit together.
Most importantly, personalize the project. Change the flower colors, simplify the toe decoration, adjust the sole length, or make the motifs in coordinating shades. With a few small adjustments, these crochet baby shoes can become a charming handmade gift designed around the baby’s actual measurements and your preferred color palette.
Tags
Crochet Baby Shoes
Free Crochet Pattern
Baby Booties
Baby Crochet
Crochet Baby Gifts
Easy Crochet Project
Floral Crochet
Handmade Baby Gifts